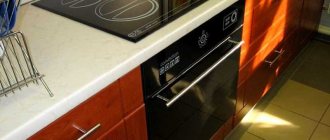
In modern kitchens you can increasingly see built-in appliances. And this is not surprising. Integrated stoves and refrigerators, washing machines, dishwashers, microwave and UHF ovens into the kitchen unit allow you to save the work surface and manage the interior space of the cabinets more functionally. And, of course, they give a more holistic and harmonious look to the overall kitchen design. How to build an oven with your own hands? You should start with the correct layout of the kitchen unit.
Electric cabinet vs gas
Ovens are connected either to a gas pipeline or to an electrical network. You can install a built-in oven with your own hands only in the second case, because any installation operations using a gas pipeline must certainly be carried out in the presence of specialists. Your task when choosing a gas oven is only to provide a niche for it.
Many people choose electrical cabinets because of their ease of installation. A gas oven requires the creation and approval of a project - this takes time and incurs additional expenses.
Therefore, exclude amateur activities - you risk not only a large fine, but also your life. And also the lives of your loved ones.
Pros and cons of the design in a pencil case
Pencil cases have a number of conveniences: when preparing food, you don’t need to bend over, it’s easier to monitor the cooking process. Such headsets are useful for owners with back problems. Of course, their scope of application is much wider than just a place to locate an oven. You can install a multicooker, toaster or other kitchen devices there.
Since ovens are located at heights, it is important that the fastening is strong, because injuries can occur if the structure collapses.
Possible installation locations
It all depends on the features of your kitchen unit and, in fact, the room as a whole.
In conditions of shortage of square meters, the most popular and justified option is to install an oven under the countertop.
In small kitchens, a hob is usually placed on top.
However, there are other embedding options:
- in a column cabinet - typical for spacious rooms, when placing, take into account your height, the optimal height is from 50 to 80 cm from the floor level;
- in the island - you can take advantage of the convenient layout and use this element as practically as possible;
- in a separate cabinet - if there is not enough space in the kitchen for a tall pencil case;
- at an angle - convenient for placement, because you can adjust the height as you like and comply with the rule of the working triangle.
Types of structures
There are several types of cabinets for installing ovens:
- Cabinets. In this type of design, ovens are built in at eye level, and spacious cabinets are installed below for storing various kitchen utensils.
- Under the hob . Such devices are more like the classic version of ovens combined with stoves. They are less convenient than pencil cases, because when cooking you need to constantly bend over, which brings some discomfort. There may also be problems with cleaning the oven. But they have advantages in some situations. For example, in small kitchens it will be difficult to install a large cabinet for the oven. Also, this design is suitable for those who concentrate all the cooking items in one place.
Size calculation
To ensure that you install a built-in oven yourself without any unpleasant surprises, ensure that the project is approved in advance.
You can do this: first, buy the appliance itself, and then order a kitchen set, taking into account the size of the purchased cabinet.
Or, after installing the headset, you select the appropriate option, keeping in mind the parameters of your niche.
Remember that the device should not fit end-to-end - the basic rules for its standardization will be discussed below.
Standard models
These are ovens familiar to many housewives with a capacity of 60 to 70 liters. Their depth ranges from 55 to 60 cm. They are not much different from the ovens of gas electric stoves. However, built-in kitchen appliances are harmoniously combined with pieces of furniture, and this is an excellent solution for creating a modern interior.
Models with a depth of 55 or 60 cm are offered by many well-known manufacturers such as Gorenje or Bosh. They are perfect for a spacious kitchen and a large family. They also have all the necessary features and an attractive, cutting-edge design. Their choice on the household appliances market is much larger, and the price range is quite wide, starting from 15,000 rubles and above. Almost all user reviews are positive.
How to prepare a niche and electrics
Most modern kitchen sets have special sides in the niche dedicated to the oven. As a rule, they are already mounted during production - the device is directly attached to them.
If there are no sides in your configuration, then it doesn’t matter - this does not affect the operation in any way. Simply install the oven as is. It will still take its place in the niche and will be securely fixed in it.
Some modules have a back wall by default. You can either remove it or just make a hole in it for the wiring. During installation, for ventilation purposes, a distance of 5 cm from the cabinet to the wall must be maintained.
By the way, she needs to pay special attention. You will need a separate electrical cable with a minimum cross-section of 2.5 mm. It will come from the distribution box - it can be connected directly to the wires that come from the cabinet.
There is another option: equip it with a separate 16-amp outlet that can withstand about 4 kW - the oven consumes quite a lot, so you need to provide it with the ability to realize such power.
In this case, you will also need a grounding plug, which is connected to the standard three-wire oven wiring through an insulated twist.
Place the socket not too low - at least 10 centimeters from the floor level.
Many experts do not recommend using direct rough twisting, indicating that the wires should be connected to each other exclusively with screw terminals.
Attention: you will also need a separate machine. Still, the power of modern ovens is decent, and it is necessary to protect the device from possible overloads.
However, we all understand that ideal conditions do not always exist. If you are renovating your kitchen from scratch, try to take into account all the nuances. If the oven needs to be built into a ready-made kitchen set, do it as best you can.
Materials
The main requirements for furniture for built-in appliances are resistance to high temperatures, withstanding heavy weight, resistance to deformation and the absence of hazardous substances or odors when heated.
Materials for kitchen cabinets and the effect of temperature on them:
- Natural wood. Expensive material. Cons - cannot withstand high temperatures. The critical mark is + 95 degrees, otherwise fires may occur with greater heating.
- Chipboard. Wood chip boards are a popular material for budget furniture. The downside is that the surface does not react well to high humidity; phenol-formaldehyde resins of varying concentrations are used in production. The higher the level of formaldehyde in the composition, the more dangerous such furniture is, since the harmful substance will poison the air when the oven heats up. Hazard class - from E 0.5 to E 1 - allowed for children's furniture and living rooms. The manufacturer indicates this indicator in the certificate.
- MDF. This material, with equal thickness, is twice as strong as chipboard. Advantages: does not change shape when exposed to high temperatures when the oven heats up and does not release toxic substances into the air; it repels water and steam well.
For the back walls, you can use laminated plywood or fiberboard (hardboard).
Installation steps
Installing an oven with your own hands under the countertop requires the presence of a special compartment for it in your kitchen set. The most common size is 60x60 cm.
However, there are other options. Therefore, when ordering a headset, you already need to know exactly which cabinet you will have to deal with.
The algorithm itself is extremely simple:
- if you plan to work with a plug and socket, then twist the standard cable of the cabinet (yellow cable to white, blue to blue, brown to brown) and insulate the contacts;
- without inserting the cabinet, check that it is working properly - just connect the plug and make sure that the current is properly supplied to the device, and that the thermostat copes with all operating modes;
- insert the cabinet into the compartment and check the guide gaps on the right and left - they should be even and not exceed 5 cm each;
- try opening and closing the door - if you did everything correctly, you will not find any interference, it will easily move back and forth;
- take a drill and drill holes exactly where the holes are - usually there are 2 on each side of the cabinet;
- insert rubber gaskets into the resulting holes on the sides - they are usually included in the kit;
- tighten the screws - match them to the color of the cabinet itself so that they are not so noticeable and do not attract attention to themselves in the kitchen.
That’s probably all - the built-in oven has taken its place of honor in your set.
All stages are in one video instruction.
There are mere trifles left: wash the inside and later check the operation at the highest possible temperature - usually 250 degrees. Half an hour will be enough, after which you can safely clean the inside area again with a damp cloth and start cooking your favorite dishes.
Equipment inspection
After connecting the equipment, it is necessary to check its functionality, including at loads that are critical for the available power. The promotion allows you to find out the quality component of the wiring.
Equipment check:
- we activate the unit responsible for the equipment;
- the LEDs or screen on the oven should light up;
- turn on the heating elements at maximum power;
- We calcine the chamber with active exhaust (>250⁰С).
It is useful to wait until the factory lubricant burns out completely, otherwise the dishes will be saturated with an unpleasant technical smell during cooking. If the verification procedure passed without any problems, then you can permanently secure the cabinet in its place.
Controlling the oven operation
Connecting the hob and oven to a single-phase network
Cable selection
For a single-phase network, a three-core cable will be required. In order to correctly select the cross-section of the cable cores, you need to know exactly the value of such a parameter as current strength (measured in amperes (A) and denoted by the letter I).
This value can be calculated using the formula:
I=P/U
P is the total load of the electrical appliance (measured in watts (W))
U – voltage in the electrical network (measured in volts (V))
Next, using simple calculations and a cable cross-section table, we determine that to connect a 7500 W hob to a 220V network, a cable with a cross-section of at least 6 mm is required. And for an oven with a power of up to 3.6 kW, a cable with a cross-section of 3x2.5 mm should be laid.
Selecting a machine
The main parameter when choosing a circuit breaker (circuit breaker) is the rated current in the network. As when choosing a cable, when choosing the desired machine, we use the formula I=P/U. After calculations, we determine that for a hob with a power of 7.5 kW, a 40A automatic is required. and for the oven, a machine with a nominal value of 16A is suitable.
Selection and connection of residual current devices (RCDs)
For the safety of the electrical network, in addition to the circuit breaker, it is recommended to use residual current devices (RCDs). In addition to protecting the electrical network, this device protects a person from electric shock by tripping if the leakage current exceeds a specified parameter.
At the moment, there are RCDs designed for differential current (leakage current) of 10mA, 30mA, 100mA, 300mA.
So, for a 220V network, a residual current device (RCD) of type AC 40A is suitable and with a leakage current of 30mA for the hob, and 16A 10mA for the oven.
Preparatory work
To make furniture, it is advisable to have a workshop.
You can use a large table in a free room. Make sure there is an outlet within walking distance to connect power tools and stock up on an extension cord. Organize your workplace lighting correctly. If you are going to make a closet in a non-residential area, then take care of heating in winter and forced ventilation in hot summer. Large window openings will save energy consumption during the daytime. A workbench equipped with stops, sockets, vices and clamps will be a good help for assembling the cabinet.
Style
Projects with built-in appliances are often created for minimalist interiors and industrial-style spaces. However, there are no restrictions on the use of this technique in classic spaces, as well as in country or Provence style kitchens. Manufacturers of household appliances have made sure that anyone, regardless of their ideas about beauty and convenience, can realize their ideas. There are many antique-style models on the market. But it’s still worth recognizing that in a modern kitchen, high-tech “rules the roost”: this applies to both the prevailing style and the technology of the equipment.