Due to certain circumstances, many people install electric heating equipment, for which they have to pay a lot of money on electricity bills. But there is one solution that allows you to save quite a lot - assemble an electric boiler yourself. Almost everyone can make a homemade electric boiler for heating, which will be in no way inferior to factory-made products. If you approach this issue thoroughly, then such a product may turn out to be even better than a factory model.
What types of electric stakes can you assemble yourself?
There are three types of electric boilers for home heating. The first ones operate from heating elements. They are equipped with a tubular electric heater, which heats up using electricity, transferring its temperature to the liquid. The heater has insulation, thanks to which the coolant is not under 220V voltage.
This type of boiler has the following positive qualities:
- fairly low price;
- the possibility of a short circuit is excluded.
The downside of such devices is the likelihood of scale appearing on the heating elements. This negatively affects the operation of the heater and the equipment as a whole, and can even lead to its breakdown. In the case when distilled water or special liquids are used as a coolant, such misunderstandings do not arise.
The second option is a do-it-yourself induction electric heating boiler. It is equipped with a transformer with a winding; the heating pipe in this type of boiler plays the role of an induction coil. The coolant is heated by eddy currents that arise on the winding.
Induction boilers have the following advantages:
- possibility of using any coolant;
- fast heating (about 5-7 minutes);
- safety;
- long service life;
- small dimensions.
The disadvantages include:
- high price;
- heavy weight (20 kg or more).
And the third option is an electrode electric boiler - this type uses liquid not only as a coolant, but also as part of the electrical system. This boiler can be easily assembled independently, but this equipment is subject to high electrical safety requirements.
This type of home electric boilers has the following positive qualities:
- efficiency. Compared to heating element models, electricity consumption is half as much;
- small size and simple design;
- insensitivity to voltage changes. The device will work even at a voltage of 180 Volts.
There are also disadvantages:
- works only with special coolant;
- It is necessary to install reliable grounding; due to the specific nature of the operation of this equipment, it is impossible to equip it with protective shutdown devices, which increases the likelihood of electric shock.
- periodic replacement of electrodes is required.
A common disadvantage of any electric heater is the danger of exceeding the limit for connecting electrical equipment in the house. Thus, the total power of all electrical equipment in the home should not exceed 15 kW.
Conclusions and useful video on the topic
Electric boiler installation procedure:
Although using an electric boiler as a heating device is considered too expensive, its advantages are obvious. Such devices are safe for people and the environment, operate automatically, are accessible and easy to use.
If the type of heating system is chosen correctly and all its components are professionally installed, the boiler will operate for a long time without unnecessary costs.
Do you have experience using an electric boiler to heat your home? Or want to ask questions on the topic? Please comment on the post and participate in discussions. The feedback block is located below.
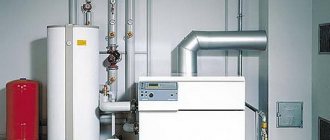
Features of electric heat generators
Due to the high energy consumption (more than 4 kW) for this heating equipment, it is necessary to make an electrical input of the required power in advance in order to prevent an accident on the line.
Devices whose power does not exceed 6 kW require single-phase power, and equipment whose power limit is above 6 kW requires three-phase power. The equipment is powered from a standard electrical network with a power of 220 V.
1 kW of electric boiler power can heat 10 m2 of space. Based on these data, it can be assumed that heating a 250 m2 home will require equipment with a capacity of 25 kW.
In order to heat a house with an area of approximately 100 m2, you need equipment with a power of at least 10 kW. Thus, after connecting the boiler, only 5 kW is allocated to the remaining appliances. In order to increase the consumption limit, you need to obtain special permission.
As a rule, a self-made electric boiler is a piece of pipe with electrical accessories built inside it. This is quite convenient, especially if you make the heating units removable, which will make servicing the equipment much easier.
If the unit is not placed in a pipe, but is equipped with a separate housing, then it is possible to install additional sensors that will automate the operation of the heating system, increase efficiency and reduce electricity consumption. In addition, if it is necessary to replace the boiler, this can be done without compromising the integrity of the system circuit.
Let's understand the features and technologies of how to make an electric boiler of each type.
Where can I buy
You can purchase a water heater as quickly as possible at your nearest specialty store. A good option in terms of price-quality ratio is purchasing from the AliExpress online store. Mandatory long waits for parcels from China are a thing of the past, because now many goods are in intermediate warehouses in destination countries: for example, when ordering, you can select the “Delivery from the Russian Federation” option:
| HYUNDAI Instant Electric Water Heater | Electric water heater TINTON LIFE with temperature display | Stainless steel liquefied water heater |
| 2500W floating electric water heater, for bath, swimming pool | RX-21.3500W instantaneous electric water heater | Kitchen electric water heater HYUNDAI |
How to make a heating element boiler with your own hands?
This type is the most common. Heating elements are used to heat the coolant. They are located in a heat exchanger, which, in essence, is a sealed, heat-insulated container equipped with pipes for coolant input and output.
A heating element is a thin-walled tube made of aluminum, steel or titanium, inside of which there is a nichrome spiral. The walls of the tube and the spiral are separated by a dielectric storage device, usually quartz sand plays its role.
The principle of operation of such equipment is as follows: the spiral heats up because an electric current passes through it, the heat from it is transferred to the sand and the tube, and the tube heats the coolant. The water heats up approximately 15-20 minutes after the equipment starts operating.
To save money and free space, you can make a similar electric boiler yourself. To do this you need to have on hand:
- grinder;
- welding equipment;
- grinding unit;
- thermostat;
- multimeter;
- steel sheet;
- adapters for connecting to the pipeline;
- pipe ø12 cm, and 3-5 tubes of smaller diameter;
- 2 heating elements.
After all the necessary tools and materials are prepared, you can begin work:
- Metal pipes are prepared: three tubes with a diameter of 12.5 mm and two with a diameter of 30 mm. These parts are cut from pre-prepared pipes.
- A piece of large pipe about 65 cm long is needed; it will act as a heating tank. In places that are pre-marked, holes are made by welding for the pipes - supply, return, drain, expansion tank, heaters. Using a grinder, the edges of the holes are polished.
- The pipes are welded to the corresponding holes.
- A circle of sheet steel of the required size is cut out and welded to the bottom of the heating tank. The protrusions are cut off and the connecting seams are sanded.
- A long pipe with a diameter of 12.5 mm is welded to the upper part - a second electric heating element is screwed to it.
- Several holes are made in the bottom for mounting a heating element with a power of 1.5 kW. After the heating element is fixed, the boiler is screwed to the heating system using pipes and the wires are connected.
- Afterwards, a less powerful heating element (about 0.9 kW), which is equipped with a thermostat, is connected to the upper pipe.
- After everything is connected, water is poured into the system. After several hours of operation, the system is checked with a multimeter. In the case when everything is done according to the instructions, the instrument readings will be 70 ° C - this temperature is optimal.
The finishing touches are sanding and painting the boiler.
The disadvantage of such equipment is the likelihood of scale deposits on the heating elements. Which leads to a decrease in operating efficiency or breakdown of the device. When using special liquids or distilled water as a coolant, this problem is prevented.
Network connection
It is this pump that needs to be connected both to the differential machine and to the thermostat. There are also two more ways: connecting at the same time with an uninterruptible power supply unit, and using boiler automation.
- As for the scheme of the first of them, this is the best option, very simple and easy to use. You will only need wires, a differential switch (8A) and contacts. The first step is to cut the cable to the desired length and pull it through the corrugation. Together they are routed through the shield to the pump. The cable is connected using a phase wire (to L), and to N - neutral. It remains to connect the ground to the PE terminal.
- To automatically stop movement at low temperatures, a circulation pump with a thermostat is used. When cooling occurs, the power supply circuit is broken. For this to happen, you need to attach a thermostat to the pipeline. Also, it is best to connect it to a metal section of the highway so that it provides reliable information.
Features of assembling induction equipment
In boilers of this type, the coolant is heated using an induction current arising in a ferromagnetic heat exchanger. An induction boiler looks like a cylindrical body, inside of which there is an inductor winding, in which the heat exchanger core is located. It may be a labyrinth of pipes or cavities.
After voltage is applied to the inductor coil, an electromagnetic field is created that quickly heats the metal core, which in turn transfers heat to the coolant that passes through it.
Ordinary water can be used as a coolant, regardless of its hardness, antifreeze and even oil. Due to the fact that there is zero probability of scale formation in these boilers, their efficiency does not decrease over time.
This boiler, like the heating element, is quite simply designed, so if you wish, you can easily make it yourself. For this you will need:
- welding inverter;
- wire cutters;
- Bulgarian;
- steel wire;
- stainless steel wire rod;
- polypropylene pipe with thick walls;
- adapters;
- metal grid;
- enameled copper wire.
Important! It is recommended to use a 15A welding inverter as an energy source (more is possible).
Induction boiler assembly steps:
- For the material to be irradiated by electromagnetic waves, make pieces of wire rod or steel wire with a diameter of 7 mm. The maximum length of the segments should be 5 cm.
- It is necessary to make a body. It will serve simultaneously as the basis for the manufacture of an induction coil and part of the heating line. To create a body from polypropylene tubes, a pipe is used whose internal diameter is slightly less than 5 cm.
- To connect the boiler to the water supply, you must use adapters. With their help, the heated coolant will go into the pipeline, and the cooled coolant will return to the boiler. At this stage, the first adapter is attached to the base.
- It is necessary to lay an iron mesh at the bottom of the structure, which will prevent pieces of wire from entering the pipeline.
- After the mesh is laid, it is necessary to fill in the wire pieces. They need such a quantity that there is no free space left in the container. After which the upper part of the body is closed with a second adapter.
- This stage is perhaps the most important, since it creates the induction coil. To do this, take enameled copper wire, which must be wound around the body in 90 turns. The coils must be placed approximately in the center of the structure.
- The structure is connected to the heating system. To perform this task, a small section is cut out of the pipeline, and a unit is installed in its place.
- The coil must be connected to the inverter and the system filled with water.
The inverter can only be turned on after the system is already filled with water, otherwise the plastic case will simply melt.
Selecting the location for inserting the device into the system
If the house already has two branches (for example, on different floors), then two devices should be installed - on each separately. And also after the boiler. If one is directed upward, then much less fuel will be consumed, since the coolant will move less. There is no need to worry about damage to your stay as it is completely safe.
REFERENCE! Thanks to modern technologies and materials used in manufacturing, the device can easily withstand even the highest temperatures and is not afraid of water. Therefore, it can be installed both on the return pipeline and on the supply pipeline.
There are features that it is advisable to take into account:
- There should be no leakage above the selected location.
- It must be made accessible so that, if necessary, it is possible to carry out maintenance, preventative maintenance on the equipment or repair it.
- In addition to access for you, it should also be for the electrical network.
- The pump is positioned in the direction of movement of the coolant.
How to make an electrode boiler?
This type of electric boiler in the heat exchanger design has two electrodes to which electricity is supplied, which creates a potential difference. The salts contained in the coolant make it an electrical conductor. Electricity passes through the electrolyte with high resistance, causing it to heat up. Nominal power is achieved in just a couple of minutes.
The role of the coolant (electrolyte) in electrode boilers can be performed by a vault prepared in a special way, or by a liquid based on ethylene glycol.
It is enough to simply assemble this type of heater yourself. To do this you need to have on hand:
- iron pipe, with a diameter of 57 mm and thick walls;
- sheet of iron, more than 2 mm thick;
- internal electrode with a diameter of 25 mm;
- paronite or rubber gaskets and connecting terminals.
Electrode boiler assembly steps:
- Before starting work, you must obtain appropriate permission from the organization involved in the supply of electricity. This permit is required to ensure that once the equipment is installed, it will have enough electricity supplied without interfering with supplies to neighbors.
- It is necessary to determine the installation location. It’s quite simple: with natural circulation, the device must be installed at the lowest point of the system, with forced circulation - in any other place.
- As during the assembly of the equipment described above, it is necessary to connect pipe connections to the future housing. One end of the pipes is welded to the unit, and a thread is cut on the other.
- When making an electrode boiler yourself, a hole for the plug is drilled in the body. An electrode is attached to it, which is installed inside the boiler.
- At the end, the homemade body is welded by installing a bottom and a lid cut from an iron sheet.
- After the welds have been cleaned, they must be checked for permeability. This is done in the following way: the welding seams are covered with soap foam, and pressure is injected into the body. If bubbles appear anywhere, you need to know that the boiler will leak in these places.
- Wiring is being installed. The boiler must be connected to a separate line. The connection cable must match the power of the circuit, because at the slightest resistance, the efficiency drops, and there is a possibility of the entire system failing.
- Grounding installation. In order to do this, the heating system must be connected to some grounded element of the house (for example, to fittings).
After all faults have been found and eliminated, the body must be coated with enamel paint.
Proper operation of the boiler depends on the presence of soda in the water, which plays the role of a coolant. It is added to increase the current strength: this indicator is calculated by dividing the device power by 220.
Varieties
Any electric boiler can be divided according to different criteria:
- Principle of operation;
- Type of instalation;
- Power adjustment.
According to the operating principle
It is quite possible to make a homemade electric boiler for heating of the following types:
- Induction - water is heated using eddy currents in the core of an electromagnetic circuit.
- Electrode - the liquid between two electrodes is heated due to the current passing between them.
- Heating elements - closed-type heating elements, under the influence of current, heat up and transfer heat to the surrounding coolant.
type of instalation
- Wall mounting is a more compact option for placing a heating boiler and, accordingly, low power.
- Floor installation is more voluminous, but, in principle, the dimensions do not matter much, since in this option it is possible to increase the power of the heating equipment.
Power adjustment
Strictly speaking, this concerns the additional capabilities of the equipment that will be used in conjunction with heating boilers. These are various types of automation that are capable of equalizing the temperature of the coolant in the heating circuit. It can be of different designs:
- relay;
- seven-sided;
- on a magnetic starter.
Rules for installing an electric boiler
When installing and connecting, take into account the following requirements of regulatory documents:
- The suspended model must be placed on a non-combustible solid wall that can support the weight of the unit.
- It is prohibited to install the heater next to a sink or in other places where even a small amount of water may come into contact with it.
- Room temperature – +5 ˚С… +40 ˚С, maximum permissible relative humidity – 85%.
- It is not recommended to lay the power cable under water supply or heating pipes. If this is the only possible option, it is placed in a protective box or sleeve.
- The minimum distance from the top surface of the heater to the ceiling is 200 mm, to the floor for suspended models is 1.5 m.
- A switch with open contacts is installed on the supply line. The gap between them is at least 3 mm.
- The boiler is connected via an RCD.
- It is necessary to ensure grounding of the housing and heating system.
- Copper wire is used. The cross-section of the cores is determined in accordance with the rated current and the method of installation (PUE 7, table 1.3.4).
- When connecting a 3-phase model, the circuit breaker is placed on the wall next to it.
Permission from Energy Supervision or other services is not required for installation.