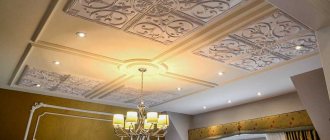
When renovating toilets, the question always arises of how to hide the pipes in the toilet. After all, the appearance of the pipeline creates the impression of “eternal” repair. The building materials market offers many types of finishing materials that can disguise a technical unit.
The camouflage of the water supply and sewerage systems should be such that access to valves and meters is convenient. In the event of a breakdown, the masking structure must provide access to the main components. Many owners have a question about how to hide pipes in the toilet, and, most importantly, with what. There are three design options for decorating the pipeline.
How to close the sewer riser in the toilet methods
In an ordinary apartment with a separate bathroom, almost all the pipes are located in the toilet.
This is where, as a rule, meters are located and taps are made. The already small toilet looks like a technical room. And the toilet ended up here completely by accident. There are several ways to hide all this disgrace.
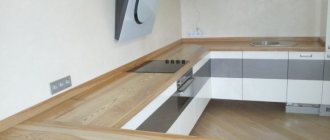
1. Construction of a false wall.
One of the simplest and most common options is to completely cover the riser in the toilet with plasterboard. You need to keep in mind that a false wall will take up about half a meter of free space. The toilet room is already small, and after sewing up the riser, not everyone will be able to sit freely on the toilet.
The solution is a wall-hung toilet. A special frame on which the plumbing fixture is mounted and the drain tank will be hidden behind the drywall. This will save space.
A false wall can be not only attractive, but also functional. If you equip the free space with shelves, you can store household items there.
2. Construction of a square box.
This method is suitable if all the pipes are in one corner. The box saves free space. And with this option, you need to leave the door opposite the meters and valves.
3. Equipment of an oblique false wall.
It goes at an acute angle to the side or back wall. It is advisable to use this method of masking the riser in the case when thinner pipes extend to the side from the main pipe. The toilet will have to be moved a little to the side.
4. Creating a multi-level box.
When pipes are “scattered along the walls” of the toilet room, it is better to build a multi-level structure. Each of its elements will cover a separate section of the network.
The box can be two-level or three-level. Building it, of course, is more difficult. But space is saved and you get stands for important little things.
Partition position
This question is quite important. Where should the false wall be located - behind the toilet cistern or in front of it? It depends on the toilet model. For the “compact” design, in which the cistern is mounted directly on the toilet bowl, there is only one option - the wall is mounted behind the cistern. If you use a wall-hung model with the tank located on a special installation, you can safely install a partition immediately behind the back wall of the toilet. The installation in many cases becomes the basis for installing such a partition and always has a sufficient distance from the racks to the edge of the toilet so that decorative panels can be mounted.
Below is a diagram of the placement of the wall between the wall-hung toilet and the installation.
How to get rid of a pipe once and for all
For those who are not looking for easy ways and prefer to do everything thoroughly, there is a radical way to get rid of the riser - moving it to the wall. As a result, the area of the room is not reduced; a flat and smooth wall fits perfectly into the interior conceived by the designers.
The walls will become smooth and nothing will disturb the harmony
This option is not possible in every house, but only where the thickness of the partitions allows cutting out the grooves. The capital method will require a complete replacement of communications, including passages through ceilings, you will have to notify neighbors, and incur additional costs.
Another way to remove unsightly parts is to install hanging plumbing fixtures. This process requires a professional approach; the thickness of the walls does not always allow this.
Hanging plumbing not only hides ugly pipes, but also adds lightness to the room
Manufacturers
Toilets with a Genoa bowl are available from many manufacturers who produce a number of models.
Brands
The Turkish company VitrA produces sanitary ware from sanitary ware and vitreous porcelain. The manufacturer's specialty is the appearance of the bowls, the design of which is based on the cultural and ethnic traditions of the country.
The company's specialists are developing the latest resource-saving production technologies.
The Russian company Oceanus is a manufacturer of stainless steel sanitary ware. The metal alloy contains chromium, which ensures high resistance of the manufactured models to corrosion. The company is focused on producing vandal-proof plumbing fixtures at an affordable price.
The Spanish company Roca specializes in the manufacture of radiators for heating systems, boilers, bathtubs and glass-ceramic sanitary ware. The products are of high quality and stylish, extraordinary design.
Models
Genoa bowl, model VitrA Arkitekt 6206L003-0054 (Turkey):
It is light in weight and the body design is equipped with stiffening ribs. The disadvantages of the product include low resistance to mechanical damage.
Model 4-005.1 OCEANUS (Russia):
The product is highly durable.
Genoa bowl, model 345090001 Oriental (Roca):
It has an aesthetic appearance, but low impact resistance.
A simple option for protection from plastic panels
Plastic is an ideal option for constructing a false wall; it is not afraid of humidity, temperature changes, and mold. rot, easy to clean, quickly disassembled if necessary. A significant advantage of the panels is that they do not have to be puttyed or painted - just choose the shade and pattern to match the color of the tile.
The color of the panels can be easily matched to the shade of the tiles
To attach the panels, you need to build the same frame as for a plasterboard screen. Use this method to make a false wall and a box. Laying ceramic tiles or applying textured plaster on a plastic coating will not work; for these cases you will have to choose drywall.
External placement of communications
Is masking of pipes always required? They are left in sight in the only case: if they are visually attractive and themselves carry some kind of aesthetic meaning. For example, copper pipes, along with plumbing fixtures made of a similar material, are often a decorative element.
External pipelines made of copper (less often - steel or cast iron) decorate the interiors of bathrooms decorated in modern industrial styles - loft, techno, hi-tech
Installation of an external pipeline, as well as repairs, does not cause difficulties. All parts and connections are visible, so they can be easily replaced or strengthened if necessary. As parts of the decor, they require constant care.
The big disadvantage of metal external pipelines is their high cost. Another inconvenience is the risk of getting burned from a hot pipe.
Actual work
Everything was tested, invented, materials were purchased. Now the work itself.
1. Installation of the frame.
If oriented strand board is used for cladding, then the frame is made of wooden blocks. For drywall we use a metal profile. How to cover the riser in the toilet with plastic panels? Better on a wooden frame.
- We install vertical guides according to the level.
- We attach crossbars to provide rigidity. The pitch is determined by the dimensions of the sheathing material, as well as taking into account the dimensions of the inspection hatch.
2. Sheathing.
For solid structures, plasterboard is more suitable. To create removable siding, it is preferable to use oriented strand board. She's stronger. And dismantling will not harm her.
3. Finishing.
Tile tiles are attached to the casing using glue, and plastic panels using staples. You can simply putty and paint.
If highly visible communications located in the bathroom spoil the interior of the room, then this is not a problem. Find out how to close the riser in the bathroom and get to work.
To avoid having to mask numerous and long pipes, draw up a diagram of all communications in advance and try to arrange them and plumbing so that, in the end, all utilitarian details remain as unnoticeable and hidden from view as possible. But this is not always possible, and often it is simply impossible to completely hide a boner. But such a problem is not as difficult as it seems if you know how to solve it.
Genoa bowl toilet – affordable price!
When purchasing a Turkish toilet, as a rule, you also buy related products, namely: a tank, a siphon, a mixer, an installation, a flush tap, etc. Many online stores offer to buy a Genoa bowl toilet and accessories for it (see the article “Where is the best place to buy toilet fittings"). For example, a floor-standing toilet can be purchased on the website (https://www.trubmarket.ru/santekhnika/sanfayans/chasha-genuya-i-komplektuyushchie/). In this online store you can purchase a Genoa bowl toilet, the price of which is very low, regardless of whether you buy wholesale or retail.
So, from cast iron - from 2,300 rubles.
From ceramics - from 3,700 rubles.
And the most expensive ones are made of steel - from 12,350 rubles. because of the actual material.
In general, you can buy a Genoa bowl toilet in many specialty stores that sell plumbing fixtures of all sizes and shapes.
Source
Sewage connection diagram
Sewerage layout
Even at the design stage of a house, a drainage system should be developed that would harmoniously fit into its structure. Initially, the diagram marks the location of the common vertical riser. It is usually located in the bathroom or toilet. Horizontal drain pipes diverge from its lower part. It is to these pipes that all plumbing fixtures are connected via siphons.
The bathroom usually has a sink, bathtub and washing machine. In the toilet, a toilet and a bidet (if available) are connected. The kitchen usually has one sink or a shared dishwasher. The sewerage scheme in the house provides for an inclination of all horizontal pipes towards the riser of at least 3 degrees to ensure gravity flow of drain water.
Elements of the sewer system
Installation of internal sewerage is carried out using key elements, without which it is impossible to do.
The elements of the home sewerage system include plumbing fixtures, connecting pipes, fittings, splitters, siphons, and elements for fastening the pipeline to the walls. The pipes now used are predominantly polypropylene or metal-plastic. Steel pipes are already out of use. The exception is copper pipes or stainless steel products. However, their cost is very high. The connecting elements are made of the same material.
Plastic risers are now also used. However, if you are not replacing the main riser, which is made of cast iron, then you will need additional rubber adapters to connect the plastic pipes and the cast iron riser. The riser has a standard size of 100 mm. In some cases, when we are talking about a multi-storey building above five floors, a riser with a diameter of 150 mm can be used.
The purpose of the riser is to compensate for water hammer in the system and the absence of foreign odors in the house. If it is not possible to lead the riser upward, outside the house, then a vacuum valve is installed at its outlet, which solves the same problems. The diameters of horizontal drain pipes are usually 50 mm.
Laying sewer pipes in the house
We will prepare everything necessary for installing the sewer system.
Installed sewer pipes
The rules for installing sewer pipes provide for the use of the following tools:
- Scissors for cutting polypropylene pipes.
- Hammer.
- Hacksaw for cutting metal.
- Level.
First, all elements of the system are brought together. That is, they are trimmed and tried on. It is better to cut pipes with special scissors, but you can also use a hacksaw.
Installation of sewer pipes in the house is carried out at the bottom of the wall, observing the required slope to the riser. After joining the pipes, the pipeline is secured to the walls using a hammer drill and special round latches. The connecting fittings also have sockets with seals, so all connections are easy to make.
In this way, literally in one day, you can completely install a sewer system in your home. Everything necessary for these purposes is now on sale.
Flow or storage heater
An electric water device should be selected according to its characteristics:
| Characteristic | Water heater type | |
| Cumulative | Flow-through | |
| Electric power | from 1.5 kW | from 3 kW |
| Dimensions | large | small |
| Price | high | low |
| Hot water volume | 200 l/4 hours | 200 l/h |
| Operating mode | long | intermittent |
| Service | permanent | not required |
| Water pressure | low | high |
In 85% of cases, apartment owners in the Russian Federation choose a storage boiler:
- 30 l – for one user;
- 70 l – married couple;
- 150 l – for all water intake points;
- 210 l – large family, boiler for kitchen and bathroom.
There are storage heaters of the following types:
- wall;
- floor;
- vertical;
- horizontal;
- flat;
- short, large diameter;
- narrow elongated;
- pressure;
- atmospheric.
For spare hot water supply lines, used only at the time of shutdown of the central hot water supply or maintenance of the gas pipeline of the dispenser, only direct-acting heaters with electric heating elements are used. Indirect heating devices with heat exchangers are not suitable for these purposes.
The easiest way out of roller shutters
The fastest way to solve the problem of hiding the sewerage is with the help of roller shutters. This design maximizes access to the pipes, while there are no doors cluttering the space. Hanging blinds requires no experience, and beautiful curtains do not require any additional finishing.
Plumbing roller shutters are not only beautiful, but also practical
In response to the increased demand, manufacturers produce special sanitary roller shutters, endowing them with noise-insulating and heat-saving properties. If desired, it is easy to choose a color that harmonizes with the decoration of the entire room.
Material requirements
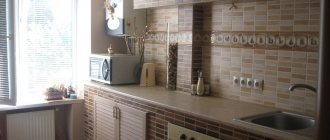
A toilet is a room with a specific microclimate. Therefore, before hiding pipes in the toilet, decide on the material.
It must meet such important criteria as:
- Moisture resistance. There is constant condensation in the toilet. Droplets of water settle on surfaces. Over time, unstable products begin to get wet, and fungus and mold appear. Therefore, the wiring should be sealed with products that are resistant to high humidity.
- Strength. Constantly need access to meters and ball valves. For this purpose, special hatches are installed - with a fragile structure, they will not withstand.
- Aesthetics. Another important criterion. It is better if the product is combined with the overall decoration of the toilet.
Space saving hiding box
The wall completely covers the utility part of the room, but noticeably reduces the usable area. In order to save space, as well as to cover protruding risers, build a concealed box, hiding the sewer pipe. Making a frame for the box will be a little more difficult, since you will have to tinker with the corners. A strong corner can be easily obtained from two ud-profiles fastened together, with the shelves directed at right angles.
Depending on the location of the elements that need decoration, the protection system can be triangular or tetrahedral. When there are many protruding parts below, and only a riser is located at the top, you can build a multi-level box. This will create more space and create an additional shelf for storing small items.
Choose galvanized profiles for the frame. For a separate toilet, where the humidity is significantly less, it is allowed to use wooden blocks.
Variety of names for floor-standing toilets
The plumbing product has many names, one of which is the Asian toilet. metal troughs as toilets , which were installed in a hole dug in the ground.
This invention became widespread in neighboring countries , in particular the Ottoman Empire (modern Turkey) and the Asian type began to be called Turkish.
In the 21st century, the sanitaryware is known as the “Genoa bowl” (due to its similarity to the Genoese bowl Il Sacro Catino, used for washing hands during ablution).
Capital method plasterboard wall
The easiest way to hide the sewage system running in a technical niche is to use a false wall. Use plywood or chipboard as a material, but plasterboard is considered the best option. One sheet of dry plaster will be enough for the job; it must be green in color - this is what moisture-resistant drywall looks like, suitable for use in wet rooms.
A completely closed technical niche is difficult to see with the naked eye
The frame of the false wall is made of galvanized profiles (which is preferable) or wooden blocks. When marking the places where the profiles are attached, it is necessary to take into account that the distance between the partition and the riser must be at least 3 cm. First, the guide profiles are attached to the walls, then to the floor.
If you plan to decorate a plasterboard screen with tiles, then it is necessary to provide a distance between the rack profiles of no more than 40 cm. In cases where there are already ceramic tiles on the walls, drilling should be done in the joints between the tiles.
Drywall is cut according to pre-prepared drawings and attached to the frame using self-tapping screws. The finished wall is puttied and decorated taking into account your own wishes and the overall design. To make working with the inspection door easier and less noticeable, use a simple but convenient magnetic mount.
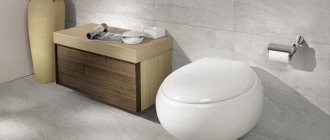
Toilet bowl Genoa: its features
The Genoa Cup is the so-called floor or Turkish toilet, which involves squatting. This toilet is intended for use in sanitary facilities and toilets in various public places. For example, at train stations, airports, stadiums, schools, shops, cafes, hospitals, hotels and industrial buildings. For example, such a toilet is appropriate in both short- and long-distance trains.
Turkish toilet at the airport
The Turkish Genoa bowl toilet has found such wide application due to its lightness throughout its entire service life and resistance to various physical and technical damage. In addition, the advantages of the Genoa bowl toilet include:
Although the genoa bowl - floor-standing toilets have a drawback. This is the need to squat, which, in turn, requires balancing and some coordination (see the article “Floor-mounted toilet: pros and cons”).
For installation in latrines, carriages, vehicles and soldiers' barracks, manufacturing companies offer to buy a genoa bowl toilet of a special device with a flange.
To find out which brand of floor-standing toilet is better, see the review article at the link: https://remontspravka.com/unitas-floor-best/
For a review of stores where you can buy a good toilet, see here.
Currently, the most popular materials for the production of Genoa bowl toilets are cast iron, ceramics and steel. However, despite the different types of Turkish toilets, they are all essentially a hole in the floor.
Although today there are also genoa bowls and floor-standing toilets that have not only footrests, but also seats. This allows a person to use it at will - sit upright or squat. So, for example, the “high” carriage toilet has footrests hidden under the thickenings in the front part so that you can also squat.
Toilet with hidden squatting footrests
By the way, you can also squat on regular home toilets, although this requires caution and some dexterity.
The Genoa bowl toilet is common in Asia, mainly in Japan and China, as well as in Muslim countries and in many public toilets in the countries of the former USSR. Particularly popular is the cast iron floor-mounted Genoa bowl.
Why is the Turkish Genoa bowl common in Islamic countries? There is a cultural tradition of squatting (or sitting). Because according to Islamic toilet etiquette, it is forbidden for legitimate Muslims to urinate while standing. Sometimes a hose is installed near the toilet for cleaning, similar to a shower.
Floor-standing toilet for Muslims
Video on how to close the riser
If your own experience is not enough to carry out high-quality repairs, you can always seek qualified help from specialists. Professionals will quickly evaluate all possible options, carry out calculations and forever hide the ugly sewer from view in the most appropriate way.
Is it possible to close a sewer riser? Yes, you can, the main thing is to do it right. There are several ways to do this job.
Application of a false wall. This is the most capital method. In order to make it, you will need plywood or chipboard
We also recommend that you pay attention to the drywall. Before installing the ceiling, completely remove all rust and paint the structure
Use galvanized profiles to frame the false wall. Attach the profiles to the walls, then to the floor. There should be a distance of 3 cm between the partitions. The drywall is secured to the frame using self-tapping screws. The sewer pipeline is hidden in the box. This design can be triangular or tetrahedral. Sometimes multi-level boxes are installed. This method is the best option if you are closing the riser in the bathroom. If you have a separate toilet, you can use wooden blocks instead of galvanized profiles.
Plastic panels. This is a very practical material that is not affected by external irritants such as humidity, temperature changes, and mold. They are also easy to disassemble and assemble, no need to paint or putty. It is enough just to choose plastic panels of the required color. You will need to build a frame for the wall and box, and lay the panels.
Roller shutters. If you don't want to waste time on complex methods, you can close the sewer pipes with roller shutters. They do not require finishing, they are easy to install, as they are ordinary blinds, and they provide maximum access to the riser. Now there are special designs, for example, with sound insulation and heat conservation.
- A box made of plasterboard or plastic. Use a metal profile and simply cover it with plastic.
- Utility cabinet. This is a great option to disguise valves, filters, meters and pipes and store cleaning products and household items. Make a frame from wooden blocks, secure it with dowels to the walls of the toilet, install hinges and doors. Laminated chipboard and plywood are suitable for making a cabinet.
Plumbing cabinets
Allows you to make the most efficient use of space. Covering the sewer line with a plumbing cabinet is a smart solution for small spaces. This niche combines a screen, as well as additional space for household chemicals, paper and other items. The most convenient is a two-door sanitary cabinet. The doors are cut from MDF boards. You can also order a ready-made screen.
Furniture companies will select a product of the required color and texture. To hide the wiring, a wooden beam is installed on the side walls of the opening. Then the doors are installed using hinges. It is possible to make a sliding structure. To save money, an edged board is used.
Masking using gating
Hidden installation looks the most aesthetically pleasing. The parts are sewn into pre-punched grooves. These are the grooves. You can cut holes with a hammer drill or wall cutter. When laying sewer and water supply lines hidden, they are hidden in the floor screed.
The wiring from above is poured with concrete. This process is expensive and complex. In case of a breakthrough, it is impossible to reach. We'll have to say goodbye to the perfect renovation. Also, before hiding the pipe using grooves, you should take into account some of the nuances of such arrangement.
You cannot use grooves:
- In load-bearing walls. They already have a lot of workload. The grooves will only strengthen it.
- Hiding this way will not work in areas where electrical networks are located.
- The method is only suitable for soldered products. Monolithic technology is used to connect them.
- Anyone who has closed pipes this way knows that when they come into contact with the walls, they make unpleasant sounds. Clamps will help fix the problem. Additionally, thermal insulation is used.
Note! An accurate drawing will be helpful. It's better to save it. In case of an accident it will be useful for plumbers.
Decorating pipes
Since it is not always possible to seal the pipes in the toilet, due to the small size of the room, in order for the room to have an aesthetic appearance, it is possible to simply decorate some of its elements.
Decorating techniques:
- You don’t have to hide it, just paint it. The color should be in harmony with the overall design of the bathroom.
- Using stencils, original patterns are applied. A little patience - and interesting stories will appear on boring pipes.
- Various pieces of glass, pebbles or ordinary sewing braid are suitable as decorative elements.
- You can braid with artificial flowers. The design will be close to eco style.
- Stickers and decals are also an option. If you cover it with newspaper or magazine clippings, they will resemble stands with posters. It will turn out stylish and unusual.
- Plumbing items can be wrapped with twine or other similar items.
Owners do not always strive to seal communications. Sometimes plumbing communications become part of the interior. Fans of high-tech or loft style will appreciate this design. The most successful combination is copper plumbing and the same pipes.
External piping is installed much faster. And there will be no problems with repairs. You can always replace worn parts.
Metal products require careful care. A significant disadvantage is the price. In addition, the metal heats up quickly. If you come into contact with it, you can get serious burns.
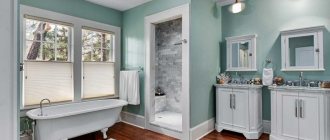
The arrangement of a bathroom requires a special approach. Materials must be durable and meet sanitary standards. There is plenty to choose from. All that remains is to decide on your preferences. There are no strict limits. Each option is easy to rework at your discretion. It all depends on the area of the room and the imagination of the owner. Based on these options, it is possible to create your own method of disguise. Dream boldly, and leave your dreams to the professionals.
Ways to disguise a boner
So how can you close the riser in the bathroom? This can be done in a variety of ways:
- Disguise in the walls. In this way, you can hide the riser only at the stage of its installation. And the work is very difficult and time-consuming, be prepared for this. First you need to draw up and transfer to the wall a diagram of the location of all communications. Then, using a hammer drill, you should make recesses slightly larger than the diameter of the pipes. Next, pipes are laid in the grooves. Then it is advisable to cover the entire surface with plasterboard sheet, chipboard, plywood or PVC panels to make a kind of false wall. It is not recommended to fill the depressions with concrete; if it breaks and is dismantled, you can seriously damage the riser.
- Closet. Yes, you can hide the riser in the closet. Moreover, you can either purchase a ready-made piece of furniture with a missing back wall and slots in the shelves, or make it yourself from an ordinary one. You will need to remove the rear section. Then, using a crown and a drill, make holes in the shelves corresponding to the diameter of the pipes. This method will not only hide the riser, but also provide additional space for storing products or hygiene items.
- The box is the most common way to disguise communications. It is convenient because you can purchase a ready-made structure of the required dimensions at a plumbing store. It is easy to install, so installation will not be difficult. In addition, there are different options for shapes and configurations: triangular, rounded, rectangular boxes, as well as those consisting of one or several levels.
- Plasterboard partition. To mount it, you must first install a durable frame, which is usually made of galvanized profiles. Although some use wooden beams, this material requires additional treatment with moisture-protective and antifungal agents. Next, the plasterboard sheets themselves are attached to the frame using self-tapping screws, and it is advisable to use moisture-resistant ones, since the humidity in the bathroom is significantly increased. The next stage is finishing. You can use different materials, but the most practical and preferred are PVC panels and ceramic tiles.
- Construction made of plastic panels. Plastic panels are practical, inexpensive, moisture-resistant, lightweight and relatively easy to install, as they have convenient joints. But the only drawback of using them is the complete lack of sound insulation; any sounds will penetrate through them. If this does not bother you, then get to work. First, install the frame, which can be made in the same way as for a plasterboard partition. But in this case it is advisable to use a metal profile. Install plastic panels on it. The joints can be masked with corners.
- Roller shutters will not only hide all communications from view, but also provide unhindered access to them. At any time, you can move the shutter to, for example, open or close a valve or troubleshoot problems. Roller shutters are installed in guides. In this case, the riser itself should be located in a recess so that it does not interfere with the movement of the shutter. And along the edges of such a recess the frame of the future structure is mounted. Currently, you can purchase special roller shutters designed for bathrooms and toilet rooms. They not only play the role of camouflage, but also perform hydro- and sound-proofing functions, as they are equipped with an additional internal coating.
Install roller shutters
On the box that hides the pipes, you need to make a hole to repair them. To close it, they install plastic roller shutters. If they are the entire length of the wall, from floor to ceiling, the box does not need to be installed.
Photo:
Ideas for equipping an outdoor bathroom in a country house
You can always improve the design of a simple toilet house in the country by equipping it with a full-fledged toilet and washbasin. If you equip the room with plastic piping elements and a bathtub, you will be able to create a full-fledged summer room for bathing procedures. For the winter, the structure is dismantled and the water is drained. A similar device is used to create a bathhouse. In this case, problems with draining water from the water seal should not arise at all, because it is enough to direct the hose into the sewer pipe. If you are afraid that expensive earthenware will crack, or are simply not confident in your abilities when equipping an outdoor bathroom, then you can resort to other, simpler methods of constructing a toilet in the country. Improvised seats and durable structures will be similar in functionality to a simple toilet. Only the need to drill a hole will disappear, since all waste will be sent to the sewer pit.
Some of the most popular options include:
You just need to choose the best toilet option for your dacha and enjoy a comfortable stay and dacha work, which will be facilitated by a well-equipped toilet house.
Open niches
In this case, the niche performs a decorative function. The relief of the uneven surface and the contour of the recess are emphasized by spot lighting.
Diversity in a monochrome interior is achieved through the play of light. Volumetric decor fills the recess in the wall and casts interesting shadows.
An open niche laconically complements the minimalism in space.
Self-production
A homemade toilet cannot compete with a purchased one in terms of aesthetic merits. But during its manufacture, the user has the opportunity to choose the most suitable shape and size for himself. Let's consider several options.
Toilet with storage for powder closet
In such a toilet, the role of waste storage will be played by a large bucket of 10 liters or more.
On top of it you will need to lay a panel made of boards with a hole, which will serve as the basis for the seat and lid.
The panel should be easily removable to allow the user to empty the bucket once it is full.
Next to such a toilet you need to install a tank for storing ash, peat or sawdust. Instead of a dispenser, you need to place a regular scoop next to the tank - with its help, the waste will be powdered with a portion of bulk material.
Waste sprinkled with dusty material does not immediately turn into fertilizer. That is, they need to be unloaded from the bucket not onto the beds, but into the compost pit, where further decomposition will take place.
Metal-based toilet seat
Very quickly, a toilet seat for an outdoor toilet can be made from a sheet of galvanized steel. In addition, it will be more durable than wood.
This structural element will serve as the basis for fastening a panel made of boards or plywood, on which the seat with a lid will be installed.
Wooden toilet seat
It is a cabinet that is made as follows: first, a frame is knocked together from bars, then it is sheathed with plywood or boards. A hole is cut out in the upper part and a seat with a lid is then attached here.
Folding toilet seat with plastic seat