Bathroom plumbing is becoming more and more constructive, interesting and practical. Manufacturers strive to ensure that interior plumbing and plumbing products provide increased functionality by reducing water consumption, facilitating comfortable use, protecting against bacteria and speeding up cleaning. Therefore, the toilet is not only a basic element of interior design, but also an important bathroom equipment for organizing an ergonomic and environmental space. But what to do when a small bathroom in an apartment is a problem for installing the necessary plumbing? Of course, consider the wall-hung toilet, which is presented in the photo gallery.
Freestanding models
The design mainly consists of open shelves. The advantage of this option is convenient access to things and the ability to hide some items behind the facades. The downside is that you need to constantly maintain order.
The cabinet takes into account the shape and dimensions of the toilet. This model can be found in showrooms or made to order. Or do it yourself: all you need is furniture panels, timber and fasteners.
Neoclassical-style furniture fills the entire wall space and forms a spacious storage area in the toilet.
The metal rack is compact; for such a design, the model of the toilet is unimportant. Decor and household items are stored on glass shelves.
The cabinet does not take up much space, but is quite spacious - ideal for a small bathroom. Frosted glass fronts hide the contents of the shelves.
Photo
Round toilet
Black toilet
Wall-hung toilet with installation
Attached toilet with built-in hidden cistern
Briefly about the features of the repair
There is no need to dismantle the partition and remove the cladding if the installation is damaged, because the parts are easily removed and replaced.
Design faults and causes:
- tank leakage - defective bottom valve;
- the drain tank is not filled - the filter is clogged;
- the tank fills continuously - the gasket is leaking;
- damage to the drainage system - incorrect choice of disinfectant.
The hole in the drain button allows you to:
- shut off the water;
- repair fasteners and communications.
Or maybe a bidet?
Electronic wall hung toilet with control panel
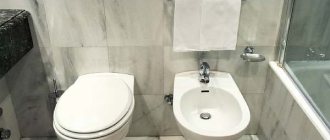
Wall-hung toilet and bidet of an elongated round shape
You can always purchase a bidet in combination with the toilet, if space allows and you want to diversify the interior of the toilet room. The bidet is installed next to the toilet. It has its obvious advantages when carrying out hygiene procedures. Today, bidets have a number of useful functions: adjustable water pressure, an automatic lid mechanism, a warm air drying system, a so-called “hair dryer,” water massage, and remote control.
Square wall-hung toilet
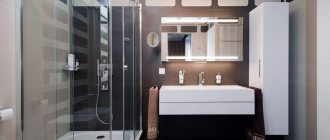
Wall-hung toilet in a small bathroom
To decide which wall-hung toilet is best to purchase, you need to decide on the main selection criteria: familiarize yourself in detail with the technical characteristics of a particular model, choose the color and shape of the bowl. And, of course, weigh the cost of the purchase against your financial capabilities. Then this essential element of the bathroom will delight its owners for many years with its impeccable performance.
Electronic wall-hung toilet and bidet in “space” style
Wall-hung toilet in Art Nouveau style
Orange wall-hung toilet
Installation of installation on a sink
Correct placement and firm fastening are the main rules when installing a wall-hung sink, so first, use a ruler and pencil to determine the location of the system.
Step-by-step installation instructions:
- The line where the sink meets the wall is marked and checked with a level. Marking points for fastening are fixed with a pencil.
- Using a drill, holes are drilled in the marked places. Dowels are inserted; they are practical and reliable for fastening heavy plumbing fixtures.
- Long studs are installed according to the diagram in the user manual.
- A mixer is mounted on the sink. Flexible hoses are connected.
- A sealing lubricant that ensures fastening is applied to the back surface of the sink.
- A washbasin is hung over the studs with sealing inserts.
- A siphon is connected to the sink and sewerage system, and flexible hoses are connected to the cold water and hot water pipes.
After installation, the horizontal level is checked. At the end of the work, you need to make sure that the water flows smoothly and that the sink is convenient for use.
Flush button
In a suspended system, the flush button, for obvious reasons, is mounted separately from the cistern, on a false wall that hides the installation. The consumer sees only a decorative panel with one or two keys. By design, the button can be:
- ordinary
, with a single key, when pressed, all the water in the tank is drained; - economical with a bipartite key
: by pressing one half, you drain all the water from the tank, when you press the other, only half of the water; - economical with the “start-stop” function
: the first press opens the drain, the second closes it, i.e. you regulate the amount of water drained yourself.
The key is connected to the drainage system using a pneumatic drive, a special lever or a cable.
GROHE Sail flush plate, chrome
Niches covered by a facade
Toilet interior in vintage style. The color of the doors is in harmony with the shade of the tiles.
Roller shutters cover a niche in the wall.
The façade material is painted white. The doors are fixed flush with the installation box.
The built-in wardrobe looks compact and provides access to communications. This, by the way, can be done very cheaply with your own hands.
White roller shutters do not stand out against the background of white walls. Despite the color division, the interior is perceived as one.
Interesting: how they hid the boilers in the closet behind the toilet (full description of the process and estimate)
The wood texture of the floor, cabinets and doors goes well with green ceramics.
The wenge door hides access to communications.
Ceramic finishing of the inspection hatch. In the closed position, the contour of the niche is almost invisible.
Built-in wardrobe, which is closed by furniture roller shutters.
Built-in cabinet above the toilet installation.
Access to the water heater through the inspection hatch.
Preparation for installation work
As always, we advise you to purchase everything you need to complete the job in advance and have it on hand.
So, to install a wall-hung toilet with installation, you need to have:
- steel frame-module complete with a plastic tank (container);
- toilet bowl;
- flush key;
- steel studs for fastening work;
- set of connecting pipes.
Usually, the installation kit includes not only a plastic container, but also a flush key, pipes, adapters and fasteners. As a rule, the kit also includes special material to protect the entire structure, which will be located in the wall of the bathroom, from condensation. The same material reduces the noise level during the period of draining and filling the container with water.
When you buy plumbing fixtures in a store, be sure to check the package and purchase additional items that you need but are not included in the basic set. Please note that the bowl is usually purchased separately. The frame itself and all mounting elements are standardized, so choose the option that you like.
The double flush button not only looks advantageous, but is also a functional element: with its help you can select the flush intensity
Most buyers prefer a double flush button: it allows you to dose the water flow. To perform installation and finishing, you will need moisture-resistant drywall.
Don't forget about the tools. You will need:
- perforator;
- concrete drills;
- roulette;
- pencil for marking;
- spanner wrenches;
- building level;
- knife for working with drywall.
Prepare the work area: remove all unnecessary items. We can start.
Other options
Wicker baskets are suitable not only for towels: your cat will appreciate such a house. If in principle it doesn’t bother you that she will watch you.
The geometry of the room gives ideas for design. In this case, open shelves are not only useful for household purposes, they also visually straighten the wall behind the toilet (suitable for crooked walls!).
Combined option - open and closed shelves.
A mirror-cabinet allows you to use the wall space to the maximum functionally.
The problem is not solved? See: Best Ways to Hide Pipes in a Toilet