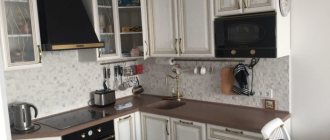
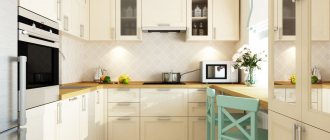
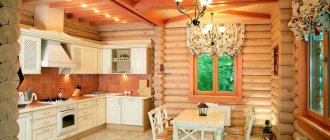
During a kitchen renovation, special attention is paid to various communications and their concealment. Everyone wants to have a beautiful and functional space. However, problems arise with the hood and the ventilation hole in the wall. Usually the stove over which the hood is installed and the ventilation window are not located next to each other. Therefore, it is necessary to make a plasterboard box in the kitchen to hide this nuisance.
For a long time, a flexible air duct (rectangular or round) was considered the best solution for connecting a hood to a ventilation window. However, it also had to be hidden behind (above) the kitchen wall cabinets. A plasterboard box can be used with any layout and with any amount of kitchen furniture. With its help, a flexible air duct can be hidden anywhere without spoiling the appearance of the room .
Correct and asymmetrical shape of the ventilation duct: design secrets
To organize competent camouflage, you should take into account the tips.
- Use putty to level the structure. Then paint it and the ceiling in the same tone.
- It is better not to disguise, but to increase functionality. You can turn the box into a TV stand. Having played favorably, you can get an additional location for the equipment.
- Integrate into furniture. This will hide everything from view and will not require any decorating techniques.
The main task when creating a kitchen interior is to turn what initially seems like an unnecessary structure into a useful thing.
A ventilation duct can become not only functional, but also the main detail in the kitchen and its decoration.
When implementing a kitchen design with a ventilation duct, it is important to consider its shape. Descriptions of the species are shown in the table.
Before you start renovating and developing a kitchen design with a box, you need to study all the features of this item.
Typically, there are two types of ventilation ducts in rooms.
| Form | Description |
| Rectangular | Mosaics and tiles that completely match the overall interior are suitable for decoration. A work surface is installed on each side. A complete image emerges. |
| Incorrect | Shape the rectangle yourself using the casing. The latter can be created from plywood or drywall. For decoration, choose attractive materials such as bricks and tiles. |
The design of a kitchen with a ventilation duct requires taking into account the layout of the room. Draw the project on paper. This will help identify problem areas, complete them, and eliminate controversial nuances. Remember safety. So, when located next to a gas stove box, vinyl siding will not be suitable for finishing. Otherwise, the risk of fire will increase. If there is a sink nearby, discard the wallpaper.
Some boxes have small dimensions: less than sixty centimeters in width and depth.
Others cause a lot of inconvenience, since the huge size of the structure attracts attention.
There are several methods of effective camouflage. The most harmonious and popular is integration into furniture. Elements are made to order, which will require increased financial investment. But after all the work has been done, it will be difficult to guess that the box is present in the room.
It is difficult to enclose such an element discreetly, and the situation is further complicated by the fact that not all ventilation protrusions are rectangular in shape.
Much depends on the location of the structure. If there is a slight protrusion, you can install a cabinet in front of it. If the box is at the top, choose a hanging model for it.
The most common layout option: a kitchen with a ventilation duct in the corner. Usually all communications are located in the same place.
You can make shelves on the structure to place kitchen items. If you fix the bracket, then there will be a place for the TV.
It is more difficult to disguise a box that is located along the wall and is located almost at the very entrance to the kitchen.
The following materials can be used for camouflage.
- Slate. Suitable for modern design. Helps create a key focal point in the room.
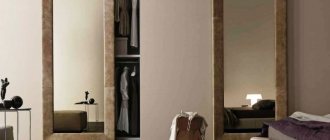
- Mirrors. Relevant for a small kitchen. The mirror surface allows you to visually increase the dimensions.
- Mosaic. Allows you to turn a problematic design into an attractive highlight of the kitchen. By choosing metal mosaic details, you can fit it into a loft or hi-tech style.
- Tile. Allows you to create an attractive appearance. A combination of light and dark squares is especially preferable.
It is prohibited to dismantle the box, because any damage to the ventilation system can lead to serious consequences.
In some rooms, it is possible to reduce the ventilation duct, but to do this, you must first obtain a diagram of the home’s ventilation system from the housing organization, and then seek help from specialists.
The ventilation duct can be included in the overall style as follows.
- Build several niches where lighting or contrasting finishing materials are mounted.
- Install several paintings, turning this island into a miniature art gallery. Photo wallpaper will also work.
- Hang a board with chalk where you can leave messages and draw.
In fact, the box is a very important element, because it allows the odors that arise as a result of cooking to evaporate from the apartment faster.
Before it becomes clear what can be done with the ventilation duct, you will have to study the features of the layout of the kitchen space
By hanging cabinets in rich colors, you can divert attention from the shortcomings of the room. To even out the area, choose floor coverings with a geometric pattern. To increase the size of the kitchen, you can connect it to the living room. More space will appear, the box will become less noticeable. If the structure is too large, then you should abandon design techniques for camouflage. It is better to divide the work surface into several sections.
The ventilation protrusion can be disguised in several ways. But most often, designers hide it under the elements of the kitchen set.
In this case, the furniture will be made to order, which, of course, will require large investments.
More often than not, an unsightly detail is not decorated, but hidden. At the same time, a kitchen with a box should not lose its overall style. They do this like this:
- To disguise the protrusion in the corner, extend the worktop along it. The upper and lower parts are covered with drawers, and the middle is finished with the same material as the apron.
- Facing with mirror tiles. This technique will help not only hide the air duct, but also visually make the kitchen area with the duct larger.
- If the protrusion is small, then it can be camouflaged with a hanging box, as is done with a hood.
- They order a set that goes around the box. With the right lighting, the hidden part becomes invisible.
Design specialists approach the box as an element of the interior from which certain benefits can be derived.
- A niche is constructed from plasterboard. It becomes a mini room for storing household appliances, dishes, etc.
- A similar structure, but already open, will serve as a shelf for souvenirs, dishes and other decorative elements.
- The protrusion is used as a panel for placing notes. A finished slate board is attached to the air duct or covered with dark paint.
- A plasma TV is mounted on one of the walls of the shaft.
- If the box is located in the work area, kitchen utensils, oven mitts, and towels can be beautifully hung on it.
- When the air duct is sufficiently distant from the stove and sink, family photographs are hung on its walls.
A box in the corner of the kitchen is not an obstacle to installing the desired furniture. After talking with an experienced designer, it is turned into the main detail or functional element, or the protrusion is made almost invisible.
A ledge for ventilation can become a useful and functional element; if it is properly disguised, an original decoration will appear in the kitchen.
READ MORE: Stylish armchairs (43 photos): beautiful and fashionable armchairs for the home, for the kitchen, the most interesting products in the interior
Disguise options:
- Use for additional needs. You can make a TV stand from a box with ventilation. For this purpose, a special bracket is placed on it.
- Disguise with furniture. If you build a structure with ventilation into the kitchen set, it will be hidden from the eyes of guests and will not require additional decoration.
- Using the main color of the interior of the room. If you paint the ledge the same color as the ceiling, it will look like the main part of the room's decor. To level the structure, putty is used.
- Installation of a fireplace or bar counter. If you place a bar counter or fireplace right next to the ledge, you will get the impression that it was made specifically. The design is lively and attractive.
- Disguise as a slate board. By covering the ledge with chalkboard paint, you can transform it into a modern chalkboard, like those found in many restaurants. You can write menus on it and leave messages for family members.
- Mirror surface. If you cover the ledge of the box with mirrors or other reflective material, the room will visually appear larger.
- Decoration with mosaics. For Provence or country style, decorating an additional ledge with small tiles in the form of a mosaic is perfect. At the same time, it is important that similar drawings be in other parts of the room.
- Brick wall effect. To make the ledge seem like a continuation of the brick wall, it can be laid out with tiles that imitate brick or natural stone.
- Using tiles. The ventilation duct, decorated with tiles in the color of the kitchen apron, looks harmonious.
- Sheathing with plasterboard. The flexibility of plasterboard to process allows you to make various niches-stands in it or install a decorative fireplace into the structure.
Ventilation ducts in the shape of a square and rectangle, corner models are much easier to fit harmoniously into the interior than intricately shaped structures. But every problem has a solution—it just takes more time and effort.
Irregularly shaped protrusions can be turned into rectangular ones. To do this you will need to make a casing. It is made from plasterboard or plywood. The resulting rectangular protrusion is decorated in any suitable way.
Initially, a rectangular or square box above a kitchen unit can be supported on both sides with cabinets - then the element will turn out to be complete.
Before creating a kitchen design with a ventilation shaft in the corner or in any other place, you should evaluate the features of the room layout and decide on the style in which the room will be decorated.
Stages of creating a kitchen design with an air duct:
- Creation of a room project in electronic or paper version.
- Identifying problem areas in the kitchen and eliminating their shortcomings.
- Taking into account the location of furniture, appliances and other kitchen utensils relative to the box.
- Determining a method for masking the protrusion.
- Selection of decoration products taking into account the overall interior design.
If a gas stove is located next to the ventilation duct, vinyl siding and other flammable materials cannot be used to decorate it. Wallpaper should not be used on ledges located at the kitchen sink.
Kitchen ventilation systems: natural or forced
Not everyone knows which ventilation scheme for the kitchen is better: standard natural, when exhaust gases exit through a duct to the street, or forced (a fan is used to remove contaminated oxygen). There is no definite answer to this question, because each of the hoods performs its own functions and has its own advantages and disadvantages.
In the kitchen, regardless of its location (in an apartment or a private house), the presence of a natural ventilation system is mandatory. Particular importance should be paid to the performance of the equipment, and especially if there is a gas stove in the room. In this case, harmful emissions will be discharged through a vertical natural ventilation channel. The exhaust rules do not consider forced ventilation to be a mandatory engineering service; it only ensures the comfort of residents. Next, we will describe each type of air exchange in more detail, consider their strengths and weaknesses.
Natural ventilation in the kitchen
Exhaust ventilation in the kitchen is familiar to all residents from vertical shafts that have an exit on the roof of a residential building. Harmful substances and fumes are removed through such passages, and fresh air enters the premises through cracks in the windows or special valves on the frames. Warm air heated by the kitchen stove tends to rise, it accumulates on the ceiling and goes through the ventilation hole outside the house. In its place, fresh oxygen comes from the street.
Proper, high-quality ventilation for the kitchen in an apartment removes a small amount of waste gas, but does this in a constant mode. A ventilation duct cleared of debris is capable of removing carbon monoxide and minor fuel leaks from kitchen equipment. To effectively remove foreign odors, a hood must be mounted above the stove.
Supply ventilation has the following advantages:
- high-quality air exchange in the apartment;
- removal of harmful substances that are released during cooking;
- removal of odors and high air humidity when several burners are turned on;
- lack of financial investments for the operation of the system;
- noiselessness.
Ventilation in the kitchen with a hood has the following disadvantages:
- decreased performance in hot weather;
- the possibility of air return from the street into the kitchen;
- relatively small volume of processed air per unit of time;
- you need to constantly check the draft in the ventilation duct.
Not all owners of country property know how to properly install a natural ventilation system in a private home. In this case, the channels will be made in the walls of utility rooms, such as the bathroom, toilet and kitchen. For high-quality ventilation of the entire house, and not just these rooms, it is necessary to additionally let in air flow from the bedroom, living room or dining room. In some cases, you need to keep the windows open.
If a four-burner gas stove is installed in the kitchen, then the hourly volume of processed air should be within 90 m3. For efficient operation of the ventilation system, it is necessary to install a channel with a cross-section of 0.02 m2. This parameter corresponds to a pipe diameter of 16 centimeters or a shaft made of brick in the shape of a square with a side size of 14 centimeters. The entrance to the channel is located on the ceiling or at a distance of 20-30 centimeters from it. To ensure stable draft, a ventilation duct of at least 5 meters in length is needed.
Forced exhaust system
The term forced ventilation refers to an engineering system in which contaminated air flows are removed outside using a fan. In the kitchen, such devices are installed using different methods:
- In the vertical ventilation shaft.
- In a hole made in the wall of a building. In this case, the polluted air will be discharged from the kitchen outside, bypassing the ventilation shafts.
- A corrugated pipe from a kitchen hood can be inserted into a window.
- Some consumers install a special device, a hood, above the gas stove. Polluted air can escape from the kitchen into natural ventilation shafts or directly into the street through a hole in the wall.
The advantages of connecting an exhaust fan or kitchen hood are:
- Improved performance. Effective ventilation in the kitchen allows you to quickly remove odors and harmful substances accumulated in the air.
- A kitchen hood above the stove removes harmful substances before they enter the room.
The disadvantages of the hood device are:
- Dirty air is removed from the room only when the fan is running.
- Such a system requires financial investment. In addition to the cost of the hood itself, you will have to constantly pay for the electricity consumed.
When installing a fan in a shaft, there are several important points to consider. The fact is that such a device has a check valve that prevents the suction of dirty air when the hood is not working. This valve must be removed so that it does not interfere with the operation of the natural air exhaust system. It should be noted that the performance of the device will coincide with the passport data only if a horizontal outlet channel of short length is installed. A modern hood connected to a common house shaft will have lower productivity compared to the declared technical characteristics. Ventilation diagram in the kitchen with a hood
What types of ventilation ducts are there?
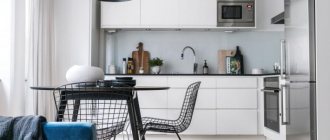
A small protrusion in the corner of the kitchen, which is an air duct, can destroy many design ideas when designing a kitchen interior, since it takes up invaluable square meters, which can be put to more rational use. However, there are kitchens whose layout includes a ventilation duct, but it is practically invisible, as it fits perfectly into the overall interior design.
If the box is very large, then it is better to decorate it with stripes: in the color of the apron, upper cabinets and on top in the color of the wall.
The protrusion in the corner of the kitchen can have a different shape and size:
- Less than 600 mm in depth;
- More than 600 mm in depth;
- Rectangular;
- Complex geometric configuration.
A box of regular shape and small size located in the corner will greatly simplify the task of adding this element to the kitchen interior.
The box may have modest dimensions and take up little space. Or have a large size, which causes a lot of inconvenience. It is important that the structure cannot be dismantled for safety reasons. The box can be located in a corner or at the entrance. Most of them are rectangular in shape.
The presence of such a detail confuses many people, because it does not allow the use of headsets created for a standard layout and the implementation of many ideas.
The design of a kitchen with a ventilation duct requires a special approach and a non-standard solution to the problem of an unsuccessful layout.
Aligning the metal frame
There are several options for opening a wireframe model. Each of these options assumes that the shelf is already secured at the ends and that its center is secured by one of the middle posts approximately horizontally (i.e., “by eye”). In this case, all shelving is cut to such a length that the shelf can “walk” a little in search of the desired position. That is, all racks initially need to be cut by 10-15 mm. reduce the exact distance and carefully turn the cut edge with scissors and pliers.
Method 1
During the initial marking, a hydraulic level was used, which means that the ends of the shelf are in the same horizontal plane. To build a geometrically correct box, it is enough to attach the posts so that the shelf is straight. We use the rule as a tool, and here it is just as useful, and I would say that we need to act together.
Press the ruler against the bottom of the shelf (the center of the measurement is in the area of the B-pillar) and loosen one of the bolts securing the B-pillar. We get no gap between the ruler and the shelf along the entire length of the ruler. We fix the middle pillar in the correct position.
We move the rule to the edge (the end of the rule rests against the wall). We open the racks between the center and edge of the box. We do the same with the horizontal plane of the frame, only the ruler is pressed not from below, but from the side.
This method is suitable if there is a rule or a long tier and the rectangle is longer than the existing instrument. But what to do if there is a rule of 3 meters, and between the walls where the box is mounted, for example, 2.75 meters? Truncating the rule is not our method, so we will use:
Method 2
To open the box frame, a construction strip of 600-800 mm is sufficient. In the area of the central vertical post, the level from below is pressed against the shelf and against the rail, which is attached to the wall. After releasing the bolt, grab the horizon and secure the bolt.
We go through all the racks. In the case of a horizontal part of the drawer, press the level against the ceiling guide and catch the plumb line. Our shelf structure is quite rigid, so it is difficult to find a wavy line on the edge of the box.
Method 3
Along the edges of the shelf (where it rests against the walls), two self-tapping screws are screwed directly into the outer edge. The self-tapping screw should enter the outer corner at an angle of 45% to the profile planes as a bisector of the angle. It’s difficult to do this the first time, but a very sharp short-length self-tapping screw will help. You can take 3.5 * 16 mm. or 3.5 * 25 mm. metal plaster.
Pull the nylon thread between the screws (0.8-1.0 mm thick cord) with the maximum possible tension. The thread serves as an excellent guide for shelf placement and produces very reliable results in the final geometry.
The main point is to ensure that the shelf does not tightly touch the thread (only for self-tapping screws). When attaching the stands, there should be a hairline gap between the thread and the outer edge of the shelf.
At the end of the nomination process. I strongly recommend replacing the screws holding the drawer posts with rivets. You will need a 3.2mm metal drill. (it’s better to buy double-sided, and if it’s simple, then several pieces), the riveter is a cheap Chinese one and the rivets themselves will do. I recommend 3.2mm diameter. length 8-12 mm.
All that remains is to check that everything is laid out in the frame of the box and can be sewn together with plasterboard. It is recommended to call (that is, check the operation of the electrical circuit) so that after applying the putty it does not hurt terribly.
If possible, sew the vertical side first and then the horizontal bottom. Thanks to this sequence, edge processing is much more convenient, since there is no need to sharpen the face up.
When attaching drywall to the frame of a box, the distance between the screws differs from that accepted for cladding, for example, walls. Here the step needs to be taken smaller and the wear of the screws increases.
Try not to insert self-tapping screws into the joints of the racks with the guides, so that the self-tapping screw does not pierce the double metal.
When renovating a room, the problem arises of the impossibility of moving various elements of the water supply and communications. An old pipe or a bulky riser will ruin your design ideas. The way out of this situation is to cover the pipes with plasterboard.
Masking and embedding the box
One of the finishing options is the implementation of a false fireplace. This is one of the simpler but more beautiful solutions to the problem. In other cases, it will be necessary to expand the space to create an additional approach. A false fireplace will add coziness and warmth to the atmosphere of the kitchen.
There are a number of other ways that a ventilation duct can become a useful element.
This is not only an excellent disguise, but also a very beautiful solution that enlivens and ennobles the interior.
You can carefully disguise the ventilation duct in the corner by decorating it in the same way as the cabinet
If the location of the box does not make it possible to use it as a decorative element, it can be cleverly hidden. A few recommendations will help you decide on the best option:
- The ventilation duct is an extension of the work area. You can create additional workspace by extending the worktop along the corner box. The top and bottom of the ledge can be covered with cabinets, and the visible part can be decorated in the same way as the apron.
- Continuation of the kitchen set. The ledge in the corner of the kitchen can be hidden with custom-made kitchen furniture. A small box can be hidden under a wall cabinet using the hood principle, and a large ledge can be folded around it. By choosing the right combination of texture and lighting, you can achieve the desired result in which the box will be almost invisible.
- Camouflage finish. You can continue the tiled apron on the box, finishing its lower part to match the color of the furniture, and decorate the upper part in light colors, using a similar thematic pattern.
- Mirror ledge. The mirror surface of the ventilation duct will help, by hiding it, to visually expand the kitchen area.
- Plasterboard partitions are installed, puttyed and painted.
- The ledge can be used as a TV stand.
- Ventilation is built into the furniture.
The ventilation duct is used as a functional element and decoration.
The air duct can spoil the aesthetic appeal of the room
Space is limited in the kitchen, so the ledge is decorated and repurposed for functionality.
Functional ventilation duct
Important! The design methods for the air duct depend on the size. Volumetric projections are covered with stripes matching the color of the facades.
A kitchen with a properly designed ventilation duct sometimes changes the room beyond recognition.
The dimensions of the protrusions may vary in depth Rectangular options are designed more often More complex structures are installed
The model of the hood and its location are always taken into account when designing a corner or straight kitchen with a ventilation duct.
READ MORE: White bathroom 80 photo design with wood and bright accents color combination - with red, gray and blue
Projection design options:
- The hood also performs a decorative function.
- Refurbishment for greater functionality.
- Masking the air duct to match the color of the walls or facades.
To choose the right design option, you need to take into account its features and advantages.
Brackets for attaching cabinets are installed on strong ledges.
It is more difficult to disguise the ventilation duct located at the entrance
It is impossible to dismantle the ventilation, since the slightest damage to the ventilation system leads to serious problems.
The corner in which the ventilation holes are located is covered with a plasterboard panel or other cladding that matches the color of the furniture and walls. The oven, located in the corner under the hob, frees up space for the work area. The ventilation duct is masked with a corner cabinet or facing panel.
The case is painted in the color of the walls and does not close
Limitation:
- The hood above the hob is installed at a height of up to 65 cm.
- Fire-resistant materials are used for ventilation finishing.
Important! Plastic, wood or wallpaper are not used in the design. Any polymers melt quickly, regardless of the manufacturer’s statement.
Final work on gypsum board sheathing
In fact, all the difficult work has already been left behind. Now you just need to cut the gypsum board into strips of the required size and screw it on. In fact, in the kitchen the box for the hood is almost ready, because it needs to be sheathed on the front and bottom. First we sew the front.
The sheets are pressed against the profile and screwed with self-tapping screws in increments of 20 cm. At the jumper points, self-tapping screws also need to be screwed in. So the box is completely sheathed from the front side. After this, the sheets are screwed from below, from the wall to the newly screwed gypsum board. The installation diagram is similar. A long sheet will be difficult to lift and hold above your head, so you can cut it into several pieces.
At a given location, you will need to drill a hole in the drywall for the ventilation pipe. You can make it on the floor in advance, if you don’t have a special attachment for a drill, and then attach the sheet with the finished hole.
When the plasterboard box for the kitchen hood is assembled, all that remains is to putty all the joints and screw heads. This is how the structure is prepared for finishing.
Using Duct as a Functional Attribute
Not in all cases, the air duct may be an insurmountable obstacle in creating a kitchen design. If you approach it from a practical point of view, you can derive some benefit from it. Some useful tips:
- Decorative shelves. Having decorated the ventilation duct with a decorative niche made of plasterboard, you can arrange small shelves in it for beautiful dishes, souvenirs or other decorative elements.
- Slate. One of the walls of the box can be used as a board for notes, covering it with a layer of slate paint or attaching a finished element to the ledge.
- Collage. The freely available box can be decorated with a collage of family photos.
- Practical hike. One of the walls of the box can serve as a place to mount a TV.
- Storage place for utensils. The box located near the work area can be used for hanging utensils and textiles.
- Bar counter. Arranging a folding bar counter near the ledge in the corner of the kitchen will help create an original interior, thereby saving useful space.
- Mini pantry. A small niche formed between the ventilation duct and the wall can become a mini-pantry for storing dishes and electrical appliances.
Small spaces require the creation of original design solutions to ensure the functionality of kitchen furniture and appliances in a small area.
Decorative shelves cling to the air duct
They place dishes or TV mounts
A slate board is attached to the ledge, on which you can leave notes
Paintings or family photos are placed on the box
Decorative shelves are attached to the air duct. Dishes or a TV mount are placed on them. A slate board is attached to the ledge, on which you can leave notes. Paintings or family photographs are placed on the box.
Not in all cases, the air duct may be an insurmountable obstacle in creating a kitchen design. If you approach it from a practical point of view, you can derive some benefit from it. Some useful tips:
- Decorative shelves. Having decorated the ventilation duct with a decorative niche made of plasterboard, you can arrange small shelves in it for beautiful dishes, souvenirs or other decorative elements.
- Slate. One of the walls of the box can be used as a board for notes, covering it with a layer of slate paint or attaching a finished element to the ledge.
- Collage. The freely available box can be decorated with a collage of family photos.
- Practical hike. One of the walls of the box can serve as a place to mount a TV.
- Storage place for utensils. The box located near the work area can be used for hanging utensils and textiles.
- Bar counter. Arranging a folding bar counter near the ledge in the corner of the kitchen will help create an original interior, thereby saving useful space.
- Mini pantry. A small niche formed between the ventilation duct and the wall can become a mini-pantry for storing dishes and electrical appliances.
A well-decorated air duct often becomes the main element of the kitchen. But you need to try to ensure that the “interfering” interior detail fits into the surrounding environment.
Designers use the following decoration options:
- Authentic column. Decoration is possible if the protrusion in the corner is small. Everyone chooses their own style. Imitation of stone or brick is done by gluing gypsum tiles onto the air duct. Decorative plaster is often used.
- Siding finishing. This option is used if the hob is located away from the ventilation shaft. The starting profile is mounted using self-tapping screws. The panels are attached from bottom to top.
- Wallpapering. It is also not recommended to use if the stove is located nearby. When distance allows, a colored panel is combined on the box, decoupage techniques and photo wallpaper are used. If there is a sink nearby, the exhaust box is covered with washing variations.
- Plastic profile. To accomplish the plan, panels or sheets are used. A box lined in this way looks modern and stylish.
A bright accent on the ventilation structure is obtained as a result of cladding with materials of different colors and textures. Mosaic tiles also create a similar effect.
Dimensions
The dimensions of the exhaust duct must be such as to provide the necessary capacity for pumping out air masses. To reduce the resistance of the internal surface, round structures are used. Standard diameters for domestic purposes are 80 mm, 100 mm, 125 mm, 150 mm, and for industrial purposes - from 200 mm.
Rectangular boxes are manufactured in the following dimensions:
- 110x55 mm;
- 120x60 mm;
- 204x60 mm.
Adapters are available from round to rectangular boxes with the following dimensions:
- from diameter 100 mm to 110x55 mm;
- from a section of 100 mm to 120x60 mm;
- from diameter 125 mm to 204x60 mm.
The wall thickness of the exhaust pipe is from 1.5 to 4 mm. The lengths of one element range from 35 to 200 mm.
Decoration
The hood is often used for decoration and is located in the middle of the wall above the hob.
The air duct is in most cases located in the corner
The length of the ventilation duct in this situation is equal to half the wall.
Sometimes you can put it on a kitchen cabinet and cover it with a curtain rod
Therefore, you have to decorate the ledge so that it fits into the interior.
Original ways of decoration:
- Columns in antique style or in the form of masonry.
- The color of the ventilation duct contrasts with the wall.
- A fake fireplace, the equipment of which is made using plasterboard or electric heaters.
Important! Decorative panels are not used if the duct is located near the stove. The surfaces are finished with washable wallpaper if the box is located near the washbasin.
Installation of guides
After marking, we fix the guides along all the lines formed as a result of the intersection of the planes (box and three walls).
© shutterstock
The profile must be fastened with reasonable sufficiency, that is, in increments of about 300 mm. Plastic dowels with a diameter of 6 mm are used for fastening. and black wood screws with a diameter of 3.5 mm, length 41 or 51 mm.
© shutterstock
PAY ATTENTION TO HOW THE GUIDES FIX THE POSITION OF THE EDGES OF THE BOX, OR MORE PRACTICALLY, THE MUTUAL POSITION OF THE VERTICAL AND HORIZONTAL PARTS OF THE PROFILE. IN THE PHOTO BELOW YOU CAN SEE THAT AT THE CORNER THE PROFILES CONVERSE SO THAT THE VERTICAL FRAGMENT IS “FINAL”, i.e. IT REACHES THE TOP OF THE CORNER.
It is important to make a similar arrangement on two opposite walls of the room where the box is installed.
© shutterstock
Air duct as interior decoration
Ventilation is often installed above the entrance to the kitchen. It takes up space near the interior wall, but leaves more space for a table and furniture. The ventilation system is used as an addition to hanging cabinets. The niche accommodates a sink, hob or work area. The ventilation box, decorated as a column, matches the red and black color combination of the facades.
A small remote table can be attached to this box
Polystyrene tiles are often used for decoration, imitating a brick wall. This is a good decoration for the kitchen entrance. The vertical box covers the working surface of the kitchen unit and hides the space loaded with various objects.
The design of a kitchen with a ventilation duct is improved if it is installed in a visible place. A wide mirror is attached to it, allowing you to visually enlarge the space. With the combination of white and blue, the kitchen looks spacious even with a large overhang.
Flexible hose
In old apartments, the gas pipe went directly to the stove or water heater. Good news: it is now allowed to connect gas equipment with a flexible connection specifically designed for this purpose. Now you can legally cut the gas pipe in the kitchen (to the tap) and install a hose. Flexible wiring, especially metal corrugation (bellows), can look much better.
The length of such wiring (up to 3 meters by law) is also not a problem; there are hoses of different lengths, or two hoses can be connected. But there must be access to all connections.
A flexible hose is much easier to cover than a pipe in a variety of ways.
A good idea is that the hose from the wall cabinet to the table top can be passed through a chrome pipe (table leg), which will fit into the interior. But it must remain removable.
If you have a countertop made of artificial stone, you can use a removable “corner” made of the same material to cover the hose in the corner of the kitchen.
Options for involving the ventilation duct in the overall kitchen interior design
16 votes
Vote for!
Vote against!
The kitchen is a room where the aesthetic component of the design must be combined with the functionality and practicality of its solutions. And if the owners of spacious kitchens, using the information gleaned after familiarizing themselves with Internet resources, are more or less free in their actions, then the owners of apartments with small kitchens are extremely limited in the choice of current design solutions.
READ MORE: DIY vase from scrap materials 16 photos on how to make a flower vase step by step
But a small kitchen area is far from a death sentence. In connection with the development of the construction industry, aimed at the construction of standard economy-class apartments, where a small-sized kitchen is an integral element of the layout, most Internet resources offer many current interior solutions for small-sized kitchens.
However, in most cases, these recommendations are relevant for kitchens of small sizes, but with a standard layout. But what should those whose kitchens have any non-standard layout features do? Often these features include a ventilation duct, the presence of which confuses most owners.
How to plan a kitchen unit if there is a ventilation duct in the most visible place in the room? How can you beat this design flaw and turn it into an advantage and a kind of “highlight” of the kitchen? Find answers to these and other questions related to the design of a kitchen with a ventilation duct, as well as the features of its installation, in our article.
Content
- What is a ventilation duct: it cannot be removed and left
- Shape and location features of the ventilation duct
- What should you consider when finishing a ventilation duct?
- How to mask a ventilation duct: solving the problem
- Option No. 1. Manufacturing of kitchen furniture to order
- Option No. 2. Installation of a ready-made L-shaped set
- Functional masking of the ventilation duct
- Options for decorative masking of the ventilation duct
- Installation of ventilation ducts: step-by-step guide
- Preparatory activities: how to determine the parameters of air ducts
- Ventilation duct installation technology
- Some features of installing ventilation ducts
If you decide to improve the interior of a kitchen with a ventilation duct, you must clearly understand the limits to which you are limited in the remodeling process. To clearly navigate this situation, you will need to study the ventilation duct diagram, which can be obtained from the developer or from the housing management office.
The basis of a standard air duct is made up of air inflow and outflow valves, the total number of which does not exceed three. They are the ones who connect the ventilation duct with the general ventilation shaft. Having such a diagram in hand, you can reduce the size of the ventilation duct by simply replacing the existing ventilation sleeve with a smaller one.
Due to the fact that this engineering installation does not fit into the harmonious design of the room at all, many have probably thought about remodeling the kitchen and completely getting rid of the ventilation duct. We competently state: “It is prohibited to dismantle the duct!” Therefore, it is necessary to carefully study the issue related to the design of a kitchen with a ventilation duct.
Let's look at the most common types of ventilation ducts:
- Small structures, width/depth not exceeding 60 cm;
- Structures of larger dimensions, the width or depth of which exceeds 60 cm;
As for the shape of the ventilation duct, there are:
- Rectangular ventilation duct;
- The ventilation duct is of irregular geometric shape.
Most often, the layout of the room is carried out in such a way that the ventilation duct is located in one of the corners of the kitchen, and most often it is a corner located next to communications. There is also a location of the ventilation duct along one of the kitchen walls. If the ventilation duct is angular or small in size, you have the opportunity to fit it into the kitchen interior almost painlessly, but in all other cases you will have to make a lot of effort.
Kitchens with ventilation duct photo
If you want to turn your air duct into the highlight of your kitchen, there are a number of ways you can go, but your final course of action depends on the following factors:
- The location of the structure and its place in the kitchen project with a ventilation duct;
- Ventilation box size;
- The presence or absence of certain materials;
- General stylistic concept of the kitchen;
- The funds you plan to spend on furnishing your kitchen.
To choose the best option for finishing the ventilation duct and orient yourself with a plan for further action, first of all, analyze the planning features of your kitchen. Draw a general or more detailed plan on paper and study similar kitchen designs with a ventilation duct.
If you are planning to purchase a custom-made kitchen set, you will need to study the design of the set in a graphic image, which will clearly indicate the dimensions of each element of the set. Also, in the process of choosing the finish of the ventilation duct, it is necessary to take into account the following features of the kitchen space:
- The location of the gas stove near the ventilation duct. In this case, it is necessary to categorically exclude wallpaper and vinyl siding from the list of possible finishing materials, the use of which is fraught with fire;
- If there is a sink near the ventilation duct, it is also not allowed to use wallpaper (with the exception of moisture-resistant samples) and decorative plaster as a finishing material.
Overheads
When designing a box in the kitchen, you should rely on the external dimensions of the hood, or rather its most massive parts - the muffler and the engine.
We find the lowest point and transfer it level to the wall. The part furthest from the wall is projected onto the ceiling. To do this, holding the building level vertically, press its flat surface against the protruding part of the structure, and the end of the level against the ceiling. Once you find the vertical position indicated by the air bubble, mark a point on the ceiling.
Draw the horizon line through a point on the wall. In the case of the ceiling, everything is a little more complicated, because you need to think through the kitchen furniture in advance, that is, maintain an angle of 90 degrees between the walls.
It is more convenient to mark all long straight lines with a painting rope (skip). When carrying out any complex renovation work, it is recommended to have 2 pieces of blue and red paint (sold separately) in stock, as the line of one of these colors will be more visible on different surfaces. For example, red is slightly better than blue almost everywhere, except exposed brick.
Examples of kitchen design with a ventilation duct in the corner (photo gallery)
Due to the abundance of small details, mosaic can make the ventilation duct in the corner of the kitchen almost invisible
The main design options for a kitchen with a corner box:
- Design of the protrusion as a decorative element.
- Masking the box using trim or furniture.
- Using ductwork as a functional attribute.
The main rule in drawing up a design project for a kitchen interior with a corner location of the ventilation duct is ergonomics and harmony.
There are no design problems if the projection is in a corner. The furniture row is lined up in one line.
The box forms a niche in which the set is placed
If its depth is greater than the drawers, you can paint it the same color as the walls. A small and narrow ledge is covered with bedside tables. Furniture of non-standard shape is designed. An incision is made on the tabletop. The interior filling of the bedside table is planned individually.
A protrusion in a corner adds problems or creates opportunities. Sometimes a niche is created for the upper shelves or a border for the wall panel.
The ledge is surrounded by lower tables and a tabletop
A preliminary measurement of the entire room is carried out. The future design must be embodied on paper in detail. It is important to take into account the type of ventilation duct, its dimensions and shape. The place where it is located is also important. This will help you decide on a style.
The box can be hidden under a floor cabinet that has open shelves.
If the box protrudes only a little, then an ordinary cabinet can be placed in front of it. If the box is located at the top, you will have to find a suitable wall cabinet.
Drywall processing
When making a box, not only drywall is used. However, it is more suitable for these purposes and easier to process. And its surface is suitable for various finishing methods. Drywall provides high reliability and durability of the future “coating”, without limiting the choice of design. This design also includes batteries. Making a box without the help of craftsmen is not difficult.
To make a box you will need a hammer, a construction knife, a construction angle, a hammer drill, a spirit level (preferably a bubble one), and a tape measure. A sheet of drywall is purchased from materials. If you want to assemble the box in rooms with high humidity, it is better to choose a moisture-resistant material.
The frame is made of galvanized profile, and lovers of natural materials choose wooden bars. If the choice falls on wood products, they undergo pre-treatment. This will protect the frame from rotting and subsequent destruction. It is more practical to use a metal profile. Does not require pre-treatment and is easier to process. The frame is made of a profile - a special fastening (CD) and a guide (UD).