Having started the renovation, I, among other things, decided to repaint the walls. The indoor unit of the air conditioner prevented me from doing this, and then I dismantled the air conditioner while preserving the freon. With some skill and having the necessary information, this can be done without the involvement of qualified specialists; Below I will tell you in what order the dismantling takes place and how to avoid mistakes.
Source yandex.net
Dismantling the air conditioner step by step
Disassembly while maintaining the functionality of the dismantled air conditioner is as follows:
- sealing of pipeline fittings;
- disconnecting and dismantling the external unit from the facade;
- dismantling the indoor unit in the apartment.
Below are instructions for dismantling a wall-mounted air conditioner.
Outdoor unit
To remove the outdoor unit of the air conditioner, first disconnect the tubes.
Dismantling the outdoor unit
There are two ways:
- Unscrew the union nuts that press the flared edges of the tubes to the flanges of the fittings of the outdoor unit. And in place of the nuts, pre-prepared caps are screwed on. The advantage is that the tubes remain intact. The disadvantage is that there is a high risk of air getting into the compressor.
- Side cutters are used to cut copper tubes (about 15 cm from the fitting). The edges are folded and clamped (caulked) using a vice. The disadvantage is that new tubes must be installed in a new place. The advantage is that the operation is quick and the likelihood of dust getting inside with air is much lower.
Note. The other cut edge of the tube must also be caulked to protect the evaporator of the indoor unit.
The next step is to disconnect the cables (signal and power), remove the fastenings of the unit to the frame on the outer wall and lift it into the room.
Compressor
One of the situations when it is necessary to remove the outdoor unit may be to replace the air conditioning compressor. And in this case, the dismantling algorithm is slightly different. The differences are as follows:
- Freon must be completely removed from the system. The correct way is to collect it in a cylinder using a freon pumping station. Incorrect, but simple - release it into the atmosphere (if the compressor is replaced in the warm season and the air temperature is higher than the boiling point of freon at normal pressure).
- There is no need to caulk the tubes - after installing a new compressor, the system is “pumped out” with an external vacuum pump.
It is impossible for a non-specialist to replace the air conditioning compressor on his own. In addition to the vacuum pump and pressure gauge station, it is necessary to have a gas burner to disconnect the suction and outlet pipes of the old compressor from the system, and then solder the new unit to the system. And even if you rent equipment, you need to have the skills to handle it.
You can remove the unit yourself, but it is better to invite a professional to replace the compressor.
Indoor unit
Most household split systems have a wall-mounted indoor unit (although there are other placement options). But with the exception of a ducted air conditioner, the remaining types are dismantled according to the general principle.
To remove the internal wall unit, proceed as follows:
- remove the housing cover;
- disconnect cables and wires;
- cut and caulk the copper tubes that go to the evaporator of the indoor unit;
- cut off the drainage pipe and drain the condensate;
- “snap off” the latches securing the housing to the mounting plate;
- remove the block and unscrew the plate from the wall.
Preparation stages
At the preliminary stage, it is necessary to retain the refrigerant in the system. It is located in a circuit that consists of a compressor, evaporator, condenser, and connecting pipes.
Freon enters the evaporator in a liquid state, so small diameter tubes lead here. As the refrigerant evaporates, it enters the compressor in the form of gas. Here the branch size is larger.
The purpose of the preliminary stage: to collect all the gas in the condenser. To do this you need to follow these steps:
- The air conditioner is switching on in cooling mode. The lowest temperature is set. The unit operates for 10 minutes.
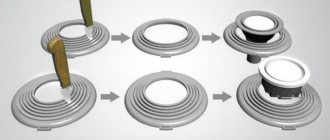
- There is a valve with a fitting on the external block. A thin tube approaches it, through which freon moves. There is a protective cap on top. When you remove it, splines appear. A key is thrown on them and the valve is closed.
- The pressure gauge is monitored, the needle of which should drop to zero after 1 minute. Immediately after this, the same procedure is carried out with the outdoor unit. The protective cap is removed and the second valve is screwed on. The air conditioner is then turned off using the remote control. All the refrigerant accumulates in the outdoor unit.
If there is no pressure gauge on the unit, then wait 1 minute and close the second valve, turning off the device.
Risk factors
As with any other work with technical devices, you should strictly adhere to safety rules. We will consider below what troubles may lie in wait for a technician who decides to dismantle the air conditioner himself.
So, what to fear:
- First of all, you should remember about the possibility of dust and moisture getting into the evaporation chamber - this should not happen under any circumstances
- Air conditioners filled with refrigerant cannot be transported, since during transportation the external unit filled with freon can simply explode
- The structural pump, unfortunately, is not designed for long-term continuous operation - thus, the back pressure after a fairly short period of time may exceed the permissible values, and the unit will be broken
- Under no circumstances should you unscrew the union nuts from the fittings yourself - the opposite will cause the purchase of a new air conditioner
- During the transportation procedure, you must be careful about the protruding ends of the pipes - again, their breakage will lead to irreversible negative technical consequences for the device
- If you use any homemade tool when working with latches, it is very easy to break them, and there is also a possibility of inadvertently damaging the evaporator
The best air conditioner can theoretically operate for no more than 10 years. In fact, in practice it turned out that complete wear and tear occurs already in the sixth year of its operation. Perhaps, if you move or sell the premises, you can leave the cooling system to its new owner and purchase a new unit yourself - and there will be less fuss with dismantling, and an incentive to purchase a new, more technically advanced device will appear.
Briefly about the main thing
If you are going to change the location of the air conditioner, the main thing you need to take care of is freon conservation. It is necessary to collect the refrigerant in the heat exchanger of the external unit, and this can be done independently in two ways, both with and without a pressure gauge.
Using a pressure gauge allows you to accurately monitor the pressure in the system, which reduces the risk of compressor failure. The second method is more economical (since you do not need to purchase equipment), but the time is determined by eye, and if you have little experience, there is a high probability of killing the compressor. The third method is applicable in extreme cases, and it is associated with losses of freon.
Question
Write in the comments what you think - how to properly dismantle if the air conditioner has low pressure protection and it can automatically turn off after closing the supply tap (with a thin tube)?
Dismantling in winter
The air conditioner can also work in winter. And not only as a heater, but also in cooling mode (for example, in rooms where servers are located).
Note. It is possible to collect freon in the condenser of the outdoor unit only when operating in cooling mode - in heating mode it already works as an evaporator.
The peculiarity of working in winter in this mode is that there is a lower temperature limit, which is affected by the type of refrigerant, type of air conditioner and additional equipment. This dependence is also related to the design features of the compressor - it is oil-based, and oil thickens at low temperatures. For conventional air conditioners, the lower operating temperature ranges from +5°C to -5°C, for inverter air conditioners - up to minus 15-25°C.
Before dismantling the split system, these nuances must be taken into account. And if the temperature is below the specified limit, and the air conditioner is not equipped with a “winter kit” with heated compressor crankcase, then to remove the outdoor unit you must use a freon pumping and collection station (it has an oil-free compressor).
Upper floors
If the air conditioner is installed on the top floor, then the place must be cordoned off to avoid injury to passersby, as well as damage to other people's property. If a tool or part falls from a great height, it can cause significant harm to a person or a vehicle parked nearby.
You will need safety ropes, as well as other equipment that can protect a person from falling. Working out subsequent actions at height, as well as the location of equipment, will help to avoid difficulties in further work, as well as an accident.
Disconnecting the indoor unit
The last step in removing the split system is to dismantle the internal module. This stage involves performing the following algorithm of actions:
- You should look into the niche of the unit where the air conditioner wires and tubes are hidden. Many split system models are specially designed in such a way that the latches in the lower area of the housing can be unfastened. If the installer does not have such an opportunity, he will have to remove the front part, blinds, a number of additional covers and other protective parts from the frame.
- Turn off the power, unscrew all joints and bolts, disconnecting the “drainage” joint from the pipeline.
- When removing the housing, it is necessary to use assistants to help hold the heavy air conditioner housing.
- After removing the housing, you should begin dismantling the remaining tubes and wires that remain in the wall.
This step is the final one. However, it is not enough to understand how to remove the air conditioner so that freon does not leak out. The installer must know how to preserve this substance during transport to another location. The air conditioner should be transported with care, placing it in a strong cardboard box, the walls of which are lined with foam plastic. All components of the split system should be wrapped in bubble wrap. After all, if you damage the parts of the split system, the freon will evaporate, and then all efforts to preserve it will be in vain.
Precautions
If the air conditioner is out of order and cannot be repaired, then it is easy to remove it - there is no need to save freon, the tightness of the compressor, condenser and evaporator is not important.
You cannot do this with a working air conditioner. And in this case, the main thing is that dust and even air do not get inside the system. Otherwise, we can talk about guaranteed compressor output after installation and start-up of the air conditioner in a new location. The reason is the design feature of the vacuum pump.
Freon is extremely fluid, and the temperature difference at the inlet and outlet reaches several tens of degrees. None of the seals and rings used in conventional pumps and compressors will withstand such operating conditions. The required tightness is achieved through extremely precise adjustment of the surface of the moving elements of the pump to the internal geometry of the chambers. The slightest scratch from a solid particle leads to compressor failure. And such a particle could be a grain of ice formed when moisture in the air trapped inside freezes.
That is why new air conditioners are sold filled with inert gas, which is pumped out with a vacuum pump before pumping in freon.
When removing the air conditioner yourself, the freon must be pumped out and the units disconnected. This must be done so that dust and air do not get inside the system. That is, create a vacuum there. And it is advisable to save all the freon (or most of it) so that it would be easier to get the system into working condition in a new place.
Preparation
To properly remove the air conditioner, the only professional equipment you need is a pressure gauge station, which can be rented.
Every home craftsman has the remaining tools:
- a set of wrenches and hex keys;
- screwdrivers;
- pipe cutter or side cutters;
- hand bench vice;
- pliers.
Freon release
There are two ways to dismantle a working air conditioner:
- Using a pressure gauge station to collect freon in an external unit.
- Using a freon pumping and collection station connected to a special two-valve cylinder. The station has its own pressure gauge manifold and a compressor for pumping out refrigerant in liquid or gaseous state.
The first method is more “affordable”, but it can only be used when starting the air conditioner - freon is transported using a standard compressor.
The second method is universal. It can be used even in winter, when the air conditioner cannot be turned on due to low outside temperatures. The advantage of this method is that the external unit will be evacuated - without freon in the condenser. Which is much safer when transporting to a new place. But renting such a station and a cylinder will cost more than a regular pressure gauge manifold.
Freon collection in the external unit
On the side of the outdoor unit body there are two fittings from which tubes extend:
- thin - for transporting liquid freon from the condenser to the evaporator;
- thick - for pumping freon gas into the condenser.
Both fittings have shut-off valve heads under the caps. An outlet with a nipple extends from the gas head.
Freon is collected in the condenser in the following order:
- Remove the protective covers from the fittings and nipples.
- The manifold is connected to the nipple.
- Turn on the air conditioner to maximum cold.
- After a few minutes, close the valve of the liquid fitting, stopping the supply of freon to the evaporator.
- The pressure is monitored using a pressure gauge.
- When the arrow shows “-1 MPa”, tighten the gas fitting valve with a hexagon and immediately turn off the air conditioner (which is why you need an assistant) - during prolonged idle mode, the compressor pump may fail.
The pressure gauge reading “-1 MPa” means that all the freon is in the condenser, and there is a technical vacuum inside the evaporator, in the tubes and in the compressor.
After this, you can separate the blocks.
Set of tools
It is strongly recommended to trust professional installers to disassemble, as well as install the air conditioner. This largely guarantees a high-quality installation procedure, without unpleasant consequences in both cases. But if there is no money for an expensive service, with certain skills, it is possible to disassemble it yourself.
The main point when dismantling a split system is careful, consistent adherence to the basic rules that will preserve the functioning of the equipment. In many ways, special tools will be useful here to help you disassemble with the least effort and with better quality. These include:
- pipe cutter
- side cutter
- construction knife
- Phillips screwdriver
- integral screwdriver
- hex socket wrenches
- open-end wrenches
- adjustable wrenches
- drill, screwdriver
- manifold.
A set of these tools is a must because not many standard mounting tools are useful. Using the latter, it is likely to cause irreparable damage to the system, after which it will have to be replaced.
Particularly difficult cases
In some cases, it is not possible to dismantle the tiles in this way. Let's take a closer look at them.
Removing tiles from a plasterboard wall
If the tile was laid directly on drywall, it will not be possible to knock it down. You will have to completely dismantle the partition. But there are situations when a plasterboard wall was first plastered, and only then a layer of tiles was laid. In this case, there is a chance to remove only the coating.
Step-by-step instruction
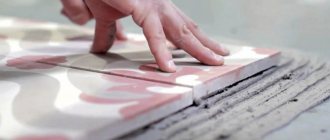
Remove grout using a knife or spatula
It is important to completely clean the seam. Use warm soapy water to soak the glue or cement mortar. Use a chisel or chisel to pry up the tile and carefully remove it. The tile is removed along with the plaster; the remains are quickly cleaned off using a scraper. Prime and putty the drywall.
This method will help preserve the partition, reducing labor intensity and lowering the cost of dismantling.
Removing tiles with metal hooks
Using a chisel and hammer, much less a hammer drill, is not convenient everywhere. In hard-to-reach places, two metal staples made from old screwdrivers or knitting needles bent in a U shape will help.
Once the seams are cleaned and the surface under the tile is sufficiently wet, insert one edge of the hook under the tile from below, and the edge of the other hook from above - and pull it towards you. This method is especially convenient when the tiles were laid correctly, using special glue. It will also help not to spoil the appearance of the product and will make it possible to use the finishing material in the future.
What do you need to know before starting work?
People who have set themselves the task of dismantling a split system with their own hands, at a minimum, need to know the structure (diagram) of such a system. We talked in more detail about the design of the indoor unit here.
In addition, this point should be taken into account: the working components of the equipment are under high pressure of freon, a gas that poses a health hazard.
This diagram must be carefully studied by every potential owner of an air conditioner from those who plan to install or dismantle the system with their own hands.
Also, the subject of study should be the electrical circuits of the air conditioning device, especially if it is planned to re-install the device in another place after dismantling is completed.
Finally, appropriate technical skills and proficiency in plumbing, electrical, and refrigeration specialty tools are required.
Work aimed at removing internal and external modules does not end with just disconnecting these modules and removing them.
The main tool of the refrigerator, necessary both when performing maintenance of household refrigeration equipment, and in the case of installation and dismantling of split system modules
After disconnecting and dismantling, each of the modules must be reliably sealed along the lines of the freon circuit. This is done to prevent dirt and dust particles from entering the circuit.
Knowledge of the classics of installing split systems contributes to facilitating dismantling work. Traditionally, work modules—internal and external—are placed as close to each other as possible, despite the fact that the two components are separated by a wall (several walls).
The length of the contour line during classical installation, as a rule, does not exceed two meters. This is a typical indicator for household systems.
The circuit pipelines are placed in insulation (each separately), grouped together with an electrical cable, and a working line connecting the two modules is built through the channel.
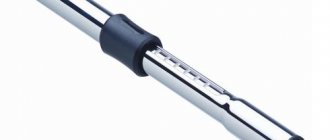
Valve assembly for a classic split system. The picture shows the valves with the brass caps removed (twisted). Inside, internal rods for a hex key are clearly visible
The circuit tube with a smaller diameter is the refrigerant injection line of the compressor. Accordingly, the larger diameter tube is the refrigerant suction line.
Each of the tubes is connected to the external unit through system valves. Moreover, one of the valves, usually the suction line, is necessarily equipped with a service port.
The so-called service port is a regular pipe outlet with a thread onto which the fitting of the filling hose or the fitting of the hose of the pressure gauge station is screwed. This outlet (service port) will be useful during system dismantling.
The most difficult actions for removing split systems
To remove the split system from the wall, you need to select a suitable set of tools and keys of the appropriate size. As a rule, some of the keys for installing and dismantling the air conditioner are included in the equipment package. The most important thing is to find a set of hex keys, without which it will be difficult to unscrew the protective screws that keep the pipes in motion. The pipes are necessary for supplying the working fluid of the equipment.
Then you need to unscrew the pipes (the main thing to know is that in a system of this type it is impossible to pump the equipment idly, so you should prepare a container in advance for draining the working fluid). First of all, you need to remove the thin pipe that allows coolant to pass through (it is called refrigerant), then you need to turn on the device and wait a certain time until warm air comes out of the air conditioner. After this, unscrew the thickest pipe and completely turn off the air conditioner.
The copper pipes of most models are not removable; you can use metal cutters to cut them off from the equipment. The cut ends of the pipes must be compressed. Now there is very little left to do: completely disconnect the electrical circuit of the device, remove the equipment from the mounting location, and then disconnect the outdoor unit of the air conditioner.
The monoblock system is removed in almost the same way. The only exception to dismantling is that there is a completely different electrical circuit, and the pipes containing the working fluid are very different.
If you are afraid to remove the device and turn off some equipment, you can use the user instructions that come with the equipment or seek help from people involved in dismantling the air conditioning system. In the instructions, you can find out in detail information on how to disconnect the drainage and other mechanisms of the product.
Before proceeding with dismantling, we recommend that you make sure that you have all the necessary tools.