07/23/2020 Read in 5 minutes.
It is impossible to imagine an ideal apartment renovation without a smooth floor covering. If you are going to decorate an old house, then first of all you should pay attention to restoring the floor, because the boards could become warped over time and begin to collapse. In new buildings, unfortunately, the floor is also not pleasing with its appearance.
To achieve an impeccable result, you should use self-leveling floor technology. This process is not as labor-intensive as it seems at first glance, but no more problems with floor repair work are expected over the next forty years.
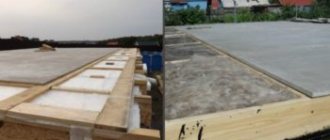
view album in new window
Laminate pie floor drawing
Diary entry created by user Tatiana2002, 12/17/16 .503,
To the floors. My 5 cents. Scheme with log beams and joists.
True, it’s not finished yet. We perform with minor deviations. Instead of acoustic slabs, I decided to fill it with ecowool. Plywood 24 mm in one layer.
In the bathroom, instead of plywood, 10mm GVL in two layers, silicone liquid sealant and glue on the tiles.
Example (still in progress):
↑ Is the space between the sheets of plywood filled with something if, for example, it is to be painted, or is this not permissible and it is necessary to lay laminate flooring, etc.?
The distance between the sheets of plywood
(on the floor)
is filled if the top covering does not have its own rigidity. For example, carpet, linoleum, etc. The joints under these floor coverings will definitely appear over time, they will trample, so to speak. The joints are filled with polyurethane sealant PU-25; it comes in white, beige, and brown. and black colors. In LEROY the cheapest option is brown. The paint adheres perfectly to this sealant.
Source
General principles
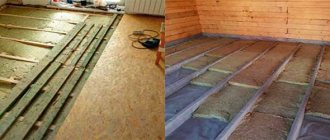
Beams, or logs, are laid parallel to each other between two walls on a layer of concrete screed or on a base slab. Previously, logs were only made of wood, but now variety is introduced by metal and polymer materials, which more successfully resist the deformations and squeaks that arise over time when the finished floor is laid on top of the boards.
The role of beams can be played by thick boards laid on edge, but more often it is an ordinary beam, fixed level in a single plane of the floor. The space between the joists is filled with insulating materials. Sometimes there is a layer of insulation underneath it. It serves as an additional barrier against high humidity.
Floor construction using wooden joists: how to make it warm and durable?
When constructing wooden and frame houses standing on a reinforced concrete “ribbon” or piles, it is important not to make mistakes in the design of the subfloor and to properly insulate it. Not only the comfort of living, but also the durability of the building directly depends on this.
The floor of the first floor, which does not have support along the entire plane, must be strong enough to bear the entire load. In addition, it must be reliably insulated, otherwise in cold weather the house will freeze through the “sole”, and ventilation of the subfloor must be organized. Otherwise, due to stagnation of air, the wooden beams will become damp and rot. How to comply with these difficult requirements?
When creating a floor on joists, it is necessary to use a fine-mesh metal mesh to protect against rodents
The next stage is the installation of beams
. For these purposes, boards or timber with a thickness of 50 mm and a width of 150 mm are usually used. They are inserted into grooves cut into the strapping beam. The pitch between the lags can be 40, 50 and 60 cm.
Next, proceed to installing the subfloor.
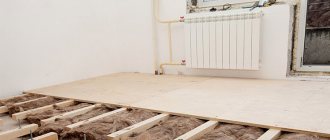
, which serves as the basis of the “pie”. Today, many builders prefer to use the technology of laying subfloor boards on skull blocks, which are fastened on both sides of each joist, and then boards, OSB boards or moisture-resistant plywood are laid on them.
Installing skull blocks is a relatively easy job, and the builders' desire to make their lives easier is understandable. But there is one very important point: the thickness of the floor’s thermal insulation layer directly depends on the height of the joists.
For central Russia, the minimum insulation layer is 150 mm, the recommended one is 200 mm. The size of the cranial bars is 50x50 mm, which means that the thermal insulation automatically becomes 5 cm thinner. You also need to subtract the thickness of the subfloor boards - 25 mm. All this leads to the need to make a thinner layer of insulation or, in the case of mineral wool, to press down the slabs so that a vapor barrier can be laid and the flooring can be laid. But the higher the density of the insulation, the lower its efficiency. In addition, in such a design it is no longer possible to create a ventilation gap between the insulation and the vapor barrier.
Without proper air exchange, the subfloor “suffocates,” which inevitably leads to condensation and rotting of the wood
In an effort to minimize the problem, some manufacturers use bars measuring 40x40 mm or even 20x40 mm. But this also has its downsides. The thinner the block, the less load it can bear. This means that the pitch between the beams has to be narrowed. This, in turn, leads to an increase in the total number of lags, and, as a result, to additional costs.
The second option for creating a subfloor is to install a continuous flooring made of one-inch boards or moisture-resistant plywood, OSB-3 boards with a thickness of at least 16 mm, screwed with self-tapping screws along the bottom plane of the joists. Installing such a “carpet” is quite labor-intensive, but the result is worth the effort. Indeed, in this case, you can make a layer of insulation of the proper thickness and not be afraid of freezing even in the most severe frosts. In addition, it should be taken into account that this option involves carrying out installation work from the underground side, and this is only possible when technological manholes are provided in the foundation.
As for the subfloor material, it is necessary that it be well dried. Permissible humidity - no more than 20%. Before installation, the subfloor boards and the logs themselves should be soaked with an antiseptic twice at intervals of at least 5 hours to reliably protect them from moisture, rot and wood-boring insects. The choice of antiseptic should be taken seriously, since the beams will be hidden under the flooring. The owners of the house will only find out that they are rotten after the fact, when the floor begins to sag, or even collapse altogether.
Features of insulation
The frame structure of logs is found not only in wooden houses, but also in many buildings built in the first half or mid-20th century. At that time, this was the most affordable way to quickly build a residential building. Characteristic features of such coatings are good thermal insulation properties. But they also require periodic repair and updating - much more often than concrete floors. Therefore, experts recommend making an additional layer of insulation when planning these works.
In addition, installing joists is one of the effective options for creating a warm base in modern residential buildings, however, due to the reduction in the overall height in the room, it is not always acceptable for standard apartments and houses.
To analyze the feasibility of insulation between joists, let’s consider the features of this technology:
- In most cases, logs are installed on a rough wooden base, thereby forming several separate cells on the surface. Those. the insulation will not be evenly distributed over the entire surface, but will fill only these zones. The difference between the heat transfer coefficients of the beams and the heat insulator can cause uneven temperature distribution on the surface.
- The insulation material should not negatively affect the wooden structural elements. To a greater extent, this relates to its hydrophobicity - moisture absorption. Therefore, the technology of floor insulation using joists provides for increased waterproofing measures.
- Mandatory air gap. It is necessary for the timely removal of water vapor released by wood. To do this, provide for ventilation gaps between the insulation and the upper base of the floor.
Taking into account this specificity, you can begin to select the optimal insulation scheme. To do this, we will consider various design options for the heat-insulating layer.
Classic laminate floor design
The classic design of laminate flooring is typical for new houses or houses and apartments undergoing major renovations.
The main requirement for the entire laminate floor structure, starting from the base, is to ensure a horizontal, even, smooth surface. Laminate is sensitive to unevenness, and it can only be laid on a surface with an unevenness of 0.2% of the room dimensions. Unevenness is checked with a two-meter rod. The check is done for slope and clearance. That is, the slats are laid on the floor in different directions, at the same time the unevenness of the floor in terms of slope and clearance is visible. There should be no visible gaps between the slats and the floor.
1. The basis of the classic design is a concrete floor slab. The slab must be cleared of construction debris. If there are technological protruding irregularities on the slab, they need to be knocked down. Protruding reinforcement, if any, must be cut off.
A cement-sand screed can serve as a replacement for a concrete slab. The screed is made from cement-sand mortar using a wet or semi-dry method.
Note: The semi-dry method, unlike the wet method, involves adding polymer fiber to the solution, which allows you to reduce the amount of water in the solution without losing strength.
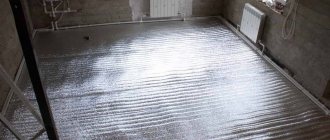
2. I repeat, the main requirement for a base under a laminate is its evenness. Ideal evenness of the base is achieved by installing a thin self-leveling floor made of polymer-cement leveling mixtures (finish self-leveling floor). The thickness of the finishing self-leveling floor is up to 5 mm. As a primer, you can use a mixture of PVA glue and water in a ratio of 1:9.
Installation of beacons
When pouring a self-leveling floor in an apartment with your own hands, beacons are not always used. Especially if the material needs to be applied in a thin finishing layer. It is liquid, so it spreads well on its own, leveling horizontally.
It's another matter if you need to form a thick floor. You can't do without lighthouses here. Purely structurally, this is a device on three legs, in the center of which there is a screw that moves vertically along the thread. By raising or lowering its lower end, the fill level of the self-leveling floor is set.
Attention! Beacons are installed in a checkerboard pattern every 1 m.
Before pouring self-leveling floors, beacons are installed, and their lower ends are aligned using a laser level. The process is not easy and will take some time.
If the floor base in the apartment is a plywood structure, under which insulation is laid, then instead of tripods you can use ordinary self-tapping screws. They are simply screwed into a wooden base every meter, both along and across the room. To increase alignment accuracy, the distance can be reduced to half a meter. The self-tapping screws remain in the body of the self-leveling floor, additionally performing reinforcement functions.
Laminate: layer cake and laying technology
Many of us, when making renovations in our home, did not even think about what this or that material consists of. For example, what does a coating like laminate consist of? Why is it so strong and durable? This is what we will talk about in this article. Let's take a look inside the laminate.
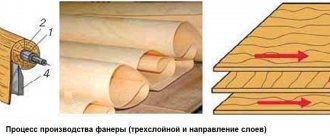
At first glance, it may seem that laminate is an ordinary wooden board coated with varnish. I want to disappoint you - this is far from true. This coating is built on the principle of a layer cake and consists of four main layers (sometimes more, but this happens very rarely).
The top layer is a film (in fact, this is where the name “laminate” comes from) made of acrylic resin. There can be either one or many layers of film. When there are many layers, such a laminate is called composite. This layer protects from external influences. It is impervious to moisture, most chemicals and dust. It should be noted that the higher quality the top covering, the more expensive the laminate.
The next layer is responsible for simulating a particular type of wood. It consists of special paper or furniture foil. There are many types of this material, depending on what texture you want to imitate.
Next comes the most important load-bearing layer, which is fibreboard (fibreboard). This is not ordinary fiberboard, but high strength. High strength is achieved by pressing the fibers. One of the main requirements for this material is the ability to withstand moisture. The better this indicator, the higher quality the laminate is considered.
There is another layer at the bottom of the board. It consists of resin-impregnated paper (unrefined paper) that is attached to the fiberboard. The main function of this layer is to protect the supporting material from moisture and level the overall geometry of the board.
Thanks to the technologies and structure used, laminate is a fairly durable and reliable floor covering. Over the past few years, its use has become increasingly popular. This is primarily due to its availability and ease of installation.
Laminate laying technology
If you are doing renovations, then this article will be useful to you. Here we will talk about technologies and methods of laying laminate flooring. Let's say right away that this is not so difficult and it is quite possible to master it yourself and not hire a team of workers for this.
The installation technology is quite simple, it is somewhat reminiscent of a children's construction set. The boards fit together easily. But this lightness depends not only on the quality of the parquet itself, but also on the quality of the rough surface on which it is laid. Before you start laying the laminate, it is necessary to level the surface of the subfloor, otherwise the work will probably have to be redone later. The floor will creak, bend, and cracks will appear at the joints of the boards. You can learn the installation process in detail from the instructions that come with the set of laminate boards. But its main essence is that the tenon on one board must fit into the groove on the other.
An important requirement of laminate laying technology is maintaining clearances from walls, pipes and risers. The size of the indentation can be different and vary from 5 to 10 centimeters. This depends on the degree of expansion of the laminate material. And expansion occurs under the influence of temperature. The higher the room temperature, the more the laminate expands. A classic point in installation technology is that the direction must be from window to door.
The technology described above is glue-free. It has a number of advantages and disadvantages. Such a floor can be easily disassembled and moved, say, to another room, or a damaged area can be replaced. However, it is not resistant to moisture. If the working surface of the board is well protected, then the seams are extremely vulnerable to water. With adhesive technology, you will need to spend money on glue and hire a team of workers. However, such a laminate will last you longer and it will not be afraid of water.
A high-quality laminate, subject to installation technology and proper care, can serve and remain beautiful for a very long time. Do not use soap solutions for cleaning. It is better to use alcohol-containing substances. It is better to place rubber pads under furniture legs.
Source
Cement-sand screed
Using a cement-sand mortar, you can obtain a monolithic base for laying any floor coverings. This eliminates significant differences in the surface, but you should not exceed 10 centimeters in the thickness of the screed so that the main floors of the building can withstand (for more details: “How to lay laminate flooring on a screed”).
Creating such a screed is quite simple, but, as in any matter, it is necessary to make efforts and diligence so that the result meets all expectations and the floors last as long as possible.
The floor is prepared for laying laminate using cement-sand mortar as follows:
- The subfloor is cleaned, covered with waterproofing material and taped around the perimeter with damper tape.
- Next, you need to determine the height of the future screed, which is also called the zero level. To do this, when measuring the base, its highest point is determined and 3 centimeters are added to it (about
Which base is best for a heated floor?
Almost every type of heated floor can be installed on any surface. In city apartments, where the base is concrete floor slabs, it is allowed to install any heated floor on them: electric, infrared or water, although the latter is recommended only on the first floor of high-rise buildings.
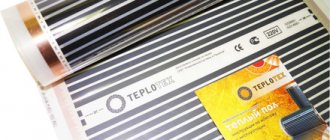
In a private house, the floor pie is usually mounted on a wooden base. You can place any device on it. However, the infrared type is more preferable, as it is fireproof and easy to install. Read the article on how to install water and electric heated floors over wooden floors in a private house.
In cases with a cable system, you will need to take additional care of safety and lay metallized plates in places where the wires are laid. When installing a heated water floor on a wooden base, you need to make sure that the ceilings can withstand the heavy structure.
When building a new house, the ideal solution would be a warm floor on the ground, water or cable, which will be installed in parallel with the construction of the building.
CONCLUSION! To summarize, we can say that the easiest installation and speediest option would be to lay a cake with infrared mats on a concrete or wooden base. Water or cable systems with concrete screed will cost more, and installation will take longer, but this option is considered more effective and is therefore popular. Laying heated floors on a dry screed is also a simple and inexpensive method, and is suitable for any system.
Insulation
Types of insulation
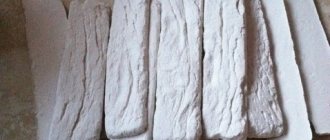
Both bulk and rolled or slab materials are used as insulation. Bulk insulation materials include expanded clay, vermiculite, slag, mineral fibers, and shavings.
Backfilling with expanded clay
Plate materials are factory-made slabs or blocks made from materials with low thermal conductivity. Recently, polyurethane foam insulation, which is blown into the space of the insulated structure, has become very popular.
Mineral wool insulation
But the most popular, especially in private construction, are flexible, soft materials. Such insulation materials are good because they are easy to give the required shape and are convenient to install. The most common insulation is the so-called mineral wool in the form of mats or rolls.
Advantages of mineral wool insulation:
- good thermal conductivity;
- non-flammable and does not support combustion;
- lightweight, saving on load-bearing structures;
- convenience and speed of installation.
Flaws:
- hygroscopicity;
- a base for installation is required.
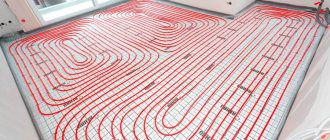
Water heated floor cake
Let's consider the sequence of work for installing a water-heated floor on concrete monolithic slabs:
For your information! When choosing basalt wool for arranging a water system, it is necessary to lay a vapor barrier material.
For a water heated floor, the thickness of the usual type of PPS is determined depending on the characteristics of the base:
When using insulation without a reflective layer, you will need to additionally lay aluminum foil.
The maximum length of the circuit should be 90 meters. If the area is larger, several separate contours should be made.
After installing the heating system, it is necessary to test the device. The functioning of the structure is checked and whether there are any pipe leaks.
This is what a warm water floor pie looks like, equipped with a concrete monolithic slab.
Self-leveling compounds
By analogy with a concrete base, a layer of self-leveling mixture can also be poured onto wooden floors, but in this case its thickness will not exceed 2 centimeters. You can pour several layers according to the following scheme: 1 – drying – 1 – drying – …. Naturally, their number will be limited by the maximum permissible mass that the ceiling can withstand.
Filling this mixture is done as follows:
- Again, we start by preparing the base: we remove any remnants of paint and varnish materials, eliminate cracks and holes. You can use a thick consistency of self-leveling mixture.
- The surface is primed with a composition with moisture-repellent properties.
- The zero level is determined.
- All gaps between the floor and walls are sealed with polystyrene foam.
- Waterproofing material with a 10-15 cm spacing is laid on the walls.
- The filling composition is mixed.
- The mixture is poured onto the floor, leveled with a spatula and air bubbles are removed using a roller with needles.
- The next layer can only be applied after the first has completely dried.
The methods for preparing wooden floors for subsequent laying of laminate do not end there. For example, you can use a mixture of sawdust and PVA glue for puttying. You can make it yourself or buy it at a hardware store, which is advisable considering the low cost of the main components.