So, in repairs, the most important thing is a clear sequence of work, otherwise you will be guaranteed headaches and chaos. If you decide to install suspended ceilings, then it’s great and it’s worth it, but there are some points that you will have to take into account. The design of the suspended ceiling itself is not too complicated, and it can be done at any time. But if you are planning a partial or major renovation in a couple of years and replacing the flooring or wallpapering, then this will have an extremely negative impact on the new ceiling covering.
In what order should repair the ceiling and walls be done?
The most popular combinations of finishing materials:
- wallpaper for painting or without it and suspended ceiling;
- tiles and paint;
- plasterboard, lining or panels, plasterboard on the ceiling.
Before any finishing work, the base should be prepared: the old finish, dust and dirt are cleaned off, cracks and unevenness are puttied, it is better to do these dirty activities on the ceiling and walls at the same time, and then remove the debris and prime.
Before starting finishing work, it is necessary to remove all construction waste from the apartment.
According to building codes, renovations are done from top to bottom. Glue and paint also flow and drip down and to the sides. The stretch ceiling is attached without glue to the frame; holes are drilled in the wall for it, and then the canvas is stretched, which is easily damaged or stained when wallpapering.
Therefore, for wallpaper and stretch ceilings, the order is as follows:
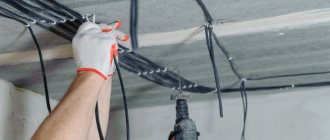
- Drill holes and install frame.
- Glue wallpaper, dry and paint.
- Stretch the fabric.
- Attach a baguette around the perimeter that will cover the top edge of the wallpaper.
If you have to paint both the ceiling and the walls, then it is rational and practical to first paint the ceiling, wait for it to dry, then wipe off any drops from the prepared wall and paint. In the case of tiles, installation also takes place in the second stage.
Finishing walls and ceilings with plasterboard involves installing a frame, but the surface of the base does not need to be leveled. Optimal operating sequence:
- Assemble a metal profile frame on the walls.
- Install the frame on the ceiling; however, the structure cannot be attached to the wall; it must be independent.
- Cover the walls with plasterboard or panels, clapboard.
- Sew up the gypsum board ceiling.
- Putty the seams and screw heads.
- Paint the ceiling and then finish the walls.
So, if you follow the technology of the sequence of work stages and buy high-quality finishing materials, even a novice finisher can make excellent repairs.
- Author: strelka2018
Rate this article: (7 votes, average: 2.9 out of 5)
Laying tiles
When laying tiles in the bathroom, the opinions of the craftsmen were divided. Some lay out the walls first, leaving the first row of the floor free. Then the floor level is displayed and the remaining fragment is reported. Others start with the floor and end with the walls. In each case, the master chooses the method himself.
Laying tiles on walls
On the practical side, it is better to tile the walls first and not worry about the mortar or grout getting on the clean floor tiles.
Parquet and linoleum
The turn of laying the final floor covering comes when the “wet” processes are completed.
An inexpensive, simple, quick-to-install material is linoleum. It is sold in rolls, so the width of the canvas is chosen according to the size of the room. Lay before finishing work on the walls - painting, wallpapering.
The process is simple:
- the canvas is rolled out to the entire length of the room and allowed to rest;
- fold in half, back side out;
- double-sided adhesive tape is glued to the screed;
- unfold, iron. Do the same with the second half.
Laying linoleum
At this stage of repair, parquet is laid. It's a difficult process. It is associated with the formation of wood dust when sanding the coating, so it is recommended to glue wallpaper and paint walls later.
Rough finish
First the floors, then the walls.
I'm sure you know what refers to rough finishing. This is the alignment of the planes of walls, ceilings, and ceilings. These are “dirty” types of work, they include: plasters, putties, flooring, etc. When performing rough work, the sequence will not be the same.
Examples of rough finishing sequence
- The ceilings are putty, the walls are CP plaster, the floors are CP screed.
First of all, you need to plaster the walls, then screed, then proceed to the ceiling.
Cement-based plasters and screeds take longer to dry than putties, so they are done earlier. First the walls, then the floors, and finally the ceilings. - GKL ceilings, GKL walls, CPU screed floors.
To build walls using gypsum plasterboard, a foundation is needed, so first of all, a screed is made, then the walls are made from gypsum plasterboard, and finally the ceiling.
First the floors, then the walls, and finally the ceilings. - The ceilings are putty, the walls are gypsum plaster, the floors are wooden flooring.
In this case, first the ceiling is leveled, then the walls are plastered, then the wooden flooring is made.
First the ceilings, then the walls, and finally the floors. - GKL ceilings, CPU plaster walls, self-leveling floors.
First you need to plaster the walls, then hang the ceiling, and lastly install the self-leveling floor.
First the walls, then the ceilings, and finally the floors.
Surface preparation - cement works
All existing surfaces, namely the floor, ceiling, walls, must be leveled.
We start with plastering the ceiling, if necessary, then level the walls (we don’t cover it with plasterboard, but plaster it), and finally we come to the floor screed.
Important! If you planned to have heated floors in your apartment, then you need to lay them before the floor screed.
What to do first - ceiling, walls or floor
You can install a suspended ceiling both in the midst of repairs and when they are completed. The most important thing is that by the time the ceiling is installed, all rough work (finishing, leveling the floor and walls, plastering the ceiling) has been completed. There are many disputes and disagreements on this topic, but in fact there are two ways to install the ceiling, one before wallpapering the walls, and the second after.
Method for installing the ceiling before wallpapering the walls
The undoubted advantages of this option is that during installation work there will be no wallpaper covering, or rather, you will not be able to spoil them (stained, dusty, scratched with a punch, etc.). The disadvantages of this option are that there is a masking tape that is installed on the new wallpaper around the entire perimeter, and since it is not there, you will have to glue such a tape yourself or additionally call a specialist. Decorating the joint where the ceiling ends and the wall begins is carried out as follows - take a wall corner, which covers the resulting gap between the ceiling and the wall.
Ceiling installation method after wallpapering
The advantage of the method is that the workers themselves will install the masking tape, quickly and beautifully. Among the disadvantages, it is worth noting that there is a possibility of damaging the wallpaper when installing the ceiling. As you can see, the issue is truly controversial. What can be considered unequivocal is that by the time the walls are wallpapered and the ceiling is installed, the rough work must be completed. This will help prevent dirt and dust from getting on the surfaces you've refinished.
If we think soberly, then the ceiling is made for a minimum of 10 years, but the wallpaper can be re-pasted more often. So don’t worry, you will be able to glue the canvas carefully and clearly maintain the joints. Most builders try to adhere to the scheme when they first do all the horizontals (floor and ceiling), and then the verticals. Now about the sanitary facilities. Before the suspended ceiling is installed, the tiles must already be on the surface of the walls. It is important that there are no voids in the top row of installed tiles.
General recommendations
The following should be highlighted:
Don't rush - you can't fuss in big matters. Renovating an apartment is a great undertaking and should be approached thoughtfully.- When drawing up a project, you should take into account all dimensions, write them down correctly, and do not trust technical data sheets; it is better to check everything yourself.
- Inexpensive overhaul with your own hands is even possible, since it can be completed independently in about 3-3.5 months.
- You should consider whether it is worth contacting freelancers for the most important work, because they usually work without signing a contract, so if something happens, you will not even be able to make a claim.
- When making initial repairs in a new building, you should not buy expensive finishing materials. New buildings must wait until the shrinkage takes place. Usually the first repair is simple, for a maximum of a couple of years.
That's all! We hope that the article helped you and now you have enough knowledge to carry out the repairs yourself.
Learning how to cover a ceiling with plasterboard
Drywall is increasingly used to create partitions because it is an environmentally friendly and easy-to-install material. It is convenient, among other things, because you can install it yourself. To understand how to sheathe a ceiling with plasterboard efficiently and without damaging the sheets, you just need to follow the instructions and tips given in this article.
Required tools and materials
When choosing what to cover the ceiling with, you must first consider where you want to install it. For rooms with high humidity (bathrooms and kitchens), moisture-resistant plasterboard sheets (GKL) are chosen. The same applies to the material for the frame: if previously wooden beams were more popular, today galvanized metal profiles are usually used, which retain their properties for a long time.
So, the materials you will need are:
- plasterboard sheets;
- UD profiles (guides);
- CD profiles (carrying);
- pendants;
- “crab” connectors;
- self-tapping screws
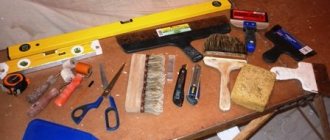
As experience shows, in order to properly sheathe a ceiling with plasterboard, you will need the following set of tools:
- level (water or laser);
- construction thread;
- roulette;
- perforator;
- screwdriver;
- edge plane;
- construction knife.
Screed
Layers of concrete floor are created in the following order:
- Underlying layer. Flooring on the ground begins with removing the top layer of soil and creating a layer of sand and crushed stone or concrete. The floor on top of the ceiling in the apartment is made without an underlying base.
Floor preparation
- Waterproofing. It is created from film, membrane, roofing felt. Concrete can be coated with bitumen mastic.
- Thermal insulation. For floors on the ground it is required. For floors on ceilings, insulation is laid only in unheated rooms or in rooms located above basements or arches. The heat-insulating layer is created from expanded clay, polystyrene foam, mineral wool, polyurethane foam or other insulation. The same material serves as sound insulation, which is necessary for flooring.
- Then a reinforcing mesh is laid. If a heated floor is provided, then the heating system pipes are attached to it.
The next stage is pouring the screed. It is performed as follows:
- To obtain a flat surface, beacons made of metal profiles or wooden blocks are installed. If the area is large, then formwork will be needed, since it will not be possible to pour concrete at one time.
Lighthouses
- Concrete is poured in a layer up to 8 cm thick with a shovel. Align it using the rule, moving it along the guides.
Alignment
- The formwork and beacons are removed after pouring is completed. The voids left behind are filled with concrete.
- The surface of the new floor is covered with film for several days.
Intermediate option
In reality, there are not two options, but two and a half. There is another possible sequence.
- leveling, plastering, priming walls;
Alignment of walls
- drill holes, install baguettes;
Installation of baguette
- After carrying out this work, we install a suspended ceiling and glue wallpaper. Or vice versa: walls first, top later.
That is, first we do the rough, preparatory stages for both works, and then the finishing stages. This removes some of the possible disadvantages of each option. In the absence of wallpaper and fabric, it is impossible to stain or damage them during rough work. Unfortunately, such a breakdown lengthens the total repair time and requires additional visits from both teams.
The procedure for performing repair work
Many companies, when performing repairs, adhere to a clear algorithm. This allows you to achieve high quality, which is clearly visible in the photo. Most often, the sequence of work is as follows:
- The preparatory stage is leveling and priming the walls.
- Installation of stretch ceiling.
- Installation of the cap and ceiling plinth.
- Wallpapering, trimming uneven edges.
There is one secret that will allow you to subsequently make cosmetic repairs without damaging the ceiling. Wallpaper should not be glued under the baseboard, but strictly close to it. In this case, you can remove the annoying coating without any problems.
The case when everything is done the other way around
However, it is not always necessary to make the ceiling first, and then the walls. For example, if you need to fix drywall. In this case, you should start with vertical surfaces, first installing a profile of the required overall dimensions on them.
Afterwards, the plasterboard slabs are attached, and only then it is recommended to begin facing work on the horizontal surface, that is, the ceiling. For installation, strong supporting structures are used that can easily withstand the heavy weight of plasterboard boards.
Main conclusions
So, as you can see, there are different options for installing facing materials. It all depends on what products are used in the repair. Of course, in most cases it is better to start at the top and move to the bottom - this is rational and justified. It also allows you to create really high-quality interior design, as you can see in the photo. And remember one more rule - it is important to use high-quality materials, then the results of the work will bring maximum satisfaction.
It is quite possible to repair the ceiling in an apartment yourself, and for this you do not need any special skills in construction and finishing work, but just follow the instructions. Almost every person has encountered problems such as uneven ceiling coverings, flooding, leaks and more. Naturally, you want to live in comfortable conditions and in a pleasant atmosphere, and therefore you have to think about carrying out repair and finishing work.
To repair the ceiling with your own hands, it is worth deciding what types of work exist and what features they have.
Works are divided into:
- Dry;
- Wet.
If there are minor defects on the ceiling, then major repairs are not needed and a dry renovation of the coating is sufficient. Naturally, a complete replacement of the ceiling covering will require not only investment, but also a lot of effort, patience and materials. Replacing the ceiling covering in a room is actually not difficult, but you will need to follow the instructions and completely follow each step.
Initially, the room should be cleared of anything that could be damaged during the renovation. Namely, from furniture, carpets and household appliances. The floor itself is covered with a special film so as not to damage the coating.
There are various ways to finish the ceiling surface that are worth exploring before purchasing materials:
- Coloring;
- Paneling;
- Leveling and applying decorative plaster;
- Installation of suspended and tension structures;
- Elimination of drips;
- Repairing after a leak from the roof or removing damp parts of the cladding.
Details
About the renovation in general
The main task of the renovation is to transform the room and make it more convenient, comfortable and modern for creativity and life for yourself and your family. So that in the future you do not associate repairs with a real catastrophe or natural disaster, so that everything goes smoothly, beautifully and quickly, you should organize the process correctly, and also follow the order and technology of the work.
Repair can be:
Cosmetic, which includes replacement of coatings.
In turn, you can repair the ceiling or install a stretch ceiling together with the entire repair, or separately, when it is convenient for you. Believe me, even the most ordinary suspended ceiling without drawings or photo printing can transform a room.
The main difficulty and peculiarity of repairs is that it is extremely labor-intensive, time-consuming and very expensive. When performing repairs, you may need not only the help of general workers, but also highly specialized specialists (electricians, plumbers, tilers and painters).
Therefore, if you cannot be completely confident in your abilities to perform work in a particular profile, it is better to immediately contact a highly qualified craftsman.
Where to start repairs
So, what should you do first – the floor or the walls? As a rule, after the owners have decided to carry out a major renovation, the owners immediately go to a large construction center and start everything that they think will be necessary, and this is the first and most important mistake. Repairs should begin with consultation with a competent specialist, as well as drawing up an estimate. To do this, you can invite the foreman to your house, discuss absolutely everything with him and discuss the intricacies of the upcoming repairs. Share with him your vision - how you see your apartment after the renovation, what the interior will be like, what design the housing will correspond to. Believe me, any successful renovation begins with clear planning.
You should follow and clearly control the sequence of all stages of repair work, and then you will be able to achieve the following:
- Spend minimal time on repairs.
- Save as much as possible without losing quality.
- Maximum quality work results.
Now let's talk about what should be included in the project.
What is included in the renovation project
The renovation project should include:
- Plan of the layout that will be obtained upon completion of the renovation.
- Schematic placement of all communications (sewage, water supply and electrical wiring).
- Layout of technological equipment (bathtub, washbasin, toilet, boiler, water meter, built-in furniture, air conditioning).
Without a project, situations may arise when there is no electricity supplied to the lamp, which is equipped with lamps, and the washbasin cannot be accommodated due to a strongly protruding pipe riser. The cost of fixing such stupid mistakes will be much more than the original cost of the project. You should not save on design, but on the contrary, if you follow a correctly designed project, you can even save money. The main thing is that everything is thought out in advance and the apartment is comfortable to live in after the renovation is completed.
We act according to the scheme
The movement of finishing the apartment should be carried out from top to bottom: ceiling → walls → floor. This way you won’t have to worry that the part of the repair that has already been completed will be spoiled or damaged. However, there are some amendments to this course of events.
Floors. If you intend to make a new floor screed, then your path will begin from the floor, and not from the ceiling. There are two ways:
Leveling the floor using cement mixture
Fill a self-leveling self-leveling floor
The first option is cheap and labor-intensive, the second is more expensive and simpler. If possible, use the second one. You will not regret. The self-leveling floor will dry in a couple of weeks.
If the screed will not be made, follow the above scheme.
Walls. For leveling you will need plaster. The number of layers applied depends on how smooth the walls are. In turn, the time spent on leveling depends on the number of layers of plaster.
The second method is drywall. Installs easily and quickly. It is usually puttied in two layers. The first is the starting one, the second is the finishing one. It is easy to install communications and cut holes in plasterboard structures. For example, under sockets. In addition, such walls will be perfectly smooth. The only disadvantage of a plasterboard block is that it takes up part of the area.
Ceiling. The principle is the same here. Either you putty or use drywall for leveling. Pros of gypsum:
it is very easy to install lighting (spotlights, LEDs);
- ideal surface;
- the ability to make figured ceilings.
Another point that stands out from the basic scheme of “sequence in repairing floor, walls, ceiling” is a suspended ceiling. This part is best left for last. You can design boxes for suspended ceilings initially, during rough work. But you will mount it at the end.
Is the dirty work done? Start cleaning.
After installing the door frames, proceed to painting and pasting. When the cosmetics are ready, we finish by assembling the baseboards, sockets and other decor.
Communications layout
Now you need to clearly think through what will be located where, and the main thing is not to forget anything! All necessary sockets, television, telephone, air conditioning, sound systems, internet. Also, don’t forget about heating, plumbing, and sewerage.
Important! Think carefully about all these points, because later it will be either very difficult or impossible to correct something.
How to decide on a color?
There are many different theories regarding which paints to use for certain spaces. At the same time, you decide for yourself which color scheme you feel best in.
For example, there are people who love their homes decorated in black, red and white. And for some, this combination has a negative effect, because it increases blood pressure and provokes the release of adrenaline.
The first question a designer asks his clients is: “What is your favorite color?” And if family members cannot come to a common opinion, the specialist tries to combine their favorite shades in a single combination and find compromises that suit the customers.
Disadvantages of this method and their elimination
Negative aspects of the technique:
- When installing a baguette, you need to create holes in the wall for fasteners. Wallpaper gets dirty. You can reduce the level of contamination by using a hammer drill with a vacuum cleaner function. It will not be possible to completely eliminate the problem, but partially removing the dust is possible;
- installation of PVC material requires heating the air in the room to 60 degrees Celsius above zero. The facing material may fall off. Often, this is typical after workers are in a hurry. According to the technology, the film is stretched with a heat gun after the wallpaper has dried. A week after pasting, the wallpaper becomes invulnerable to heat;
- The assembly of the ceiling frame is carried out according to the following scheme: after preparing the rough base, measurements of the structure are taken. It will take 7 days to produce the ceiling panel. This time is enough for the walls to dry. The main reason for peeling off the facing material: a violation of the technological process or the use of low-quality construction raw materials;
- the baguette on the ceiling will not affect the re-gluing of wallpaper. The cladding is carefully trimmed. First, along the perimeter of the room, the level at which the baguette was installed is marked. Starting from this line, the surface is pasted. Minor differences in height are eliminated with tape.
Minimizing disadvantages, influence of materials on choice
The accidents or shortcomings of both methods are partially or completely removable. It’s clearer with accidents: the work of unprofessionals, tired workers, the likelihood of troubles is many times higher.
Washable wallpaper is not afraid of dust. It is advisable to install fiberglass wallpaper, which is also supposed to be painted, before installing the stretch ceiling. Working with special hammer drills combined with vacuum cleaners (there are many of these now available) reduces the amount of dust. It only reduces it, they don’t suck up all the dust! You can protect the walls (or suspended ceiling) by covering them with pinned old newspapers, mounting film, or whatever you can find. True, this is additional trouble.
The range of wallpaper for walls is very diverse
If you are going to make suspended ceilings, you should not pull the rolls to the top: beat off the level of future moldings on the wall. We glue it up to it, there’s simply no need to go higher. Moreover, it is not particularly accurate, the tolerances are within the width of the selected decorative tape (plinth). When re-gluing in subsequent years, you will not have to pick out the paper from under the baguettes. Don't rush to stretch the fabric, let the wallpaper dry.
Do not point the heat gun at the papered walls!
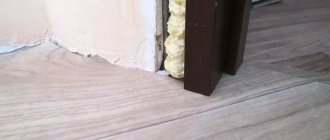
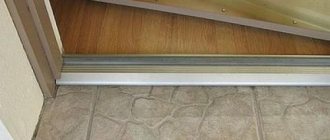
Installation of interior doors and skirting boards
The floor is there, the walls are there, all that remains is to install the doors and install the baseboards. After this, you can install kitchen and other furniture, and open champagne.
The sequence and list of works when renovating an apartment is described in detail in the table.
Happy renovation!
Continuation of preparation: furniture is moved, unnecessary elements are dismantled
An ideal option if, in order to carry out renovations, it is possible to completely empty the apartment of furniture and interior elements. But, most likely, it will have to be moved to one of the rooms so that it does not interfere with work. We lay it compactly and wrap it with stretch film. Renovation begins with other rooms. When at least one room is ready, the furniture is moved there, arranging it as the rooms are ready.
The next step is to dismantle the elements that need to be replaced. If the repair is cosmetic, remove the layer of old linoleum and remove the wallpaper. During a major renovation, you may have to remove interior doors, remove partitions, change the location of doors, create special niches in the walls, remove plumbing, etc. If you are not going to change the floor, but only update it, do not forget to cover it with film so as not to damage it.
Time to remove the old windows if you are going to install new ones. After installing the windows, do not remove the protective film from them. Let it remain during the repair and protect the glass from scratches, dirt, and dust that are inevitable during repairs. If redevelopment is planned, there is a desire to start from scratch, we demolish non-load-bearing partitions.
Dismantling
Once you have everything planned, it's time to dismantle. If you started cosmetic finishing, then everything is simpler. They tore off the old wallpaper and put up new ones. But we are not here to discuss wallpaper. Our plans are more global, which means:
—
We dismantle old floors;
— remove the tiles that have lost their luster;
— we demolish unnecessary partitions;
— moving doorways to new places;
— dismantling old window frames;
— we remove the painted baseboards to the side.
Now that you have gotten rid of everything unnecessary, you can move on to the next step of our plan “sequence in apartment renovation: floor, walls, ceiling.”
Special cases
It is impossible to cover the variety of existing materials with which modern repairs can be made. Do the floor and walls first? Where to start? In what sequence should processes be organized? Decisions on these issues often have to be made based on the specific situation. To avoid mistakes, always use a simple algorithm. When choosing between two finishing materials, first of all, use a durable one that is easy to clean. Next, work with more fragile or easily soiled ones. Here, as in medicine, the rule “Do no harm” prevails. With this in mind, you can easily organize the order of work during your home renovation.
Features of insulating bath walls
In this case, the insulation materials described above are also used. However, most often pressed or rolled basalt wool with a foil side is used (it costs more, but simplifies installation).
If we talk about the thickness of the thermal insulation layer, then you need to take into account the climate of the area where you live and how much time you plan to spend in the steam room. If cold weather prevails, and in winter the temperature drops significantly, then the thickness of the heat-insulating layer should be at least 100 mm. For mild and warm climates, 50 mm is sufficient. If you are not such an ardent lover of steaming and spend a short time in the steam room, then such a layer will be enough to maintain the desired microclimate. For longer bath procedures, it is worth laying out the insulation in a thicker layer (100 mm).