Sitting near a private house or cottage in the summer heat, you probably imagined how cool it would be to plunge into the cool water of your own pool. You probably immediately drove away the thought of its construction, but it persistently returned and literally haunted you on hot days. Maybe we shouldn't give up on such an excellent idea?
After all, you can build a simple pool with your own hands, investing a minimum of money in the construction. And in this we are happy to provide you with effective assistance by providing full information support. Here you will learn about the types of artificial reservoirs and the features of choosing a location for the bowl.
We have collected for you popular design options and technologies for their construction. The detailed description is supplemented with explanatory diagrams, step-by-step photo instructions and videos.
What you need for a pool
First, let’s define why and for whom the reservoir is being built. Exclusively for children, a small family or a large group holiday. Next, you need to understand what resources and systems you have for construction and how to apply them to the future pool.
It’s logical to set up a small mini-reservoir for children. This will be quite enough for children's joy and will not bring big losses to your pocket. In addition, such an object is easy to look after and clean.
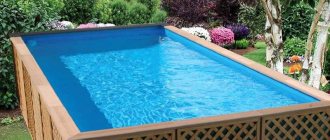
For a small pool intended for family use, a frame structure is perfect. It is easy to assemble, relatively cheap and meets all the necessary requirements to be called a full-fledged swimming pool.
For solid large pools, the use of concrete will be required. This is the most time-consuming option, but it will serve you much longer than the above options.
We are building a mini-pool
The mini-pool is only suitable for small children
To install a mini-pool in your yard with your own hands, you do not need construction tools or materials. An inflatable pool would be an ideal option for children. You should not buy expensive pools of this type with an eye to durability, because children are growing and in a couple of years they will need greater depth for comfortable swimming.
After purchasing, select a location to install the pool. It should be flat, without large branches and stumps. To prevent small twigs or small stones from piercing the bottom, lay a carpet or a special PVC lining on the ground before installation.
Even the smallest pebble under the bottom of an inflatable pool can damage the integrity of the tank, as it will create additional friction when the water moves.
After inflating the sides with air, fill the mini-pool with water from a garden hose or any convenient method. To keep the water warm, you can simply leave the pool in the open sun for a couple of hours. Additionally, to speed up heating and protect the water from dust, you can cover the surface with a dark film. It comes with some pools.
For such a pool we do not need a water supply, heating and filtration system. You can do all this with your own hands, and heat the water with the help of the sun.
We have analyzed the simplest option for children. The following will describe solutions that require time, financial expenditure and effort.
Installation of a swimming pool with a plastic bowl
This is a type of tank in which the bowl is already ready; we only need to install it correctly and connect all the necessary systems for full functioning.
The advantages of this option include short installation times and simplicity, since a semi-ready solution is purchased. The downside is that this is not the most financially profitable path.
It is highly not recommended to skimp on the bowl. In this case, it serves as a basis that must withstand water pressure, frost and be able to connect all the necessary systems.
Let's say we bought a bowl, the question remains: how to make a pool with your own hands in the yard. To fix the bowl, it is buried in the ground completely or halfway. To do this, a hole of the required depth is dug in the ground, water supply is supplied, and pipes for the filtration and heating system are installed, if their installation is planned.
The bottom of the hole must be covered with a layer of sand at least 20 cm thick. This is a kind of cushion to reduce the pressure of the bowl on the soil underneath.
The pool frame is only half dug in
Option for arranging a fully dug frame
Beginning of work
First you need to dig a pit. To do this, if you want a large pool, you will need special equipment, and the dimensions will need to be adjusted to pinpoint accuracy with a shovel. If your goal is a small bowl and to lose a couple of sizes, you can start digging a pit yourself, by hand. Keep in mind: the bottom should not be lumpy, and the walls should be perfectly smooth, but have a small angle (5 degrees is enough so that the earth does not fall off).
You need to understand: when you transfer the outline of the pool to the construction site, they need to be increased: on each side, as a rule, 60-80 centimeters are added. And add about 50 cm more to the desired depth - for the bottom plate and the thickness of the finishing material.
When the pit is ready, you need to lay a drain pipe: dig a pit, a trench for it and install it (and bring the drain pipe up).
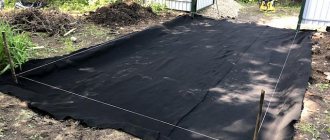
And then the installation of the “pillow” begins. A layer of sand and gravel is poured successively over the laid drain pipe, then compacted. Next is roll waterproofing in two layers (you shouldn’t skimp on it either). And all this must be done with a slope towards the drain pipe. Waterproofing can be “doubled” - laid not only on top of the “pillow”, but also on the ground.
Photo: remstroiblog.ru
Concrete pool
The most durable concrete tanks
A concrete pool is the most complex and time-consuming option, but it will last for many years if the construction was carried out correctly and the calculations were correct.
A concrete pool is a serious construction that requires calculations. We recommend that you read the article on our website:
- Phased construction of a concrete pool
The site also has a section about step-by-step self-construction of different types of swimming pools.
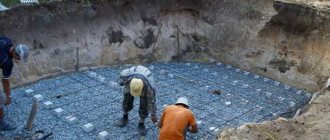
First you need to carry out calculations and make an approximate drawing. Next, you will need to dig a hole at a pre-selected construction site, add a layer of sand to the bottom, build formwork with reinforcement and fill the structure with mortar.
Photo The construction process at the stage before pouring concrete
Do not forget to place in the formwork all the necessary openings for the output and supply of pipes to the tank.
When the concrete has completely hardened, it will be possible to remove the formwork, fill the side edges of the bowl with sand and begin finishing the bowl with tiles and arranging all the necessary systems.
Overview of popular formats
The design of indoor pools can have different formats. In private construction, prefabricated and monolithic structures are especially in demand. The first option is convenient because each season the developer can install the structure in a new location. However, this requires additional effort. The monolithic capital pool has a stationary format. It is reliable and durable, so the place for its construction is chosen with special care.
Among the advantages of collapsible structures, it is worth highlighting the following aspects:
— low capital costs;
— ease of installation;
— large selection of tank shapes and sizes.
The greatest disadvantage is considered to be the fragility and unreliability of the structure and its short service life.
As for the advantages of stationary indoor pools, they include the following features:
- long service life;
— reliability;
- stability;
— the ability to build a tank of any shape and size.
The disadvantages of a stationary indoor pool are associated with the complexity of installation and the high cost of materials required for its construction.
Pool heating and filtration
To keep your pool water clean, you will need a non-stop water filtration system. The device that takes water from the pool is called a skimmer. It takes the top layer of water into the system, where most of the debris and contaminants are collected. Skimmers are floating, mounted and built-in.
Which type of skimmer you choose depends on the type of pool you have.
Built-in ones are usually installed in concrete pools. These are worth thinking about when planning the structure.
Built-in skimmer in the design
Mounted ones are more suitable for frame pools with a thin wall, onto which you can easily attach the mount.
Special fastenings are used for mounted skimmers
Floating skimmers are used in bodies of water with variable water levels, such as private lakes or small ponds. It is used extremely rarely in swimming pools, but perhaps it will be the best option in your case.
An example of using a floating water intake
The skimmer takes water, after which it enters the filter through pipes under pump pressure. The most effective, affordable and popular is cleaning through a sand filter. We have a separate article that describes step by step how to assemble a sand filter with your own hands.
After the filter, the water enters the heating system, and then clean and warm returns to the pool. To heat the pool yourself, you need to choose how the temperature will increase. There are simple and cheap systems that you can assemble with your own hands; there is also the option of purchasing an electric heater with complex internal heating systems.
On our website there is a separate article dedicated to pool heating systems, which describes each in a similar way:
8 ways to heat a pool at your dacha
General instructions on how to make a swimming pool in the courtyard of a private house with your own hands
The construction process began from the moment the family council decided that the pond on the site was much more important than fruits, vegetables or flowers. Like any business, creating a pool in the yard goes through three main stages:
- planning;
- selection, acquisition of materials;
- embodiment of the idea with your own hands or by invited workers.
1. In winter, while it is cold outside, there is little work on the site, there is time to work on the project. Determine the general idea of what the family needs:
- a swimming pool with a jacuzzi, hydromassage, and a barbecue area nearby for a festive getaway with friends;
- a practical lake with a counter-current, a springboard, and a water slide for active sports;
- a building of an unusual shape, causing delight and envy among all neighbors, for a romantic holiday in the fresh air.
Based on the general idea, the entire project is calculated. A convenient location in the yard is selected, taking into account the area and topography of the site. There should be no power lines nearby. The absence of trees around the pool is only beneficial - there will be less fallen leaves on the surface later.
Choose the type of structure: an outdoor outdoor pool for the warm season or a free-standing pavilion in the yard, designed for year-round use.
Think about how you can transform the disadvantages of the site into advantages. For example, turn the awkward space between the house and the fence into an excellent training path.
Remember: you cannot use the foundation of a building as the walls of a pool if this is not included in the design of the house. Walls designed for different temperature or water loads will react differently. Expansion and contraction will occur at different rates. This will lead to the formation of cracks at the junction points.
When constructing a swimming pool in close proximity to the house, the concrete bowl should be constructed as an independent structure, in no way connected with the foundation of the building.
In addition, the weight of a filled concrete container creates additional load on the ground, which can cause uneven subsidence of the building, which will lead to cracking of the foundation.
However, with a little bit of planning, a small backyard can be turned into a great relaxation area.
And if the house is located on a cliff, then the pool, as in the photo, will become a place of daily relaxation.
Decide how deep you will dig. If not all family members know how to swim, then you should not make a uniformly deep bowl. It is necessary to provide for a gradual lowering of the bottom or a children's area.
In the project, be sure to consider where the used water will be drained. The reservoir can be filled from a private well - this is free for now, but regularly draining large volumes of liquid into the sewer will be expensive. It is easier to provide a separate drainage well in the yard. Or, as experienced pool users recommend, periodically water the garden, provided that no aggressive chemicals are used for cleaning.
Particular attention should be paid to the type of water purification and circulation:
- skimmer;
- overflow.
Skimmer – characterized by a simple device and economical maintenance.
Overflow, as a rule, has a more interesting design - the water mirror is level with the sides, guarantees more effective cleaning, but is more expensive. It is used when many people swim in the pool every day.
By the way, experienced users recommend not to immediately skimp on the pump that will pump the liquid. Low-power models cannot cope with the load. Filters that use sand for cleaning are praised. In this case, the pump must work without interruption: it was turned on once in the spring, and then turned off only in late autumn. This way the filters do not silt up and work without failures.
Consider a relaxation area in the yard around the pool. What will it be: a terrace made of boards, stone slabs or a grass lawn.
During construction, the future recreation area can be used for storing soil, materials or for placing equipment.
2. After creating the project, materials for the construction and finishing of the bowl are selected and purchased. In order to save money, you cannot buy materials for interior spaces. Subsequently, this can lead to deformation of the structure and costly repairs. For the construction of a concrete bowl, only high-strength cement M350 is used. For wall finishing, specialized two-component materials with latex additives are selected, which allow the waterproofing or tile adhesive to expand and contract under the influence of temperature without losing strength or causing cracks. When choosing materials, it is better to consult with specialists. This will help avoid serious rework later.
3. When building a pool in the yard with your own hands, regardless of the type chosen, you should adhere to the points of the general instructions:
- Clear the selected area of the yard and mark it in accordance with the project.
- Dig a pit; compact the walls so that they do not crumble.
- Dig a drainage hole for drainage and bring the pipe there from the bottom.
- Level, compact the bottom of the pit or pour a concrete pad. Carry out waterproofing.
- Build walls.
- Carry out waterproofing and finishing with selected materials.
As shown in the video, even a woman can build a swimming pool near her house if she wants.