Even if there is a river or lake not far from your dacha, a frame or inflatable pool on the site will never be superfluous. Dive into cool water after a bath, refresh yourself after gardening, have fun water games with your children or grandchildren - in all situations, a pool will come in handy. And in order for it to last a long time, not tear, and keep its shape well, it is necessary to properly prepare the base area, level it and create a coating of one or several layers. It’s not difficult to do this with your own hands.
- 2 What materials can the platform be made from?
- 3 Options for the right sites for a frame or inflatable pool
3.1 A platform made of thick film or linoleum on sand
3.1.1 Video: how to prepare a sand platform for a frame pool
- 3.2.1 Video: how to make a pool deck from boards
- 3.3.1 Video: making a concrete pad for a frame pool
Introduction
Arranging a sauna pool is not the easiest task.
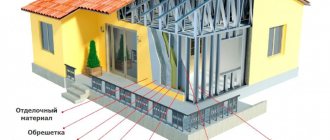
This is a labor-intensive task that requires not only physical but also financial investments. But all the difficulties that the master has to face will be completely justified, because a cool pool in which you can swim after a steam room is simply indescribable bliss. The peculiarity of the pool in the bathhouse is that short-term and sudden changes in temperature are very useful for the human body. This can significantly strengthen your immune system and improve your mood. But not everyone can afford a full-fledged swimming pool. This requires a sufficient amount of free space, so it is best if such an addition is planned during the construction phase. This can significantly save time and money. There are a huge number of bathhouse projects with swimming pools for every taste and budget. But they all have one important feature, namely high requirements for waterproofing and fire safety
Therefore, even at the planning stage, it is always recommended to pay special attention to the material from which the bathhouse will be built. Recently, experts are increasingly recommending laminated veneer lumber, as it has a huge number of advantages compared to other options.
Making the bottom
Experts advise laying two grids of steel reinforcement on the bottom, one on top of the other. When you purchase reinforcement, keep in mind: the diameter of the rods should be 10-14 mm, and the grating pitch should be 20 cm. Leave the gap between the gratings in the region of 10-15 cm, the bottom is filled with a layer of 20-25 cm to reliably protect the reinforcement from corrosion. As when pouring a concrete foundation, it is not recommended to weld the reinforcement - it is tied with wire. And in order to connect the reinforcing frame of the bottom with the frame of the walls of the pool bowl, you need to bend the ends of the “bottom” reinforcement onto the walls by about 10 cm.
And now you can start pouring: first fill the bottom, and maintain a slope towards the drain. Now you should wait a week until the concrete gains strength.
Photo: housedb.ru
Pool on the podium - why and how
Another option for the device is to create a rigid base protruding above the ground for an inflatable pool. Two simple examples: a monolithic concrete slab and a boardwalk on stilts or brick pedestals.
The higher you raise the pool, the higher the likelihood that your neighbors will become unwitting witnesses to your relaxation.
Of the special cases of high superstructures, it is worth mentioning separately the pool deck. It is assembled in a wide arc at the edge of the stationary base and rises to the level of the sides, thus the temporary pool acquires all the signs of a stationary one.
rmnt.ru
09.06.16
What tools and materials will be needed
If you plan to make a small podium around a round pool, you will need a minimum of materials:
- Pine boards at least a meter wide and 40-50 mm thick, on average at least 15-20 m.p. are required. for one runway span;
- Post beam 60x60 mm, the quantity is calculated based on the height of the pool bowl and the length of the podium path;
- Croaker and slats, diameter 50-60 mm. They will need to be used to make struts and struts in order for the wooden frame to be sufficiently rigid;
- Facing board, you will need 2-3 m2, you can use clapboard or board 10 cm wide.
To build a wooden frame you will need a standard carpenter's kit. Firstly, an electric pruning saw is a circular saw. You can use a jigsaw, but the amount of work is quite large, so it is better to use a circular saw. Secondly, you will need carpenter's corners, measuring tape and tape measure. If you plan to make a full-fledged podium around the entire pool bowl, you will need a laser level or level. Thirdly, you will need to stock up on a good cordless screwdriver and a set of batteries.
The construction process itself does not present any particular difficulties if you have at least a little experience in carpentry.
If you need to build a full-fledged stationary podium, then it is best to take the advice of experts; this is a complex matter and requires a foundation and flooring of joists. One of the options for constructing a wooden base for a pool is shown in the video:
Where and at what price can I order turnkey production?
Manufacturing should be ordered from construction organizations . It is recommended to contact officially registered companies that guarantee their work.
It is advisable to order the production of a platform if the size of the pool is large and the use of construction equipment and devices is required to complete all work. For example, sand compaction performed using a vibrating plate can only be performed efficiently by professionals.
The cost of work depends on the size and design of the base . On average, the cost can be calculated by the number of materials required - usually it is multiplied by 2 and the full amount is received for the construction of the site.
For example, if sand and other materials are required for 5 thousand rubles, then the estimated cost of the entire order will be somewhere in the region of 10 thousand. However, other options are possible if you have to carry out a large volume of excavation work with soil removal.
Supports
Consider the option of arranging concrete supports with a diameter of 12 inches each.
| Feet | Centimeters | Inches | Centimeters |
| 1 | 30,48 | 1 | 2,54 |
| 2 | 60,96 | 2 | 5,08 |
| 3 | 60,96 | 3 | 7,62 |
| 3,5 | 106,68 | 3,5 | 8,89 |
| 4 | 121,92 | 4 | 10,16 |
| 5 | 152,4 | 5 | 12,7 |
| 10 | 304,8 | 12,7 | 32,258 |
| 11 | 335,28 | 11 | 27,94 |
| 12 | 365,76 | 12 | 30,48 |
| 15 | 457,2 | 15 | 38,1 |
| 20 | 609,6 | 20 | 50,8 |
- According to the project, holes are dug of the appropriate diameter and a depth of about 4 feet.
- Afterwards, so-called “sleeves” made of roofing material secured with adhesive tape are inserted into these holes. They should protrude approximately 1 foot above the ground surface.
- Concrete is poured into these “sleeves”, and metal connectors are installed on top, to which wooden supports will be attached.
To avoid digging holes again, make a sketch with dimensions that will show the coordinates of each support. It’s better, of course, to do this on a site plan, especially if there are plants in the construction area or there are communications, then you won’t have to uproot a tree or repair the water supply.
Figure 2 shows the location of concrete supports (Footings), as well as their coordinates. If the support ends up on a water pipe, or if there is a tree growing nearby, simply move the support slightly to the side. It is better to calculate everything and draw it on paper rather than face unpleasant surprises during the construction process.
Figure 2. Location of supports
Having marked the location of the supports on the site, dig holes for them and concrete them. Don't forget to install post connectors into the wet concrete supports. After the concrete has hardened, secure the vertical supports in metal connectors. Use 4" x 4" cross-section posts for supports since the deck is less than 6 feet high.
Figure 3. Scheme of concrete supports
Step-by-step installation instructions
After choosing a place to install the pool, you need to mark the site.
For this purpose:
- pegs;
- roulette;
- laces.
The marking boundaries for the site should extend 0.5 m beyond the contours of the pool.
Taking into account the shape, the outlines of the base are determined:
- For a round product, a peg is driven into the soil and a rope is put on it. A can of paint is attached to the free end. Using the principle of a compass, a circle of the appropriate diameter is drawn.
- For an oval pool, two circles are drawn in the same way. The borders are then connected by parallel lines using threads.
- If the shape is a square or rectangle, you need to drive 4 pegs in the corners. Between them, threads are stretched at right angles - the sides of the platform.
Before laying the base, the area must be cleared of grass and debris, and then the soil must be compacted tightly.
Materials and tools
For installation you should prepare:
- sand (preferably river sand);
- gravel;
- water;
- cement (it is better to take frost-resistant brand F200);
- boards;
- construction trowel;
- reinforcement or solid reinforcing mesh;
- beacons made of metal profiles;
- level;
- construction mixer or concrete mixer.
A layer of geotextile can be laid at the bottom of the base. This material prevents the soil from mixing with the sand mound. Thus, the site will not sag during application.
If the pool bowl is large, it is more profitable to order a concrete machine to complete the process in one day, saving time and effort. When making the mixture yourself, you need to use cement and PGS - a mixture of pebbles with river sand.
Manufacturing process
Manufacturing stages:
After removing the top fertile layer of soil, do not throw it away. The earth will be useful for supporting the formwork in the future. Sand 10 cm high is poured onto the bottom of the site, compacted and filled with water. Get a high-density sand substrate
It is important that it is as even as possible. Gravel is poured onto the sand: the layer thickness is 5 cm. A sand and gravel cushion is created. Reinforcement or a ready-made reinforcing network is laid on top. Formwork is made along the contour - walls that limit the shape of the future concrete base
The optimal height is 10 cm. The outside of the wall should be pressed tightly with pieces of turf. Concrete is poured using a concrete mixer or mixer. The mixture should be homogeneous. It is necessary to achieve complete filling of the formwork. The platform is pierced with a metal stick to release air bubbles and increase the strength of the concrete. The surface is leveled using a construction trowel. Leave the platform until it hardens completely and remove the formwork; After hardening, the top layer is cleaned and sanded.
When installing a high concrete base, the unattractive walls of the site can be finished with natural stone.
What to put or lay on concrete?
The finished concrete site should be coated with special impregnations in order to:
- increasing durability;
- fortifications;
- preservation of appearance.
For this you can use:
- primer;
- plaster;
- waterproof paint coating.
You can cover the site:
- wooden flooring;
- polyethylene;
- a substrate, if it comes with the pool;
- linoleum;
- polyurethane insulation.
How to make the base?
Let's look at popular methods of making platforms for frame pools with photos.
Made from concrete
Concrete casting provides a durable and smooth surface. To fill you will need:
- sand-cement mixture (ready-made or made on site);
- clean sand or ASG;
- shovel, crowbar or pickaxe;
- geotextiles;
- reinforcing bar or mesh;
- vibrating plate or manual rammer;
- boards for assembling formwork;
- building level.
Procedure:
- Clearing the site of turf, removing the top layer of soil (15-20 cm).
- Leveling the surface, checking the horizontal position.
- Create a layer of sand embankment (about 20 cm) and carefully compact it.
- Laying geotextiles and assembling formwork.
- Manufacturing of reinforcement frame.
- Pouring concrete, removing bubbles.
- Casting is aged for 28 days.
The formwork is removed after 2 weeks, and further work is allowed no earlier than after 28 days. Read more in this article.
From paving slabs
A platform made of paving slabs differs from other types in the possibility of spot repairs and restoration of damaged planes and horizontal lines.
You will need to prepare the following tools and materials:
- shovel, crowbar;
- rubber hammer;
- grinder with diamond wheel;
- vibrating plate;
- clean sand;
- paving slabs;
- geotextiles.
The site is created as follows:
- Clearing the contoured area of turf, removing the top layer of soil (20 cm).
- Filling with a 20 cm layer of sand and thorough compaction with a vibrating plate.
- Checking plane and horizontal, laying geotextiles.
- Creation of a working sand layer of 5-10 cm, compaction and leveling.
- A border is installed along the perimeter (special stone, bricks in a vertical position, etc.).
- Laying tiles, horizontal alignment.
- The gaps between the individual elements are filled with sand.
- The entire surface is watered to compact all layers.
Some craftsmen prefer to lay paving stones on a layer of cement screed and connect the elements with mortar. This gives strength and additional rigidity, but makes it impossible to carry out spot repairs to the coating.
Made of wood
Using wood to create a deck for a framed pool is a risky idea. You should not count on the long-term service of such a structure, so this option can only be used as a temporary measure.
You need to prepare:
- edged boards 40-50 mm thick;
- power saw, hacksaw;
- electric plane;
- hammer, nails, screws;
- paint and brushes (roller);
- tape measure, ruler;
- shovel;
- tamping;
- geotextiles.
Assembling the wooden platform:
- A shield is drawn up on which the shape of the pool is outlined.
- The boards are cut along the marked lines, numbered, and the surface is treated (planed).
- The board is assembled and connected with nails or screws in two with the transverse direction of laying.
- The panel is painted in two layers (minimum) with intermediate drying.
- 20 cm of sand is poured onto the prepared area.
- The embankment is compacted and covered with geotextile.
- Lay the wooden platform and check the horizontal position.
It is not recommended to install the pool directly on a wooden board; you should lay a layer of geotextile or other material. This article will tell you more.
From penoplex
Tools and materials:
- fine-tooth hacksaw;
- ruler, tape measure, square;
- adhesive tape (construction tape);
- sand, geotextiles;
- vibrating plate.
Installation order:
- Marking the site, removing the top layers of soil to a depth of 20 cm.
- Leveling the surface, laying geotextiles and creating a 20 cm sand embankment.
- Compacting sand and carefully leveling its surface.
- Cutting and laying penoplex, connecting joints along the entire length with tape.
- Laying the top layer of polymer material.
When laying penoplex, it is necessary to ensure a tight connection of all parts of the canvas. Read more here.
From foam plastic
The foam platform is made according to the same scheme as the version with penoplex. Required tools:
- small hacksaw, ruler, square;
- construction tape;
- materials for creating a sublayer (sand, ASG, etc.);
- geotextiles.
Installation order:
- A layer of geotextile is placed on the prepared surface of the pit, 20 cm deep.
- Pour sand in a layer 20 cm thick and compact it until it becomes dense.
- Lay cut pieces of polystyrene foam and fill the entire base area.
- The seams between the individual pieces are connected with tape.
- A cutoff made of elastic sheet material must be laid on top of the foam.
It must be borne in mind that polystyrene foam is very popular with garden rodents, who like to make tunnels and nests in it. As a result, the material loses strength and sags under the weight of the pool.
From KDP
WPC, or wood-polymer composite, is a material with high performance properties. It is resistant to moisture and is able to maintain its shape in difficult conditions. A WPC platform is created in the same way as a wooden base.
You will need the following accessories:
- power saw, jigsaw;
- WPC boards;
- tools for measuring length and level;
- shovel, sand, geotextiles.
The site is assembled in stages:
- Preparation, removal of the fertile soil layer, leveling the base.
- Laying a sand cushion, compacting and leveling horizontally.
- Cutting WPC boards to length and assembling a two-layer panel.
- Laying the shield on the prepared surface, checking the horizontal position.
The shield is assembled from two layers of boards, which are laid in a mutually perpendicular direction.
From pallets
A platform made of pallets can be created for relatively small pools, where the size of the bowl does not exceed 4-5 m. This is due to the low load-bearing capacity of the wood.
For production you will need:
- required number of pallets;
- fasteners (nails or screws);
- tools for preparing the base (shovel, building level).
Assembly order:
- Site preparation, turf removal, surface leveling.
- Laying geotextiles to isolate the site from the ground.
- Laying pallets in one or two layers and connecting them to each other.
- Laying the top covering (geotextile, foamed polyethylene, etc.).
The use of pallets is only suitable as a temporary measure and is not intended to last. It is difficult to cover them with a protective layer, so the material quickly begins to fail.
From sand
A sand pad is a compacted layer of backfill that is made on many foundations as an intermediate element.
To make it you will need:
- clean river sand (sometimes ASG is used);
- building level;
- tamper (best vibrating plate).
The procedure for creating an embankment:
- Site preparation - removal of plants, cleaning of the top fertile layer.
- Leveling the surface, removing plant roots and large stones.
- Laying a layer of sand about 20 cm thick.
- Thorough compaction using a vibrating plate.
Tamping must be done with the utmost care. Otherwise there will be no point in the whole procedure. It is not for nothing that some manufacturers directly indicate in their instructions that it is prohibited to level the base with sand, since there is no confidence in the correct progress of the work.
If there is no vibrating plate, it is better to lay the sand in layers, 5 cm each, and compact them manually . This will not give maximum density, but it is much more difficult to compact a thick layer by hand at once.
A criterion for density can be considered a passage along the surface - if no traces remain, the compaction is good. After completing the work, the surface is spilled with water to make the result more durable.
Made from polystyrene foam
Expanded polystyrene is the general name for a group of materials consisting of different types of foam and penoplex. The technique of creating a platform from them was discussed above, so there is no point in repeating it.
Read about making polystyrene foam backing here.
From linoleum
Laying linoleum is one of the options for creating a site with a minimum of investment and labor. You will need:
- linoleum;
- tools for removing topsoil;
- knife, scissors or other cutting utensils.
Work order:
- The turf is removed from the surface.
- Level the site, ensuring a flat and horizontal plane.
- Lay linoleum.
This option is used if there is no need to create a multi-layer support platform. As a rule, it is used in areas with an initially prepared plane, where there is no need to insure against changes in surface quality.
From film
Laying film is a procedure completely similar to using linoleum , the only difference is in the material. It is inappropriate to consider it separately.
From geotextile
Geotextile is a non-woven material that is used as a layer for cutting off soil from upper embankments and screeds. Sometimes it is used as an independent coating to separate various objects from contact with the ground. Geotextiles are laid on a prepared base.
You will need:
- shovel;
- measuring tool;
- geotextiles.
Installation order:
- The turf layer is removed.
- The surface is leveled, horizontal and plane are checked.
- A layer of geotextile is laid.
Sometimes a sand cushion is first created if the soil is unstable and prone to movement.
Read about how to level a platform for a frame pool here, and about making a base from various materials here.
Maintenance and care
The maintenance procedure requires access to the site. This is problematic if a frame pool is installed on it. Typically, maintenance is carried out in the spring, before installing the structure.
However, if signs of plane disturbance, visually observed distortions or subsidence appear, the water is drained, the structure is removed to the side and the site is restored. Methods are used depending on the material and structure of the base.
If the paving slabs have sagged, lift the problematic elements and add sand. Damaged polystyrene foam is replaced with another material, etc.
What should not be used as a base?
Do not use fabrics made from natural materials that can absorb moisture and rot. Such substrates not only cannot fulfill their tasks, but also have a negative effect on the material of the bowl and destroy the platform.
These include:
- natural wood;
- tarpaulin;
- organic types of thermal insulation (ecowool, cellulose, etc.).
In addition, it is not recommended to use thermal insulation made from granulated polystyrene foam (foam) . It has a good set of working qualities, is resistant to moisture, and retains the heat of water well.
However, polystyrene foam usually becomes a haven for mice and other garden rodents. They make passages in it and build nests, which is why the pool sooner or later sags.
What can a platform be built from?
At first glance, it is easiest to build a podium from brick and concrete; in practice, such a design turns out to be too complex and requires a solid foundation and backfilling of the soil cushion.
Important! If the steps of the ladder can somehow be built next to the bowl of the reservoir at minimal cost, then it is impossible to assemble a path parallel to the upper edge of the pool without special brick racks and a reliable foundation. The result will be a monumental structure that will be more of a nuisance at the dacha than a delight with its presence.
It is best to make a frame from a wooden beam
A small swimming pond is usually assembled during the summer season, after which the pool is disassembled and transferred to storage. The wooden parts of the podium can be made stationary or also collapsible.
You can make a pool deck on racks made of pipes, metal or asbestos-cement. Such a structure will be much more practical than a concrete one, but it will still be quite difficult to make it collapsible. In addition, under such racks it will be necessary to pour pillows and form installation sleeves. All this is quite expensive and not very practical.
Pipe base will support any size deck
The easiest way to build a frame pool podium is from wood. Any lumber available at the dacha will be used - scraps of timber, remnants of slatted cladding, lining and even pallets. The latter are considered to be the most promising material; making a podium from pallets will not be difficult, even without disassembling them into planks.
Requirements for a swimming pool site
To choose the right location, think in advance about how the pump and lighting equipment will be connected, and where the drain will be located. The requirements that we list must be observed, including for frame pools.
- The place should be level, without changes in height, slopes, or potholes. This is necessary for uniform distribution of water and durability of the structure. The maximum deviation is 2-5 mm per square meter.
- Small stones, driftwood below, construction waste, and remnants of the root system (it quickly grows again) are not allowed.
- The soil at the site where the structure is installed must be compacted tightly. Preferably with gravel.
- It is better to place the platform or pit at a sufficient distance from the house and other buildings so that in the event of damage to the system, the foundation will not be flooded.
- Do not place the base for the bowl next to trees or bushes. The water will become polluted faster.
- The place under the destroyed building is not suitable for the podium. There may be cavities left in it, which will contribute to rapid destruction.
- Also, do not use foundations intended for other objects. It has different characteristics and this will affect the stability of the tank.
- The soil should not be loose or creeping; river cliffs and places near a railway or highway are not suitable.
Let's summarize
When choosing a site, it is important that it is level, cleared of all kinds of debris and plants. It is advisable that the soil be compacted, outbuildings and residential buildings, wires, trees, and roads should be far away. It is better to build it in a sunny or half-shaded place that does not block the passage for people
Instagram @ideiipodelkidliadachi
Instagram @dnevnikmaikla
Along the perimeter, the platform should be larger than the tank itself. So that the water that splashes out of it does not form a puddle. We'll tell you what you can use to make a platform or podium for a swimming pool at your dacha with your own hands.
Base materials
The tank can be installed on ground covered with film or sand drainage (SGD). But such a foundation will not be reliable. It would be better to strengthen it. Here's how you can do it.
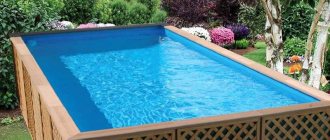
- Concrete or sand-cement mixture. Durable, moisture-resistant screed does not dry out over time. It is easy to obtain a smooth surface of any shape. Suitable for both removable and stationary pit pools. An excellent option for large areas.
- Boards. Easier to handle material. It’s also easy to get a flat area, but without maintenance, boards can dry out, swell, and rot.
- Decking (terrace board, garden parquet). Wood-polymer modules that do not require special processing. Decking is not afraid of rain and snow - it will not dry out or rot. Laying garden parquet can be difficult; it can fade in the sun or float in the heat.
The photo shows options for different platforms.
Instagram @khayakdolf
Instagram @gvk2008
Instagram @vintovayasvaya
So, the place and materials have been chosen. Now you need to prepare the area.
steps
The next step in building a wooden deck is to install the frame for the steps. The basis is the stringers, which are located at a distance of 16 inches from each other.
Scheme of stringers
To make them, use a board with a cross section of 2x10. In order for all the steps to be the same in length and height, you first need to make a pattern for one step, and then sequentially mark the steps on the blank for the stringer.
Stair stringer is a sawtooth-shaped wooden board or beam with rectangular teeth
There are, of course, non-standard sizes of steps, but most often they are made within the limits given above.
At the bottom, all stringers are connected by one board for stability of the structure. Figure 7 shows the frame of the terrace and steps.
Figure 7. Frame of the terrace and future steps
POOL WITH YOUR OWN HANDS
Next to the bathhouse, I dug a hole of the required diameter, its bottom was made at a slight slope towards the center (photo 1) like a funnel, so that when pumping water from the pool, the pump could be installed in the center.
EVERYTHING YOU NEED FOR THIS ARTICLE IS HERE >>>
The sandy bottom was covered with foam plastic (polystyrene), then polyurethane foam slabs were laid on it. The latter were connected to each other with tape (photo 2) on a fabric basis. Then covered it with geotextile.
From painted metal sub-wood (bought at the building materials market) I assembled the edge of the pool. Then I covered the bottom with penofol so that its edges slightly overlapped the wall of the pool (photo 3). The result was a soft bottom, which is very comfortable when swimming.
I attached a plastic insert around the perimeter and filled the pool with water from the well (photo 4)
Why is the device needed?
If the pool bowl is installed on a slope or fold, the frame will begin to experience uneven loads - one part of it will work in compression, the other in tension.
Since the structure is collapsible and connected with a limited degree of rigidity, multidirectional loads will cause destruction of the frame and leakage of water into the area.
Another reason for creation is plants, the roots of fruit trees . There are aggressive species that can grow through the bottom of the bowl and destroy it. To prevent contact between the canvas and plants, artificially created platforms are used to raise the bowl above the ground level and ensure its safety.
There is another type of platform that forms a platform at the level of the upper cut of the bowl. In addition to the supporting plane, they provide convenient and safe entry and exit from the water. This design allows you to strengthen the frame from the outside and protect the sides of the pool from any loads.
Requirements for a swimming pool site
To choose the right location, think in advance about how the pump and lighting equipment will be connected, and where the drain will be located. The requirements that we list must be observed, including for frame pools.
- The place should be level, without changes in height, slopes, or potholes. This is necessary for uniform distribution of water and durability of the structure. The maximum deviation is 2-5 mm per square meter.
- Small stones, driftwood below, construction waste, and remnants of the root system (it quickly grows again) are not allowed.
- The soil at the site where the structure is installed must be compacted tightly. Preferably with gravel.
- It is better to place the platform or pit at a sufficient distance from the house and other buildings so that in the event of damage to the system, the foundation will not be flooded.
- Do not place the base for the bowl next to trees or bushes. The water will become polluted faster.
- The place under the destroyed building is not suitable for the podium. There may be cavities left in it, which will contribute to rapid destruction.
- Also, do not use foundations intended for other objects. It has different characteristics and this will affect the stability of the tank.
- The soil should not be loose or creeping; river cliffs and places near a railway or highway are not suitable.
Better
Along the perimeter, the platform should be larger than the tank itself. So that the water that splashes out of it does not form a puddle. We'll tell you what you can use to make a platform or podium for a swimming pool at your dacha with your own hands.
What criteria must the substrate meet?
Under the base of the inflatable pool you need to place a material that meets a number of requirements:
- the surface of the substrate must be durable and withstand heavy loads;
- To avoid punctures, the backing material is laid in an even layer, having first removed tree roots, household and construction waste from the site.
It is not recommended to install pools under trees or near bushes. This will make it easier to care for the structure, since fruits, branches and leaves will not get into the water.
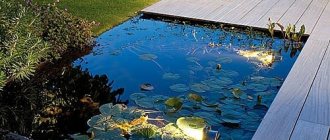
Pool design on a podium
Pools can be built-in or free-standing. The latter option has a staircase for entry. The pools on the podium look impressive. They fit perfectly into the landscape design or interior of the room. The bowl is built into a podium, which is decorated with mosaics, ceramic tiles, marble or natural stone. The standard set of equipment for swimming pools with hydromassage function includes:
- frame;
- overflow grate;
- piping;
- nozzles;
- overflow tank;
- pump;
- filtration, heating and disinfection system.
The bowl is usually made of acrylic. Depending on the model, a certain number of nozzles of different sizes are placed. An integral part of the design of swimming pools are filters for water purification; the frequency of its replacement depends on their quality. The presence of an ozone generator improves the quality of the liquid by an order of magnitude. In hydromassage pools, there may be an option for air massage, aromatherapy and countercurrent.
Alternative
Other types of heat insulators are recommended that can perform the same functions:
- Styrofoam. It crumbles and requires laying a hard sheet layer (plywood or chipboard) on top, but otherwise the material can serve as a base for a pool.
- Izolon. This is foamed polyethylene. Rigid varieties with high density differ little in their qualities from penoplex.
- Technoplex, Stirex, Extrol are types of polymer boards whose parameters are similar to penoplex.
- Arbolit. A mixture of wood chips and cement mortar. It has high strength, but is not resistant to water.
- Foam glass. This material retains heat well and is highly durable. However, it is expensive and rarely found on sale.
All materials have their own specific characteristics, so you need to choose carefully, taking into account all the features and factors.
Why is it better to use frame containers if the soil is unstable?
The main positive side of frame tanks is the possibility of their independent construction. How to make a base for a frame pool and a podium for a pool with your own hands? Quite simple - use separate panels and high-quality waterproofing. It is necessary to tightly tighten the wall and floor elements so that the frame can withstand high internal pressure.
But it’s faster and more reliable to buy a ready-made “constructor set”, which is based on steel elements. This design is reminiscent of load-bearing walls of buildings. The inside of the tank is covered with a heavy-duty film with an additional layer for water disinfection. This pool:
- fits into any design;
- folds quickly;
- acceptable price;
- meets the main needs of buyers;
- works well;
- the water circulation system is so simple that anyone can handle it - just drain the water with a hose;
- The bottom is cleaned using a conventional pump or vacuum cleaner.
The bottom of the pool is cleaned using a special vacuum cleaner.
The stand with the pool remains outside in the winter only in cases where the elements of the tank are made of frost-resistant materials. But such designs are expensive.
High maintenance costs and difficulty in maintaining are the main reasons to choose a smaller tank. It’s better to do everything for the pool yourself.
What can be put under the frame for different forms of relief?
The condition of the site depends on the materials used in its manufacture. Using a substrate you can compensate for some surface imperfections.
Flat land
What to lay under a beautiful swimming pool? On a flat area, a regular underlay , which can be bought in a retail chain, is sufficient.
It consists of several layers of polyethylene foam, sometimes with an additional reflective layer.
If the surface of the platform is insulated, you can use any film (polyethylene or polypropylene, PVC) to separate the insulation from the material of the bottom of the bowl.
Uneven
If the terrain of the site is uneven, the site will have to be made multilayer . You will need to lay a sand cushion, which is carefully compacted.
Sometimes, on moving and unstable soils, a podium is made around the bowl. An air gap remains between the ground surface and the supporting structure, allowing contact with an unstable surface to be cut off.
Sometimes ASG is used instead of sand if the soil is too loose. Additional layers of cutoff (geotextile or polyethylene) are laid on top of the sand cushion, a concrete screed is poured, or a piece coating is laid.
Economy option: swimming pool from a banner
If you need an express option for a pool at minimal cost, you can get by with a thick film. For example, an old banner. The fabric used for them is thick, and you can buy an old one at an agency for mere pennies. If you need a pool in your garden, this is exactly the material: the costs are minimal.
So, armed with a banner, we dig a pit, which is significantly smaller in size than the canvas.
We lay out the banner in the pit
We lay the film in the dug pit and straighten it. For testing, a small pit was dug in case it wasn’t to his liking. Since the banners were old, after all, they laid two. They also tried to straighten the second one.
The second banner was laid on top
To prevent the edges of the film from being blown away by the wind, they were pressed down with bricks and a hose was thrown in to collect water.
They threw a hose
While the water was being collected, a little earth was poured around the “bowl” under the film, forming sides. They were lined with bricks.
While water was being collected, the edges were pressed with bricks
We left the “pool” to bask in the sun. Three hours later the tests were carried out. I liked the result. It was decided to expand the “swimming” part.
Testing a pool at the dacha
This, of course, is not a great option, but you can freshen up. It took 2 hours for “construction”. The main thing is to dig a pit. And what happens next is a matter of several tens of minutes. The photo below shows the same idea implemented on a larger scale. We bought the film for swimming pools and soldered two pieces together to create a more voluminous “sea”.
Larger film pool
Here, by the way, are several country pools made from scrap materials: an excavator bucket and a huge tire.
A long-lasting pool at the dacha is easy))
Gorgeous!
Choose your location wisely
After choosing the type of pool, we begin to take a closer look at our site and choose a place for the future home pond. Selection criteria are suitable for any type of frame pool:
- Proximity to water supply.
- Possibility of draining water through communications or into the drainage compartment.
- Comparative distance from the house and remaining buildings.
- Comparative distance from the fence.
- Sunny side of the yard.
- A flat surface of the yard area or the ability to level it.
- A convenient location for you so that it does not interfere with movement around the yard and does not block the path to plantings, a summer kitchen, etc.
- Possibility to arrange the area around the pool, making a kind of recreation area.
The choice of location should also have an area 20 cm larger than the size of the pool base. If there is no such free space, then consider either installing a smaller pool, or freeing up your area for the selected large frame pool.
When should you choose it?
A concrete platform should be chosen in the following cases:
- The site is located in a swampy area.
- It is planned to install a large-volume frame pool - from 10 thousand liters.
- The site has loose soil and excessive seasonal soil heaving.
- The pool has a height of 80 cm (on a soft sandy area the walls may become deformed).
If the frame structure is supplied with a ladder, its legs will sink into soft ground, which will damage the bottom of the bowl. With concrete this problem is eliminated.
How to prepare the site for installing the bowl?
The base for an inflatable pool is prepared as follows:
- We choose a place to install the structure. To do this, you need to make a plan of the site, allocate an area for recreation and children's games, and determine the most convenient place for the pool.
- We measure the area of the inflatable pool in working condition and outline the boundaries of the substrate area. For comfortable use of an inflatable pond, it is recommended to add at least 50 cm to the pool area. Large designs require an increase in the substrate relative to the diameter of the pool bottom by 1 m.
- We determine the presence of an angle of inclination.
To do this, you will need to drive a peg into the expected location of the center of the pool and tie the simplest building level to it (this can be done with a rope or tape). Having carefully examined the area, we find its lowest point, which will be a guideline when measuring the slope. Now you need to move the measuring structure in a circle. If a slope is detected, it is necessary to remove excess soil and level the surface. It is not recommended to add soil to low areas. Water has significant weight, so over time, the place where the bedding was made may sag. Only minor holes can be filled (by carefully compacting them). - We clear the site. If there is no desire or need to remove the soil layer, then the inflatable pool is installed on the grass. Before this, you need to remove branches, sticks (including small ones), stones, dry growth, and roots protruding from the ground.
- We lay the substrate. The substrate finally levels and strengthens the area, prevents the soil from being washed away by splashing water, and fixes the surface.
Pros and cons of concrete for site construction
Advantages of a concrete pool platform:
high strength and reliability;- durability of service provided that high-quality materials are used and manufacturing technology is followed;
- resistance to high humidity and temperature changes;
- wear resistance;
- grass does not grow on the concrete surface;
- easy to clean - sweep and wash;
- environmental Safety;
- ease of work and the possibility of self-installation;
- affordable cost, no need to use expensive tools.
Flaws:
- concrete becomes dusty if it is not covered with finishing materials;
- risk of coating deformation in severe frosts;
- hardening and hardening of concrete will require at least 20 days;
- not very aesthetically pleasing;
- If cracks appear, it cannot be repaired; the layer will have to be completely replaced.
How the foundation is constructed
Site preparation
After the location for installing the bowl has been selected, the area is marked out where the surface layer of soil overgrown with grass (turf) will be removed. To do this, use pegs, laces, a tape measure and a special can of paint for marking lawns. The boundaries of the prepared area should extend approximately half a meter beyond the contours of the pool bowl.
A damper pad made of polystyrene sheets eliminates the deformation of the base due to thermal expansion of the pool tank. Source housedb.ru
Depending on its shape, several methods are used to determine the boundary of the base:
- for round ones, a peg is driven into the ground (in the planned center of the structure), and a cord is put on it in a loop. A paint cylinder is tied to the second end of the thread, then a circle of the required diameter is drawn using a compass;
- in the form of a capsule, two circles are drawn in a similar way, which are connected by two parallel tangents (two threads are pulled);
- in the shape of an ellipse, three circles are outlined, which are then joined by curves “by eye”, drawn using a coloring aerosol;
- for square and rectangular ones, 4 pegs are driven in between which 4 threads are pulled at right angles for intersecting sides. Right angles are formed either using a theodolite (a geodetic instrument) or using strings by calculating the sides of a right triangle (hypotenuse and legs).
When you don't have the necessary tool at hand to mark the boundaries of the base of a square pool, you can use the Egyptian triangle rule. In correctly set angles, the hypotenuse will be equal to 5 m. Source bankfs.ru
The turf within the outlined boundaries is removed using a sharp bayonet shovel, which is stuck into a full bayonet. This is a physically difficult, but high-quality and effective method. It leaves a fairly smooth surface. The turf itself can be moved to another place and used to form lawns. Additionally, to prevent the grass from germinating again, the soil is treated with biological products.
Base structure
After preparing a certain area of the site for arranging the foundation for a frame pool, the formation of a sand and gravel hard and even cushion begins, it is carried out according to the following algorithm:
- A dry mixture is prepared from a sand-gravel mixture and cement (grade 300) in a ratio of 10:1. An alternative to cement can be friable light clay, and the ratio of the components must be changed to 10:1.5;
- the mixture is poured onto the surface in an even layer of 4-5 cm, trampled down and leveled using a strip to which a level is attached. If somewhere there is not enough mixture to form a flat surface, add it, the excess is removed with a shovel;
The area for the pool made of compacted sand is leveled Source pinterest.com
- a layer of construction sand 8-15 cm thick is poured onto the leveled layer of ASG, it is also leveled and compacted;
- A damper pad is placed on top of the sand; it consists of polystyrene sheets. It is needed to prevent deformation of the sand and gravel cushion due to thermal expansion of the water container under the influence of the sun or hot water;
- the resulting multilayer “pie” is covered with a dense film (usually included in the frame container), its area should be larger than the area of the prepared base, the boundaries of the film should protrude beyond the boundaries of the site by about 1 meter. This is the final operation, after which you can begin installing the pool.
What it is?
To install the bowl, choose a flat place, without folds or slope .
However, you cannot simply place the structure on the ground. The layer of turf under the bowl will begin to rot and sag, creating the conditions for the pool to collapse.
Therefore, before installing the pool, it is necessary to create a flat and rigid platform, ready to receive heavy loads.
As a rule, platforms for small bowls are not complex . Inside the perimeter, the turf is removed and the surface is leveled. The requirements for sites for large swimming pools are much stricter. The volume of water in them can reach 15-20 m3, creating large loads on the frame.
Platforms for such structures are made multi-layered, capable of not only providing strong support, but also retaining the thermal energy of water. Sometimes a platform is made in the form of a podium, cutting off the contact of the bottom of the bowl with the cold soil. This method is used in areas where significant frost heaving of the soil is observed.
Do-it-yourself concrete platform for a swimming pool at the dacha
Making a foundation pit
For work, frost- and water-resistant concrete of grade M100 or M300 is used. If you prepare the mixture yourself, take coarse sand, crushed stone, cement and additives to increase water resistance. The latter are sold ready-made. Conduct all communications in advance.
- Lay two layers of roofing material overlapping on a sand or sand-gravel cushion.
- Seal the joints with mastic or sealant.
- Lay another sheet of roofing material on top.
- Cover the joints again with mastic or sealant.
- Lay the reinforcement on the bricks so that you get a grid with 20x20 cm cells. Bend the ends of the rods onto the walls.
- Start pouring the mixture. The recommended layer thickness above the mesh is five centimeters.
- Level the mixture and pierce it in several places with a sharp stick so that there are no air bubbles left inside.
- Cover the bottom with film or spray it every day to prevent the concrete from cracking as it dries.
- When the bottom hardens, install the formwork on the walls. You can build it from plywood.
- Make a reinforcing mesh at a distance of 5 cm from the formwork. Tie the new rods to the ones that are bent at the bottom.
- Secure the mesh with diagonal slats.
- Pour the concrete.
- When it dries, plaster the surface.
Check if the waterproofing is done well. Fill with water, mark its level and leave for two weeks. Taking into account natural evaporation, no more than 2 cm should go away. If all is well, you can begin finishing. This is also additional waterproofing. Instead of roofing felt, you can use geotextile fabric, thick film, or polypropylene.
Instagram @ekskavatorpogruzchikizhevsk
Instagram @oazis_ul
Instagram @oazis_ul
Making a podium
For work it is recommended to use concrete M100 or M300. Hydrophobic additives, cement, crushed stone and coarse sand are added to the mixture, made independently.
- Lay overlapping sheets of geotextile, film or roofing felt on a sand or sand-gravel bed.
- Seal the joints with mastic or sealant.
- Place reinforcing mesh on the bricks with a cell size of 20*20 cm.
- Make the formwork the desired height.
- Pour concrete or cement-sand mixture (1:3) and level it.
- Pierce it in several places with a sharp stick so that there are no air bubbles left inside.
- When the mixture sets, remove the formwork and wait until it dries completely.
- Cover the surface with plaster, primer and, if desired, waterproof paint and tiles.
Instagram @_natashik_1804
Instagram @konakovokolodec
Instagram @svetlanaelshankina
Instagram @_natashik_1804
Problems and difficulties during creation
When building a concrete foundation yourself, it is important to pay attention to the following points and tips:
Keep in mind that concrete tends to strongly compress and expand with temperature changes.
This problem is solved this way: the solution must be poured 2 cm below the top line of the formwork.- The mixture must be poured at once or in parts.
The second option is undesirable, as it can lead to defects. If there is no assistant nearby, you will have to break the site into parts - sectors, and carefully fill them one by one. - The problem of uneven drying of concrete can be solved by pouring a small amount of water on the surface.
- If after pouring the mixture it rains immediately, the solution will wash away.
- If the site is being built during the cold season, after pouring it should be covered with film until the concrete hardens to protect it from frost and precipitation.
- The base should not be installed adjacent to other structures. Since concrete can expand, neighboring buildings may be damaged.
- When arranging a large site, deformation gaps are necessary to prevent expansion and contraction of the concrete pour.
- While the mixture is drying, do not touch it with your hands, step on it, or drop anything on the surface, so as not to leave marks.