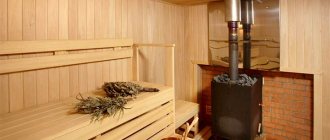
“The soul of any Russian bathhouse is a broom, and the heart is a stove!”
Hello lovers of hot steam and ordinary inquisitive readers!
On this Spring holiday, first of all I want to congratulate beautiful women! Let all your dreams turn into reality! And remember that true happiness is... (quote at the end of the article).
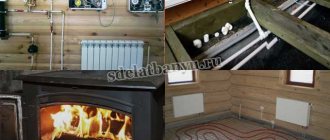
Today we’ll talk about how to line a metal stove with bricks in a bathhouse. Of course, an iron stove has its advantages, the main one (and perhaps the only one) is fast heating. However, this is not such a virtue, but quite the opposite. For those who don't understand, I'll explain:
The first disadvantage of an iron sauna stove is its low inertia. It heats up quickly and cools down even faster. This leads to increased fuel consumption and worries about replenishing them.
The second disadvantage is uneven thermal comfort. You go into a steam room somewhere in the country, and there is scorching heat from the stove, you sit on a bench, your head is hot, and a chill flows down your legs from the dressing room. This is similar to the feeling created by a car heater turned on in a frozen car... Your face already feels warm, but your feet are still frozen at the pedals.
The third drawback is the danger of fire (since the walls of the “iron heart” have a temperature an order of magnitude higher than brick ones), and the consequences of getting a burn from hot metal with a temperature of several hundred degrees are much more serious than from those lined with brick.
The red-hot walls of a steel furnace “work” in the short-wave spectrum of infrared radiation, which leads to increased “burning out” of oxygen. The result is headaches, increased blood pressure and, instead of vigor, lethargy.
And lastly, an unlined stove burns out faster, and sometimes the appearance is rough. So, 7 main points that should be taken into account when doing this creativity...
Why is it necessary to line the stove in the steam room with bricks?
If you were still in doubt up to this point, check out this list:
- The metal structure heats up very quickly, which does not allow the body to adapt to the high temperature.
- A metal stove cools down as quickly as it heats up. You have to constantly monitor the temperature by adding logs, which is not very economical.
- The material lined with brick will not heat and dry the air so quickly, which means the atmosphere in the steam room will be more comfortable.
- There is a high probability of being burned on the walls of a metal structure. People sitting next to the stove will not feel comfortable.
All these small shortcomings can be easily eliminated with the help of cladding, which will increase the performance of the stove, improve its design and neutralize harm to health, because people go to the bathhouse to improve their health, and not vice versa!
This is the most optimal solution in terms of efficiency and labor costs - to combine the advantages of a metal and stone stove.
Factory-made metal sauna stove “under the lining”
At the moment, factories are producing stoves that are initially designed for further lining with brick; this design is the golden mean that will allow you to profitably equip an excellent steam room.
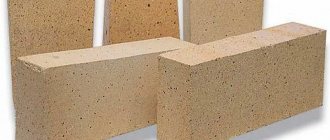
For lining the furnace you need to use only these types of bricks:
- red ceramic brick;
- fireclay brick.
You don’t have to search on the forums, there’s no point in us deceiving you! If you take any other brick, it may crack on its own or peel off from the adhesive mixture, and you will need to reposition it over and over again!
Do not take sand-lime brick. It is great for cladding a house, but it is not suitable for lining a sauna stove. Lime-based bricks are simply not able to withstand constant temperature changes and high humidity in a steam room.
After just a few weeks of use, it will begin to deteriorate. And from a decorative point of view, it is not suitable and additional cladding will still be required.
A good option would be refractory fireclay bricks, which are specifically designed for sudden temperature changes.
Fireclay brick
Outwardly, it is, of course, inferior to red ceramic brick, but this issue can be resolved with decorative finishing cladding.
If there are no remaining bricks on the farm, it is better to buy a new one! Give preference to ceramic red brick. Its specific gravity is much lower than that of fireclay. It demonstrates excellent technical properties, reliability and durability. And externally, the stove, lined with red ceramic bricks, will delight you for many years with its stylish, authentic look.
The process of lining a sauna stove with bricks is not very complicated, and if you strictly follow the detailed instructions, even a beginner can handle it.
Brick lining scheme
The advantages of this solution
A metal stove heats up very quickly, but cools down just as quickly. In order for the temperature in the bath to be comfortable, it must be constantly heated during washing. And this is an extra consumption of firewood or other fuel.
In addition, the heat from the hot metal is too dry, and it is easy to get burned on its surface and cause serious injury.
Hot metal walls are a common cause of burns
But if you line an iron stove with brick, these disadvantages disappear, but significant advantages appear.
Namely:
- Long and uniform heat transfer, since the heated brick cools down slowly;
- Reduced fuel costs, the price of which is of particular importance if the stove heats the house and is heated daily;
- The heat from such a stove is not sharp and scalding, but soft and pleasant;
- It's much safer to be around her;
- A lined potbelly stove looks much more aesthetically pleasing;
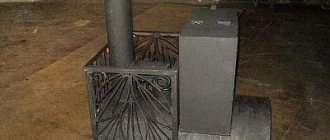
Homemade potbelly stoves made of ferrous metal especially need finishing
Covering a metal stove with brick is much easier than laying a fireplace with a chimney, and it will cost less.
Today, a metal stove in a bathhouse is already a standard equipment, without which it is difficult to imagine the wellness procedure beloved by many. Compared to other types of ovens, it has a number of advantages:
- Easy to install. It is easy to make with your own hands.
- Easy and simple operation.
- It melts quickly.
- Has good traction.
- High performance.
- Economical in fuel consumption and affordable in price.
But in order to really appreciate all these advantages to the maximum, you need to learn how to use it correctly!
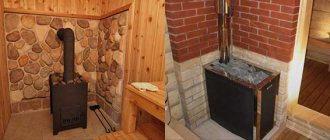
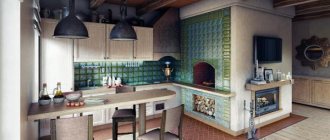
Oven in the steam room
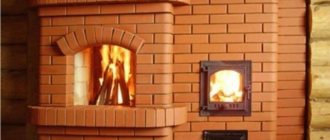
No one, of course, would argue that a stone stove is ideal for a bathhouse. But it needs to be heated for at least 5 hours so that it really begins to give off its heat, imagine how much firewood will be consumed during this time. And this, in turn, does not suit everyone. And the price of a brick building will be many times higher than that of a metal stove lined with stone.
Air mass movement pattern
In addition, in order to build a brick stove for a bathhouse, you need to have the basic skills and knowledge of a stove maker, since in this design you need to take into account many nuances that are invisible, but play a decisive role!
Brick oven
A metal stove can be bought ready-made, and the lining will not entail large financial expenses.
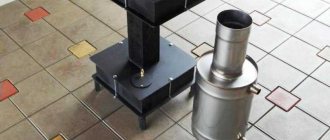
Metal stove without brick lining
What necessary parameters should a metal sauna stove have?
- It should have small dimensions so as not to clutter up the space.
- You should not choose too high a power, since the sauna room is usually small. It will be difficult to control the optimal temperature.
- The characteristics of the stove must strictly comply with fire safety regulations.
In addition, it is necessary to take into account the location where the stove is located. According to SNiP standards, the metal unit must be located at a distance of at least 15 cm from wooden floors.
95bb0a6a0ae6834cc7092d91d0c2ddad.jpeSauna stove
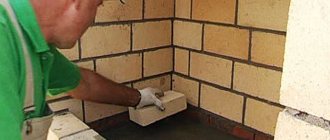
The process of lining a metal stove step by step
finishing a metal stove with bricks step 1
When you have everything ready, you can begin the process of lining the metal stove.
Bath stoves covered with bricks must have a reliable foundation for installation.
- The structure itself will ultimately be heavy and must be securely fastened.
- If the foundation is weak, then you need a solid or columnar foundation (this is a system of columns installed along the edges of the brickwork). Its height should not reach 40 cm from the base of the floor.
Before laying, make a solution. Clay and sand are sifted, removing debris and stones.
- The stove should be at least 30-40 cm from the walls of the bathhouse.
- If the bathhouse has a wooden floor, then for fire safety, a metal sheet should be laid in the place where the door is installed in the firebox, and the top should be covered with asbestos cardboard.
finishing a metal stove with bricks step 2
The lining process itself is carried out in the following sequence, namely:
- The base is being laid out and masonry will be done along its edges. Make the laying in 1-2 rows and allow time for the solution to harden.
- Laying the furnace begins on the base. Remember that the first row must be placed very carefully, and do not forget about the ventilation windows. Two is enough. We start laying from the corner with a whole brick.
- Three-quarters of a brick is prepared for the second row (at the corner). Proper bandaging of rows is required.
- For 30-40 minutes, the brick is soaked in water. Only this kind of brick should be used to lay out the stove; when working with it, the mortar will better adhere to the surface of the brick.
- Don’t forget about one more nuance: the brick around the potbelly stove is laid half a brick thick.
- Leave 2-3 holes at the bottom and top for air circulation around the stove.
finishing a metal stove with bricks summary
- The seams are completely filled with mortar.
- To avoid blocking the corners, they often check with a plumb line, and the parallelism of each row with a level.
- All additional elements (door for air intake, for water, for air outlet and build a chimney or install an iron pipe).
- Insert immediately during the action. A hole is also made in front of the firebox door. Along the edges of the holes, to strengthen the structure, place scraps of metal corners.
- The masonry is done according to the level of the heater.
- When laying, it is necessary to monitor the size of the seams between the bricks: they should be no more than 5 mm.
So we got a sauna stove lined with brick. Oh, you do whatever you want to do next. Do you want to cover it with tiles or tiles, or leave everything as is.
Important points
Brick partition laid out
Pay attention to the basic recommendations before and after
If you decide to plaster the partition, then:
- For its masonry, it is permissible to use different bricks, or used ones;
- During the work itself, you should not spend a lot of time and effort on the quality of the seams.
If a brick partition is a design solution, then:
- Lay the rows with extreme care. For correctness, you need to check the horizontalness using a building level. Then you won't have any configuration problems;
- Remove excess solution in a timely manner, or add as needed;
- It is better to straighten the seams immediately, while the solution is fresh. For convenience, you can use jointing.
You may need to make holes in the partition for communications. Prepare a piece of pipe of the required size in advance, insert it in the planned location and cover it with brick. You should not fix the pipe with a solution; it is better to use polyurethane foam for this.
At the end of all work, be sure to thoroughly rinse the tools used.
Waterproofing measures
Prepare the surface for waterproofing. To do this, remove the old finish and clean the brickwork from dirt.
- Level the surface by applying water or a layer of primer.
- Apply two layers of liquid rubber, which will reliably protect the desired surface from moisture penetration. The advantages of liquid rubber are that it is not only elastic, but also highly durable. This will protect it from damage due to possible settlement of the foundation and the appearance of cracks.
- The second option could be roll waterproofing. It also has high strength and reliability. But installing it is quite difficult.
- One of the most common roll waterproofing materials is roofing felt. It is fairly inexpensive, not difficult to work with, and reliably protects against moisture for a fairly long period. If you heat treat roofing material, it will easily take the required shape.
- But this material also has its disadvantages: when working with it, you will definitely need an assistant, and the joints will have to be processed very scrupulously. Ruberoid is quite fragile, try to protect it from mechanical damage.
- It is advisable to use roofing felt as a waterproofing material on small areas.
Today there is a fairly wide range of new generation waterproofing materials on sale. They are produced using innovative technologies, so they are more reliable, durable and better cope with the tasks assigned to them.
You already know what kind of brick to make a partition in a bathhouse from and how to provide for everything. The most important thing is to take your time and not forget about waterproofing.
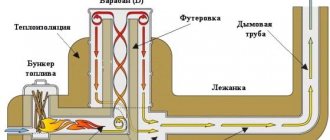
Technologies
There are several proven technologies for bricklaying around metal furnace equipment:
- Heat shield. A brick fence that does not exceed the dimensions of the furnace in height. Promotes better heat transfer.
- Continuous cladding. It quickly releases heat to the surrounding space, which increases the cost of heating the premises. This technology is used when it is necessary to make a beautiful decorative design, sacrificing the performance of the furnace equipment.
- Convector masonry, which has vents. Suitable for metal heating units. In this case, the size of the steam room is not important.
Cast iron stove lining
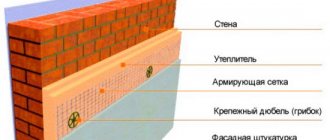
Insulation
Insulation of a bathhouse is carried out in several stages:
- Exterior walls. The insulation is laid inside lightweight masonry.
For it, you can use sheets of expanded polystyrene, which are cut to the desired shape and filled with them into the space inside the lightweight masonry as the internal walls are built.
Mineral wool is also good for these purposes. External structures must be insulated so that when warming up the bathhouse there is no need to spend money on heating the entire building. The task of a sauna stove is to warm up the air inside the room. Internal walls. Here it is necessary to make a high-quality finish so that the heat does not escape into the walls. To do this, the rough masonry is waterproofed with coating materials (for example, bitumen mastic). Next, a layer of plaster is applied, a lathing is attached to it, and fiberglass is placed inside the resulting cells.
A layer of thermal insulation is laid (expanded polystyrene, ecowool, basalt wool). Next, the wall is covered with a vapor barrier (for example, foil), on top of which the finishing is placed. Experts recommend using lining, which quickly warms up and will become an obstacle to the transfer of heat to the brick.
The wall near the stove is insulated with a denser layer of heat-insulating material, according to the same principle as the internal surfaces of the bathhouse. Foil must be used as a vapor barrier, since the steam room is the wettest part of the bath and is subject to the most dramatic temperature changes.
The steam room must have high-quality ventilation so that when heated the room does not turn into a kind of thermos without air access.
Iron stove shielding effect
The filling screen is often advertised as the most convenient and safe for use in home baths. Most home-grown experts believe that finishing the walls and iron stove with rubble or crushed basalt best ensures heat transfer into the air and at the same time reduces the surface temperature of the heater. In reality, an iron stove, after being lined with crushed basalt or quartzite, produces very strong heat in the immediate vicinity of the stove, while at a distance of up to one and a half meters the air in the steam room does not warm up well enough.
Lining the stove in a bathhouse with brick gives a somewhat different effect:
- A thermal gap of several centimeters is created between the iron wall of the housing and the brick lining, due to which a third of the heat is transferred into the air flow flowing around the stove. Therefore, if you cover the stove in a bathhouse with your hands according to all the rules, the amount of heat produced will not decrease, but the outer brick surface will be much colder than the iron one;
- The smooth flat surface of the brick lining, like the smooth iron wall, has a concentrating effect, so instead of chaotic dispersion, radiant heat easily reaches the most remote corners of the sauna steam room.
Advice! If, after lining an iron stove with bricks, it suddenly turns out that the radiation from the iron stove causes the parts of the room that are too far away to warm up weakly, in this case the outer surface of the brick screen can be lined with heat-resistant tiles.
Any smooth plane, no matter whether it is metal or polished malachite, which is used as cladding and lining for expensive cast iron structures, gives off the bulk of the heat in the form of radiation. Therefore, the iron walls of a not very hot stove quickly dry out the floor and make the air too hot to breathe. Even at a distance of a meter and a half, the radiated heat of a stove that is not equipped with a brick screen severely burns the legs, arms and face
Even at a distance of a meter and a half, the radiated heat from a stove that is not equipped with a brick screen severely burns the legs, arms and face.
Iron furnace lining design
The weight of a steel or cast iron stove rarely exceeds 80-90 kg; another 40 to 100 kg can be provided by filling the heater. Without a brick lining, the stove structure can be freely installed on a heat-resistant, durable pallet without fear of damaging the joists or wooden floor boards.
In order to line an iron stove, you first need to decide on the basic design parameters:
- Dimensions and width of the lining. The shielding wall of the furnace can be laid out in half a brick, or in a quarter of a one and a half block. In the first case, the thickness of the lining is 12 cm, in the second it is only 8.8 cm;
- The size of the gap between the lining wall and the iron body of the furnace. Depending on the slot parameter incorporated into the design, a “cold” or “hot” brick screen is obtained;
- Choose a method to strengthen the base. It is impossible to lay the lining directly on the floor of the steam room, for reasons of the strength of the wooden base and the requirements of fire safety regulations.
In the first two rows of the lining, special air intake windows are made, through which cooler air near the floor, due to thermal suction, enters the gap between the iron wall of the stove and the brick screen, is heated and thrown out through the top layer of the heater under the ceiling of the steam room. Thus, overheating of the lining brick is eliminated, and at the same time good heat transfer of the furnace is ensured.
But you should not abuse the number of windows; it is enough to make one window in the lower tier of the lining and one in the middle part of the masonry to improve the operation of the heater. To improve heat extraction, additional steel pipes - “locomotives” - are installed from the lower rows of stone into the heater.
If you pour boiling water into the pipe, the heater practically “explodes” with a huge amount of hot steam due to the sudden evaporation of water and hot air passing through the gap between the brick lining and the iron wall of the stove.
Important! Practice shows that if you properly line a metal stove in a bathhouse, the heating time of the room remains virtually unchanged. If a corner location is chosen for the steam room, the iron stove is tightly shielded from the walls
For normal airflow of bricks closed in the corner, a sanitary gap of 100-120 mm is left; windows for steam and air intake are not made on this side of the lining
If a corner location is chosen for the steam room, the iron stove is tightly shielded from the walls. For normal airflow of bricks closed in the corner, a sanitary gap of 100-120 mm is left; windows for steam and air intake are not covered on this side.
Fire safety requirements
When installing any sauna stove, it is necessary to strictly comply with fire safety requirements, since the walls of the device heat up to fairly high temperatures during its operation. In order to ensure maximum safety and not have problems with regulatory organizations, it is recommended to install the stove in accordance with the provisions prescribed in SNiP 41-01-2003 (Chapter 6.6).
- The first thing that needs to be done is to equip a reliable foundation for the main structure of the stove, which will be adjacent to the wall dividing the room. The foundation should be covered with heat-resistant material and then with metal sheet. Asbestos sheets were previously used as heat-resistant insulation. Today on sale you can find panels of pressed mineral wool, which is less dangerous from an environmental point of view, sheets of foam glass or EZHKAKH (heat-resistant structural mica plastic).
- It is also necessary to provide a metal flooring in front of the combustion door, which will prevent the wooden floor from catching fire and simplify debris removal. The size of the pre-furnace sheet must be at least 400×800 mm.
- If the partition between the steam room and the dressing room is wooden, then the opening through which the fuel channel will pass must be separated from the wood by brick or stone masonry. The distance between the stove and wooden walls should be 400÷450 mm.
In the version shown, the owner chose to fill the opening with bricks
- Provided that an opening is installed along the end part of the wall through which the combustion channel will pass, a gasket made of heat-insulating material (mineral basalt wool or cement-fiber sheet) with a thickness of 40÷50 mm, the distance between the part of the wall built from combustible material and the outer wall oven can be reduced to 250 mm. If thicker thermal insulation material is installed, the safe distance can be 125 mm.
- The distance between the ceiling of the bathhouse and the surface of the stove should not be less than 1200 mm.
- The distance from the edge of the combustion door to the nearest door must be at least 1250 mm.
- If you purchased a non-factory-made stove, or the device is independently made from sheet metal, then it is best to cover it with brick. Thus, it is possible to protect the structure of the bathhouse from fire, and people taking water procedures from burns. Factory products, as a rule, are made with double walls, between which thermal insulation material is laid or convection channels pass through.
Protective screens near (around) the stove
Protective screens are insulation panels that cover the side surfaces of the furnace and reduce the intensity of thermal radiation. Screens can be metal or brick. As a rule, they are used for metal furnaces.
Method #1 - metal screens
The most common protective screens are factory-made steel or cast iron sheets. They are installed around the stove, at a distance of 1-5 cm from the walls of the firebox. Depending on the need to insulate one side or another of the furnace, you can purchase side or front (front) screens. Many metal furnaces are initially manufactured with protective screens in the form of a protective casing.
Protective screens make it possible to reduce the temperature of external metal surfaces to 80-100°C and, accordingly, reduce the fireproof distance to 50 cm. The total distance from the firebox to the wall (including a gap of 1-5 cm) will be 51-55 cm.
Installing protective screens is not difficult. Thanks to the presence of legs, metal panels are easily bolted to the floor.
Method #2 - brick screens
A brick screen can cover all the side surfaces of a metal furnace, representing its outer cladding. Then the stove will be in a casing made of brickwork. In another case, a brick screen is a wall separating the stove and the flammable surface.
To lay the protective screen, solid fireclay bricks are used. The binder is cement or clay mortar. It is recommended to use half a brick (thickness 120 mm). But, if there is a lack of material, it is possible to make a wall of a quarter of a brick (60 mm thick), although in this case the thermal insulation properties of the screen will be reduced by half.
Small openings (sometimes with fire doors) are left at the bottom of the shield for air convection between the brick wall and the stove.
The brick walls of the screen must end at least 20 cm above the top surface of the oven. Sometimes the masonry goes all the way to the ceiling.
The brick screen is not installed flush against the walls of the stove, the optimal distance is 5-15 cm. The acceptable distance from the brickwork to the flammable wall is 5-15 cm. Thus, the use of a brick screen allows you to reduce the distance from the stove to the wooden wall to 22-42 cm (stove - ventilation gap 5-15 cm - brick 12 cm - ventilation gap 5-15 cm - wall).
Surface marking
It must take into account the “backlog” for the brickwork.
Before laying the first row, you need to measure the distance from the walls of the stove to the bricks. By the way, if you bought a factory-made stove, then the installation instructions should indicate the tolerances for the gaps necessary for air circulation between the stove and the masonry. The approximate range is 5-10 cm. This is an important point that determines the efficiency of heat transfer.
Advice. If the oven is factory-made and equipped with a convection protective screen for the oven (casing), it is recommended to remove it. Now, this brickwork function.
Preparing and laying bricks
Calculate how much brick will be needed at the initial stage, then clean it and soak it in water for 12 hours. This is a mandatory procedure, since the material tends to absorb liquid from the solution. You can select installation options:
- lattice;
- a solid well.
The first one is more beautiful, as it has many holes. At the same time, it is this feature that leads to a decrease in the efficiency of the heat shield. If the body of the heating equipment has a rounded shape, the material is laid in accordance with the shape of the object.
Of course, this approach will require significant effort, but the arrangement of the rows will not change. A distance of less than 5 cm should be left between the metal and the stone. There is no need to install spacers and lintels. The metal will begin to expand when heated, which will put pressure on the brick.
An average oven usually requires 13 to 15 rows of bricks. It is better to carry out the work in several stages. In 1 day it is enough to lay 7 rows and leave them overnight. The next day, they check how well the structure has shrinked, after which they begin to complete the remaining rows. The thickness of the masonry is half a brick.
Step-by-step instruction
Forming the base
In order for a brick-lined sauna stove to be strong and reliable, it is important to lay the foundation correctly. The strip foundation is considered the easiest to assemble and install.
To equip it, the wooden floor elements in the house are first dismantled, after which a trench is dug, the bottom of which is covered with a sand-crushed stone mixture. Everything is compacted well and watered. The next stage is concreting the foundation. For the strength and reliability of the structure, it is recommended to additionally lay a reinforcing mesh into the foundation before pouring it. The solution is then left to dry. Until the base is completely dry, further work is not recommended.
Preparation
Before constructing the protective apron, it is recommended to soak the lining brick for 12 hours. To do this, the required amount of material is separated, cleaned if necessary and placed in cold water. This event is necessary to ensure that the blocks do not absorb moisture from the solution during the formation of the order.
How to prepare brick mortar?
The installation of a metal furnace will be reliable if a cement-clay mixture is used as a masonry mortar. Both components are taken in equal proportions and diluted with water to obtain a creamy consistency. To mix the solution well and obtain a homogeneous mass, it is recommended to use a construction mixer. After mixing, you need to let the masonry mixture thicken, and then proceed directly to the masonry.
Bricklaying
In order for the apron to be reliable, it is important to correctly calculate the permissible distance between the brick wall and the iron body, because if the gap is small, the masonry will quickly crack and you will have to redo everything all over again. On average, it will take up to 15 orders to form a screen
It is recommended to divide the work into 2 stages: on the first day, form half of the rows, then leave the structure to dry until the morning. Then the rest of the masonry is done, the optimal row thickness is half a brick. The ordering scheme is presented in the table:
| Row | Description of work |
| 1 | The perimeter is completely laid with bricks, the row is started from the corner, with strict observance of evenness of laying |
| 2 | The wall is built up, reinforcement is carried out, air gaps are formed |
| 3 | Posted as 1st |
| 4—5 | A portal is formed for the firebox door and ash pan, |
| 6—8 | A metal corner is placed above the base of the portal |
| 9 | Can be stacked randomly |
Depending on personal preferences, you can arrange the arrangement with an arch at the level of the stove where the coals are located. This way the smoldering embers will be visible and you can admire them for a long time. You can also complete the arrangement by installing a round pipe in the bathhouse through which the smoke will come out. In none of the selected options, the step-by-step instructions for forming the order do not change.
11e848e1d3edc9508581e7ba9670a865.jpe
b93bf8b1cfe8d748c9f00f0289d65ea6.jpe
ca0a0831eef5a22c9c2b40b8d044df0d.jpe 4ee5b7901e5b4f12fd8d62f5442bdc66.jpe
First heating
When the brick finish dries, and this lasts on average up to 2 weeks, it is important to put the device into operation correctly. To do this, 2-3 test fires are performed, during which a minimum of firewood is used
This will prevent excessive heating and cracking of the structure. In this way, it will be possible to safely dry wet areas, thanks to which the stove will serve reliably and for a long time.
Selection of bricks and binder
The brick screen of the heater has not only a protective, but also a decorative function
Therefore, it is clearly not worth taking everything that comes to hand for masonry - it is better to pay attention to the selection of materials, even if this involves additional costs
A brick, for example, must be solid - the screen must accumulate heat well and quickly. True, it is still better to refuse lining fireclay of the PB or ShA brands: their fireproof properties are of little use, and the appearance is not particularly attractive. Well, since the density of the brick must be moderately high so that the masonry has time to warm up, the best option can be called red clay stove brick of the M-200 brand.
The binder in the screen lining is a mixture of MSh-18 fireclay mortar and TsPS. The mortar is mixed with river sand in equal parts and soaked for 2–3 days. Cement grade 400 acts as a setting accelerator; it is added immediately before laying in an amount of 1/4 of the volume of the dry mixture of mortar and sand. To give the masonry a more refined look, the mortar can be tinted with chalk, red lead, ocher or soot.
Prices for construction work
When laying partitions:
| Type of work | Unit measurements | Cost, rub.) | ||
| Moscow and region | Krasnodar | Volgograd | ||
| ¼ brick masonry | sq. m | 550-700 | ||
| ½ brick masonry | sq. m | 480-750 | 660 | 500 |
| 1 brick masonry | sq. m | 700-950 | 800-1020 | 1000 |
For dismantling brick walls indoors:
| Type of work | Unit measurements | Cost, rub.) | ||
| Moscow and region | Krasnodar | Volgograd | ||
| Dismantling in ¼ brick | sq. m | from 160 | ||
| Dismantling in ½ brick | sq. m | 300-500 | from 300 | 250 |
| Dismantling in 1 brick | sq. m | 390-600 | from 500 | 500 |
To insulate brick walls in an apartment from the inside:
| Type of work | Unit measurements | Cost, rub.) | ||
| Ekaterinburg | Krasnodar | Volgograd | ||
| Insulation of walls indoors | sq. m | from 155 | from 200 | from 200 |
Masonry mortar
Durability depends on its quality.
Sand. It should be fine without impurities and poured through a sieve with a mesh of 1.5 mm.
Clay. Pour into a container and fill with good water (not musty), then stir. After kneading, the water should cover the clay. The mixture is left to “sour” for 2-3 days. Then filter through a sieve, rubbing out lumps. Add a new portion of fresh clay to the container and soak again. And so on until the required volume of paste-like consistency is formed.
Clays have different fat content. Particularly oily ones are “neutralized” by adding sand (otherwise they dry out and crack). The proportion of added sand ranges from 0.5 to 1.5 by volume. A good solution is to use fireclay clay. Some craftsmen add heat-resistant glue. However, I will not recommend it because the results may vary.
Using tiles
The tiles on the stove in the bathhouse are afraid of thermal expansion, therefore, when performing work, it is important to carefully follow the technological process. The lining of the stove in the bathhouse does not tolerate negligence
Kinds
Typically, 7 types of tiles are used for cladding:
- Terracotta is a tile that has not been glazed. It consists of terracotta clay and fireclay, which are mixed in a certain ratio. Such tiles have been known for several centuries. A correctly implemented technological process greatly influences the final quality of the material. This tile can be easily recognized by its characteristic red tint.
- Clinker tiles - clay is the main raw material. The material is obtained by pressing, then it is fired at a temperature of +12000C. The crystal lattice of the clay changes and the tile acquires the properties of ceramics.
- Majolica is very difficult to produce. Previously, only manual labor was used for drawing. Now there are industrial designs. The glaze on the tile is obtained by firing. Properties resemble terracotta tiles.
- Tiles are the most preferred option due to the air gap between the tiles and the oven wall. This layer works as an additional heat insulator, allowing the stove to retain heat near itself even longer.
- Porcelain tiles can also be used for lining a stove. Marble chips added during the production of porcelain stoneware give the material unique decorative properties and high strength. Due to this, porcelain tiles are rapidly gaining popularity.
- Fireclay is able to withstand direct exposure to fire. Fireclay is pressed into blanks and fired at a temperature of +13000C.
- Tile - only a material with a high heat resistance coefficient can withstand temperature loads.
Expert opinion
Nikolay Davydov
Stove maker with 15 years of experience
Based on their properties, the most preferable option for lining a stove is tiles. It is also the most labor-intensive. The most budget option is special tiles with a high heat resistance coefficient, but with its help it will not be possible to finish the hottest areas.
Instructions
Do-it-yourself tiling of a sauna stove is done as follows:
- It is necessary to properly prepare the surface. All traces of old finishes must be removed from the wall. Each seam should be selected at 10-15 mm.
- We dilute a deep penetration primer and add marble chips to it. Carefully prime the surface. Do not forget that the primer must dry (at least 24 hours).
- We stretch and fix the metal mesh using dowels. Such reinforcement will significantly increase the strength of the structure.
- The tiles should not be laid on an uneven surface. We level the wall with plaster. We recommend using stove mortar that is specifically designed for plastering stoves. The plaster must be allowed to dry for 48 hours.
- Apply the facing adhesive evenly to the entire surface of the tile. Carefully cover the surface of the stove and press lightly. The tiles can be leveled in about 10 minutes. Then the glue will set. We check the correctness of the masonry using a level. The glue layer should not exceed 1 cm. To make the seams even, we use special crosses. The thickness of the seam is 2-3 mm.
- When the glue dries, we grout the joints.
This is interesting: Window decoration in a house made of laminated veneer lumber - study with us
Finishing
The solution may take time to set, so it is better to wait 2-3 days. Finishing involves cleaning the brick from the mortar and giving it a uniform shade.
It is more convenient to remove excess solution using a drill with a brush attachment. The work is dusty, so use a respirator and goggles.
After cleaning, stains of uneven color may remain on the bricks. To even out the shade, use a solution of laundry soap and water and a hard, dense brush. After this, the brick “coat” is washed with water. The result is a beautiful shade without blemishes.
Carry out the first fire after lining slowly, allowing the brick to gradually absorb the heat.
That's probably all. I think that you will feel the comfort of a lined stove right away. The heat will become more balanced, and the heat source will delight you with a pleasant view and pleasure from independent work.
Wisdom Quote: The greatest happiness in life is the confidence that you are loved (Hugo Victor Marie).
Criteria for choosing a full or partial furnace lining
Many bathhouse owners, having decided to line the stove with brick, doubt what type of cladding to choose. If you surround the device with brick walls on all four sides, you will get a complete one, otherwise it will be partial.
Whichever option is chosen, the difference will be in the control of convection. In simpler terms, problems may arise for lovers of Russian baths. If a controlled convention is organized, then it is possible to close it, in this case the hot air heats not the steam room room, but the brick casing, transferring the heat into the steam room softer.
To control the flow of warm air from bottom to top, special openings should be provided. If necessary, they are closed or opened using special doors or pieces of brick.
But open cladding, when the stove is not closed on one or more sides, is most likely an aesthetic aspect and a safety issue, since it is less likely to get burned from a brick than from hot metal.
Making masonry for a furnace with a remote firebox
Sometimes there are stoves in which the main part is located in the steam room, and the firebox is placed in the dressing room or outside. In this case, the cladding is performed using a slightly different technology.
- After defining the furnace and completing the foundation, an opening for the firebox is made. It must exceed the dimensions of the firebox by 25 cm on each side.
- The stove is installed level so that the edges of the firebox do not protrude beyond the limits. After installation, you can begin to perform insulation. Insulation work is carried out using basalt cardboard, ceramic fabric, aluminum foil and mineralite sheets. The latter is one of the most modern insulating materials, which, when heated, does not release toxic trace elements into the atmosphere. Basalt cardboard is cut into wide strips and secured with a stapler to the walls of the hole. The protruding edges are carefully wrapped. A similar procedure is done with ceramic fabric, and then with foil.
- Holes corresponding to the size of the firebox are cut out in two sheets of mineralite and secured with self-tapping screws on the side of the steam room.
- The brick is placed in water for half an hour. At this time, the solution is prepared. The work starts outside. The first row is laid in half a brick. To form a decorative protrusion, the last brick is laid across the row. When making the second row, leave a protrusion for the ash pan, which will ensure air circulation. When making masonry, maintain a distance of 3 cm between it and the stove in order to maintain the integrity of the masonry longer and also to prevent overheating.
- After the masonry is slightly higher than the firebox, two steel corners are laid. They should not come into contact with metal. Then the masonry continues to the desired height.
- After the masonry is completed, the protruding edges of the thermal insulation should be removed, and the resulting gaps should be filled with basalt wool.
- Then work continues inside the steam room. The type of masonry depends on the choice of the owner. Before starting cladding, install the stove and mark the location of the masonry itself.
As you can see, lining a stove with bricks on your own is not as difficult as it might seem at first glance. If you know how to properly line an iron stove in a bathhouse with bricks, then no questions will arise. The main thing is to prepare thoroughly and carry out all work in compliance with the rules and regulations.
Ventilation windows for convection of air leaving and entering the oven
This is an important option that allows you to stabilize the air flows “washing” the furnace and improve the uniformity of heat transfer. If it is round (stove), then the ideology of ventilation ducts is preserved. Try to arrange them symmetrically, on three sides (conditionally), with two windows at the top and bottom, as it would be approximately in a rectangular masonry.
Classic option: two windows in the second row from the top and the second row from the bottom. So, on each side. The lower openings will provide suction of cold air, and the upper ones will provide the release of heated air. In addition, circulation will have a beneficial effect on the metal of the furnace.
Foundation arrangement
Now on the Internet you can find many drawings, photos, and plans for building a foundation for lining a stove in a bathhouse with bricks. What is this building?
The foundation is made in the form of a quadrangular well, the height of which is equal to the height of the furnace. To cover the metal walls, use solid or masonry with windows, through which not only fuel is thrown in, but also ventilation around the heating surface is enhanced.
According to experts, wooden floor beams can withstand up to 650-700 kg of load. Although practically, it is not recommended to give a load of more than 400 kg per 1 m². Therefore, it is advisable to further strengthen the existing frame with an iron structure from an angle (50 mm), or screw piles, provided that approximately 180-200 bricks weighing 3.5 kg each will be used for the screen.
Foundation construction algorithm
- Cut a square of a certain size in the floor (if it is already installed), dig a pit approximately 35-45 cm deep.
- Fill the bottom with coarse crushed stone, lay waterproofing, and install formwork.
- Place pieces of reinforcement in the foundation frame, apply the required amount of mastic waterproofing, and fill the structure with concrete approximately 15-20 cm above the ground.
- Bring the “pillow” to the floor level with ordinary bricks, on which the stove and lining will be placed.
- Wait about 3 weeks until the concrete shrinks, then lay thermal insulation and steel sheet (3-5 mm thick) under the stove.
Preparation of the solution
In order to properly line an iron stove in a bathhouse, it is best to use a classic clay-sand mortar. You can add a small amount (about a sixth) of grade 400 cement to it. This ingredient can only strengthen the entire structure, since the temperature of the future screen will not be high enough.
Since little clay is required, it is best to buy it at a building materials store. For rural residents, such a problem as purchasing clay should not exist.
To prepare the solution, you need to take sifted sand and mix it with clay in equal proportions. Add water gradually until you get a thick mixture that can easily slide off the trowel.
What other materials are used to line a sauna stove?
It turns out that not only bricks can be used to line sauna stoves. Granite or marble slabs are an excellent substitute. They also tolerate temperature changes well, have a large mass and high thermal conductivity. In addition, such finishing will give the bath room an unusually beautiful and unique look. Not everyone can afford such luxury, from a financial point of view. But if you have some leftovers, you can use them to build a stove partition.
True, the installation of such slabs is a little more difficult in comparison with brickwork. To ensure a beautiful appearance of the lined stove, it is necessary that the work be carried out by a specialist. At the very least, the owner needs to at least consult with such a person.
Minerite slabs are also used to construct a heat shield. With their help, the wall is mounted much easier and faster, even in comparison with masonry, and is able to withstand temperatures of 360-400⁰C. But the heat capacity of this material is low, so it can be used as a good partition that will not be able to accumulate heat.
Base structure
Before laying brick over the unit, you need to thoroughly prepare and strengthen the base for it. Since metal structures are light in weight, they do not require a separate foundation for the furnace, but brick cladding will provide an additional load of tens of kilograms.
Not every floor covering can withstand such a mass. For this reason, before covering the boiler with bricks, it is imperative to dismantle the floor and arrange a separate foundation - columnar or monolithic.
Most often, a monolithic base is made. To do this, the floor under the stove is dismantled. The foundation parameters should be such that there is a gap of 10 to 15 centimeters between the future brick cladding and the metal body of the unit.
First, they dig a hole approximately 30 centimeters deep, pour crushed stone and sand onto the bottom, compact it, install reinforcement and fill it with concrete mortar. The foundation will harden in about 2 weeks.
To arrange a columnar foundation, pillars are installed at the corners of the facing box and in places of the highest load. The advantage of this base is that no drainage or waterproofing is required.
The sequence of actions during the construction of a columnar foundation is as follows:
- Markings are made at the corners of the furnace for mounting the pillars.
- Dig holes located strictly vertically, having a depth of about 50 centimeters.
- A 10-centimeter layer of sand is poured into the bottom of all holes and compacted.
- Prepare a solution of cement and sand in a 1:2 ratio; it should have the consistency of thick sour cream.
- The solution is poured over the layer of sand in a 10-centimeter layer. Crushed stone or brick chips are added to it.
- After hardening, brick pillars are laid out so that they rise 7–10 centimeters above the floor.
- Install the lower trim beam. The most reliable way would be to lay the channel around the perimeter and weld the edge.
The use of concrete pillars is allowed. You can make sure that they are vertical using a building level.
The method of constructing the base depends on whether it already exists and what kind it is. It also depends on whether you are covering an already connected and operating stove or installing it and covering it at the same time.
If you have already poured a solid concrete foundation with a thickness of 20 cm or more, it will most likely withstand the expected load. In this case, you can line the iron stove with bricks immediately, without preparatory work.
If there is no foundation for the furnace, it is recommended to pour a solid reinforced concrete base. Its area should be larger than the cladding area. When calculating it, keep in mind that the distance from the metal body to the brick walls is assumed to be 8-10 cm.
The foundation is being prepared in stages:
First, you need to dig a hole 30 cm deep in the ground, fill it with sand, crushed stone, broken bricks and compact this pillow;
Installation of crushed stone cushion under the base
- Then, along the perimeter of the pit, formwork is built up to the level of the floor in the combustion room;
- A concrete mixture is poured into it, which is reinforced with metal mesh or rods;
Poured base for stove and cladding
- The concrete base must be allowed to dry for 2-3 weeks;
- After which it is covered with roofing felt and a brick platform one or two rows high is laid on top of it.
The brick base is laid on a layer of waterproofing. A common picture is that it is necessary to cover an already working stove with bricks
This is possible if the wooden flooring is able to withstand the additional load from the brickwork. To verify this, the floor must be disassembled and the joists inspected. To do this, the stove will still have to be temporarily dismantled by disconnecting it from the chimney.
ffcaa0f9f1b6b9a8cdc29457b0afc02c.jpe
389a356c3b5100ee2ba34c643a374d09.jpeAfter opening the floors, inspect the joists.
They must be dry, without signs of damage or rot, and the distance between them should not exceed 60-80 cm. If it is larger, another support with a cross-section of at least 10-15 cm must be laid in the place where the stove is installed.
The distance between the logs and their cross-section must be such as to withstand the load from the furnace
The floor boards themselves should be dry and strong, and their thickness should be no less than 30-40 mm.
After the inspection and reconstruction of the wooden base, first a metal sheet and then a fire-resistant material such as asbestos cardboard are laid on the floor according to the markings and secured with self-tapping screws. And a brick foundation is already laid on it.
Part of the stove and brick walls will rest on a wooden floor - we cover it with fireproof material
Required materials and tools
For work, prepare the following tools:
- bubble level 90 cm long;
- plumb line;
- steel square with sides 40x60 cm;
- mason's hammer and small trowel;
- pencil, tape measure and cord for marking;
- Master OK;
- container for mixing masonry mortar;
- a grinder with a circle for stone, it will be needed to adjust the brick to size.
What is needed to build a stove
To build the furnace, you should use ordinary refractory bricks made of red baked clay. According to the standard, their dimensions are 12.5 × 25 × 6.5 cm. However, various brick factories can produce batches of material that differ in dimensions. Based on this, before work you should carefully select the size of the bricks.
To construct a firebox, bricks made of fireclay clay, grade Sh-5, are required. They can be light yellow, pinkish or white. This material is fireproof and can withstand exposure to open flames.
Fireclay brick sizes may vary slightly. There's nothing wrong with that. Typically, the fuel chamber in a sauna stove is not connected to its body. Therefore, there is no need to adjust the brick rows to a single level.
It is not worth laying out the stove completely from fireclay material:
- firstly, it is expensive;
- secondly, fireclay bricks cool faster than their ceramic counterparts.
Furnace mortar
You should not completely build a stove using such a mixture. At a temperature range of +700-800º, such a solution is baked to a monolithic state. There will be no such temperatures in the external part of the structure. Therefore, the fireclay gradually cracks and falls out of the masonry.
For laying the stove body, a clay-sand mortar is used in a ratio of 1:5. The sand must be quartz - river or quarry. The quality of the first variety is slightly worse. The grains of river sand are round, so the solution made from it has worse properties.
Clay must be taken from a quarry, raised from a depth of at least two meters. How to check its quality:
- Soak some clay (300 g) in water for one day.
- Then make a ball out of it and let it dry.
- After a couple of days, throw the bun onto a hard surface. If the ball breaks up into large fragments, then the material is suitable for oven mortar.
Also prepare steel wire with a cross section of 3 mm. This will be used to secure the doors of the firebox and vent. For installation of casting you will need an asbestos cord. This heat insulator is used to wrap the edges of the grating, which are embedded in the masonry. Thanks to this, the brick does not crack due to high temperature.
Preparatory stage of cladding
Before you begin lining the body of the potbelly stove with bricks, it is necessary to carry out a number of preparatory work:
- If the stove is installed against a wall made of any flammable material, it is covered with a fire-resistant shield made of asbestos cardboard or other fire-resistant materials.
- A clay solution or any of the previously listed compositions is prepared. If the solution is made of clay, it is filled with water and left for three days in order to gain the necessary elasticity.
- The bricks are checked for identical sizes and soaked in water for 30-40 minutes for better adhesion of the surface to the mortar.
- In order not to clean the stove body from the solution, you can wrap it in plastic wrap or cellophane and secure the edges with tape.
- Next, you can begin working directly with the cladding.
Purpose
The portal in the bathhouse is a U-shaped structure, which is intended for decorative framing of stove equipment on the front side. The upper part of the structure can be used as a shelf for photographs, jewelry, watches, and candles. Portals are often made around combustion chambers to improve their appearance.
There are several types of portals, which are divided according to the material from which they are made:
- The portal of the stove in the bathhouse is made of brick. High temperatures are dampened by thick brick walls. If decorative elements are needed, they can be purchased at the same store as the brick. It is recommended not to completely fill the space between individual elements. It is better to fill this distance with a special grout for joints.
- Structures made of natural stone. Possible options include marble, shell rock, sandstone, and travertine. If the surface of the stones is porous, they should not be secured around the oven door. They will quickly become covered with soot, which is more difficult to remove from uneven surfaces.
- Ceramic tile. This material can withstand high temperatures and does not absorb soot.
The advantages of this solution
Below is a list of the advantages that this design has:
- Even heat distribution. This is due to the fact that the brick first accumulates energy and then releases it into space.
- The presence of pleasant warmth instead of scorching heat. There is always humid air in the room due to the fast and efficient heating of the stones.
- Long-term preservation of high temperature. Brick is a natural accumulator of thermal energy. That is why you can heat the sauna well and steam there for several hours, without thinking about additionally increasing the temperature or adding fuel again.
- Ensuring safety while in the steam room. Hot metal poses a certain danger: the possibility of accidental burns upon contact with the walls of the tank. The lining of the sauna stove with bars acts as a barrier that protects against extreme heat and sudden injury.
Manufacturing of furnace equipment
You can assemble a simple stove for a black sauna with your own hands. To do this, you need to come up with a design, draw up a drawing, prepare tools with consumables, and perform assembly.
Drawing up a diagram
The first stage of self-construction of furnace equipment is drawing up a diagram. In the drawing you need to note the dimensions and design of the stove, indicate the location of the stones. After preparing the drawing, you can calculate the amount of consumables.
Preparation of tools and materials
After drawing up the diagram, you need to prepare tools and consumables:
- Stones that will accumulate heat will not be destroyed by temperature changes or exposure to moisture. It is better to use jadeite.
- Set of locksmith tools.
- Metal rods.
- Fireclay bricks.
- Boards, fittings, wire.
- Container for mixing masonry mortar.
- Trowel, spatulas of different sizes.
- Bayonet, shovel.
- Welding machine.
- Hammer.
Dimensions and location of the structure
To calculate the dimensions, you need to choose a place for a homemade stove and adhere to some rules:
- For a steam room with a volume of 10 m3, the following equipment dimensions are suitable - 150 by 100 cm, height up to 50 cm.
- The optimal shape is rectangular. Thanks to it, the room will warm up evenly.
- It is better to install the structure opposite the door. This way the cold air will spread heat throughout the room.
Foundation
A homemade stove for a black sauna will weigh a lot. Therefore, you need to build a foundation for it. Foundation construction process:
- Dig a pit 60 cm deep.
- Place a 15 cm thick layer of sand at the bottom of the hole.
- Pour a second layer of expanded clay 15 cm thick and compact it.
- Lay two layers of roofing felt on top of the expanded clay.
- Tie a metal frame from reinforcement and place it in the hole.
- Put together the formwork. Make it so high that its height exceeds the bathhouse floor by 50 cm.
- Mix the cement mortar and pour it into the formwork to the required height.
Wait until the base hardens (7–10 days), disassemble the formwork.
Construction of the structure
Oven assembly process:
- Place 2 layers of roofing felt on the base for waterproofing.
- Mark the dimensions of the structure.
- Mix the masonry mortar. To do this, you need to mix 5 parts clay with 1 part cement.
- Lay out the first row of fireclay bricks and check it with a building level.
- The next rows are laid so that the seams do not coincide.
- Stop at the 4th–5th row and install a grate made of thick reinforcement.
- Leave space for a combustion hole through the row of bricks.
- Secure the grate on which the stones will be laid.
- Make the last row of fireclay bricks.
You need to start laying out the stones from large to small.
Brick partition
If you decide to install a brick wall, you need to pay special attention to the quality of the cement. The durability of the partition in a bathhouse made by yourself depends on this
It is also necessary to use reinforcement for connection to the main wall. The reinforcement is rods with a diameter of 6 mm. We should not forget that a wooden frame will definitely settle by about 4-5 cm. This will happen in 4-5 years. The brick partition retains its dimensions. Therefore, in a new bathhouse it may not be built up to the ceiling. Before starting work, you need to provide the work area with lighting and remove everything unnecessary from there.
To work, you need to prepare materials and tools (Fig. 2):
Figure 2. Tools for laying a brick partition.
All stages of work on the construction of a brick partition in a bathhouse can be completed independently. The working process is approximately as follows:
- the boundaries of the structure are indicated;
- remove all unnecessary items from the workplace;
- apply the solution with a trowel;
- leveled;
- a row of bricks is laid out.
Reinforcement bars must be laid every 4-6 rows of masonry. The solution is mixed from high quality cement grade M500 or higher. For 1 part of it take 3 parts of sifted clean sand. Mix everything carefully and add a little water. Knead the solution until it has a homogeneous consistency. The solution should resemble sour cream. Gradually it will set. Under no circumstances should you add water. You just need to stir it every 15-20 minutes. It is not recommended to prepare the solution for more than an hour of work.
To form the door opening, a strip of metal is laid above it. Its width should be equal to the thickness of the partition in the bathhouse. After completing the entire wall, you need to give it time to dry completely. This will take 7-10 days. During this time, the surfaces are sprayed with water and thoroughly cleaned with a brush. The finished partition can be subjected to decorative finishing. For this, wooden slats, lining made of aspen or linden, and magnesite sheets are used.
Sheet magnesite is a relatively new finishing material of varying thicknesses. It contains perlite and cellulose fibers. It has the following features:
- has high fire resistance;
- the material is hydrophobic;
- easy to install;
- it's cheap.
Wooden lining must be impregnated with antiseptics, which protect the material from mold and mildew.
You need to make a partition in a brick bath so that it is durable and lasts for many years. The reinforcement between the rows of bricks is used for this purpose. There is usually a small gap left near the ceiling itself.
It is filled with crushed stone made from bricks and tow, which is moistened with a solution. The horizontality and verticality of the wall is constantly checked by the building level. If it is planned to carry out any communications through the partition, sections of plastic pipe of the required diameter are installed in the masonry. Subsequently, the pipe is lined with bricks.