Today, not only farmers, but also more and more owners of suburban land plots prefer to mechanize soil cultivation using walk-behind tractors. A large number of types of various mounted and trailed equipment allows these units to be indispensable assistants in almost all types of earthworks.
As for the plow, this device is not only in demand, but also necessary when cultivating the soil. In this article we will talk about plows for the Neva walk-behind tractor, which is popular in our country, which is widely used when cultivating small plots of land.
You can install the plow for this walk-behind tractor yourself
Installing a plow on a walk-behind tractor
Regardless of the design features of the plow, its size and shape, it is attached to the walk-behind tractor with a special hitch. It can be universal or stationary. The first option is optimal due to the great possibilities for customizing the device.
The type of hitch does not affect the features of mounting the structure on motor vehicles.
You can attach a plow to a walk-behind tractor by following a simple diagram:
- The unit is installed on an elevated position. You can use bricks or logs;
- The plow hitch is attached to the towbar. Both holes on the devices must match completely;
- The clutch on the towbar must be secured with a bolt.
Do not forcefully tighten the bolt when attaching attachments. A connection that is too rigid will negatively affect the quality of plowing the soil. When creating resistance during operation of the plow, it will be thrown a little to the sides. To avoid this, it is necessary to leave a horizontal gap of approximately 50.
Care
When using a plow, regardless of its type, it is imperative to monitor the cutting elements. After each use, the metal is cleaned of adhering dirt and washed. Over time, the sharpness of the knives is lost and they need to be sharpened. Doing it right takes experience. You can use a grinder or sharpen it by hand.
But this is not the only care that attachments need; polishing is no less important. You can sand it with sandpaper or polish it using specialized equipment. The main thing is that the surface is shiny, even and smooth.
How to properly adjust the plow on a walk-behind tractor?
It is important to configure the plow on the unit correctly, since this will directly affect the quality and ease of soil cultivation.
The canopy adjustment is carried out in three stages, which are accompanied by the following actions:
- Plowing depth is adjusted;
- The tilt level of the field board is adjustable;
- The blade angle is adjusted.
Plowing depth determines how much the plow will be buried in the ground. Often this figure is equal to the height of the spade bayonet. If the depth is insufficient, many weeds will not be uprooted. If the soil is plowed too deeply, the fertile layer will mix with the lower layer of soil. This will lead to loss of nutrients necessary for normal plant growth.
The depth of plowing is adjusted by three bolts that connect the lock to the plow stand. The immersion level is adjusted when the plow is lowered down or raised up.
The level of inclination of the plow board or “angle of attack” indicates how inclined the tillage plane is in relation to the soil being cultivated.
The adjustment is made using a screw handle according to the following principle:
- The walk-behind tractor is placed on a hill;
- The handles are turned until the field board is positioned on the ground;
- The handle is twisted in the other direction until the board is positioned at a height of two to three centimeters above the ground.
If the “attack level” is too high, the plow will cling to the soil, causing the unit to slip. If the parameter is small, the plow will not be able to process the required soil layer.
To adjust the blade angle, follow these steps:
- The walk-behind tractor is installed on the edge of the cultivated area and the first furrow is passed to determine the optimal plowing depth;
- You need to walk along the most even path possible. You can pre-tension the thread;
- The walk-behind tractor wheel is placed in the furrow, the plow must be positioned perpendicular to the surface being processed. A square will make the task much easier.
Thanks to these steps, you can quickly and competently configure the plow on the unit.
Features of soil treatment
The eternal law of balance says that if something has arrived, it means that somewhere has lost. In gardening, this is expressed in a pattern - the richer the harvest, the more the land is depleted. To preserve and restore the fertile layer, there is a whole range of measures, including various operations - digging, soil correction by introducing certain additives, fertilizing, and loosening. To increase fertility and provide vegetable crops with all the necessary substances, the soil is dug up every autumn, after harvesting and harvesting the tops.
Digging provides access to air and moisture to the lower root layers, thereby creating optimal conditions for the development of beneficial microorganisms. Autumn digging is more effective, as it allows you to apply organic fertilizers, which have time to “reach condition” over the winter, as well as get rid of the rhizomes of perennial weeds and reduce the emergence of annuals and the number of pests. In the spring, all that remains is to loosen the soil in time to level the surface and retain moisture. But it’s not always possible to “prepare a sleigh in the summer.”
Please tell me if the beds have not been prepared since the fall. Can this be fixed in the spring? We bought the plot last summer, but there was no way to develop it. And this year I want to start by planting a couple of beds in the far corner: with herbs and carrots. And is it necessary to fertilize? This area was never cultivated, only grass grew on it.
It is possible, but there are nuances.
Can! As soon as the soil dries out a little and is easy to dig, pick up the soil from the roots in the right place and sow for good health. It is quite normal for the bed to settle within a week or two. Only after digging and shaping, pour it well with water, and it will quickly settle to its normal level. Before sowing, all that remains is to loosen it with a rake. As for fertilizer, it’s great that there are forbs, the harvest will be just crazy. I planted this way the first year, the main thing is the weather and watering, but no fertilizers are needed.
Today, deep digging using the moldboard method, with turning over the layer of earth, is practically not practiced. Although this approach kills most of the weeds and pests, the soil fertility and its structure deteriorate, since humus-forming microorganisms find themselves at depth, without access to oxygen, and die.
Types of plows for walk-behind tractors
The following types of plows for tillage are distinguished:
- Single-hull . They are characterized by ease of operation, minimal weight and simple design;
- Reversible: reversible or rotary. The top of the structure has a curved feather that turns the ground when plowing it. This type of plow is best suited for cultivating heavy soils;
- Rotary. They are distinguished by the most complex structure. Manufacturers offer two-body and three-body models depending on the number of shares;
- Disk. They are most suitable for processing wet soil, but the depth of plowing of the soil is much less compared to other types of canopies of this type.
It is quite possible to make any plow yourself, taking into account its design features and following simple diagrams.
Common types of equipment - study the characteristics and design
Before choosing a plow for a walk-behind tractor, you will need to study the types and characteristics of the equipment. As a rule, the buyer has to pay attention to three main types of equipment:
- Single-hull;
- Reversible;
- Rotary units.
Before deciding which of the proposed options is better, you need to familiarize yourself with the characteristics of the various types.
Single-hull type equipment
Single-hull equipment is equipped with one share, which is why it is considered the simplest.
If you want to make a plow for a walk-behind tractor with your own hands, you should choose this particular prototype. For this, there are many schemes that differ in attachments and other details, so everyone can choose the most suitable drawing for themselves.
Operating principle of a reversible plow
A reversible, or reversible plow, refers to a more complex double-body equipment.
It is equipped with a curved stylus at the top of the body. Due to this, the soil layer is turned over during processing, which makes it possible to use it in areas with hard ground. Such a plow can be disassembled for the purpose of sharpening the knife or modernization.
This kind of universal plow for a walk-behind tractor differs from conventional units in that it is equipped with a ploughshare, which turns over in the ground in one direction. Thanks to this, he processes the area several times faster. The plow hitch is standard, which is why the soil is processed much more efficiently.
The plow has 3 planes: horizontal bottom, vertical side skid and front moldboard mechanism. To purchase a high-quality plow of this type, be sure to study the advice of experts:
The lower horizontal skid of the unit with the dismantled blade and plowshare placed on the table must coincide with the surface of the table;
The lower edge of the plowshare, intended for cutting, can be installed 2 cm below the horizontal slide;
The position of the side edge of the blade and the side edge of the share should be in a straight line. In this case, the elements themselves should be 1 cm outside the side vertical runner:
- The surfaces of the fixed ploughshare and plow form an angle of 15–20 °;
- The working part of the ploughshare, with its front part, is adjacent to the blade body without visible gaps;
- There should be no fasteners, and the surface of the elements should be polished.
Having carefully studied the descriptions of all types of plows, it will be much easier for a beginner to decide on the most suitable option for him. Next, we’ll look at how to make a homemade plow for a walk-behind tractor.
How to make a plow on a walk-behind tractor with your own hands?
Before you begin manufacturing attachments, you need to review the drawings. They indicate ways to attach the elements of the device to each other.
Scheme of steps for creating a plow with your own hands:
- Ploughshare. You will need a steel sheet of five millimeters thick, which is given the desired shape. The part for cutting needs to be beaten and sharpened (according to the principle of a hand scythe);
- Homemade dump. Take a pipe with a diameter of 50 centimeters and walls of 5 millimeters in thickness. The workpiece is cut with a cutter. To obtain the required shape, you should use an anvil and a sharpening machine;
- Collection of a single structure. You will need a steel sheet, its dimensions are 50*50 centimeters and a thickness of 3 millimeters. You need to step back 4 centimeters from the edges of the sheet and level it until you get a zero angle;
- A ploughshare is applied to the sheet, double-sided welding is done at an angle of 250;
- The upper part of the blade and the blade of the ploughshare are connected as tightly as possible at an angle of 80;
- The key elements of the ploughshare, side shield and rear part of the blade are welded together.
You can learn more about the specifics of making a plow from the video instructions.
It is necessary to re-measure all angles of the structure before final welding of all plow parts. After the attachment has completely cooled down, the weld seams are cleaned.
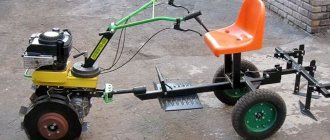
Improvement of the chassis
The first thing users of a walk-behind tractor think about is how to make a cart with a seat for it. Using equipment in normal mode using levers requires the application of great physical effort. However, the use of a trailer reduces the stability of the vehicle. This problem can be eliminated by extending the wheelbase. This is done using extensions that are attached to the axle shaft with pins or bolts. Having solved the stability problem, the operator is faced with another issue: the unit is poorly controlled. helps give it good maneuverability. This device is made by analogy with components of passenger cars. Homemade unlockers for walk-behind tractors are made using ordinary household tools - an angle grinder, welding and a sharpening machine.
The low weight of the walk-behind tractor causes poor traction between the wheels and the ground. Slipping is a common occurrence when lifting virgin soil, working on wet ground or driving in snow. To avoid slipping, weights are attached to walk-behind tractors.
These devices are divided into the following categories:
- Wheeled. They are discs that are mounted on wheels or hubs. Disks are made monolithic from metal, concrete or hollow, filled with sand. The weight of wheel weights can be 30-70 kg.
- External. Made from any heavy material (steel, lead, concrete). Attached to the body using hooks or bolts. Some craftsmen weld a frame from a corner to the body. Sandbags, bricks, scrap metal and other heavy objects are placed in it.
You can improve the cross-country ability of a walk-behind tractor by installing lugs. The easiest way to make lugs is to make a rim from a strip of metal and weld blades onto it. The rim diameter should be larger than the rims and smaller than that of the tires. The rim is installed with flat tires. After the lug is installed, the wheel is inflated.
You can improve the transmission by installing a homemade variator on the engine. The system of belts and discs will allow you to smoothly change the speed of the unit, without jerking or vibration.
Disc plow: algorithm of actions
A disc plow-hiller is used to prepare even furrows for planting vegetables. Using the drawings, you can control the progress of the assembly and avoid shortcomings.
The manufacture of a disc plow is carried out according to the described scheme:
- Support corner as a basis. It is made from a corner with equal sides, its shelves after cooling should converge at an angle of 700;
- The sock is welded to the corner. The heel is welded to the thrust bar;
- The cheeks are secured to the support corner with loops. The end sides of the cheeks should not rest against each other when opened;
- The rotating mechanism is welded to the stop angle at a right angle.
Finally, you need to adjust the plow cheeks. They are fixed with a vice and adjusted until they are directed in different directions.
Recommendations for use
As practice shows, the Niva is supplied for sale already assembled, but after purchase, before installing attachments, it is necessary to correctly adjust the main components. Proper preparation of equipment allows you to perform full-fledged work with maximum use of characteristics.
For proper engine operation, the valve system must be adjusted. For this purpose, the carburetor is disassembled, as well as all screw connections on the upper and lower housing are unscrewed, followed by cleaning of the elements. The next step is to adjust the valves using adjusting screws.
To ensure that the equipment lasts as long as possible and maintains its functionality, you should adhere to the following operating recommendations:
during the installation of cultivation canopies, it is necessary to control the direction of the knives in the direction of movement of the equipment; if the wheels slip during agricultural work, it is recommended to install additional weights; it is very important to control the quality and purity of the fuel used in the walk-behind tractor; when starting up a cold device, it is necessary to close the air supply using a special valve; after starting, the throttle is set to position XX, and the engine warms up for about three minutes; It is strictly forbidden to set the speed to maximum during the engine warm-up stage; It is especially important to prevent oil from getting onto the surface of the air filter element during operation. Before starting to work with adapters and walk-behind tractors, it is very important to read the instructions supplied by the manufacturer
Before starting to work with adapters and walk-behind tractors, it is very important to read the instructions supplied by the manufacturer
Rotary plow: algorithm of actions
A rotary plow for a walk-behind tractor with a support wheel is considered a complex type of canopy due to its design. It is necessary to work on it with special care so that mistakes do not negatively affect the quality of tillage.
The rotary plow is manufactured according to a certain algorithm:
- The cutter is a working part. For manufacturing, you need to prepare a steel tube and metal plates. The latter are welded to the pipe for subsequent grinding of the soil and throwing it to the side;
- Manufacturing the frame for the gearbox. It can be of any shape, the main nuance is that the frame must protect the gearbox from moisture, debris, and external damage;
- You will have to buy a gearbox. It is connected to the gearbox of the unit;
- The rotary plow is quite large in size, so you need to install wheels. Old motorcycle wheels will do just fine.
This design will last a long time. It is important to promptly change the oil that lubricates the gearbox to prevent breakdowns.
Principles of self-adjustment of inventory
The next problem that land owners face is how to set up a plow on a walk-behind tractor? The efficiency of the equipment and the speed of tillage depend on the correct adjustment.
After you finish installing the plow, start making adjustments. In this case, take into account such factors as the coincidence of the longitudinal axis of the garden equipment and the regulator, as well as the vertical position of the machine bed.
In order to increase the efficiency of tillage, you can use an axle extension and metal wheels with weights. The walk-behind tractor itself should not have a thin stand, a short blade, or a thin body sheet made of low-quality steel. A technique that does not have such flaws and has sufficient horsepower will be a good assistant for cultivating the soil with a plow.
How to make a plow for a walk-behind tractor with your own hands from a horse-drawn one?
A horse plow, compared to other types of attachments, can be made entirely of wood. The only metal element can be the ploughshare.
Step-by-step instructions for making your own horse plow for plowing the land are given below:
- The handles are made of two wooden beams, the thickness of which is about 10 centimeters. The upper part of the handles is complemented by rubberized pads;
- The handles are connected at right angles, so it will be more convenient to hold them with both hands;
- The lower parts of the elements are connected with self-tapping screws;
- A beam 20 centimeters thick must be bent so that its ends are parallel;
- The lower end of the beam is attached to the ploughshare;
- At the upper end, the plow is attached to the walk-behind tractor. For manufacturing, you can use small wooden blocks;
- A double handle is installed in the middle of the mount.
The structure of a horse plow is very simple, but highly efficient.
It cannot be used when processing wet soil, so as not to break the wooden parts. The method of making a plow for a walk-behind tractor can be chosen to suit you. Each homemade canopy can be used with units of the popular brands Neva, MB-1 and MB-2, MTZ, Krot, Salyut.
Types of cultivators
Since we are talking about the full cultivation of the garden, be it in the autumn or spring, it makes no sense to consider in detail hand cultivators designed for loosening the soil in the process of caring for plantings. But it’s worth taking a closer look at the power units.
Cultivators are universal gardening equipment that is used not only for cultivating the vegetable garden, but also for cutting virgin soil, laying lawns, and caring for the trunks of garden and ornamental trees. The power source for the motor of these units can be either electricity or gasoline. Cultivators equipped with internal combustion engines are called motor cultivators. But, regardless of the power source, all cultivators are divided into three types.
Ultralight and lightweight - electric or gasoline models, with a power of up to 1.5 kW or up to 1.5 liters. p., intended for processing already developed soil to a shallow depth. Due to their compactness and relatively low weight (9-20 kg), they are maneuverable and convenient when working in hard-to-reach places - row spacing, flower beds, stationary beds in greenhouses, tree trunk circles, etc. Coupled with its affordable cost, this is the optimal technique for small areas with loose soils.
My electric cultivator weighs 8 kg - yes, you can’t dig 20 acres with it, but I have 4 acres for my garden and with a shovel I would be digging them all the May holidays. And then it lay flat for another week, and then a couple of hours, and it’s done!
Medium (featherweight) - mainly gasoline, with a capacity of up to 5 liters. pp., weighing around 50 kg, are designed for processing heavier, even compacted or trampled soil to a depth of 10 cm. Like the light ones, they are not intended for virgin lands, their task is to loosen the soil in the developed area. But unlike light ones, with these units you can use a mounted set for various additional operations - hilling, aeration, digging potatoes. Despite the fact that medium cultivators are not intended for cutting virgin soil, they are sometimes used for these purposes.
I used a medium gasoline cultivator to plow up a virgin plot overgrown with sap. There was no big cushion of herbs. The procedure is as follows:
What I like is that the cultivator does not cut the roots of the plants, but throws them out entirely. Then all that remains is to collect them from the surface with a rake.
Heavy - powerful, up to 6 liters. With. units weighing on average 75-90 kg, with a processing depth of 20 cm, designed for heavy soil. This can be either an abandoned site where nothing has been done for several years, or virgin land. Such cultivators are also multifunctional due to various attachments. The downside of power is clumsiness and high cost. By and large, a heavy cultivator is needed only once - to turn virgin soil into plowing, and only if we are talking about large areas. But if finances allow and there is someone who can handle literally heavy equipment, it will be an excellent help.
I believe that if the cultivated area is large, say from 10 acres and above, then it is necessary to purchase a heavy cultivator, because it can be used not only for virgin soil and twice a year. And light and medium ones are cultivators for several beds; they can actually raise virgin soil, but when this virgin soil is 2-3 acres. If there is more such land, then the time and effort spent on cultivation will be too great.
And although there is an opinion that heavy cultivators are exclusively men’s “toys,” a woman can master this technique, especially if there is no alternative.
The only guy I have is my 85-year-old father. I bought a Chinese motor cultivator (75 kg), learned how to maintain it and work on it (this took two years). Now I can’t imagine how I would manually, without a cultivator, maintain a plot of 25 acres.