Aerated concrete is a rather fragile material and can be drilled with any tools without any problems. Moreover, you can get by with a regular hammer and chisel. But in order to make the holes smoother and deeper, various nozzles are used.
It is recommended to drill aerated concrete with a hammerless drill or screwdriver.
So, different tasks require different holes in aerated concrete; this could be a regular hole for a dowel or anchor , or a place for an outlet , or a large cavity for a ventilation pipe.
In other words, holes are needed of different diameters and depths, which are made with conventional attachments: a drill, a wood pen and crowns .
If you need to make a deep hole with a crown, then you cannot do without an extension attachment . Having drilled a circle to the thickness of the crown, a piece of aerated concrete must be carefully broken off with a hammer and chisel, then, using the same pattern, drill circle by circle to the depth we need.
But there are also situations when you need to drill a hole of a very large diameter, and not necessarily a round one, but, for example, a square one. Now we will figure out how to do this.
Correct use of fasteners
To begin with, it is worth considering the above-mentioned disadvantages of the foam block:
- Hygroscopicity . This interesting property of the foam block can be considered both an advantage and a disadvantage when the material becomes saturated with moisture;
- Low density . There are also two opinions here: the advantage is that the weight on the foundation is reduced, and the disadvantage is that choosing a fastening for foam concrete becomes an exciting task.
Now let’s talk in more detail about the last point.
How to choose fasteners for foam blocks
When using any building material, it is necessary to use consumables that will correspond to its physical properties and qualities. This is determined by a simple definition: The consumable matches the material and enhances the fastening capabilities.
In accordance with this definition, a similar consumable element and fastening is available for the foam block. Taking into account the low density of the block, the fastening will not only easily fit into it, but will also create additional support, and this, in turn, makes it possible to count on increased loads.
Criterias of choice
The right choice and the ability to correctly use fasteners will not only help you quickly and reliably complete the planned work, but will also make it possible to rationally use the money set aside for repairs.
Features of the choice of fasteners:
- plastic dowels – fixing parts used for fastening light-weight interior items;
- dowel nails - a consumable material intended for through fastening of building materials both indoors and outdoors;
- metric screw – fastening for installing windows, doors and technical equipment;
- metal anchor - a fastener for hanging furniture and equipment that is heavy;
- foundation bolt - a fastening used for work with a high level of load and complexity;
- chemical anchor is a universal consumable material with a wide range of applications.
When choosing a fastening, it is necessary to take into account the planned load. The longer the dowel size, the greater the load it can withstand.
The most popular are metal parts made in Poland, Switzerland, Finland and France. Plastic and metal fasteners from Russian manufacturers are in high demand and have an affordable price and high quality.
When purchasing this type of product, you need to know the parameters that make up the price. These include:
- material;
- size;
- manufacturer;
- availability of special packaging.
Types of fastenings to foam blocks
Before moving directly to the consideration of products and their features, let's look at what it will be possible to work with:
- Simple dowel;
- Dowel nail;
- Simple and chemical anchor;
- M4 screw;
- Self-tapping screws.
Each of the listed fastenings for foam concrete can be used at various stages of construction. Of course, these are mainly fasteners used in finishing.
Dowel for foam block
First of all, we will consider a dowel as a fastener for a foam block. The characteristic technical effect of a dowel is that it expands inside the wall. As a result, it compacts the material and creates internal supports.
An important point is that the thread of the dowel easily passes through all the pores of the foam concrete and does not violate its structure. Dowels are produced either nylon or metal, and you will choose from your needs.
To install the dowel, you will need a spacer for a screwdriver or drill. But taking into account the composition and density of the block, a screwdriver will be more suitable. By the way, we can help you choose a good screwdriver or choose a drill for your home.
You can also note that nylon (plastic) dowels are designed to work with metal screws or self-tapping screws. In addition, they will be a more economical option among others. So, for example, 100 similar dowels will cost up to 6 times less than the same number of metal ones.
Dowel nail
Options for fastening to foam concrete will depend not only on their purpose, but also on the density of the material. The thing is that the blocks are not always homogeneous. Therefore, it is recommended to choose fasteners for different material densities, for example, for interior partitions.
Dowel nails, like fasteners in a foam block, will be perfect for dense wall foam blocks. In the case of this fastener, you can also pay attention to external work. This is because the dowel nail is perfect for through and quick fixation of wood, aluminum and metal profiles to an aerated concrete base.
You probably imagine how important it is to make a strong sheathing, for example, for siding. Even seemingly lightweight vinyl siding carries additional loads on the supported wall. And after that, think about what load the foam concrete should withstand at the point of installation of the fastening and not be subject to deformation.
It is worth noting here that fasteners for foam blocks in the form of dowel nails can also be used for installing ventilated facades, as well as facade canopies. They can also be successfully used in the installation of suspended ceilings, as well as in fixing cable routes.
Anchors
It’s worth saying right away that the anchor for foam blocks will be different from those that everyone is used to using in dense walls. The thing is that conventional anchors in less dense foam concrete will not withstand the necessary loads.
The anchors we need have the following features:
- They have either a spacer part or a plastic dowel;
- Can also be used by gluing.
The technology for working with such anchors is simple and consists of the following:
- Drilling is in progress;
- An anchor is inserted;
- We unclamp and the element falls into the thread.
According to a similar scheme, the most durable fastening to foam concrete used today in construction is made.
In addition, there is a chemical anchor . This is also a very modern and progressive installation method, which can be characterized by the following points:
- Ability to bear high loads;
- Versatility;
- Frost resistance.
An example of the work can be called the implementation of fastening the Mauerlat to foam concrete. In such work, only one option is used - anchors with threads and nuts.
The principle of operation will not be fundamentally different from working in brickwork. The only difference will be that in the case of foam blocks you will have to make a concrete reinforced belt, because separately, foam concrete cannot withstand the high load of the roof.
Metal
Such dowels are made of galvanized steel, they are for fastening to materials with voids, including foam blocks:
- wall office cabinets and shelves;
- kitchen cabinets and rails;
- cornices and structures for drying clothes;
- chandeliers and sconces;
- paintings and mirrors.
The dowel consists of a galvanized screw, a ring or half-ring, as well as a hollow collet, which has a non-expandable part, the length of which is selected equal to the thickness of the supporting base, and four fixation segments. The screws have a spherical or countersunk head.
Another important detail in the structure of the dowel is the side, which protects it from falling into the drilled hole. And the sharp teeth located around the circumference of the locking edge create a reliable obstacle to turning it around its axis.
Important: The structure of the dowel allows it to be dismantled by unscrewing the fastening screw, and makes it possible to reuse it without reducing the reliability of the fastener.
Frame
They are used for through fastening of slats, window frames, door frames to hollow bricks, foam blocks and gas blocks. Moreover, the frames themselves, which need to be fixed, can be made of wood, metal, or plastic.
The structure of such a dowel:
- a hollow sleeve having a conical spacer zone and a three-sided spacer part;
- screw with metric thread;
- cone-shaped bushing.
This fastener allows you to withstand very high loads, which is important when installing window and door structures.
M4 screw
Along with other fasteners, screws combined with metal expansion elements can be used for fastening into a gas block. They are also suitable for dense gas and foam concrete. The installation process is simple. A hole is drilled. The fastener is inserted and tightened. At the moment of tightening, the metal part expands the material. This allows the hardware to be securely fixed in the wall.
Self-tapping screws
You may be surprised, but you can use a regular wood screw in a porous gas block. However, it is advisable to use them in denser versions. So, they will not stay in a porous foam block. But for fastening elements that will not create significant loads on the fasteners, they are quite suitable.
For example, if you need to hang a picture, frame or something similar, then such fasteners are quite suitable. For example, you can take a self-tapping screw measuring 3.5x55. However, it is worth estimating the load that will be placed on it. If in doubt, it is better to use a plastic dowel.
Verdict
Various types of fasteners allow you to carry out all the finishing work on the facade of the house, as well as safely install various equipment - air conditioners, heating devices, shelves, etc.
But for each type of mounted equipment, it is necessary to select its own mount, designed for its load. This will be the main feature of working with foam block walls.
Foam block and gas block are not very expensive materials. Mounts for it are also not expensive. And if you also choose plastic fasteners, you will get serious savings and the cost will be generally minimal.
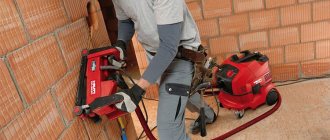
How I drilled two holes for pipes in a 730 mm thick wall in half an hour.
The article will be useful to a person both planning this work for the first time and having the “bitter” experience of labor intensity.
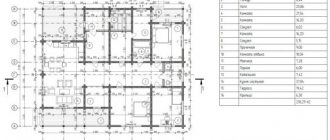
I was faced with a problem - to drill through a thick wall consisting of several layers, namely: a concrete block 200 mm thick, a sleeper 240 mm, plastered with 80 millimeters on each side, plus an “air cushion” of 100 millimeters is provided between the block and the sleeper , not less. I could be wrong with the dimensions somewhere, but having measured the thickness in the doorway, the wall was 730 millimeters.
How to attach timber to a foam block: features of various options
Many people are faced with the need to attach a wooden block to a wall made of foam block or brick materials. For example, in the construction of a rafter structure, timber is often used in the form of a mauerlat. If you take any catalog collection, you will find in it projects of residential buildings in which the first floor is made of blocks, and the second is in the form of a wooden attic. So how to attach the beam to the foam block so that the structure is reliable? There are several ways to do this, which we will consider today.
Drill bit for aerated concrete: which one is better to use?
Walls built from any type of concrete have to be drilled to install hanging furniture, elements of plumbing and heating systems, and household appliances.
Concrete walls have to be drilled with a special tool. Most often, drilling as such is not used; drilling is done using a hammer drill. However, if it is necessary to work with relatively soft building materials, the use of conventional types of cutting tools is allowed. At the same time, there is a special drill for aerated concrete, designed for making large-diameter holes (from 50 mm and more). However, using a specialized tool is not the only way to drill holes in aerated concrete, especially when you consider that it is often necessary to drill a rectangular or complex-shaped socket. In most cases, improvised tools are used, often making do with an ordinary chisel and hammer. Let's take a closer look at this issue.
Various mounting methods
So, how to attach timber to a foam block? It is recommended to use one of the options:
- tie with metal wire;
- secure with anchors;
- top view of the installation of the harness using metal studs.
Foam block is considered a fragile material and has a porous structure, so it is recommended to use two methods simultaneously to increase the percentage of reliability.
Metal wire
If this method of fixing the timber is chosen, then a thick knitting wire is used. Any stainless steel will do as long as it has sufficient strength and flexibility.
For proper installation, you should place wire on one or two rows after finishing the masonry work. Laying is carried out in such a way that multi-layer wire tails remain on each side of the wall being built. Their length should be sufficient to completely cover the beam through the remaining block rows and twist.
It is recommended to leave the tails longer so that they are sure to be enough. Fastening is carried out in two-meter increments.
The positive features of this method are:
- ease of installation work;
- there is no need to make holes in the blocks;
- wire can be found on the building materials market.
There are also negative points:
- the wire may break while twisting;
- unattractive fixtures remain that can only be hidden with a ventilated façade;
- After some time, the material may change its position, because this method of fastening does not have sufficient rigidity.
In this way, timber is fastened during the construction of small residential buildings and bathhouses. When building a large house, you should not use this type of fastening as an independent one.
Anchors
When constructing a combined object, the question arises of how to secure the timber to the foam block. Along the outer block row, special reinforcement is made, which further strengthens the walls and gives rigidity to the entire structure. Let us add that after the reinforcement, the upper edge of the box is leveled. Foam block is considered a soft material, so it is best to fix the timber with anchor bolts. To simplify the process, the top row is laid out in V-shaped blocks. Their placement forms a trench into which the block is placed.
To ensure that the gutter is not interrupted at the corner joints, the blocks must be sawn to the required width.
After this, a frame base for reinforcement is made from reinforcement rods, the diameter of which is 1.2 cm. Six-millimeter pieces of reinforcement are used as transverse elements. The frame structure can be made directly in the wall gutter, but to facilitate the process, such work is performed on the ground in parts, which rise to the top and are connected to each other at the corners. The frame is poured with concrete mixture at one time and left for several days.
Anchors are attached every one and a half meters until the solution is poured. They are fixed at the same level, because the timber is distinguished by the evenness of its geometric parameters. It is necessary to ensure that the anchor bolts are positioned vertically.
When installing anchors, take into account one feature - they should not be located in places where roof beams are laid or rafters are installed.
As soon as the poured screed sets, the anchors will be firmly fixed and will not be able to move. Holes are made in the wooden beam, and with the help of tightening washers it is screwed to the wall.
By the way, it is not necessary to perform reinforcement, but then you will have to arrange monolithic type plugs or a pillow, the thickness of which will be at least forty millimeters. This type of fastening is recommended for brickwork, as it is more durable compared to blocks.
The advantages of fastening timber with anchors include:
- strength of the entire structure;
- long operational period;
- the rigidity of the connection of the timber to the wall.
There is one big drawback - significant labor costs await.
Chemical anchors
How else to secure the block to the foam block? Chemical anchor bolts are considered one of the most durable and reliable fasteners. If you study the instructions for use, it will instill confidence that the connection with the material will be strong, will withstand significant loads, and will not create stress in the foam block.
The binding mortar mixture used for installing anchors consists of two components:
- cement mass - due to this inorganic mixture, maximum adhesion to the base is created;
- highly reactive resins - organic components characterized by rapid hardening.
A can of this composition has two chambers. During extrusion, the two components enter a static mixer, where they are mixed in the required proportion. The mixing part ensures a continuous supply of the finished solution to the fastening unit. For ease of working with the cylinder, use a simple pressing gun, which is used when applying adhesives and sealants.
The advantages of a chemical anchor are:
- excellent load-bearing and loading capabilities;
- safety of operation, environmental friendliness of the fastening composition;
- resistance to changes in temperature conditions;
- versatility;
- ease of use.
As a disadvantage, many cite the high cost, but the strength and durability of the resulting connection fully compensates for all monetary costs. Such anchors do not become loose over time.
stiletto heels
How to lay timber on a foam block using studs? Let us immediately note that for combined construction this fastening option is not recommended. It is best to use it when installing a mauerlat or a small attic.
The studs must be embedded in the blockwork. Externally, such fasteners look like a bent bolt. For fixing, use nuts onto which 6 x 6 cm metal squares are welded. The studs must be secured to the wall in one remaining pass. The length of each element must be sufficient and equal to the total width of the block and bar. Fastening is done with a lock nut.
There are pins in the shape of the letter “P” with two pointed ends. They are simply driven into the wall and block.
This fixation has its positive aspects:
- work is completed quickly;
- The cost of consumables is reasonable.
But there are also negative points:
- the fixation is not very strong, the fragility of the blocks leads to the fact that the staples begin to loosen;
- The structure turns out to be insufficiently rigid and does not withstand the load from a full upper floor.
Some tips for installing the installation.
Today I want to reveal some of the nuances of installation installations. But first, a few words about Geberit.
Today, I consider Geberit installations to be the best solution for residential installation. Why? In order.
Geberit has more installation models for different requests and for different situations than other manufacturers. The mechanics of the internal mechanism of the tank have been greatly simplified. Spare parts are easy to obtain. Geberit provides a guarantee: if a certain installation model goes out of production, spare parts for it will be supplied for another 25 years.
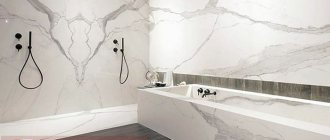
Why an installation and not just a toilet? Same in order.
If we install a toilet behind a plumbing box (in which the water risers are hidden), the toilet tank will be in front of the box. This means that the toilet takes up more space in the toilet by the thickness of the tank. In the installation, the tank itself is hidden in a plumbing box, which means there is more space in the bathroom. Not to mention such things as convenient cleaning of the area (for example, the floor, or the walls next to the toilet).
Tank failure, how to fix it? I’ll tell you from my experience. Repairing the installation tank using a button (removing it opens access to the mechanism) is much easier than repairing a toilet tank. I know from practice: toilet cisterns break much more often than installation ones. In installations, I observed breakdowns only in public places (in a restaurant where they drink all night, then hit the key while in flight).
Today the most common models from Geberit are:
Geberit Duofix 111.300.00.5 installation of this module is convenient when there is a flat wall behind. Attractive for its price, while the quality is appropriate, all types of buttons are suitable. Geberit has models and economy class, where the insides of the tank are different, only one specific key is suitable.
And the second model is:
Geberit Sigma Plattenbau 111.362.00.5 is the same as the first model, only a frame is added on top. Thanks to this frame, the studs that are attached to the wall and hold the installation can not be installed in a strictly specified position (but can be fixed to the left or right as far as the grooves in the frame allow). This is convenient when water and sewer risers interfere with the rear of the installation.
Now for some minor installation details. It is advisable to mount the installation on a solid concrete base (not on a screed). And if there is already a screed, what should I do? Pay attention to the photo below.
Properly remove sections of the screed in the area of the legs. Many people argued with me: what can be installed on a screed. Honestly, I'm tired of proving something. I simply recommend, and it’s up to you to take the advice or ignore it.
If there is a soft wall behind the installation, how to attach the studs. There are many ways, I’ll show you a couple. First.
We sew a profile onto a soft wall. It can be stitched to the wall like on a sewing machine, using multiple fasteners in its numerous holes. And secure the studs from it.
You can install a profile from wall to wall and attach the installation to it. In this case, you won’t be able to move it with a bulldozer. But this is a difficult installation. If anyone doesn't know the sequence, I'll tell you. First, the frame is attached to the floor. Then I attach one stud to the wall, why? To position the installation perfectly vertically! Since on a swinging frame it is not possible to mark where to drill fastenings for the profile. Then I mark the side wall mounting.
In fact, everything ingenious is simple. A seemingly difficult task can become a ridiculously easy solution.
Once Geberit interviewed me. The magazine has not yet been published; no one has seen the issue that I am showing yet.
I'm only showing a snippet of me. Well, I'm not bragging, but it's nice.
Fastening timber to the wall
You should not only select the appropriate fasteners, but also lay the timber on the masonry. Wood is afraid of moisture, for this reason it is treated in advance with an antiseptic.
First, a layer of waterproofing is created. Ruberoid material or polyethylene film are suitable for this.
When fastening to anchors or studs, holes are made in the wood material in advance. At first glance, the work may seem simple, but everything can be complicated by incorrect placement of anchors. To calculate their location, a simple flat board will do. It must be applied and the tops of the fasteners must be marked and holes made in these places. Then insert the fasteners and tighten the nuts.
It's easier with wire fastening. Markings are applied, holes are made in the block, the size of which should allow wire ends to be threaded into them.
Famous brands
Installations are presented on the market by manufacturers from many countries.
The most common are Vitra from Turkey, ROCA from Spain, CERSANIT from Poland, IDDIS from Russia. In first place is the manufacturer GEBERIT from Germany, producing tanks without a single seam. In second place in the ranking are the companies GROhe Viega, followed by TECE. When installing the system, you must remember that the shelf life and strength of the structure can be reduced if installed incorrectly, due to bad water, or by violating the rules of use.
Foam block
Foam block is a material used in construction. It has a durable structure that has porous cells. A foam block is made from sand, cement and water using a foaming agent.
The building material has many advantages:
- lasting;
- durable;
- construction happens much faster.
Since the foam block has high-strength properties, the fastening must be selected accordingly. From the article you will learn what fasteners are used when working with foam blocks.
Application of fasteners for foam blocks
It is not easy to overcome foam block walls, but it is possible if you skillfully select the fastening. They are used for finishing and exterior work.
Dowels for foam block
Let's take a closer look at which dowels are most often used for fastening. And also how to use them.
Screw-in dowel
Most often, a screw-on dowel is used for foam blocks; many consider it more reliable and convenient for fastening. It consists of two dowels:
Fastening occurs using a drill or hammer drill, a hole is drilled in the wall, then a plastic dowel is screwed into it, and a metal dowel is screwed into it. It is securely and firmly fixed inside the wall. Such dowels can be used to fasten parts with heavy loads. There is practically no-thrust anchorage here.
Depending on how heavy the fastening is, select a screw-on dowel. Studs or bolts with M6-M10 threads are used. Having purchased a nylon dowel model, it is better to use bolts, screws or wood studs with M4-M10 threads.
Before drilling a hole in the wall, select the required drill size for the plastic dowel. Usually its size is indicated on the packaging. You can screw in the metal dowel manually or using a screwdriver. When using a screwdriver, do not start screwing at maximum speed, it is better to screw in lightly, jerkily, so as not to curl the plastic.
Using a screw-in dowel, the part can be screwed tightly (completely) or leave space for hanging cabinets, mirrors, brackets, etc.
Of course, you should not use dowels intended for large and bulky parts when fastening small installation decorative elements.
More famous manufacturers:
The price of nylon dowels is from 16-22 rubles, metal dowels up to 220-260 rubles.
Drive-in dowel
Unlike hardware designed for working with hard concrete, driven dowels are made with large teeth. They are designed for fastening in porous material and are securely fixed. The minimum anchoring depth is 32-38 mm. Due to the shape of the teeth on the plastic and metal dowel, it is almost impossible to pull it back out.
The driven dowel is attached using a drill of a suitable diameter. Having made a hole in the wall, first hammer in a plastic dowel, and then you need to install the part on top, then secure the metal dowel.
The approximate cost of one dowel is from 11 rubles.
Fastening thermal insulation with dowels
Metal thermal insulation dowel
At the initial stage of construction, everyone is faced with the question of how to install thermal insulation in a foam block room. In this difficult task, elongated dowel nails, designed specifically for facade work, come to the rescue; they are perfect for attaching thermal insulation.
Plastic thermal insulation dowel
The kit consists of a plastic dowel and a wedging dowel. The standard dimensions of a plastic dowel are 8-10 mm, its rounded limb is 45-90 mm in diameter.
These two dowels are used in two versions:
- Heavy types of thermal insulation are fastened using a wedging dowel, which consists of impact-resistant plastic and galvanized steel.
- A plastic dowel is used for light thermal insulation.
- the largest is 200-300 mm;
- average 90-180 mm;
- minimum 50-55 mm.
Depending on the type of thermal insulation, a dowel is selected. Initially, using a drill and a hammer drill, a hole is drilled in the wall, then a plastic dowel is inserted. Then the nail is driven in, at this moment the dowel in the wall expands at the end and a tight fixation occurs.
The price for one set ranges from 2.4-7.5 rubles.
Problems with the toilet
Everything was going well until it came to the toilet.
The master placed 5 cm thick foam blocks between the toilet and the installation. I hung the toilet, everything is ok. But when the tiles were laid, the drain pipe did not reach the end of the toilet hole and water flowed onto the floor and to the neighbors during installation. Then they partially opened the masonry and extended this pipe. This was enough for one evening, in the morning it started dripping. They turned off the water to the toilet. The master did not arrive that day, although he promised. Question: is it worth dismantling this masonry to reduce the thickness of the wall? No sealants of any kind. There is no such thing as a reliable connection using sealant. Installation designers invented and thought out everything technologically a long time ago, and there is nothing to “Kulibin” here. Now to the point. The first mistake, you don’t need to hang a toilet without tiles, only a professional can vary the size, and any centimeter in installing the installation is very expensive (as a rule, installers neglect these. Installation of any brand allows the wall to be built up by 50 mm. (So I don’t see a problem with this, but I agree with Roma that gypsum board is more convenient), it was probably adjusted (cut) in advance and after gluing the tiles (or other thickening) it simply became stupidly out of proportion. A foam block (or other material) is certainly acceptable between the installation and the ceramics itself (toilet), the most important thing is that there are absolutely no gaps between the materials (This is the most common a mistake made by many installers). Of course, there is nothing irreparable about this, everything can be fixed, the most important thing is that the person who does it understands how it works and how it should work, and then everything will be fine. Now really in essence. First of all, you need to check the strength of the partition. To do this, you just need to sit on the toilet, if when you land on the surface of the toilet you hear the sounds of crackling, creaking, etc., then you will have to redo the partition in any case (not to be confused with lifting the ceramics). What if there are no sounds, then you can get by with “little loss.” In my practice, I found a way to achieve a tough result in any situation with a partition without opening the tiles, but in any case this is two days of work, so the question probably remains open. Or to the tiler you have to pay for 2 days, or a plumber, and in the case of installation it’s not cheap. One thing is clear, you’ve been screwed, and now you can’t do without a knowledgeable specialist. Good luck to you.
why open it, you can try to properly lengthen it, using sealant if necessary
I agree with my colleague, just connect securely. Good luck to everyone!
Valentina, why did your master use foam blocks? It seemed to me that moisture-resistant drywall should be used to cover the installation. GKL + glue + tiles total thickness no more than 25 mm. It is this thickness that the pipes, fastener studs, and drain button are designed for. When using blocks, the thickness is about 70 mm. The studs and button have a wide range of adjustments, so your master managed to “stick” them, but there was trouble with the pipes. Unlike my colleagues, I would recommend that you disassemble everything before installation (if you have a supply of tiles) for two reasons: 1. The installation’s pipes are non-standard and their extension is a low-tech, risky procedure, in a word, “collective farm”. 2. Drywall is attached in one sheet to the profiles and frame of the installation, representing a strong single base. The blocks rest on the frame, but are not connected to it. The rigidity of a wall made of 50 mm blocks is none! And the load on the toilet and the wall is very serious. In general, sooner or later it will “fly off” or “leak”.
To the answer to R.V. Korneichenko there's simply nothing to add
No sealants of any kind. There is no such thing as a reliable connection using sealant. Installation designers invented and thought out everything technologically a long time ago, and there is nothing to “Kulibin” here. Now to the point. The first mistake, you don’t need to hang a toilet without tiles, only a professional can vary the size, and any centimeter in installing the installation is very expensive (as a rule, installers neglect these. Installation of any brand allows the wall to be built up by 50 mm. (So I don’t see a problem with this, but I agree with Roma that gypsum board is more convenient), it was probably adjusted (cut) in advance and after gluing the tiles (or other thickening) it simply became stupidly out of proportion. A foam block (or other material) is certainly acceptable between the installation and the ceramics itself (toilet), the most important thing is that there are absolutely no gaps between the materials (This is the most common a mistake made by many installers). Of course, there is nothing irreparable about this, everything can be fixed, the most important thing is that the person who does it understands how it works and how it should work, and then everything will be fine. Now really in essence. First of all, you need to check the strength of the partition. To do this, you just need to sit on the toilet, if when you land on the surface of the toilet you hear the sounds of crackling, creaking, etc., then you will have to redo the partition in any case (not to be confused with lifting the ceramics). What if there are no sounds, then you can get by with “little loss.” In my practice, I found a way to achieve a tough result in any situation with a partition without opening the tiles, but in any case this is two days of work, so the question probably remains open. Or to the tiler you have to pay for 2 days, or a plumber, and in the case of installation it’s not cheap. One thing is clear, you’ve been screwed, and now you can’t do without a knowledgeable specialist. Good luck to you.
Most likely, the pipe was cut to size before the tiles were laid, the craftsman apparently hid this from you and tried to stick it “in a worker-peasant way.” Usually the pipes that come with the installation are more than enough and, as a rule, you have to cut them all the time. If the foam block fits tightly to the installation frame, then it will withstand the load, but you will have to go to the market to get a new pipe; this pipe costs 900 rubles
our master has merged. We wash it out of the bucket. The local plumber said he doesn't work with toilets like that. Friends sent a plumber they know, but what's the point in extending the drain pipe now? , but he doesn’t do tiles and drywall. We decided to dismantle the wall (about 120-130 high) and put drywall there. You also need to plaster the wall with the openings for the doors on the corridor side. and some little things. Work for two days. Next we plan to renovate the entire apartment in stages, because... we live in it. We need an intelligent and obligatory master.
Valentina, if you are flushing from a bucket and no water is flowing, then the problem is not in the drain pipe - you need to look at the junction of the pipe connecting the installation tank and the toilet itself. There is no need to dismantle the wall, I think you need to change the tube and cuff. If anything, call.
Foam block 5 is, on the contrary, good and reliable. There was probably just too much gap left between the frame and the blocks. because with foam blocks, we also cut off an extra couple of centimeters from the pipe, but, strangely, you don’t have enough. Maybe he just cut off too much? then you can buy a new adapter (available in Moskvoretsky). No sealant is needed, it's temporary. In any case, now there will only be homemade products, corrugation, for example. If without it, then “move” the wall closer to the frame
If you use FIX ALL adhesive-sealant, you can sit directly on the pipe. no ceramics! will not leak or fall off.
By the way, there are connections through a rubber seal in the socket (for maintainability), do you also propose to seal it to death?
Chemical anchors
Such anchors are used for large and serious loads. Their installation is not difficult, but this will require a suitable tool and correct sizing.
- Initially, you need to drill a hole slightly larger than the diameter of the chemical anchor.
- The hole must be cleaned and blown out so that there is no dust inside.
- Next, take the adhesive composition, they need to fill the hole by about 70-75%.
- Then a metal pin is screwed in.
- When the glue is completely dry, you can continue working. Depending on the type of stud, different loads are applied.
Mauerlat fastening with chemical anchors
When erecting the roof of a house, it is necessary to arrange the rafters; for this you need to erect a wooden frame - a mauerlat.
It is most reliable to use steel studs that are installed on chemical anchors.
There are quite a few manufacturers, because the cost of chemical anchors is not small. One of the more famous suppliers is Tytan Professional EV-1.
Chemical anchors are also used for other fastenings, for example, poles, frames, etc.
Before you begin installing anchors, it is worth studying the information on the packaging in order to more accurately calculate the dimensions and center of gravity.
Installing the system
The block installation is the easiest to install. Due to its affordability, this design is used most often.
Using the example of installing a block system, we will consider the step-by-step process:
Step 1 – choose a location. If the bathroom is small, it is better to place the installation in a place with the least traffic, for example, in a corner.
Step 2 – make the markings. First, we measure the dimensions of the system itself, then mark the center of the structure on the wall. From the center we take all the necessary measurements and mark the places of fastenings. We use a dash line to mark the location where the drain tank is attached.
Step 3 - according to the markings, we make holes with a hammer drill or impact drill and hammer in the dowels.
Step 4 – insert the anchors into the prepared dowel-nails and fasten the key structural elements.
Step 5 – level the installation, secure the drain tank using the fasteners included in the kit. We install fittings inside the earthenware container.
Step 6 – connect the system to communications. We connect the drain tank to the water supply system using the flexible hose included in the kit.
Step 7 – we put a corrugation on the sewer outlet and connect it to the installation with a plastic clamp.
Important! At this stage, pay special attention to pipeline joints. Don't forget to use fum tape and silicone sealant to secure the connections.
Step 8 – attach the bowl of the plumbing fixture. We insert pins into the prepared holes, put couplings on the studs, install a shock absorber and install the bowl itself, not forgetting to seal all connections.
When the sealant has hardened, you can open the water and check the installation for tightness, as well as for operability: is the system functioning normally, are there any malfunctions or any deficiencies. When you are completely sure of the reliability of the installation, you can move on to the next stage - decorative finishing of the bathroom.
Installing an installation is a relatively simple process if you have basic installation skills and an understanding of the design of the system itself. Happy installation!
How to attach timber to a foam block: all the methods and their advantages
Top frame beam on a foam concrete wall
Foam concrete is a modern material with a lot of advantages that are increasingly attracting individual developers. However, it also has some disadvantages, one of which is insufficient rigidity and strength. Therefore, when it comes to adding a second floor made of wood or installing a mauerlat, the question arises: how to attach the timber to the foam block?
In this article we will look at two mounting methods, each of which has its own advantages.
Classification and varieties
According to the area of application, all fastenings to foam blocks are divided (albeit very conditionally) into two main groups:
- for outdoor use (fastening thermal insulation, clamps for installing drainpipes, gas pipelines, water pipes, etc.);
- for indoor use (installation of radiators, lamps, shelves, wardrobes, etc.).
Based on the materials used for manufacturing, fasteners are divided into:
- metal (galvanized steel, zinc-aluminum alloys);
- plastic (nylon, polyethylene, polypropylene, polyamide).
According to the installation method in holes drilled in a foam concrete wall:
When the need arises
When building country houses, it is impossible to do without wooden structures. And they have to be somehow fastened with other materials. In some cases this action does not cause any difficulties, but in others it can become a problem.
For example, when wood comes into contact with concrete, it can begin to rot, so a waterproofing layer must be made between these materials. But in the case of foam concrete, there is also a risk of destruction of fragile blocks under the weight of a massive wooden structure.
Laying timber on a foam block and fixing it on it is necessary if:
- The project provides for a second floor made of timber or a wooden frame. Such combined buildings are very popular, as they save money and time spent on construction;
To erect a wooden second floor, the first beam must be rigidly fixed to the wall made of foam blocks
- It is necessary to secure the roof rafter system to the box;
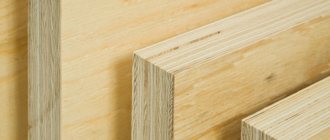
First steps. Slab countertops
Sano published a blog entry in Furniture made from slabs, solids, and various differences, October 6, 2021, blog entry
The first attempts to make something from the brought slabs. Although there may be some attempts, the material costs money and the right to make mistakes is as much as there is money in your pocket. Train at your own expense, as they say.
Therefore, each board is carefully inspected and tried on; the proverb about measure seven times is in action.
The work itself is not tricky, creative, there are several boards and they need to be selected so that they look beautiful and there is no overspending. All sizing and trimming is done with the minimum possible removal of material, simply sawed off a little here, cut a little there with a chisel.
Mounting methods
You can fix the timber frame on foam concrete walls with your own hands in different ways. But some of them are not highly reliable, others require large expenses and labor costs. We will describe the most popular mounting options, and you can decide which ones are right for you.
Fastening with threaded rods
To give the building frame rigidity and further strengthen the walls, an armored belt is installed along the upper perimeter. Another of its functions is to create a rigid base for installing a second floor, floors or roof.
In addition, the instructions do not allow the installation of metal fasteners into porous and fragile foam concrete - they will not hold securely in it. Therefore, most fastening methods are designed for the presence of a concrete reinforcing belt.
We will not ignore its structure, talking about how to secure a beam to a foam block using threaded rods.
Stud mounting diagram
| Image | Description |
| Instead of the last row of foam blocks, formwork is installed along the perimeter of the wall or special U-shaped blocks are laid in the form of a tray. At the corners and joints, part of the side walls is cut off so that the tray for the armored belt is continuous around the entire perimeter. | |
Manufacturing of reinforcing frame | Then, according to the internal dimensions of the formwork, a metal frame is knitted from reinforcement bars with a diameter of 12 mm. They are connected with thick knitting wire. |
Installation of the frame in the formwork | The finished frame fragments are installed in a tray or formwork and connected to each other. |
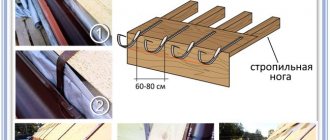
| A cord is pulled over this structure, the position of which should coincide with the axis of the bar, which will be attached around the perimeter. At this level, studs with 12 mm threads are installed strictly vertically. Their length should be such that the studs pass through the beam. The step between the attachment points is about 1 meter. | |
| Concrete solution is poured into the tray with the studs installed, being careful not to disturb their position. If this happens, the studs are immediately leveled until the solution sets. | |
| After a few days required for the solution to dry, the installation of the strapping beam or mauerlat begins. A waterproofing barrier made of roofing felt or roofing felt sheets must be laid underneath it. | |
| The points where the studs exit the armored belt are marked on the bars and through holes are drilled at these points. Then they are placed on the fasteners and pressed to the base. In the corners and places where the timber is extended along its length, joining cuts are made on it. | |
| Wide washers are placed on the protruding ends of the studs and the beam is tightened with nuts. |
This is the most reliable method that must be used for attaching heavy and bulky structures to walls made of foam blocks.
Fastening with anchors
There are two ways of such fastening. The first one is no different from the previous one, just instead of studs, expansion anchor bolts are embedded in the armored belt.
The second is used in cases where the armored belt is already ready, but no thought was given to the embedded parts during its manufacture. It is more labor-intensive, but no less reliable.
| Image | Description |
| As in the previous example, before attaching the block to the foam block, it must be protected from contact with concrete by a layer of waterproofing. | |
| The timber is laid on the base, tried on, adjusted in the corners and cut. | |
Marking of fastening points | Attachment points are marked on it in 1 meter increments. If the beam will serve as a support for rafters or floor beams, the places of their installation are first marked on it, and the attachment points are located between them - they should not coincide. |
Drilling a hole in wood | Using a drill with a wood drill corresponding to the diameter of the anchor, you need to drill through the beam all the way to the concrete. |
Drilling a hole in concrete | Then the work continues with a hammer drill. Using a concrete drill, you need to drill a hole in the armored belt directly through the hole in the beam. Their total depth must correspond to the length of the anchor. |
| The final stage is driving the anchor through the beam into the concrete and tightening the head. |
Advice. If the timber is not dry enough, the hole in it should be made slightly larger than the diameter of the anchor or pin and covered with a wide washer. This will allow the wood to move in a horizontal plane without causing tension in the fastener.
The positive features of fastening with anchors are durability and reliability. The negative ones are the rather high price of anchors (as well as studs) and increased labor costs.
Fastening with dowels
If you want to save on fastening, expensive anchors can be replaced with wooden dowels. The installation technology is exactly the same as in the previous case.
The dowel is driven into the pre-drilled hole
Advice. You can also use scraps of reinforcement bars with a diameter of 12 mm. They are cut slightly larger than the depth of the hole, then they are inserted into the beam and armored belt, and the end is bent and driven into the wood using a sledgehammer.
Fastening with steel wire
This method is not the most reliable; it is used in the absence of a concrete armored belt along the upper perimeter of the walls. In general, it is always recommended to reinforce buildings made of foam and aerated concrete blocks.
Exceptions are allowed only in the following cases:
- For small outbuildings - bathhouses, sheds, outbuildings, etc.;
- If the roof structure is simple and does not have a lot of weight. For example, a gable roof, covered with corrugated sheets along the sheathing;
The photo shows an example of a simple roof
- If the climate in the region is mild enough and there is no strong wind pressure or snow load on the building.
This fastening method is often used for brick buildings. To do this, strong and flexible wire (preferably made of stainless steel) is cut into long pieces and twisted into 4-5 whips.
They are walled into the masonry several rows before the top level so that the ends hang on each side of the wall. In the case of foam blocks, this is done two rows before the end of the laying, with a step of no more than 2 meters between bookmarks.
In this case, the length of the wire is calculated in such a way that it is enough for the thickness of the masonry and timber and there are ends sufficient for the connection. After waterproofing the top of the walls and laying the timber, the ends of the wire rise up, wrap around the lumber and twist and tighten.
This method has one advantage - ease of installation. But there are many disadvantages:
- When tightening, the wire may break;
- Since the foam block is a soft material, it can crash into it, violating its integrity and leading to the appearance of cracks;
- The ends of the wire will interfere with the finishing of the walls;
- The fastening is not rigid enough and weakens over time.
If you still decide to make an armored belt, the wire for attaching the beam can be used as follows:
Scheme of fastening with wire to a concrete belt
As can be seen from the figure, when knitting the reinforcement cage, the ends of the wire are not cut off, but are brought out outside the formwork. After pouring the armored belt and laying the timber on it, these ends wrap around it on both sides and twist.
Plastic
Cheaper plastic dowels can also be used for fastening plumbing fixtures, gratings, pipelines, and consoles. This dowel is made of plastic, and the fastener itself is metal. To fasten objects to foam concrete, metric screws are used.
The dowel for foam blocks has a specific thread that allows it to be easily screwed into materials with a porous structure.
Important. A very convenient design feature for installation is that metric screws are often made in the form of an attachment for a screwdriver.
Frame
Frame plastic dowels are made of polyamide (nylon) and are used with special galvanized steel screws. They are used for fastening window and door frames, slats and bars, metal profiles to walls made of foam concrete, lightweight concrete and gas silicate.
The design consists of the following components:
- long non-spacer part;
- extended three-section spacer zone;
- retaining edge to prevent falling into the hole.
There is a through hole in the very tail part of such a dowel; it provides the screw with optimal movement. It is the double spacer zone that allows you to securely fasten the mounted parts in materials with voids.
Such fasteners are difficult to replace and you should not try to save money by using simple dowels for bricks and foam blocks. It is clear that the price of special fasteners is somewhat higher, but the reliability of the fastening also complies with the standards.