Drawings and designs are drawn up to control the construction and finishing processes - from beginning to end. The plan is drawn up with the help of architects, authorized bodies or personally. In the latter case, nothing prevents you from seeking help. There are ready-made options for all cases: for large and small objects, of all possible shapes, with different internal layouts. A diagram (drawing) and a project should be distinguished. The first is a schematic designation of the entire object or some of its parts, as well as the surrounding area. The project includes not only the above data, but also statements on the consumption of materials, the cost of certain types of work and many other indicators. It contains all kinds of information necessary for the construction and preparation of the building. Projects can be both two-dimensional and three-dimensional.
House plan: from drawing to finished project
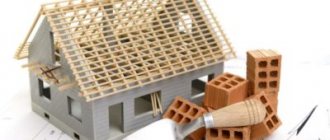
For many, a cozy country house is a lifelong dream, where every hour spent alone with nature contributes to relaxation. It is important that housing is not only beautiful, but also comfortable and multifunctional. The realization of a dream begins with the creation of a project, the basis of which is drawings and a house plan , containing a detailed layout and communications diagram. This material will tell you how to properly organize the constructive stage. Projects of houses and cottages: photos, videos, interesting planning ideas (read more)
Before construction, you need to make a house plan to avoid mistakes that can delay the process for a long time.
Basic principles of drawing a section of a house
To create a section, it is necessary to position the section plane so that it passes through the front door into the window located in the opposite outer wall. Thus, the section of a house has many similarities with the plan of a house, since the section is also formed by a section plane, with the difference that here it is vertical.
The important steps are to indicate the floor and ceiling elevations of each ceiling. In residential buildings, the floor height is 2.8-3 meters. In public buildings, the floor height may be slightly higher - 3-3.3 meters. Stair railings should be 9 cm. The distance from the window sill to the floor is 60-80 cm. The distance from the ceiling to the window is 20-30 cm.
How to make a project: preparatory stages of creating a drawing
Before making a drawing of a private house, you need to decide what its direct purpose will be: whether it will serve as a country vacation spot in the summer or as housing for year-round living for the whole family. The number of household members must also be taken into account. In this case, you need to take into account the lifestyle of family members, their tastes, preferences and hobbies.
Before you start creating a drawing, you need to decide on the number of residents of the house.
If the future inhabitants of the house are adherents of a quiet lifestyle, then the building should be located on an area that is located away from the roadway and neighboring areas. The best place is in the depths of the garden. For open, sociable people, a house can be built at the beginning of the site, exposing the facade of the cottage and the beautiful landscape in front of it. In technical terms, geodetic data obtained by studying the territory are especially important. They will indicate the features of the surface, the composition of the soil and the presence of slopes, which will allow you to create a plan of the area.
How to build your own house: choosing an economical project (read more)
In order for the house design to be streamlined, the process is conditionally divided into stages, which are then displayed in the following sections of the finished house project:
- sketch;
- architectural;
- constructive;
- engineering and technical;
- design or finishing.
Having decided on the location and purpose of the future home, you can begin designing the house. For this purpose, initial sketches are made. If they have basic artistic skills, the owners will be able to do this on their own, even without a special computer program for building a house. Based on the sketches, a basic sketch is drawn up. In accordance with it, all other detailed drawings are prepared and the layout of the future building is determined.
Types of drawings
Getting acquainted with the world of images of objects should begin by answering the question of what types of drawings there are. Professional drawing documentation is carried out strictly in accordance with the requirements of state standards. Amateur performance and creativity are not appropriate, otherwise no one except its creator will be able to read the drawing.
GOST establishes the following graphic documents:
- detail drawing;
- assembly drawing showing the composition and method of assembly of the structure;
- a general view drawing that helps determine the purpose of individual components and the operation of the entire structure;
- theoretical drawing;
- dimensional drawing;
- installation drawing containing information on installing the product at the installation site;
- electrical installation drawing;
- packaging drawing;
- scheme.
Drawing subtleties
When carefully viewing photos of drawings, you can discover interesting nuances. Thus, an assembly drawing can be a document that includes an installation view. In this case, in addition to the assembly unit itself, a drawing of the foundations, installation locations for foundation or anchor bolts, etc. are drawn.
In many cases, it is not necessary to draw up a full-fledged drawing of the part; you can limit yourself to a sketch. It is an image without a specific scale, but in compliance with proportions and GOST standards.
Where does the drawing begin?
Just as theater begins with a coat rack, drawing begins with the ability to construct basic views and projections of drawings. Imagine any object that is placed inside a cube. Each side of this object will give a display (projection) onto the faces of the cube parallel to it.
In drawing, the view is usually understood as that part of the object that is seen by the observing person. There are 6 types in total: main or front, right, left, top, bottom and back. The number of types is selected taking into account a clear understanding of the geometry and shape of the part.
Each type has its own place in the drawing. The top view should be below the main view, and the left view should be placed to the right of the front view. You cannot break this rule by arranging the views in random order.
Preparing to Create a Drawing Manually
Where to start if you finally decide to create a drawing? First of all, you need to decide whether you will draw by hand or using computer programs.
First, let's look at the “old-fashioned” method. To complete the image, you need to prepare paper, pencil or ink, an eraser and tools for constructing lines and angles (rulers, squares, protractors).
Drawing paper can be of 2 grades: regular and premium quality. The peculiarity of the latter is the presence of watermarks that can be detected through light.
If you need to draw something to scale, you can take graph paper. And if we are talking about a sketch, then there are no paper requirements. A regular 5x5 mm checkered piece of paper will do.
Pencils are classified based on the hardness of their leads into hard (marked T or H) and soft (M or B). The letter designation is preceded by a number indicating the degree of hardness or softness. The larger it is, the harder or softer the rod.
A few simple tips on how to correctly draw a drawing on paper with a simple pencil:
- To make the contours of an object, choose TM brand pencils.
- Use T-type pencils to create dimensions or extension lines.
- To draw a frame limiting the field of the drawing, a pencil of the M or 2M series is suitable.
We draw in special programs
Methods and instructions on how to make a drawing on a computer are based on the use of special software (software). Advantages of computer drawing:
- you can create drawings of any complexity;
- work in both 2-D and 3-D modes with the creation of visual models;
- in addition to drawing, you can carry out calculations (for strength, for shear);
- Software saves people from routine, time-consuming work.
The most popular among amateurs and professionals are 3 software environments - AutoCAD, Compass and SolidWorks. The operating algorithm for all of them is approximately the same. To create a document, select “Drawing” with the mouse button.
A window with a standard frame and main inscription will appear on the screen. Further construction is carried out by selecting commands on the user panel.
An example of creating a drawing manually
Suppose we are faced with the task of drawing a drawing of a rectangular box 100x50x20 mm (length, width and height, respectively), on the upper edge of which there is a through hole with a diameter of 40 mm in the center. There is nothing complicated about this if you follow the recommendations outlined below.
Step-by-step master class on how to make a drawing of an object in three types:
At the first stage, you need to decide which type will be the main one. According to the recommendations, the main view provides the most complete picture of the part.
In our case, this will be the largest face of the box. Therefore, we build a rectangle measuring 100x20 mm, in the center of which we draw a vertical dash-dotted line 30 mm long. This will be the axis of symmetry, which divides the figure into 2 equal parts.
Let's move on to the top view, mentally imagining what our box looks like from above. Strictly under the main view, with a slight indentation from it, we draw a rectangle of 100x50 mm. In the center of it, using a caliper, draw a circle with a diameter of 40 mm. Don't forget about the axes of symmetry.
On the right side of the main view at the same level we place the view on the left - a rectangle 50x20 mm. The drawing in three types would be ready, if not for one point: how can we understand from our images that the hole is through?
Imagine that it is deaf, i.e. reaches the middle of the part. Then the top view would look similar. In these cases, they do this: on the main and left views they show the location of the holes with dashed lines. Or they resort to cutting or sectioning parts. All that remains is to put down the overall dimensions. It is recommended to distribute all sizes evenly between types.
Source: https://clubsamodelok.ru/kak-sdelat-chertezh/
What to consider when drawing up a house plan
Already at the stage of drawing up a sketch, you need to clearly determine the number of floors, the type of roof, the appearance of the facade and front parts of the house, up to the number of windows, balconies, the presence of a terrace or attic. The preliminary design also involves sketches of the building in longitudinal and transverse sections, which indicate the design features and materials from which the house is supposed to be built.
An example of a drawing of a one-story brick house with an attic floor.
On a note! Experienced designers do not recommend making bedrooms very spacious, since large rooms can contribute to the formation of a feeling of anxiety in their inhabitants. Therefore, bedrooms should be compact and cozy.
Before drawing a house plan, you need to decide on the location of the site and study the orientation relative to the cardinal points. Based on this data, the location of the rooms is determined. Their number depends on how many people will live in the building and how often guests will come for a long time. The placement of premises and the functional purpose of each of them is also an important element.
Projects of country houses: description of design features (read more)
Next, you need to determine which specific rooms will be allocated to family members, and which to guests and employees, if it is planned to form a certain staff. We should not forget about the layout of the premises in which the whole family will gather - this is the dining room, hall or living room.
It is important to take into account the preferences and hobbies of the inhabitants of the house in order to determine the need to include in the layout a gym, swimming pool or sauna, winter garden or greenhouse, library with an office or a spacious workshop.
When drawing up a preliminary design of a house, you need to take into account all the wishes of future residents.
Layout of a small room according to a sectional drawing
Limited construction options do not always mean the inability to properly arrange your living space. Even if your location is only a few square meters, and it is not possible to add additional floors or an attic, you can still properly distribute the space.
Unlike the design of apartment premises, the location of a house on a private plot has its own characteristics:
- It is necessary to plan the arrangement of such a residential premises quite carefully, since the heat transfer of an ordinary house is much higher than that of apartment buildings due to the fact that all external walls communicate with the street, and there is also no entrance or other heated general purpose premises. Therefore, the location of rooms in the house should be given special attention when developing drawings.
- The sectional drawing should take into account the need for a vestibule for most types of residential premises, regardless of the layout. This way there will be less heat loss in the house through walls, doors and windows.
- In some cases, the design of the veranda will need to be indicated on the drawing. It can be either open or glazed. If you plan to build a veranda in the house, then the presence of a vestibule is not mandatory.
By making a sectional drawing for his home, the owner of the house will provide himself with comfort and coziness.
Features of drawing up house projects: drawings and plans as the main part of planning
Having decided on the layout of the house, you need to mentally imagine the life of the family in the building, think through all the elements so as not to miss anything. Therefore, there is no need to rush into creating the final layout of the house. The finished drawings and plans of the house must be as perfect as possible so that the final result satisfies all household members, and the constructed home lasts for the maximum number of years without reconstruction or alterations. The final version of the sketch should be discussed at a family council, taking into account all the details, down to the smallest detail.
First of all, the desired number of floors is indicated in the house plan. It can be a spacious one-story house, a compact two-story cottage, or a luxurious two-story mansion with an attic.
The internal layout shown on building drawings should include the following areas:
- living rooms;
- utility rooms;
- common areas;
- additional extensions.
A one-story house is divided into zones using partitions, as well as placing rooms of the same functionality in one wing. In two-story cottages, bedrooms, guest and children's rooms are traditionally located on the second floor, and on the first there are utility and service premises for common use.
Tips for planning your own home
A block of practical tips that should be taken into account at the stage of planning the premises will help to optimize the budget and more rationally distribute the interior space of the future country house:
- It is better to plan the interior of the kitchen, bathroom and boiler room close to each other or close to each other in order to compactly place the sewage system and water supply;
- Bathrooms in a two- or three-story house should be located strictly above each other for convenience when placing a common water riser;
- It is advisable to place windows on the south or east side as much as possible;
- When calculating the area of residential premises, it is necessary to take into account the norm of 8 square meters. m. per adult, and also at the planning stage, consider the likelihood of a possible increase in the family;
- A vestibule, insulated veranda or hallway will help keep the house warm.
You can make a competent and successful home layout yourself, saving money on a professional project. Drawing a house plan on a computer or by hand is a visual way to discover overlooked details and hidden possibilities. A thoughtful layout of the interior space of a country house is the key to a comfortable and quiet life in a cozy, multifunctional home! [ad:niz]
House project structure: building plan, drawings and dimensions
Before you make a house project yourself, you need to have a clear idea of what kind of document it is and what sections it consists of. Firstly, it is the main assistant and guide during the construction stage, which will help you create a house according to all the rules, make it reliable, comfortable and functional, and most importantly, safe for living.
An example of a project for a two-story house with a two-car garage.
Note! Building a house without a design is a huge risk. Without comprehensive information about the future home, it is impossible to control all expenses, calculate the required amount of materials and the size of the premises. Chaotic construction can have disastrous consequences in the form of subsidence of the foundation, inconvenient stairs and small rooms.
Secondly, a project is a document that provides control over the quality of construction and the consumption of materials. In the absence of estimate documentation, not only will the quality be low, but the construction itself will be illiquid. It is simply impossible to register such a house as real estate.
The house project consists of two main parts:
- architectural and construction, which includes architectural drawings of facades and detailed construction diagrams indicating dimensions and materials;
- engineering design, usually consisting of drawings of plumbing, sewerage, electrical, heating and ventilation systems.
The classic version of the project with drawings of a two-story house includes the following sections:
- architectural, detailed by floor;
- constructive with a detailed layout of the house;
- electrical wiring plan;
- water supply and sewerage scheme;
- heating and ventilation system installation plan;
- gas installation project;
- project passport and explanatory note.
The main parts of the house project are architectural, construction and engineering design.
On a note! Drawings can be made manually or using special computer programs for online house design.
What to focus on when making drawings
The project should be started collectively, taking into account all the engineering and structural characteristics of the house. When constructing a building, you need to think about the possibilities of arranging electricity, water supply and sewerage even when purchasing a land plot. Even if the development of drawings is carried out very carefully, an ill-informed person may still not take into account all the subtleties. Because of this, unforeseen circumstances may arise during construction that will slow down construction for quite a significant period of time.
The modern variety of building materials and accessible information greatly simplify the work for private developers. Nowadays you can easily find on the Internet a huge number of all kinds of free standard projects, from where it is not difficult to choose something suitable for yourself.
But it should be remembered that no one will provide good and high-quality work for free for widespread use. Everything that is presented on the Internet is not a complete result, which requires very serious modification with your own hands.
List of required architectural drawings of a house with dimensions
Architectural and construction drawings require the indication of exact dimensions and contain characteristics of the general parameters of the house, individual buildings, structures and their parts. Detailed plans for each floor are included here, providing for the placement of living rooms and utility rooms. The area of all elements, the height of ceilings, and the location of openings for windows and doors are indicated.
For example, drawings for a two-story house with an attic in the architectural and construction section are arranged in the following order:
- basement plan;
- ground floor plan;
- second floor plan;
- attic plan.
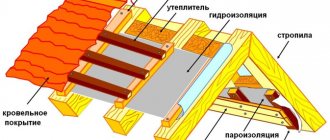
Also in this section there should be a plan for the roof truss structure. To draw a drawing, it is necessary to depict the complete system of structural elements of the floors in section. The table attached to the drawing indicates the specification of the parts of the roof truss structure, a complete list of the range of materials and their quantity. The roof plan is drawn up separately, it indicates the shape, dimensions, roof pitch and angles of inclination, as well as the location of ventilation outlets, dormer windows, hatches, and attic windows.
Basement floor plan, where 1 is a hall, 2 is a recreation room, 3 is a furnace and laundry room, 4 is a vestibule, 5 is a storage room, 6 is a storage room, 7 is a bathroom, 8 is a sauna, 9 is a gym, 10 is a terrace.
Drawings of private houses must include several sections indicating all the elements of the structure along or across. They are performed sequentially from the roof to the foundation. Thus, the cross-section shows the dimensions and location of the floor, all ceilings and roof. There should be five similar cuts made from different sides.
How to make a drawing of a paper house and make it yourself
When creating many things, a precise plan is required that outlines the entire process. In addition to the verbal plan, a drawing is usually drawn up, which displays a reduced or real view of the object. When choosing the size of the drawing, everything will depend on what kind of item you are making and what its parameters are.
Once everything has been determined as precisely as possible, you can begin making the drawing. But how exactly to make a drawing yourself with an exact indication of all the parameters of the object. Let's try to understand the situation using the example of a house made of paper, so that the situation is more clear.
Once you have decided to make a house out of paper, first select its appearance, the design will depend on this. Having decided on this point, you should draw or find on the Internet an exact image of what the house will be like. In our material we will talk about all the intricacies of creating a house from paper and its drawing.
What is needed for the house
First of all, when creating a paper house, preparation is important. And you need to start preparing for the process by preparing the material and instrumental base. Since the house will be made of paper, prepare exactly that, but it’s up to you to decide which one.
This can be scrapbooking paper, if it is thick; ordinary landscape or notebook paper will also do. If desired, these can be thick sheets of colored paper; wallpaper also looks beautiful.
But the most suitable option, which will be both dense and easy to stick together, is drawing paper. In addition, one must not lose sight of the fact that the sheets of paper for the drawings are very large, which means the house will turn out to be large.
In addition to the main material, you will need a pencil and a ruler. We will also prepare glue, which can be of any type - PVA, glue stick, etc. Instead of scissors, it is better to use a stationery knife and a rubber backing under it. But if the manufacturing process is for children, then it would still be better to take scissors.
And, of course, you will need a lot of imagination and decorative elements. In addition to the drawing, you should also understand how to make a description of the drawing.
House template
A house made of paper is, of course, not a real house, but it also requires drawings, drawings, and descriptions. First, as already mentioned, decide what your house will look like and an accurate image will help with this.
Sectional drawings of a house and images of facades from different sides
It is impossible to draw a house project without depicting all the facades, which clearly demonstrate the external state of the front entrance, rear and side views. Thus, there should be four sheets where it is necessary to draw drawings depicting:
- front facade;
- side facade No. 1 (right side);
- side facade No. 2 (left side);
- facade of the back of the house.
A house elevation drawing actually displays the original sketches and outline plan of the building. It can be easily created using special computer programs, therefore, before drawing a house project, you need to think carefully about everything, consult with specialists in various fields in construction and coordinate all the details with family members. The final version should please everyone in the household.
Brick house projects: interesting ideas and solutions (read more)
After the drawings of the facades, a separate list in the table indicates the specification of the elements of carpentry - doors and windows, and the method of opening them is taken into account. For each product, clear shapes and parameters are indicated, the presence and quantity of glass is determined. A two-story house can have up to three dozen types of such products.
Drawings depicting the facade of a two-story house from different sides.
On a note! You can create a project for a small two-story house by analogy with apartment drawings. The first floor is based on the plan of a two-room apartment, and the second floor includes a bedroom, two guest rooms and an additional bathroom.
Windows and doors
To draw a house yourself, it is not at all necessary to study for several years at a higher educational institution to become an architect. You just need to follow the instructions we provide you. So, after drawing all the walls, you need to correctly depict the entrance and interior doors, as well as draw the windows. Doors may vary in size and this must be noted in the planning. For example, the front door is significantly larger than the one that leads to the toilet.
A door is very easy to draw. It will be enough to erase part of the wall with an eraser, draw a small line perpendicular to the wall, and then connect the edge to the other wall, thereby schematically showing how exactly the door will open. Windows are even easier to draw. You just need to draw two stripes on the edges of the wall, as if you were drawing a line segment.
Constructive section: how to draw drawings and diagrams of individual elements
The structural section is an already detailed part of the project, which contains both general and individual data, various layouts of building elements: foundation, staircase structures, floors, trusses. Also included in this part are detailed drawings of all components, which indicate the specifics of products and materials.
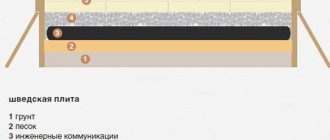
The cross-sectional drawing of the foundation deciphers the dimensions of the strip fortifications of the house, the depth of their occurrence and the materials that are necessary for their construction.
The image of the foundation is presented in the form of the following plans and drawings:
- general foundation plan;
- longitudinal section diagrams;
- cross-sectional drawings.
Certain types of drawings provide a cross-section of floor slabs, their longitudinal and transverse sections at different elevations:
- overlap plan at point +0.00;
- at + 3.00;
- at an altitude of +6.00.
At the constructive stage, layout plans for the foundation, floors, and trusses are made.
Assemblies of structural parts are objects of a special structure, including stairs and flights both outside and inside the premises. Accurate calculations for strength and static strength are also given here.
This section of the project contains in separate tables the characteristics and sequence of use of materials, in particular:
- steel reinforcement;
- reinforced concrete elements;
- wooden crossbars.
Deciding on the area
If you decide to draw the house correctly, then you need to estimate in advance the total area of the room, which directly depends on the number of potential residents. According to modern construction standards, at least 12 square meters of free space should be allocated per person. This figure may be higher if your finances allow you to build a large house. Therefore, during design, you first need to calculate the minimum amount of free space that you will need. For example, your family consists of 5 people, therefore the minimum amount of free space should be 60 square meters. We divide this number by the number of desired rooms - living room, three bedrooms, kitchen and bathroom. That is, the average area of the rooms should be at least 10 square meters. In this case, all members of your family will be comfortable in the house.
Engineering section: drawings of rooms and communications
The engineering section contains diagrams and drawings of electrical supply, water supply, sewerage, ventilation and heating systems. Explanation tables include data on equipment specifications and general calculations. These are separate components of the building located inside the future home.
Project of a 6x8 country house with an attic: (read more)
The plumbing section contains a plan for the location of communications in the basement and on each floor. The sewerage system diagram is carried out in a similar manner. Sometimes these two plans are depicted in one drawing. There is also an axonometric diagram of the installation of cold and hot water supply.
Drawings of electrical supply, water supply, sewerage, ventilation and heating systems are prepared at the engineering stage.
The heating installation section presents floor-by-floor drawings, starting with the basement, and a general heat supply diagram for the entire house. Gas equipment and electrical supply systems are shown in separate drawings with individual layout diagrams of gas and electrical installations.
In order to prevent thunder danger, it is necessary to include the installation of a lightning rod in the modeling of houses, since the absence of such protection can not only lead to destruction, but also pose a threat to the life and health of the inhabitants of the house. The installation of a lightning rod is carried out according to a separate scheme with the involvement of qualified specialists.
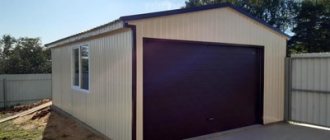
Project of an individual residential building 268.5 sq. m. m using frame technology
Max
October 13, 2021
- 100
29 630
Architectural and Construction Solutions. Working draft. House. 2 floors. Height of 1st floor 3600 mm, 2nd floor 3000 mm. Building area 1520 sq. m., construction volume 2350 cu. m., residential area 108.2 sq. m., non-residential area 112.8, total 268.5 sq. m. External load-bearing walls are made in the form of wooden frame panels 145 mm thick with subsequent
House projects / House drawings
Security alarm system in house plan drawings
Before you design a house yourself, you need to consider the need to install additional systems, for example, a security alarm. Its design is the development of a separate plan that provides for the structure of a network of engineering devices. The main goal is to provide varying degrees of protection for construction projects. Drawing up security system drawings for a home is an individual process, as it involves the operation of the alarm system in specific conditions.
When creating such a project, it is necessary to take into account a number of rules and regulatory requirements. In particular, when drawing up drawings, you should act in accordance with SNiP standards and other technical documents.
Key factors to consider:
- the purpose of the premises, according to which equipment of a certain complexity is selected;
- the area of the object that is subject to protection, as well as the features of its architecture and design;
- determination of the type of alarm, which can be wired or wireless.
A diagram of the location of security sensors, where the opening sensor is marked in yellow, motion in red, glass breaking in green, reader in blue, siren in blue, motion detection zone in pink.
The alarm project plan is subject to mandatory approval by the relevant organizations, and only after that detailed drawings of the house security system are drawn up.
Instructions for drawing a section of a house
We draw the vertical and horizontal axes of the building. By horizontal axes I mean the lines that will become the top edges of the floors.
After this, we set aside 190 mm from the vertical axes in both directions. From the horizontal lines it is laid down 300 mm - this way overlaps are formed.
The resulting mesh has a lot of unnecessary elements, so we cut off the extra lines, thus getting a section of the house, which is about to be ready.
We begin to draw landings and flights of stairs.
We follow the instructions in the following diagram.
We copy the resulting flight of stairs to the underlying floors.
Let's move on to drawing the roof. It should be noted that depending on the location of the cut, the roof cut can vary significantly.
After this, we move on to drawing the foundation blocks and the foundation itself.
The matter remains small. The section of the house must be edited by removing unnecessary lines and adding the necessary elements. The latter include openings, stair railings and balconies.
Related documentation for the project and construction drawings
A construction project is not only a set of sketches, drawings and tables, it contains detailed information about each of the stages of construction and individual areas of work. This allows us to ultimately obtain a complex capital construction.
On a note! It is fundamentally important to locate the children's room next to the parents' room, so that when the child has the slightest need, the parents are nearby. If at the time of construction there are no children in the family yet or they are still small, you need to think in advance about the presence of a special playroom or area. If space allows, then several rooms can be allocated for children's games.
Each project, in addition to the drawings already listed, must include the following documents:
- architectural and structural characteristics;
- description of the functionality of the building;
- technical and economic data such as area, cubic capacity, height;
- description of engineering solutions;
- types, list and quantity of construction and finishing materials.
Guided by the project, you can organize the construction process, establish the sequence of work and determine financial costs.
The architectural passport contains a copy of the designer's license, an explanatory note, facade colors, floor plans, axial sections and a roof plan.
Yard layout
After you have managed to draw a diagram of the house, we move on to the next stage of planning - drawing the yard area. You don't need to use a lot of detail to do this. It will be enough to mark the driveway for the car, porch and garage. However, do not forget to maintain all the proportions with your house and take into account the total area of the site so that you have enough space during construction.
Computer programs for house design: reliable assistants in creating projects
Modern computer technologies allow you to quickly visualize all your desires and depict the home of your dreams. Moreover, thanks to special programs, you can independently carry out 3D design of your home. Even inexperienced users can do this using, for example, Google SketchUp. In this service you can design both residential and commercial premises.
Projects of two-story houses with a garage: features of modern projects (read more)
Using an online house plan, right in your browser, you can create models of buildings indicating the exact dimensions and even the texture of materials. Offline programs require downloading and installation on a PC, so the computer must have sufficient RAM.
The house designer allows you to design a virtual luxury cottage or small country house using individual samples and details. Such programs make it possible not only to design different models, but also to create a list of materials and parts required for purchase, and even calculate the approximate cost of the project.
Using computer programs, you can easily design a house yourself.
Popular electronic products include AutoCAD and KOMPAS-3D. These are universal programs that can be used to create house and interior designs. Their main drawback is their high price. Cheaper but less functional is Ashampoo Home Designer - this is an ideal choice for beginners in the design business.
Drawings of private houses are the main element in a construction project. Not only the reliability of the structure itself, but also the service life of communications and housing support systems depends on their correct implementation, which makes it durable, comfortable and cozy for a family to live in. Therefore, you should approach the issue of creating drawings as carefully and responsibly as possible.
Projects of houses made of foam blocks: advantages and disadvantages (read more)
Geological exploration of the house site
Where does “do-it-yourself home project work” begin? First of all, when working on a house project yourself, it is necessary to conduct a geological exploration of the site - assess the nature of the terrain, soil and find out the groundwater level. The best time of year for this is spring, then their level is as high as possible and it is possible to determine this indicator with maximum reliability. It is very important to do this based on the fact that this indicator is of greatest importance when laying the foundation of a private house.
To determine the depth of groundwater, we recommend contacting a specialist
Determination of physical wear and tear of the surveyed 2-story, 2-section, 6-apartment residential building
Max Chupryakov
September 29, 2021
- 0
294
Assessment of the physical deterioration of a building by structure. Determination of the physical deterioration of the building as a whole. Plan of the 1st and 2nd floors, Facade 1-7, Section 1-1, Explication of identified defects. Section of a building with a table of physical wear and tear of foundations, walls, partitions, floors, coatings, roofing, floors, windows, doors, finishing, engineering equipment and stairs in
Wooden structures / House drawings