There is no reason to write about how important a garage is for a car.
But the discussion of what material it can be built from is the point of this article. If the reader has become one of those who decided to build a garage on their own using sandwich panels and is looking for a guide to action, then he has come to the right place.
The most useful information on this matter is collected here.
Materials and tools for installation
Preparation for the construction of a garage is important, as is the stage of its construction itself. You need to start preparatory work with the purchase of consumables and working tools.
Accurate calculations of all devices, made in advance, will help during the work itself not to be distracted by additional trips to the store for missing goods, as a result of which the construction will stop.
To work you will need :
Hammer or drill.- Screwdriver.
- Grinder with a disc.
- A metal saw with fine teeth or a jigsaw.
- Building level.
- Roulette.
- Pencil or marker.
- Frame material.
- Fastening elements (special self-tapping screws).
As for fastening elements, the length of the screws should be slightly greater than the thickness of the panel, the screw drill should be very sharp, and the threads should be clean. The surface of the fastener is galvanized or cadmium plated, and a press washer with a sealing rubber is installed next to the head.
Such special screws may come with sandwich panels, but sometimes manufacturers do not include them in the kit, so these consumables have to be added to the list of expenses:
- Gaskets for sealing.
- Scissors for cutting sealing material.
- Sealant for sealing seams.
- PPE (gloves, glasses, headphones).
Finishing work
To maximize the life of a structure, it is necessary to protect the structure from environmental influences. Despite the excellent technical characteristics of the SIP material, exposure to rain and sun over a long period of time will have a negative impact.
Siding, lining and even ordinary paint can be used as finishing materials. A perfectly flat surface makes it possible to complete the finishing without preliminary preparatory work. If siding is chosen as the finishing material, you will need to mount a frame on which the panels will be attached.
Installation instructions for sandwich structures
Since the total weight of a garage structure made of sandwich panels is small, there is no need to lay a very powerful foundation under the building. A columnar or shallow strip base is suitable for these purposes. If you need to save money, you can use a regular “cushion” consisting of crushed stone, fine gravel and tightly compacted soil, equipped with a drainage system.
After the foundation has completely hardened and the base has been prepared for subsequent work, the construction of the frame can begin. It can be made of metal or wood.
If a metal frame is made, then a corner with dimensions of 50×50 mm or 75×75 mm is used. The frame parts are connected to each other by welding or bolts.
If the frame is made of wood, then beams measuring 100×100 mm are used. The bars must be impregnated with an antiseptic solution and a fire retardant. Wooden blocks are connected using metal corners.
The frame of the building can be a square or rectangle with possible vertical posts in the center to provide rigidity to the structure. First, the lower belt is assembled and fastened, then the racks are mounted at the corners, in the places of the future gate (on the sides), as well as along the entire perimeter at least in 3 m increments.
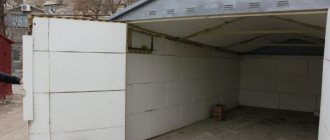
Installation of the sandwich panels themselves begins from the corners of the garage. The panels are attached to the vertical frame racks using special screws. The screws must be fastened at a distance of at least 5 cm from the edge of the panel. The elements are leveled and connected to each other. Self-tapping screws are screwed in in increments of 50 cm.
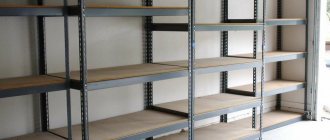
A panel 2 m long requires 4 screws, and an element 3 m long requires 6 fasteners. If heavy wall cabinets or shelves will be attached to the wall, or the garage is being built in an area with strong winds, self-tapping screws need to be installed more often.
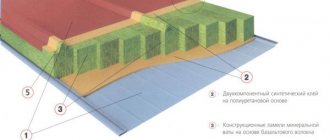
The elements are fastened together using a special locking mechanism in the panels themselves. Gaskets must be inserted between the seams, panels and frame to ensure a more airtight and tight connection of these parts of the structure. In areas with a cold climate, you must first coat the joints with sealant, and only then connect the sandwich panels. The more airtight the joint, the less thermal conductivity will be.
The second and every even row begins with half a panel to avoid joining at the seams. A gap is left at the ends of the building, which is closed with corner gaskets.
It is necessary to remove the protective film from the panels only after the building has been completely erected . Previously, it is not advisable to do this so as not to damage the panels during work.
It is also recommended to construct the roof from sandwich panels. It can be made single-pitch or gable. All seams are coated with sealant and protected with a special gasket.
The height of the garage is usually 2.2 m, and the height including the roof is 3.6 m.
Top trim device
Before you begin attaching the material, you must complete the process of constructing the frame. The final stage is the top trim. It is recommended to lay the boards or bars used for this purpose on the top of the vertical support. This will allow you to evenly distribute the load during snowfalls. Also, the supports will take the weight from the roof, and the SIP panels will not be subject to deformation.
Problems and errors in the process
Some people make mistakes during the construction process, which can affect the quality of the work performed. To avoid them, you need to adhere to the following recommendations :
Screw screws only vertically, not at an angle. This will ensure reliable adhesion of the screws to the material.- Protective seals and decorative overlays must completely cover the installation gap so that poorly sealed cracks do not become cold bridges.
- Handle sandwich panels carefully so as not to damage them. If you still cannot avoid scratches, then the errors can subsequently be painted over with oil paint in several layers.
- During the operation of the garage, you can sometimes treat the building with anti-corrosion materials for metal surfaces.
- Don’t forget to leave or make holes for the ventilation of the garage later, so that dampness does not accumulate inside and there is good air exchange in the room.
- It is best not to use a grinder to trim panels, because it will cause the edges of the material to overheat and melt, resulting in damage to the anti-corrosion coating. But if there are no other trimming devices (hand saw, jigsaw, metal scissors), as a last resort, you can use a grinder with caution.
- The panels are not easy to lift by one person. Therefore, you won't be able to work alone. For example, the weight of a panel 6 m long is about 90 kg, and roofing elements generally weigh about 120 kg. They can be mounted either with 1-2 assistants, or using a manipulator.
Complete set of cabins
The set of a collapsible change house or utility unit using Canadian technology (an alternative name for sandwich panels) includes the following materials:
Collapsible frame
. The main element is made from a profile pipe (assembly is carried out with bolts); The cross-section of the parts is determined by preliminary strength calculations.
Set of wall and roof panels
. The thickness of the modules is selected taking into account the climatic conditions of the region. The thickness of modules for residential cabins in the central region of Russia starts from 100 mm; for a garage, 50-60 mm is sufficient.
Metal door
, with or without mineral wool insulation (depending on the purpose of the object). The insulated door does not freeze around the perimeter and does not deform in frost.
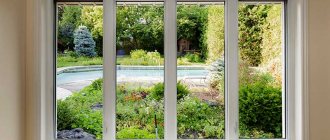
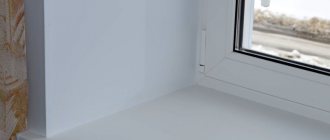
Window
. To achieve maximum energy efficiency, double-glazed windows are installed at the customer's request.
Pros and cons of self-building
Building a garage from sandwich panels with your own hands is an opportunity to save a lot on work and build a building according to your wishes and requirements. If you have a ready-made foundation, garage walls can be erected in 2-3 days, which cannot be said about construction made of brick, foam block and other materials.
The design can be updated if desired by adding or removing individual fragments of panels and replacing them with new ones. The work can be carried out at any time of the year, so this is to the benefit of the garage owner. He can take into account his plans and carry out work at a time convenient for him, for example, during his vacation, even if it is in winter.
The disadvantage of installing the panels yourself is that you need a partner to lift, transport and install these elements.
Choosing a foundation
If there is a slope on the site, it is recommended to install a pile-screw foundation for the foundation of a stationary utility block. Installation of such a base is carried out mechanically and takes one day. This technological option has additional advantages:
Installation is carried out year-round
; The technology is used on all types of soil.
The process is not accompanied by excavation work
, it does not include pouring concrete mixture and removing soil.
A feature of the technology is the need to install a floor and decorative cladding of the base (on an uneven landscape). Unlike a pile-screw foundation, a slab foundation is a solution with a finished floor. Pouring the slab at the base of the utility block is carried out on any soil and also has its own characteristics:
Installation takes one to two days
, but concrete hardening occurs within three weeks.
The method includes excavation work
. It will be necessary to arrange formwork and remove excess earth.
The method depends on the weather
and is not suitable for sloping areas.
Prices
If you build a garage yourself, its construction will cost the owner much less than using standard materials, and the building will last from 30 to 50 years.
The average price for sandwich slabs varies from 920 rubles. up to 4200 rub. for 1 m2 . The greater the parameters of the elements (thickness, width, length), the higher the price. This cost must be multiplied by the area of the garage walls and subtracted from it the sizes of windows and gates. Roofing panels will cost about 2000 - 4000 rubles.
To the costs you also need to add the price of the foundation, fastening elements (if they are not included in the package of the panels), gates, windows, tools for work.
Panel characteristics
This is a relatively new building material, for the production of which polystyrene foam and OSB boards are used. The main characteristics of the panels are reliability and low heat loss. Most often, sheets are produced in sizes 2500 by 1250 mm. This size must be taken into account during construction.
SIP panels can have different thicknesses, which is very convenient for the construction of buildings for various purposes. The thickness directly depends on the thermal insulation material. For a barn, you can choose a medium size of products; this will be enough to keep any animal or simply store equipment.
The material is environmentally friendly. It can be used not only for the construction of outbuildings, but also residential buildings. During operation, the building material does not emit any toxic substances. [ads-pc-1]
We are building a swimming pool
Many people dream of having a swimming pool on their property. Thanks to modern affordable inflatable or prefabricated structures, now almost everyone can afford to splash around in the summer in their own pool, installed right on the open-air site. Not only children, but also adults love such water procedures, and if the summer is hot, the whole family will certainly appreciate the innovation.
Alas, summer in the northern regions is short - before you know it, it’s already cold, and the first leaves begin to smoothly “dive” right onto the water surface of the pool. All that remains is to sigh heavily and put the structure away until next summer, forgetting about swimming for a long time. How great it would be - it’s frosty or blizzard outside, and you’re splashing around in warm water, as if on a tropical beach.
Of course, a swimming pool can be built in a house, but it is quite expensive and labor-intensive: you need to think about such work at the stage of designing a house, and you will also have to comply with many different technical conditions for everything to function normally. You can take a simpler route and build a separate pavilion for the pool, which can be adjacent to the house and have access from the living quarters. The pool itself can be made extremely simple, for example, using the already mentioned prefabricated structures. The main thing is that the room is warm in any frost. Accordingly, the material from which the walls of the pavilion are built must have low thermal conductivity. PPU sandwich panels are ideal for this role.
There will always be high humidity near the pool, so its walls should in no case be afraid of water, and this, again, can be easily achieved using sandwich panels with polyurethane foam. Thanks to these structures, you will be able to protect yourself from the appearance of mold, mildew, and microbes, which is very important for this type of premises
Don’t forget another important advantage of sandwich panels mentioned above - using this material, you can build a pavilion for your personal pool very quickly. In addition, the pool can be combined with a sauna
But this is a topic for another discussion.
To feel comfortable in your summer cottage, you will have to put in a lot of effort and money. However, if you choose sandwich panels with polyurethane foam as the material for building a house and other structures, this entire labor-intensive process can be simplified and accelerated, and quite noticeably.
More information about PPU sandwich panels can be found on the ProfHolod company website https://www.profpanel.ru/
Barn project
Design is one of the important stages. All work will be carried out on the basis of this documentation. The project also takes into account the costs and construction time.
When designing, be sure to take into account the purpose of the building. It is necessary to comply with legislative norms and requirements for the maintenance of cattle, dairy, etc. Select the optimal options for flooring, placement of stands, feeders, cleaning, engineering and other systems
In general, as you understand, there is a lot of work and it is important to carry it out correctly. Our employees have designed many objects, accumulated vast experience and will competently draw up all project documentation
At the design stage, you can follow one of the following paths:
- Select a standard barn design. This option has already been implemented and worked out. Construction based on it will save time and money on its development.
- Develop an individual project from scratch. If for some reason the standard options are not suitable for you, an original design solution will be developed for you. The cost of the service is from 250 rubles/m2.
How to calculate the quantity?
To calculate the required number of sandwich panels for building a shed, you need to take into account a number of facts, including :
- Roof features: single-pitch or gable.
- Dimensions of the building: width, length, height to the roof and to the ridge.
- Number of windows and doors.
- The thickness of the panels for walls and roofs, their width and length.
It is difficult to perform accurate calculations on your own. As a rule, panel sellers do this after providing them with the necessary characteristics. As a last resort, you can use an online calculator by entering the required data in the appropriate columns.
Accurate calculation is very important. It will allow you to avoid unnecessary expenses and immediately purchase additional elements of the required size.
It will not be possible to use only solid panels. They will have to be cut, so you need to take care of the necessary equipment in advance.
Direct construction
Even a small utility block can cause many difficulties during construction. The event therefore welcomes the following sequence of actions:
- Clearing the area for the structure;
- Carrying out measurements;
- Digging holes or trenches for the foundation;
- Filling the trenches with a drainage cushion of sand and crushed stone;
- Installation of formwork for a strip foundation or ready-made pillars for a block analogue;
- Installation of reinforcement under a cement strip foundation or backfilling of blocks with drainage;
- Filling the reinforcement with cement or laying roofing felt on top of the blocks;
- Organization of the lower trim from metal channels or wooden logs with a cross-section of at least 150x100 mm;
- Construction or assembly of walls from piece building materials or finished panels, respectively;
- Organization of the top trim from lightweight wooden logs with a cross-section of at least 100x100 mm;
- Installation of rafter sheathing;
- Laying roofing;
- Installation of doors and windows.
If you want to build a utility block with a toilet and shower, you will have to supplement the structure with a partition. Such a project welcomes the organization of a pipeline for water supply and sewerage at the foundation construction stage.
When organizing a utility room with a cellar, you will have to dig a large pit and fill its bottom with a drainage pad. The latter will serve as the basis for the construction of the basement foundation.
Relaxation area under a canopy
A patio is a specially designated place in the local area in the open air or under a canopy.
Everything that fills its space strongly resembles a living room, but only placed in the fresh air. Functionally, such a site should be perceived as a comfortably equipped courtyard. Only one part of it is equipped with canopies - most often the dining area. Sun loungers or a play area remain free. Patio Features:
- the shape of the horizontal plane can be different - from strict geometric shapes to elaborate and fantasy ones;
- the site is filled with concrete and laid with garden (or paving) slabs or stones;
- fences are lattice miniature fences or two-level rises, rifts, cascading curbs;
- a classic set of furniture - a table, chairs (armchairs), a chest of drawers for storing dishes, sun loungers (garden swings), lamps;
- imitation of the walls of a covered area with curtains or climbing plants;
- Great for receiving guests, arranging parties, celebrating family events.
Spacious patio for relaxing outside the homeSource homesns.com
The gazebo is installed in the comfort zone of the adjacent house area, open, semi-closed or closed. Standard building shapes are square, hexagon, circle. Less common are rectangular and triangular arbors along the horizontal perimeter.
Characteristic details for building a gazebo:
- installed on the foundation;
- the perimeter is fenced with a parapet (height up to 80 cm);
- roof is required;
- pillars support the roof;
- has one, two or three inputs.
Gazebos can have a simple design, or they can be a real work of art. They are made from wooden beams, brick, stone, concrete and even marble. Both last options are suitable not only for city parks. They are also suitable for private areas with a large area.
Octagonal wooden gazebo with a blank wallSource blg.specdispetcher.ru
Small-sized snow-white marble gazeboSource dizaburg.ru
The gazebo adjacent to the fence is made of concrete, brick and marble, the roof is metal tileSource studiya-kamnya.com
Metal-tiled gazebo made of mixed bricks and a brick ovenSource novomoskovsk.tiu.ru
The recreation area can be made adjacent to the house. These are terraces that are made of wood or have brick pillars added to them. In this case, the floor can be earthen, made of boards or poured concrete, decorated with stone or slabs.
Covered terrace - aluminum frame on a wooden two-level floor, polycarbonate roof Source: sadfacade.rf
Advantages of terraces:
- proximity to the kitchen - no need to carry dishes and various things for a picnic far;
- protection from drafts (if you choose the right place);
- accessibility of electrical communications, running water (to regularly water flowers in hanging pots, for example);
- can serve as a dining room and even a living room in the warm season.
On a note! If they want to use the terrace in winter or autumn, then I equip all openings with removable double-glazed windows or other materials. Glass is considered the most practical. It opens up access to aesthetic pleasure in the beauty of autumn nature or a winter snow-covered fairy tale.
Terrace glazed with sliding systems - in summer they fold almost imperceptibly to one side, in winter they move apartSource balkon-fasad-spb.ru
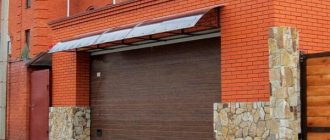
Garage Doors
An important detail is the garage door. They provide safety and comfort of use. Gives a completed look to the building.
Popular types: — Roller shutters — Sliding — Swing — Sectional
All options have insulation in the form of foam filling. This gives additional heat and sound insulation properties. You can choose almost any color, in combination with the main one.
Can be equipped with automatic remote opening. Only in swing gates this will be more difficult to implement.