Modern glazing technologies imply careful attention to every detail, so questions about how window sills and slopes are designed also do not go unnoticed by the craftsman. Proper repair of these structural elements of the window will provide it with a longer service life and prevent the risk of cold air entering the home. Let's talk further about how the interior window slopes are finished, and what materials need to be used for this.
The need to finish the slopes inside the window
The relevance of finishing window openings indoors and outside the house with sandwich slabs, plaster, etc., as well as the front door with decorative stone, is very high. Internal factors, the action of which can negatively affect the quality of the window itself and its slopes, include:
- increased humidity indoors;
- the appearance of condensation on the window due to a significant difference in temperature outside the window and inside the house.
External factors that have a destructive effect on the window and its slopes include:
- precipitation, wind, sunlight;
- sudden changes in ambient temperature;
- mold, mildew, harmful insects.
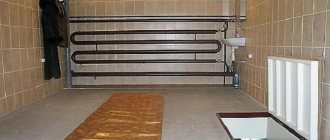
Proper finishing of windows and doors with decorative stone allows you to raise the level of resistance of the window structure to the influence of the described factors to the highest possible level. This will ultimately extend the service life of the windows, improve the appearance of window openings in particular, as well as the facade of the house as a whole. You can see a window with high-quality slopes inside the room in the following photo.
Sequence of work
Success, the speed of achieving results, depends on proper preparation for work. Purchase the necessary tools and available materials:
- Table for cutting and applying wallpaper glue.
- Step ladder.
- Clean container for glue.
- Grater with mesh for grinding.
- Sharp scissors, wallpaper knife with spare blades.
- Tape measure for measuring the length of panels and the height of walls.
- Level, wallpaper ruler.
- Wide wallpaper brush for applying glue.
- Painting fur, rubber roller for rolling wallpaper.
- Plastic spatula for wallpaper.
- Rags, sponge for removing excess glue.
- Hammer, insulating tape, pliers.
Drywall
Most often, the decoration of indoor slopes and entrance doors is done using plasterboard. This is a finishing material with high performance parameters, which allows you to quickly and with a minimum of effort make slopes perfectly smooth and resistant to external influences.
Drywall is lightweight and its installation on vertical surfaces is not particularly difficult. It is beautifully painted in the current color shade. In addition, such materials, when properly treated with antiseptic compounds, can prevent the risk of mold and mildew developing at the joints of slopes and window frames. Window finishing with plasterboard is shown in the following photo.
Material selection
You should not think that you can choose any type of drywall to design slopes in your house. The material should be selected taking into account its operational parameters. And they differ for different types of drywall, which should be taken into account by the master before materials are purchased and window repairs begin.
Types of drywall
Absolutely any window is a source of moisture in the form of condensation, which is formed due to the large difference in temperature in the house and outside. As a result, the materials used to repair slopes must certainly be resistant to this factor. This means that you need to select only moisture-resistant plasterboard sheets, on which the presence of condensation will not have a negative impact. Otherwise, the repair will retain its functionality and attractive appearance for only a short period of time. In addition, it is worth using antiseptic compounds to cover the surface of the material, as well as special paint for its finishing.
Measurements
Finishing the slopes of plastic windows in a house should always begin with taking measurements, for which you will need to stock up on a measuring tape. The final results of the master’s work largely depend on the quality of this stage of work. If the slope does not fit as tightly as possible to the window frame, there will be a risk of developing such negative consequences as:
- the appearance of mold and mildew outside and inside the premises;
- the appearance of microcracks through which frosty air will begin to penetrate into the house during the cold season. Gradually, without adequate measures to eliminate the problem, the cracks will grow, and with them the costs of heating the premises;
- reduction in the service life of the window structure, its rapid wear both in quality and aesthetic terms.
Taking measurements
Installation of slopes
Finishing slopes with plasterboard begins with an analysis of the measurements taken. All window parameters are transferred to plasterboard sheets, from which you need to cut out pieces that are ideal for the window opening.
Drywall cutting process
Installation of such canvases can be carried out on the lathing, on the profile, or without them. The choice of technology should be determined by the fact in which state the slopes are. Visually evaluate whether they are processed with high quality, as well as what quality the double-glazed window itself has.
Installation of drywall is carried out using a special adhesive composition if the walls are perfectly even. If not, you will need to first bring them to this state.
Next, you need to attach the strip to the window profile or frame, which will securely fix the drywall on the side of the double-glazed window. Plasterboard panels are installed on top of the planks, carefully treating the resulting voids with sealant. Then the structure will be devoid of cold bridges.
Removing excess polyurethane foam
Installation of a slope corner
Metal sheathing
Installation of drywall boards
Ready-made plasterboard slope
Decorative plaster
If the window slopes will be finished with plastic, first the surface can be plastered to level it. There are many benefits to such preparation.
- Firstly, it is resistant to mechanical stress.
- Secondly, it allows you to cheaply finish the base.
- Thirdly, it is easy to use and environmentally friendly.
Before finishing the window slopes with your own hands, you need to protect the window sill with paper or film, but you should not remove the plastic tape from the frames until the work is completed. If possible, opening doors can be removed so that they do not interfere with plastering work. If we are talking about plastic windows, this will not be particularly difficult. You will only need to remove the decorative plastic caps.
Finishing window slopes begins with removing old plaster. This can be done mechanically or using a hammer drill. The base is dust-free and then treated with a primer. The slopes are located close to the outer wall, so they should be insulated to prevent freezing. This can be done with 20mm polystyrene foam. It is secured with dowels.
The plaster mortar can be a mixture with a cement binder. Such compositions are preferable to gypsum ones for the reason that they have moisture-resistant characteristics. cladding with plaster can be carried out using beacons, which are metal perforated corners. The solution is applied in large strokes using a spatula. The tool must be held at almost a right angle. Once all the space between the beacons is filled, it should be leveled using a spatula. You can begin applying putty after the plaster layer has dried.
Types of decorative plasters
If you decide to finish window slopes in a wooden house using plaster, you should understand its main types. Among the market offers, the following compositions should be highlighted:
- acrylic;
- silicate;
- mineral;
- silicone.
In terms of texture, plaster can be represented by Marseille wax, wet silk, Venetian mixture, or wet breeze. This list is not complete, as there are a great many textures on sale. If you want to finish the internal slopes of plastic windows with plaster, you can choose acrylic, which is ready to last up to 15 years, dries quite quickly and is suitable for difficult operating conditions. The surface can even be washed if necessary.
But this mixture has its drawbacks, for example, it is a fire hazard, can crack when exposed to the sun and has a low level of vapor permeability.
As for the mineral composition, its ingredients include cement and clay. Although this coating is inexpensive, it is not afraid of frost and moisture, so it is in great demand. Before application, the surface should be coated with a primer and any uneven surfaces should be filled with putty.
One of the most durable is a silicate mixture, the binders of which are clay and glass. This coating repels moisture and is ready to last up to 20 years, but is more often used for exterior decoration. When considering options for finishing window slopes, you should pay attention to silicone plaster, which is characterized by durability and elasticity. This composition has its drawback, which is its high cost. The formed layer will be easy to maintain, will demonstrate strength and resistance to fading.
Surface preparation
Before finishing the slopes of wooden windows, you need to make sure that the base is dry and clean. All dirt and oil stains are removed. Notches can be applied to the base to increase adhesion. The composition will stick well if you fill it with shingles. The elements are fastened with nails. When you have to work with a complex surface where wood is combined with another material, such a base must be covered with a metal mesh. Its fastening is carried out with self-tapping screws. After reinforcement, you can begin plastering.
PVC panels
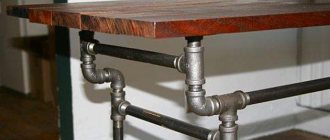
No less popular today is the repair of slopes in a house with PVC panels on the profile and doors with decorative stone, thanks to which the entire structure acquires a solid appearance. Such repairs, as shown in the photo below, have a long service life and retain their properties for a long time.
PVC panels
Plastic panels are selected taking into account the size of the window opening, as well as its technical parameters. Before starting repairs, you will need to prepare the surface of the slopes. Then, PVC parts of the current size are cut out, which will be mounted around the entire perimeter of the window on wooden slats and profiles.
If you want to insulate the house, the space between the wall surface and the panels should be filled with a layer of mineral wool or construction foam. Finishing slopes with PVC profile panels is also advantageous because PVC materials have a smooth surface, are produced in different color shades, and look harmonious in the interior of a private home. This allows you to save on the final painting of the slopes.
Another attractiveness of this method lies in the fact that all elements of the window structure (window, slope) acquire the same expansion coefficient, which will ensure they fit tightly together and prevent the risk of cracks forming.
Scheme for finishing a slope with PVC panel
Surface preparation
To install plastic slabs on a slope, you need to carefully prepare the surfaces. To do this, I carefully cut off the excess mounting foam using a utility knife, and the surface itself is cleaned of dirt and dust, coated with an antiseptic, and primed. Next, you will need to install a metal frame made of guide profiles.
A hairdryer can help remove paint from walls.
Installation of the guide profile
Measure the profile along the outer edge using a construction tape, and then its outer width and the distance from the top edge of the window structure to the surface of the window sill. Take a U-shaped profile of the current width, cut it into pieces using metal scissors, according to the window measurements. Next, the sections are screwed at intervals of 20 cm using screws along the outer part of the window frame. The top and side profiles are mounted in the same way.
Metallic profile
Installation of the starting profile
Lathing
To organize the sheathing, you will need wooden slats with a cross-section of 20x40 mm, which are fastened on the far corner of the slope from above and on the sides with dowels in increments of 30 cm. The sheathing must have perfect evenness, for which the thickness of the wooden slats is trimmed with a plane and the work is checked with a building level.
Fastening the sheathing
Panel installation
Finishing with plastic plates can be easily done with your own hands. To do this, cut the material with a jigsaw, then fix it on the upper profile and secure it to the sheathing using self-tapping screws.
The side profile is mounted in the same way as the top bar. And the gaps between the window frame and the wall need to be filled with construction foam, for which the surface is first moistened with water. After this, you need to lean the plastic panel against the base and secure it to it with metal screws.
Fastening PVC panels
Installation of F profiles
The F profile is cut and inserted along the edges of the panels. In those areas where the corners come into contact with the fasteners, you will need to make a small cut. At the same time, the slopes of the front door should be decorated with decorative stone, which looks very expensive. At the end of the work, you need to fill the joints with white sealant, carefully filling the gap with the compound, removing excess volume.
These measures will not only make the window even more attractive, but also protect it from mold, mildew, and rapid wear.
F profile for slopes
Instructions for use - TECHNONICOL HAUBERK facade tiles
We will tell you how to properly install TECHNONICOL Hauberk facade tiles and what you need to pay attention to.
Created on the basis of fiberglass, improved bitumen and natural basalt granulate, facade tiles are characterized by increased tightness, resistance to corrosion and temperature fluctuations, and also have exceptional durability of the material and color.
The expressive capabilities of TECHNONICOL HAUBERK facade tiles lie not only in color, but also in the tile design itself: their combination can turn a country house into a cozy “family nest”, striking with its lines and originality.
You can view the range, documentation and examples of objects on the official website of TECHNONICOL.
Installation instructions
Step 1. Installation of counter-lattice
To create a ventilated gap between the wall and the finishing, it is recommended to install vertical timber with a pitch of 300 mm and a thickness of at least 25 mm. To ensure capillary cut-off of wooden elements in contact with the wall, it is recommended to glue a self-adhesive underlay carpet to the surface adjacent to the wall.
Step 2. Installation of counter-lattice
Initially, a counterbeam is installed to match the size of the OSB sheet.
Sandwich panels
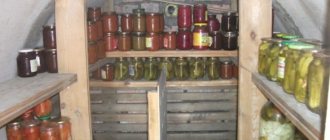
Repair of window and front door slopes can be done with sandwich slabs, as shown in the following photo. The window sills and windows are decorated with sandwich slabs, and the door slopes are decorated with decorative stone. Sandwich slabs retain their visual appeal and original performance parameters for a long time.
Sandwich panels
In accordance with all the rules and regulations, repairs of window structural elements can increase the degree of resistance of windows to the negative effects of negative factors inside and outside the house. The distance between the wall and the sandwich plate must be filled with construction foam, which will act as additional insulation for the structure.
Installation of such plates is not particularly difficult. The sandwich board is fixed to the base using liquid nails, which will provide the connection with high practicality, density, and durability. Check the angles of the slopes for compliance using a small tool.
Installation of sandwich slabs should be carried out on wooden blocks, which will give the surface of the slope ideal evenness even if there is a deviation of the slope from the vertical. To ensure a neat appearance for the joints of the plates, they need to be treated with silicone.
Installation diagram of PVC sandwich panels on window slopes
Advice from the experts
When using plaster as a finish, which can act as a base for plasterboard sheets, it is recommended to level the mixture with a wooden spoon. The length of the tool will be determined by the width of the slope. Opening the window when working with the mixture is strictly prohibited. It is also important to ensure that the composition does not get into the fittings, as it will damage it, which will cause disruption of its functions.
Before choosing plaster as a facing for slopes, you should compare it with other materials, for example, gypsum plasterboard. The first is an outdated approach and has many disadvantages. The mixture bonds to the plastic frame, which can cause gaps. Cracks will certainly occur due to the low elasticity of the mixture and constant temperature changes. Plaster also has rather weak thermal insulation characteristics, which often leads to the formation of condensation and mold.
The traditional solution today is plasterboard. Preference should be given to its moisture-resistant variety. If you have plasterboard left over from the renovation and you want to use it, it is recommended to cover the surface of the sheets with a moisture-proof compound or primer in several layers. But if you still plan to purchase gypsum boards, you should choose moisture-resistant sheets, despite their higher price. The cost will be repaid by the excellent thermal insulation properties of the material, its high thermal stability and good rigidity.
Plastering
Finishing window slopes outside or inside the house is often done by plastering the surface. But applying this method is only relevant if the slopes are perfectly even. The layer of plaster mass should not exceed 2 cm in thickness, otherwise the slopes will quickly crack and become unusable. This type of finishing goes well with finishing door slopes with artificial stone.
| Stages of work | Target |
| Slope preparation | Removing greasy stains, dust, applying antiseptic |
| Slope primer | Increases adhesion of finishing materials |
| Applying the first leveling layer of plaster | The plaster is sprayed with a spatula and leveled using the following rule: |
| Slope reinforcement | To impart stability to the structure outside the house, you can use a reinforcing mesh on the slope, which is pressed into the first layer of plaster |
| Applying a decorative plaster layer | Finishing the base, giving it texture, painting |
Applying plaster
Main types of coating
Decorative types of plasters are divided into groups according to their main substance in the composition and type of filler. They can be textural , structural and Venetian.
- Textured plaster has a special pattern, which the consumer knows about in advance.
- Structural plaster creates a simpler relief compared to textured plaster, but its pattern becomes unpredictable.
- Venetian plaster includes several layers at once, as a result of which the surface becomes smooth and acquires a characteristic pattern.
Common mistakes
It often happens that the finishing of window slopes inside is carried out in violation of technology, which entails a number of negative consequences. In other words, these structural elements of the window opening acquire low resistance to the effects of negative factors indoors, which entails rapid wear of the slopes. This is why it is so important to identify the most common mistakes made by inexperienced builders when finishing window slopes:
- incorrect measurements of the base for installation of sandwich or PVC panels, plasterboard, etc., which leads to a loose fit of materials to the slopes;
- neglect of antiseptic and sealant increases the risk of mold and mildew developing under sandwich panels, drywall and other finishing materials for decorating slopes;
- When using plaster mixtures, inexperienced craftsmen often try to correct defects in the base by applying an excessively thick layer of finishing. And this is unacceptable, since plaster more than 2 cm thick may crack after drying;
- When finishing door slopes with stone, you should not give preference to too cheap material. Decorating even with artificial stone cannot be too cheap, because such savings affect the quality of the finish.
Selection and installation of window sills
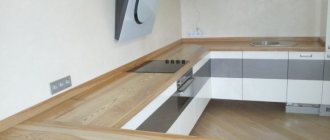
The internal window sill serves to properly direct the flow of heat, protecting the wall from pollution and flooding. The choice of such a part is influenced by the technical characteristics of the window, its size, width, and frame material. Wooden and stone window sills fit into a high-quality, solid opening made from similar panels. You should not install a natural element under a regular plastic window.
The choice of window sill is also influenced by the characteristics of the room. For the bathroom and kitchen, it is better to give preference to moisture-resistant materials (plastic, laminate, stone). It is better to decorate the bedroom and living room with a more functional and warm option, for example, wood.
The process of installing a window sill requires care and strict adherence to certain rules. Regardless of the material, the products are mounted according to the general principle. We make the necessary measurements. Add 1-2 cm to deepen the element. Using a hammer drill, we make grooves in the wall and insert a window sill. We place wooden wedges under it and level it to the spirit level.
We deal with undefined edges of canvases and external corners
I’ll say right away that the method I propose is the most natural collective farm, but it works, it has been tested repeatedly.
So, it happens that you glue a strip, everything goes fine, but for some reason its edges just don’t want to stick to the wall. Accordingly, the wallpaper seams look simply terrible. Or, for example, glue a wide sheet to the outer corner, but it always sticks out, no matter how hard you try. Liquid nails or (which is better) acrylic sealant will come to your aid. For non-stick edges, you will only need to apply the sealant evenly to the wall below the edge. That’s it, he’ll stick to you like he’s cute. In the case of an external corner, glue the entire sheet heightwise first to one part of the wall, then also apply a strip of sealant to the corner (here it’s already quite generous) and you can glue the rest of the sheet. Now it’s not the wallpaper that will stick to the corner, but the corner to the wallpaper)) It’s a joke, of course, but acrylic sealant really works.
There is a hypothetical risk that the sealant will show through the wallpaper if it is thin and light-colored. I don't know if this is possible. Most likely, no, because it is distributed under them in a very thin layer and is unlikely to affect anything.
In general, there are special types of glue for corners, borders and joints in the form of a thick paste. But no one really buys them. I’m not advocating my method, but it works.
Wallpapering: from a window or from a door
Wallpaper is a popular material for wall decoration because, thanks to the richness of types, colors and textures, it provides wide scope for the implementation of design ideas. When it comes to gluing wallpaper in an apartment with your own hands, the most pressing question arises: which side to start gluing the wallpaper from, and how to glue the wallpaper correctly - from the window or from the door? Professionals know the answer to this, but beginners will find this information useful.
Wallpaper is a popular material for wall decoration
Which material to choose
Having accepted as a starting condition that the design of such a plan suits us, all that remains is to choose the appropriate material for designing the slope. There are several options here - from inexpensive to very expensive:
- Decorative stone imitating brick.
- Wall panels with imitation stonework.
- Plaster with subsequent processing to give it the desired look.
Among the options presented, decorative stone will be the most expensive. However, this is also the most realistic way to design a door or window opening under brickwork. If you need a cheaper method, you can choose either plaster or paneling - both options will not cost too much. At the same time, working with plaster will require certain skills from you, and the panel is simply cut into parts of the desired shape and fixed in place.
Types of artificial stone depending on external design
Modern manufacturers offer the most common textures and shades of this artificial material. Below are samples of some of them.
| Alpine slate | Rock formation |
| Under the brick | Bassoon |
| Marbled | Granite |
| Rocky Pile | Old fortress |
A few tricks from the professionals
Where do professionals start gluing wallpaper? Where they want it, where it’s easier and faster for them. With novice masters they can be done with some nuances and tricks, for example:
- It is better and easier to cut canvas with a kitchen knife - it is easier to control. Trim off the remains using a clerical tool.
- Hanging wallpaper in the kitchen, living room - in any other room, it is better to cut it off after a day.
- Where to properly glue vinyl wallpaper from, a novice master will ask. An experienced one will answer - from where any others come from.
- If your eyes are a little blurry and the bubbles formed on the wallpaper are invisible, you can run your palm over them and listen. If you hear a rustling sound, that means it is located in this place.
- Drafts for wet canvases are the most dangerous enemy. In principle they should not exist.
The question: where to start gluing wallpaper has been discussed by us. Using and following the recommendations given, every novice master will be able to complete his work easily and quickly. The main thing is to adhere to the gluing technique, prepare the base correctly, create an appropriate microclimate in the room, avoid drafts, and where it is better to start is a matter of taste and possibilities.
Installation of wallpaper on walls
There are several ways to glue wallpaper (you can easily see them from photos or videos). One of them involves initially gluing all smooth walls, and then the corners. Other artists advise starting from the most visible corner in the room. There is no consensus on this issue - everyone can glue at their own discretion.
Wall preparation is mandatory for any method. The old coating must be carefully removed and cracks filled with putty. Then the walls are covered with a special primer or wallpaper glue. Only after the primers have completely dried do they proceed to pasting the walls.
At the location of the reference point, draw a vertical line; this must be done with a plumb line or a building level. The first strip is cut from the roll, the length of which is equal to the height of the wall plus 5-7 cm. The wall is carefully coated with glue and wallpaper is applied. Level the canvas with a plastic spatula or wallpaper roller, focusing on the vertical.
At the baseboard and under the ceiling, the wallpaper is cut with sharp scissors or a construction knife. Move on to the next lane.