Clinker bricks for facades are characterized by high strength and decorative qualities. In terms of chemical and physical properties, it is several times superior to ceramic brick, despite the fact that it is a type of brick. Houses lined with clinker acquire a well-groomed, respectable appearance. Clinker brick is the best facade material.
Production technology
The first clinker brick was made in the middle of the 18th century. In Holland, roads were paved with clinker material. If we consider the technical properties, then clinker brick is not inferior to natural stone, while the facing material is used in any volume. Whereas the extraction and processing of stone is a complex procedure. Gradually, enterprises specializing in the production of clinker bricks began to appear. Many of these organizations became successful and still occupy leading positions to this day.
Clinker blocks are produced in a variety of formats. They produce both traditional and non-standard forms to create bold design solutions. Among the standard options are:
- base brick;
- single block;
- euro brick;
- half.
Bricks are produced solid and hollow. Blocks are produced by manual or conveyor molding. Currently, several technological methods for the production of clinker blocks are used. Each of which has distinctive characteristics and features.
How to lay bricks correctly?
To ensure uniform masonry during the construction of cottages, it is necessary to mix material from different pallets. You can mix several shades to get an exclusive effect. To lay out clinker you will need the following tools:
- trowel (a tool for creating a seam between brick layings);
- a simple pencil;
- hammer-pick;
- sieve with a mesh of 2 mm;
- meter;
- spirit level;
- Metal sheet;
- a brush with stiff bristles;
- trowel for expanding horizontal seams.
Lay the clinker based on the instructions:
- The first layer of stone is laid “dry” to obtain a clear marking of the vertical joints, which should have a thickness of 10 mm.
- The laying mixture is divided into working sections.
- A ventilation hole is provided. When carrying out installation work, nothing should get into it.
- After laying out the clinker stone, make recesses in the joints with a depth of 20 mm. The rate of hardening of the solution depends on the brand used. Each manufacturer is different.
In order for the masonry to look neat and beautiful, it is better to invite a team with experience in working with this type of brick. Not all builders can work with it. Considering the cost of the material, the money saved on labor during the construction of a cottage can lead to financial losses. Also, when planning to use clinker, you need to use the services of a designer who, at the end of the project, will calculate the amount of material for a specific cottage.
Materials for clinker production
The basis for the production of clinker products is refractory types of clay with a high content of aluminum oxide. This element is responsible for ensuring that the product does not deform during the firing process. If there is an insufficient amount of aluminum oxide in the clay, kaolinite clay is added to the mass.
Clay is highly plastic. The raw materials should not contain salts or limestone rocks.
The forming mixture also contains:
- magnesium oxide;
- calcium oxide;
- iron oxide;
- calcium;
- magnesium;
- silicon.
The content of each substance is limited to the permissible norm. Exceeding will have a negative impact on the original product.
How and why did clinker appear in construction?
The history of clinker goes back more than one thousand years. However, only from the beginning of the 19th century, thanks to the Dutch, this material began to be positioned as a special building material. This happened because Holland was deprived by nature of a natural resource necessary for construction, such as high-density rocks. This forced the local population to seriously engage in the production of clinker bricks. Then, as usual, the experience was adopted first by Western European neighbors, and then by the United States.
In Russia, the first production of clinker bricks was established at the end of the 19th century near Chernigov. After the revolution, the number of factories gradually increased. But only by the middle of the 20th century, in order to implement the program to provide the population with housing, enterprises began to appear for the production of other types of clinker: facing, architectural, etc.
Product manufacturing technology
The technology for producing clinker blocks is similar to the procedure for creating ceramic blocks. The difference is that the ceramics are fired at lower thermometer readings. Firing at high temperatures increases the strength of the product and improves performance.
Two production methods are used: extrusion and pressing. The first option is very expensive. Such blocks are produced only at some domestic factories. The second method is more popular and requires less energy.
Extrusion molding method
The extrusive method of producing clinker bricks is implemented using an extruder, through which clay is pressed, which comes out as a single plate. Then parallelepipeds are formed from the strips and placed in a kiln for further firing.
The technology allows us to obtain high-quality products with excellent performance characteristics. However, the presented method is very expensive.
Semi-dry pressing
Plastic semi-dry pressing involves placing raw materials into molds. Next, the blanks are pressed until they acquire the desired configuration. The operating procedure is as follows:
- The raw materials are dried and crushed.
- The crushed clay is laid out in molds.
- The pressing process is underway.
- Drying the workpieces during the day (temperature 80 °C).
- Burning.
The pressing option does not allow obtaining durable facing blocks. Bricks produced by pressing technology are inferior to bricks made by extrusion.
Firing clinker bricks
Firing represents the final stage of production. Tunnel furnaces are used for firing blanks, into which the material enters via a conveyor belt. The length of the tunnel can reach 200 meters. The temperature inside varies in certain areas. This approach is necessary for uniform heating. The critical temperature is 1,200 - 1,450 degrees. The output is a monolithic durable brick. The temperature used affects the original color. The natural palette ranges from yellow to brown.
General properties, characteristics
Technical characteristics are interconnected with the characteristics of physical and chemical properties. Clinker is a durable, low-porosity material. The facing material does not absorb moisture and is resistant to low temperatures. Products made from clinker blocks will last a hundred years.
Density of clinker brick
The main property of clinker products is increased density. The density indicator ranges from 1,900 to 2,100 kg/m3. This is achieved, first of all, by firing and pressing the brick, when the porosity of the product is reduced to a minimum. High density allows the material to withstand heavy loads and not collapse.
OLYMPUS DIGITAL CAMERA
Hollowness
Hollow blocks are characterized by lower weight. This material is suitable for cladding walls and other surfaces. Through holes are made in the brick during pressing.
Hollow bricks, in addition to their decorative function, play the role of additional thermal insulation and reduce the percentage of heat loss.
Thermal conductivity
Among analogues, clinker is characterized by the highest thermal conductivity coefficient due to the high density of the material. Hollow blocks have a lower degree of thermal conductivity. Full-bodied options require the creation of an insulating layer.
Moisture absorption
The density of the material is characterized by a small number of empty areas, so the material practically does not absorb moisture. Therefore, clinker can be used in aggressive environments with high levels of humidity. Even prolonged exposure to water will not cause significant damage to the clinker.
The degree of water absorption is less than 6%. The glazed surface does not absorb moisture at all.
Frost resistance
Clinker material can withstand temperature changes and several cycles of freezing and thawing. Clinker coatings will withstand harsh winters and will not crack. Bricks are suitable for regions with cold climates. Paving made from clinker blocks can withstand harsh winters and high humidity.
Fire resistance
Clinker owes its high fire resistance to firing and the use of refractory materials. Bricks can withstand temperatures of 1800 degrees. Under the influence of a direct fire flame, the coating does not deform or collapse.
Soundproofing properties
Clinker cannot be called a soundproofing material; this indicator is low. The clinker coating will require laying an additional soundproofing layer.
Vapor permeability
The structure of the blocks is dense, so the vapor permeability of this material is low. For internal clinker cladding, it will be necessary to create an effective ventilation system so that the room “breathes”.
Environmental friendliness
Clinker bricks are made from natural materials. Therefore, products made from it are characterized by environmental friendliness. Clinker coatings do not emit toxins or substances harmful to human health.
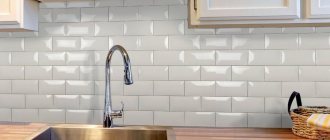
Preparing the facade and laying clinker tiles
If you plan to use the “wet” method of cladding, then you cannot do without appropriate preparation of the walls. All cracks must be sealed and irregularities eliminated; when carrying out restoration work, it may even be necessary to plaster the entire surface.
After this, the base is primed to increase the adhesion of the materials.
It is also recommended to pre-treat the back side of the tile with a primer or, alternatively, moisten it with water immediately before laying.
Next, you need to choose the right adhesive for clinker tiles , which should be designed for use in outdoor conditions.
Tile laying is always done from the bottom row using a special so-called starting rail, which is pre-set exactly at the horizontal level. And after completing each row, it is recommended to check the evenness of the masonry and, if errors are identified, promptly correct the defects before the adhesive solution sets.
The glue must be applied both to the wall and to the clinker itself, for which a trowel and a special notched trowel are used.
On average, the glue hardens in about half an hour, so when preparing the solution you should focus on this period.
Advantages and disadvantages
The main advantages of siding material are high strength and resistance to low temperatures. Facades lined with clinker do not fade when exposed to sunlight. Alkalis, acids, salts do not destroy clinker coatings.
The advantages of the material include the following factors:
- richness of colors: yellow, red, yellow, terracotta, gray, black, etc.;
- various textures: smooth, chipped, antique, corrugated, natural stone, etc.;
- resistance to salts and phosphates;
- resistance to temperature changes;
- dirt-repellent property;
- versatility;
- long service life.
The richness of colors and textures allows you to implement complex design projects. The result is not only a strong and durable house, but also an attractive one.
On facades made of clinker bricks, efflorescence does not form, which appears as a white, unattractive coating. This process occurs due to the fact that the salts and sulfates present in the clay begin to appear on the surface. Despite the fact that clinker contains clay, such processes are not typical for this material. Because during the production process, sulfates and salts melt under the influence of high temperatures.
The dirt-repellent property allows you to maintain an attractive appearance of the facade without the need for regular cleaning. The material has a wide range of applications.
Clinker has several disadvantages. This material is characterized by high thermal conductivity, due to which it is prone to significant heat loss. If necessary, you will need to make thermal insulation layers. Installation work requires a professional approach; the work uses a special composition for this type of blocks.
Also, the disadvantages include high cost. The end result will result in an impressive price.
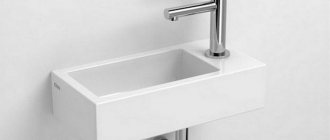
Clinker solution. Color selection
The choice of mortar color should take into account the shade of the brick - it is recommended to choose products that either match or harmonize in color with the clinker, or create a contrasting effect. The first solution will allow us to hide the joints between the bricks, and the second will “expose” them, thanks to which we can get an interesting, original effect.
It should be remembered that only universal solutions are suitable for painting, as well as for grouting and joining wall joints. Products used only for the first type are usually gray in color. By what color of clinker mortar can we choose a universal product?
The usual choice is white clinker mortar, although it is quite expensive. You can also choose clinker mortar in the following colors:
- brown;
- beige;
- brick red;
- yellow;
- orange;
- sand;
- green;
- and even black.
What solution should I choose for black clinker?
Here, of course, a lot depends on the effect you want to achieve. In the case of black clinker, using a white solution will create too much contrast, which may be unsightly. So experts recommend opting for black or dark clinker mixtures, with a similar shade to brick.
What solution should I choose for clinker on the chimney?
Be sure to choose a solution with suitable pigments. The finished mixture must be fire resistant, otherwise the chimney will be leaky.
An important parameter when selecting a mixture for finishing a chimney is also the compressive strength, the value of which should be at least M10. There are many products on the market that are specifically designed for chimney laying, so you should not have any problems purchasing them.
What solution should I choose for clinker on the fence?
In this case, it is worth thinking about products that are additionally protected from the formation of white efflorescence and the development of various microorganisms. Removing moss from a fence is not an easy or pleasant task.
What solution should I use to finish the terrace?
The terrace is a representative place, so there can be no talk about possible mistakes when choosing a solution. Of course, the safest thing to do would be to buy a mortar that is similar to the brick you are going to use on your deck. However, if you want to create contrast, first consider whether it will be visually appealing. A good choice might be, for example, a combination of light bricks with dark brown joints.
Areas of application
Clinker blocks and tiles are used mainly in facing works. The material is used for laying floors in industrial premises. Stoves, chimneys, and fireplaces are made from bricks.
Paving clinker is intended for laying:
- pavements;
- sidewalks;
- walking paths;
- alleys in parks and gardens.
Clinker material is reliable and durable, does not wear out, resists mechanical stress, and does not crack from frost.
The facing material is additionally glazed, ideal for interior decoration and external cladding. Clinker bricks are used for decorative purposes to create small architectural forms; the blocks can serve as elements of a landscape landscape.
Waterproof clinker is intended for the construction of hydraulic structures operated in environments with high humidity.
For the construction of residential buildings, clinker bricks are used extremely rarely due to their high cost. In addition, this material has high thermal conductivity, so an insulating layer will be required. Another reason is heavy weight. We will have to create a reinforced foundation. In construction work, bricks are suitable for creating supporting elements:
- columns;
- stair steps;
- ground floors;
- foundations.
Monumental structures are characterized by increased strength and are resistant to the negative effects of the environment.
Appearance and size options
The standard block shape is a rectangular parallelepiped. Other types used for design purposes have been developed:
- internally and externally rounded;
- with beveled corners;
- with straight cuts;
- with semicircular cuts.
The front surface can be:
- matte:
- smooth;
- glossy;
- glazed;
- corrugated.
Natural tones range from white to brown, and with the help of color additives they create a rich palette of colors.
Facade brick-like clinker tiles are used for cladding walls made of gas and foam blocks, balconies, loggias, and fireplaces. Tiles can be used to update an old home. Clinker tile covering has the same qualities as brick.
Clinker bricks are produced in accordance with technical requirements. Construction material is produced in the following formats:
- single: length – 250 mm, width – 120 mm, thickness – 65 mm (1 NF);
- one-and-a-half: length – 250 mm, width – 120 mm, thickness – 88 mm (1.4 NF);
- double: length – 250 mm, width – 120 mm, thickness – 140 mm (2.1 NF).
European standard sizes include the following parameters: 250 x 85 x 65 mm (0.7 NF). GOST allows deviations in length, width and thickness within 4, 3, 2 cm, respectively.
In addition to traditional options, non-standard formats are also relevant. Fractional formats are produced for decorative purposes.
Methods for fixing cladding to load-bearing walls
There are two opinions among professionals about strengthening rows of cladding. Some argue that the masonry in the corners is securely connected and no additional work needs to be done to increase its stability. Others, on the contrary, insist on mandatory fixation. We believe that fixation never hurts and can bring a lot of benefits. In addition, time does not play an important role in the cladding process. Make a commitment and live in peace in your home.
Methods of fastening facing bricks
Fastening a wall made of facing bricks to the load-bearing base through insulation
The cladding is attached in several ways.
Using construction fittings. Use reinforcement with a diameter within 5 mm; there is no need for anything thicker, as it is difficult to work with. Use a pobedit-tipped drill to make holes up to 10 cm deep in the wall, drill at an angle to the plane of approximately 45°. This position prevents the reinforcement from being pulled out during loading. Advantages of using construction reinforcement: high reliability, the ability to adjust the length of the rod depending on the characteristics of the load-bearing wall and cladding. Disadvantages: each rod must be aligned with the plane of the facing bricks; it should not protrude beyond the seams.
The photo shows how you can attach the cladding using masonry mesh and plastic umbrellas
Fixing masonry with reinforcement
Using perforated profiles. Such profiles are sold in stores and are used during the installation of suspended ceilings or plasterboard wall coverings. Advantages - the plates can be bent at the desired angle without any problems, which makes it possible to install clamps on the entire wall even before the start of cladding the building with clinker bricks, and then precisely adjust their position. Disadvantages - the cost is slightly higher than that of building reinforcement.
Cladding a house wall with bricks
Installation of lintels on cantilever anchors above the window opening
It is recommended to strengthen the wall after 5–7 rows; specific distances should take into account the characteristics of the load-bearing wall and cladding. If there are many window openings, then metal clamps must be installed between each of them. This is especially true when window frames are fixed to the cladding.
Step-by-step masonry guide
Laying clinker bricks requires compliance with technological standards. The process is carried out with great care; the blocks must be placed in such a way that they do not end up being defective. Prepare tools for work:
- elastic trowel;
- hammer to chop blocks;
- wooden slats;
- grater;
- cord - mooring;
- grout for clinker;
- a brush or wooden spatula to remove excess solution;
- sponge;
- V-shaped steel sheet to widen the seams.
For installation work you will need a special mixture.
The algorithm of actions is as follows:
- clean the surface;
- the first row is laid dry, without mortar, to mark vertical seams;
- measure the height of the block in order to calculate the average height of the masonry, taking into account the horizontal seam;
- outline a horizontal level;
- install vertical wooden slats along the length of the facade surface;
- pull the mooring cords to determine the height of each layer;
- prepare building materials and laying mortar.
The mixture will need to be divided into parts for each section. Laying is carried out in whole layers.
Facing bricks are characterized by low moisture absorption, so the blocks must be dipped in water before laying. I lay each layer to the established cord level. It is necessary to maintain the average thickness of the seams. Expansion joints are located near the corners of the building. Up to six rows are laid at one time. The masonry is leveled by sawing. Excess solution is immediately removed using a wooden spatula. You can use a stiff brush.
Cladding of buildings without insulation
The method is most often used during the repair of old structures that have satisfactory heat saving indicators. General advice for all types of cladding - the mortar should have a viscosity slightly higher than for masonry with ordinary red bricks, add more cement to it, use only river sand without clay.
river sand
For facing work, you will need a mason's spirit level, a mason's hammer-pick, a tape measure, metal square rods with a side of 6–10 mm, a trowel, and special tools for internal and or external jointing.
Bricklaying Tools
Mason level
Non-sparking mason's hammer (brick pick)
You can purchase plastic or metal devices at a hardware store to level the thickness of the seams. We will tell you below how to work with them, what their advantages and disadvantages are.
Masonry accessories
Prices for building levels
Construction levels
And one last thing. The requirements for the quality of masonry during cladding are much higher than when laying walls. Accordingly, these works can only be performed by those craftsmen who have considerable practical experience as a mason.
Step 1. Checking the condition of the foundation and load-bearing walls. A very important point, treat this procedure with great responsibility; it is very difficult, and in some cases impossible, to correct errors discovered during cladding; you will have to disassemble the finished cladding. How to check and what to pay attention to?
- The width of the foundation must be at least the width of the brick. If this is not the case, then you will have to use other building materials for cladding. If the surface of the tape has lost its strength, but the exfoliated areas need to be removed, cleaned and filled with a layer of new concrete. It is not necessary to make a water barrier for clinker bricks, but practitioners still recommend laying roofing felt. Check the horizontality of the tape; it is impossible to align the rows of cladding by changing the thickness of the mortar layer - the attractiveness of the appearance of the wall is lost.
Checking the horizontal foundation
- Check the verticality of the walls, find the place of maximum deviation and measure its value. Deviations from verticality must be taken into account when determining the gap between the load-bearing wall and the cladding. If the ledge creates obstacles, you will have to cut it down. Depressions do not affect the quality of the cladding.
Checking the verticality of the wall
Step 2. Lay out the first row of facing bricks without mortar. Start from one of the corners and work your way to the opposite one. If the last brick in the corner protrudes too much or, conversely, its length is not enough to cover it, then try moving the entire row to the left or right. If you can’t find the optimal position, you’ll have to cut the brick. Measure the length with a tape measure, make the cut as even as possible. You need to have as many of these cut bricks as there are rows of cladding. You can prepare several pieces at once, or you can measure and cut each one separately as needed. We will tell you how to cover door and window openings below. Laying the first row is a very important point, you need to dwell on it separately.
Dry laying of the first row of bricks
- Decide whether you are doing the cladding flush with the foundation or with an overlap. If the base will be covered, then an overlap of approximately 2–3 cm should be made.
- Place the first clinker brick on the corner. Lay out all subsequent ones taking into account the width of the seam. For control, take the devices that you will use during laying. In the same way, lay out the first row around the entire perimeter of the house. The foundation strip is uneven, the bricks have gaps of different heights, the minimum gap needs to be controlled, the maximum gap will decrease to standard during the work.
Laying the first brick on the mortar
- If the brick on the opposite side of the foundation does not fit exactly in size, then move the outermost one to the desired position. If the discrepancy does not exceed a few centimeters, it doesn’t matter. Move all the bricks in the opposite direction these few centimeters to the beginning of the doorway. The width of each seam will change by tenths of a millimeter.
- At the doorway, tear off the strip of bricks. If necessary, the brick is cut to length.
- If the discrepancy is on the wall without a doorway, then you need to make a reverse layout with a slightly increased seam width. But this way you can eliminate a gap of several centimeters. If the discrepancy is greater, then you will have to cut the brick to size.
Practical advice. In order to make the problem area less noticeable, when laying, use not one very short brick, but several with a difference in length of no more than a centimeter.
You will have to cut several bricks, which complicates the cladding process a little. But the problem is solved at a professional level and becomes invisible. And one more note. You will find out the specific width of the seam only after the tape has been completely laid out around the perimeter. Start fitting with eight millimeters, and later, after laying out and shifting the bricks, you will find out the exact width of the seam. Taking this data into account, select the sizes of metal rods for cladding.
Step 3. Prepare a cement-sand mortar. We have already mentioned that clinker does not absorb water, so make the solution somewhat thicker. If the cladding is laid from bricks of non-standard width, then every 4-5 rows you need to stop working for a day or two to allow the mortar to harden. This does not mean that construction work stops altogether, just move on to finishing the next wall and so on around the perimeter of the house.
How to prepare the solution
Important. Be sure to sift the sand for the solution or buy clean sand from warehouses. Small pebbles will create problems during laying; you will have to remove the laid brick and remove the pebble. Otherwise, the seam will be uneven, and this should absolutely not be allowed.
Prepare all the tools, they should be at hand. Do not make a lot of mortar; cladding is done much slower than laying walls. During this time, the solution will be able to harden or separate into fractions. Both the first and second require additional effort to restore its properties. You need to start facing from the corners of the building.
Laying corners
A very important and responsible moment. The entire cladding will then be leveled at the corners; any mistake can be critical.
Step 1. Place a layer of mortar about 1 cm thick on the foundation tape; if the unevenness of the tape is alarming, then the thickness of the mortar can be increased to two centimeters. In the future, due to this, it is possible to maintain the horizontal position of the first lower row of cladding without any problems.
Laying out the solution for the first row
Step 2. The height of the corner should be approximately 4-5 bricks. To do this, the first row must be 4 bricks long, all subsequent rows must be half a brick shorter. Place the first row of the corner, constantly monitor its position horizontally and vertically with a level. To level the position, lightly tap the surface of the bricks with a hammer or trowel handle. The thickness of the seam at the junction of the ends of the brick can be controlled with homemade or purchased devices. We will tell you what they are and how to work with them throughout the article.
Step 3. Carefully continue to pull the corner up, once again check its position along all planes. Monitor the thickness of the seams using special devices.
Making corners
Using the same algorithm, lay the second corner of the wall. If the cladding technology requires it, then all corners of the building can be done at once. How many there will be depends on the architectural features of the building. Next, you can begin cladding the wall surfaces.
Lay out the bottom row of the wall between the corners
Practical advice. If you do not have enough experience, be sure to use various devices to control the thickness of the seam. You can make the devices yourself or buy them at a factory-made store.
House cladding process
Laying facing bricks
Homemade seam thickness control devices
To create a seam of the same thickness, squares, hexagons or wire rod of appropriate sizes are used. For a horizontal seam, rods approximately 50 cm long are needed, a vertical seam is controlled by rods approximately 15 cm long. The main condition for all rods is that they must be as even as possible. The thickness is selected taking into account the required dimensions of the seam; during cladding it is recommended to be approximately eight millimeters. Before starting cladding, stretch the rope between the corners along the level of the front surface, making sure that it does not sag. It controls the position of the bricks. For each new row you need to raise the rope at the corners. When the height of the cladding is equal to the height of the corners, start laying new corners of the same height. We will tell you later when and how to unstitch the seams. How to use the devices?
Step 1. Start laying a horizontal seam, prepare a container with mass, a trowel and a rod.
Step 2. Place a long rod on a row of bricks, it should lie on about three bricks at a time. The outer edge of the rod should be in line with the edge of the bricks.
Use a rod to control the thickness of the seam
Step 3. Use a trowel to lay the mixture onto bricks slightly thicker than the thickness of the rod.
Step 4. Level the layer of mass. At the same time, hold the trowel at a slight angle. One side should slide along the rod, and the other should level the mass. The thickness of the mass on the opposite side may be slightly greater than the height of the rod, but in no case less. The fact is that you can level the horizontal position by lightly tapping a hammer on the rising part of the brick. If it lies below the horizontal level, you will have to remove it and re-apply the solution.
Step 5. Lean the short rod against the end of the brick, align its position with the angle.
Step 6. Apply cement-sand mortar and level it. Also level with a margin of thickness on the opposite side of the brick.
Step 7: Place the brick in place and adjust its position. Use a skein or trowel for this.
Step 8. When the length of the horizontal rod is not enough, take it out and put it in a new place. If the rod is smooth and even, then you can not completely remove it, but stretch it along the seam. With minimal skill, this technology significantly speeds up the laying - you won’t have to sand the seams or this work will be much easier.
How to lay a brick under a joint with a rod
Practical advice. Start cladding the house from the wall opposite the facade. Even if there are minor mistakes, no one will pay attention to them. And further. While working, you will be able to gain practical experience in masonry, and this is very important. You can be sure that you will lay each row much faster, it will turn out smoother and more beautiful.
Factory fixtures
We recommend using a plastic mason's set. It consists of two accessories: for horizontal seams and for vertical seams. The kit allows you to make mortar of uniform thickness on bricks, increases the speed of cladding and has a positive effect on quality. Additionally, the position of the bricks in each row is controlled; they are automatically aligned along one line. Disadvantages - it is impossible to adjust the thickness of the seam depending on the layout of the first row. Another drawback is that the short length of the device for horizontal seams makes the work somewhat more complicated.
Tool for laying facing bricks
Important. Purchase devices for the size of clinker bricks.
How to use plastic devices?
Step 1. Place the device on the bricks, apply the mortar and level its surface with a trowel, remove excess.
Frame for laying out mortar and forming seams
Step 2. Move the plastic frame to the free space and repeat the operation. Continue placing the mixture onto three to four bricks. As the template moves, the back side will evenly remove excess mortar and level the surface.
Step 3. Place the first brick in place and lightly tap it on the surface to press it down a little until the mass begins to squeeze out. If you have experience, then there is no need to check the position with a level. Do such checks after several rows; if problems are discovered, correct them in several steps.
Step 4. Place the smaller tool on the end of the laid brick, throw the mass and level it. Place the next brick, move it a little towards the one already lying before you start squeezing out the mass.
Bricklaying with factory fixtures
Experienced craftsmen do not use such devices, but this measure will help beginners get their hands on it. We have already mentioned that the specific width of the solution can only be determined after laying out the first row. Depending on how it lies, the thickness of the seam changes, and the device has fixed parameters, this is a drawback.
How to make jumpers
Brick cladding. Covering the opening
For jumpers, you can use metal corners or rods. If the corner has dimensions of 100x100 mm, then you can put one, if the shelves are smaller, then take two, one on each side of the brick. The number of rods depends on the diameter, but in any case there cannot be less than two. The diameter of the rods cannot exceed the thickness of the seam.
The metal should be cleaned of rust and coated with a high-quality primer; after finishing the cladding, the surface will be painted in the desired color. The length of the lintel stop on each side of the opening is at least 15 cm. You should not use lintels that are too thick for two reasons. Firstly, the elements should support the weight only until the solution hardens, after which the load on them is minimal. Secondly, too thick lintels are then difficult to make invisible, and this spoils the appearance of the building.
Opening reinforcement scheme
Joining seams
An important point: the complexity depends on the correctness of the chosen time. You can find advice to do the seams 3-4 days after finishing the work. Do not take such recommendations into account; they are given by those who have never done anything with their own hands. After 3-4 days, the cement mortar will completely harden; you will have to scratch the surface with great effort to level the seam. When exactly to start jointing depends on the speed of the masonry. The more practical experience, the more bricks you will have time to lay. Focuses on the state of the solution. As soon as it begins to resemble soft plasticine, start aligning the seams.
Forms of jointing
Types and methods of seams
The jointing can be:
- concave or convex. The most complex types can only be embroidered with a relatively fresh solution. The convex part of the mortar should lie in the same plane as the bricks;
- straight with recess or undercut. The first one is most often used due to its simplicity and versatility. The second is used only by the most experienced craftsmen on high-quality bricks. Requires great practical skills, the plane of the jointing must exactly coincide with the plane of the facing bricks;
- single-cut or double-cut. It is rarely used, mostly for decorative architectural elements.
Tool for jointing brickwork
Tools for stitching can be purchased in stores or made from any available materials, such as metal, plastic or wood.
Practical advice. The width of any type of joint should be slightly less than the thickness of the seam. The fact is that it will never be possible to achieve ideal thickness parameters over the entire area of the house; there will be areas several millimeters wider or narrower. The device must pass along all lines without jamming.
The most difficult method of embroidery is the use of special colored decorative mixtures. Let's look at it in detail.
Step 1. Using jointing and a wire brush, clean the seams from the mortar to a depth of approximately 8–10 millimeters; use a hard-bristled brush to remove dust and remaining mortar.
Brickwork before jointing
Preparation of masonry
Preparation of brickwork
Step 2. If the seams are completely dry, it is recommended to moisten them with water. Use spray bottles or watering hoses for this.
Important. If dirty streaks appear on the front surface of the cladding, wash them off immediately or wipe with a clean cloth.
Step 3. Prepare a special solution for jointing, it is sold in construction stores. There is no opportunity to purchase - make it yourself. To do this, mix dry sand with cement in a 3:1 ratio and add mineral dye of the desired color. Mix everything thoroughly. Prepare the dry solution for the whole house at once and with a reserve. Then, as needed, dilute it with water in portions and use it for jointing.
Mixing the solution
Step 4. Take the desired jointing and gradually fill the gap between the rows of bricks with it. Level and remove excess at the same time. If the solution gets on the front of the brick, remove it with a slightly damp cloth or foam rubber. The mortar is pressed in with sufficient force, otherwise the new jointing will fall off and fall out of the seams.
Filling joints with mortar
To clean the wall, use a wire or stiff brush made of artificial bristles.
Removing excess solution
The work is long and uninteresting, but the result always justifies the effort.
Manufacturers and product prices
Clinker blocks are very popular. There are several manufacturing companies operating on the modern market. Among them, the most famous are:
- the domestic LSR group has four factories, produces high-quality bricks from Cambrian blue clay, 9 shades are offered, the company is one of the world leaders in the production of clinker material;
- GRH Group has opened branches in 25 countries, produces professional-grade material, production is carried out on modern high-quality equipment;
- one of the reputable manufacturers is the German manufacturing company Wittmunder Torfbrand Klinkerwerk, which produces classic clinker bricks using a unique ancient technology without the use of artificial dyes and chemicals, for over one century, they produce exclusive bricks of gold and silver shades;
- another long-liver, the Terca plant, has been producing building materials for landscape design and facing work from clinker for two hundred years;
- German companies Feldhaus Klinker and ADW Klinker produce material in a variety of colors;
- manufacturer Rauf from Russia offers high-quality bricks of natural color, made using modern European technologies.
The highest quality products are produced by German factories, which occupy a leading position among other manufacturing countries. Clinker blocks from Germany are distinguished not only by their high quality, but also by their reasonable price. The price per piece reaches 95 rubles, exclusive options cost over 100 rubles. Russian-made bricks are more economical; the cost, as a rule, does not exceed 35 rubles per brick.
Several laying technologies are used: with and without the formation of an air gap, with thermal insulation. The air space is up to 4 cm. This layer is needed for air movement. This technology is applicable to wooden buildings and prefabricated structures.
For buildings being built in areas with a cold climate, I lay an insulating layer between the cladding layer and the wall. Polystyrene or mineral fiber wool is used as insulation material.
To prevent condensation from forming between the wool and the cladding, leave 2 cm. If facade panels are used, a heat-insulating layer is not required.
Ventilated gap between cladding and insulation
Water may appear at the border between the cladding and insulation.
Moisture appears as a result of condensation on the surface of a brick of water vapor, a constant flow of which tends to pass through the wall from the premises to the outside (more details here).
In addition, water can get inside due to the cladding not being sealed when the wall is soaked by slanting rain.
Water on the inner surface of the cladding soaks the insulation, and also flows down and collects on the horizontal waterproofing of the base and lintels above the openings.
If vapor-permeable mineral wool slabs are used to insulate walls, then of 3-5 cm wide must be left between the cladding and the insulation layer
The ventilated gap must be through and ventilated to the entire height of the wall.
For air circulation in the gap in the brick cladding, holes are left in the vertical joints of the masonry. Water accumulated on the horizontal waterproofing flows out through these same holes.
In brick cladding, the walls between the bricks are left with vertical seams free of mortar to allow air circulation in the gap and water drainage.
Special inserts are installed in the mortar-free vertical seams between the bricks to protect the holes from insects.
Holes in the brick cladding are made in the following places:
- Above the horizontal waterproofing of the base (item 7) and lintels above the openings (item 2 in the figure) for water drainage and air flow into the gap, every second or third vertical seam is left unfilled with mortar.
- At the top, under the eaves overhang, in the third or fourth row of brickwork from the top, to allow air to escape from the gap, vertical seams are left free of mortar at the rate of one or two seams for every 1 m2 of wall area.
A ventilated gap is also necessary when cladding single-layer walls with brick (without a layer of insulation between the cladding and the wall), if the load-bearing wall is made of autoclaved aerated concrete. gas silicate or non-sandy large-porous expanded clay concrete, as well as when facing wooden and frame walls.
If the facade is insulated with slabs of polymer insulation - polystyrene foam, extruded polystyrene foam, then a ventilated gap is not needed . In the vertical joints of the cladding masonry, only holes are left for water drainage every 800 - 1000 mm.
Household products
⇆
Brick cladding of single-layer walls made of porous ceramics or walls made of SIP panels is done without a ventilated gap .
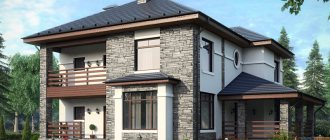
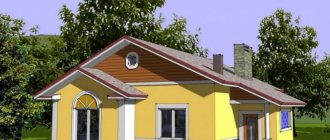
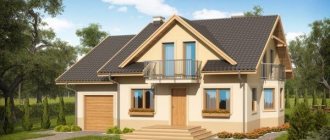
Clinker brick houses
Clinker blocks are an ideal option for siding a country house. The cladding is done once and will not require updating in the future. Houses made of clinker bricks look impressive.
A combination of several colors is possible. The house looks unusual.
The color range is amazingly diverse, even bold options are available.
The path to the house is also laid with clinker.
The combination of textures looks impressive.
Bavarian masonry looks impressive.
Facing bricks or clinker tiles are characterized by excellent decorative properties. The material is sold in different textures. Clinker is used for exterior decoration, increases the strength of buildings, and gives buildings an attractive appearance.
Technology of cladding buildings with clinker bricks
We have already mentioned that for clinker bricks, the requirements for cement-sand mortar differ from the standard ones; only an experienced mason can prepare the mass. Only he knows how much to reduce the amount of water, taking into account the weather and the location of the masonry. Otherwise, the thickness of the seams and the degree of adhesion will be compromised, and this has an extremely negative effect on the appearance and stability of the lined wall.
Buildings can be clad both during the construction of walls and after its completion. In addition, during cladding, additional insulation of the facade is possible.
House cladding
We will provide step-by-step instructions for all types of work and consider each technology separately. Let's talk about possible mistakes of inexperienced masons.
Application of facing bricks