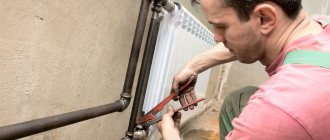
When installing a chimney in a house or bathhouse, you not only need to secure it correctly, connect it and calculate the aerodynamics for good draft. It is extremely important to ensure proper passage of the chimney through the roof so that in the future there are no leaks in this place and the rafters do not become charred.
And here it is necessary not only to make a neat hole in the covering, but also to seal the penetration as much as possible, select sealants and at the same time maintain the aesthetic appearance of the entire roof. There really are a lot of subtleties and nuances here!
Chimney installation rules
If the house has a stove, then a chimney is also needed. Although instead of a stove there may be a special tank running on gas. In any case, the house is heated somehow, and combustion products need to be removed. There are several options for removing the pipe through the roof, related to determining the location. It is planned when a house project is being developed. The location is considered relative to the ridge of the roof - a horizontal edge that is located where two slopes meet. The pipe can be installed:
- directly in the ridge;
- at a distance from the ridge.
The first and second options have their pros and cons. On the one hand, it is easier to install a chimney in a ridge. But this is for someone who deals with this particular issue. But for arranging a rafter system, this is more difficult, because you will have to make a gap in the horizontal beam. On the other hand, when the pipe is in the ridge, this guarantees good traction. And the possibility of leakage under it is reduced to a minimum here. But still, most often the chimney is moved relative to the ridge.
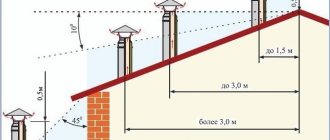
Chimney offset relative to the roof ridge Source katlavan.ru
In this case, the following building regulations must be observed:
- If the chimney on the roof is installed at a distance of no more than 1.5 m from the ridge, then the pipe should be 0.5 m higher than it.
- When installed at a distance of 1.5 m to 3 m from the ridge, it is made on the same level with it.
- When the pipe is more than 3 m from the ridge, it can be lower than it, but no more than 10°.
The best option for locating the pipe relative to the ridge is not far from it. If you make the chimney much lower, the risk of damage from falling snow increases.
To ensure good traction, you must adhere to certain standards for placing the chimney relative to the roof ridge Source rekvartira.ru
There is a place where it is generally not recommended to install a pipe - the valley. This is the internal angle that two slopes of a complex roof form when connected. There is always an increased load on it, since precipitation flows there and snow is retained. With such an installation, the possibility of waterproofing damage is very high. This means that there will be leaks.
What are the dangers of errors when installing penetrations through the roof?
There is an opinion that the efficiency and safety of an individual heating system depends on the design of the stove and the skill of the stove maker. Few people think that complete combustion of fuel depends more on the chimney and traction force. And only specialists know how important it is to install a high-quality passage through the roof.
When building a furnace, the main attention is paid to the temperature stability of the materials. But the fire-resistant brick of the chimney and the mineral insulation of the sandwich pipe are defenseless against systematic moisture.
Poor design of the pipe outlet to the roof entails serious consequences affecting the operation of the chimney. Violation of the standards for thermal insulation of pipes from flammable roofing materials and attic floors can lead to:
- to fire in places where the pipe and combustible materials of the house structure come into contact;
- to the formation of a large amount of condensate in the pipe, which will lead to its rapid destruction;
- to the formation of a thick soot deposit on the inner wall of the chimney and a decrease in its working clearance;
- to a decrease in stove draft and the formation of carbon monoxide, which is dangerous to human life.
Poor quality waterproofing of a roof penetration assembly threatens:
- penetration of atmospheric moisture into the attic, which provokes the formation of fungus and mold;
- getting the rafters wet leads to the initiation of wood rotting processes, no matter how well it is treated with an antiseptic;
- destruction of the brickwork of the chimney;
- increased corrosion of the metal pipe;
- by getting the thermal insulation (mineral wool) wet, after which this material becomes completely unusable and loses its thermal insulation properties.
We recommend reading: How to ventilate plastic windows
Note! Even minor flaws during the installation of a roof penetration of a chimney over a couple of years can cause an unexpected fire, destruction of the heating system, and carbon monoxide poisoning of residents.
Protecting the roof from heat coming from the pipe
When organizing a pipe passage through the roof, it is important to insulate the roof from it. After all, the pipe gets very hot, which increases the fire hazard. The roof is protected using a separate box, the beams and rafters of which are located taking into account the requirements of SNiP. The minimum distance standard from the chimney to the load-bearing beams and rafters is from 130 to 250 mm. The inside of the box is filled with some material that does not burn. For example, it could be basalt or stone wool.
The chimney in no case directly touches the roofing Source barmanlive.ru
Further organization of the pipe outlet depends on what shape it is and what it is made of. The shape of the chimney can be made either as a regular square or round, or in the form of a rectangle or oval. And pipes can be brick, metal, asbestos-cement or ceramic. The material from which the roof is made is also taken into account. This can be slate, metal tiles, corrugated sheets, ondulin, roofing felt or bitumen shingles. Each case has its own characteristics.
Conclusions and recommendations
Today, brick chimneys in their pure form no longer meet modern standards for structural and fire safety. Therefore, they were replaced by modern metal sandwich chimneys or three-layer ceramic chimneys. Such chimney systems open up great opportunities for finishing solutions. For example, decorating like a brick.
Or plastering. As a result, the system, as well as the connection to the chimney, looks aesthetically pleasing on the roof of the house, in harmony with the façade decoration and roofing. When repairing an old brick chimney, or when finishing a modern ceramic system, it is unacceptable to use piece tiles with glue. There is a risk of it peeling off and the danger of falling on people. It is best to use ring lining with high-quality finishing bricks or special systems for facade finishing, and it is better to use ready-made factory solutions for chimney systems. We recommend a topic that tells you what fire distance must be maintained to wooden rafters when driving a chimney through the floor and roof.
Sources
- https://zen.yandex.ru/media/kakprosto.ru/kak-sdelat-montaj-dymohoda-iz-sendvichtrub-cherez-kryshu—5a7bef8c8c8be3ed323109fc
- https://ProfiTeplo.com/dymohod/145-prohod-cherez-kryshu.html
- https://krovlyakrishi.ru/elementy-kryshi/dymoxod/proxod-truby-dymoxoda-cherez-kryshu.html
- https://kamin-expert.ru/otopitelnaya/prohod-dyimohoda-cherez-krovlyu.html
- https://mr-build.ru/newteplo/prohod-dymohoda-cerez-krovlu-iz-metallocerepicy.html
- https://kamin.ru/main/presscentr/stati/kak_zakrepit_trubu_dymohoda_na_kryshe/
- https://obustroeno.com/stroitelstvo/elementy-konstrukcii/krovlya/30183-prohod-truby-cherez-kryshu
- https://kryshadoma.com/dymokhod/kak-ustanovit-dymokhod-cherez-kryshu-pravila-sozdaniya-i-germetizatsii-prokhoda-truby.html
- https://pechnoy.guru/pechi/izgotovlenie-pechi/dymohod/vyvod-pechnoj-truby-cherez-kryshu.html
- https://AvtonomnoeTeplo.ru/pechi-kaminy/436-ustroystvo-pechnoy-truby-na-kryshe.html
- https://www.forumhouse.ru/journal/articles/8594-dymovaya-truba-vzglyad-skvoz-kryshu
[collapse]
Installation of a round pipe
Often in construction a circular chimney section is used. To pass a round pipe through the roof and seal it tightly, special flexible adapters are used. They are made from heat-resistant polymer with elastic properties. In appearance, such an adapter looks like a funnel, at the base of which there can be a circle or a square. The base is called an apron, it is made in the form of wide fields. Since the material is elastic, it easily takes on different configurations. Therefore it has a wide range of applications. Such adapters can be used on roofs with any covering and slope angle.
Exit of a round pipe through an ondulin roof Source nashaotdelka.ru
The main thing is to choose an adapter that will match the diameter of the pipe. Although there are universal options for such products. They are made in the form of a stepped pyramid. To adjust their size to the pipe, the excess is simply cut off with scissors. Elastic adapters are attached to the roof using bolts or metal studs. They are installed in holes on the flange, which presses the adapter to the roof. The space between the flange and the roof surface is lubricated with a sealant that can withstand temperature changes.
Universal adapter for passing a round pipe through the roof Source pinterest.it
Master flush
This penetration can be applied to any type of roof - slate, tile, metal roof, asphalt or tile.
Ideal for sealing stove and fireplace chimneys.
Used for straight roofs and for sloped roofs.
This type of product is an excellent combination of price and quality.
Master Flash is distinguished by high professional reliability and functionality - this is achieved through the use of high-quality materials for use.
The main feature of this penetration is the use of reinforced polymer rubber, which can withstand heavy loads (temperatures up to 138 degrees).
Polymer rubber does not become more flexible due to heat.
Features of a sandwich chimney
A type of round pipe is a sandwich chimney. It consists of two pipes of different diameters, between which there is a heat-resistant thermal insulation material. They are made of stainless steel. The sandwich chimney is in great demand because it provides stable draft, does not heat up, is easy to install and looks beautiful in appearance.
The passage through the roof of a sandwich chimney can also be done using an elastic adapter. However, it may not be in harmony with its mirror surface. In this case, a metal adapter is used, the material of which is also stainless steel. It is not flexible, so you must take into account the diameter of the pipe and the angle of the roof slope.
Passage through metal tiles
Metal tiles are sheets of steel, copper or aluminum, which are coated with a polymer layer. In appearance they resemble natural tiles, which are folded in even rows. This roofing material is very popular. If a round pipe is to be passed through the metal tile, flexible adapters are used, which we have already described. When using a square or rectangular brick pipe, a different method of installation is used. It is as follows:
- The connecting unit is being manufactured. It consists of two aprons - internal (main) and external (decorative). The material of manufacture is thin aluminum sheet or tin.
- Before the metal tiles are laid, an internal apron is installed on the sheathing. These are 4 strips located on 4 sides of the pipe. They simultaneously extend under the metal tile (no less than 250 mm) and onto the pipe (no less than 150 mm).
- The apron elements are installed in a groove - a groove that is cut along the perimeter of the pipe to a depth of 10 to 15 mm. The groove is cleaned and filled with fire-resistant sealant.
To install an apron, you need to make a special groove in the pipe Source experttrub.ru
- The apron is attached to the pipe using heat-resistant dowels. The joints between the four planks are soldered. On the slats that are located on the sides, sides are made, the purpose of which is to drain water down.
- The lower part of the apron is installed on the so-called tie - a sheet of metal with sides. This ensures water drainage from the chimney to the bottom of the roof. The width of the tie should be greater than that of the pipe by at least 0.5 m on both sides. Its length depends on the distance from the pipe to the edge of the roof.
- After installing the tie and interior apron, the metal tiles are laid.
- An external apron is installed on top. It is usually a corrugated sheet of lead or aluminum. There is a decorative strip in its upper part. It is attached to the pipe using self-tapping screws. The attachment point is slightly higher than parts of the inner apron. Before fixing the decorative strips, the fastening points are coated with sealant. To attach the corrugated sheet, its back side is provided with a self-adhesive coating.
Finished chimney pipe passed through a metal tile Source tproekt.com
The final stage of installation
The design of the unit is completed in the following stages:
- Remove the protective film from the sandwich pipes. It is highly undesirable to free parts from polyethylene earlier - they may be damaged during transportation or installation.
- Seal the joints properly with sealant. Ideally, the composition should withstand temperatures within 1000 degrees.
Which areas need to be coated with sealant:
- seams at the junction of internal sandwich pipes - the plane located on the outer part from above;
- joints of external pipes - the entire outer surface area;
- the junction of sandwich pipes with other components of the system - the entire area or diameter, if we are talking about round pipes.
Do not rush to use the new chimney right away; first check that it is working correctly:
- Turn on the heating device (boiler, stove or fireplace) at low power.
- Now inspect the device to see if it is leaking smoke in the wrong places.
- Check for excessive heating of components of the entire system, especially in the wall or roof transition area.
What is good about a chimney made from sandwich pipes? It looks aesthetically attractive and provides the fireplace with a modern style; even a beginner can assemble it. And also, if installed correctly, it will last a long time and will delight the owners with uninterrupted operation.
Installing a chimney through corrugated sheeting
Corrugated sheeting is a sheet of metal produced by cold rolling and then profiled. Mainly made of steel, but can be made of copper and aluminum. The sheet has ribs of oval, square, trapezoidal or polygonal shape. A special coating is made on top, which gives it anti-corrosion properties. Corrugated sheeting is often used as a roofing material.
To pass the chimney through the roof, in the case of a square or rectangular pipe, a device in the form of two aprons and a tie is used. The method is the same as for a metal roof. Installing round pipes in corrugated sheeting is not recommended, because it is difficult to cut the correct circular section into it. But if you still make a round chimney, the pipe is insulated using a universal elastic adapter.
Accessories for running round pipes Source metalsteel.com.pl
Passage through ondulin
Ondulin looks like regular slate, but its material is completely different. This is compressed cellulose, which is treated with bitumen impregnation. It comes in a variety of colors, is water resistant, but burns quite well. Therefore, when a passage through the roof is organized, maximum attention is paid to filling it with fire-resistant materials. The hole for the pipe in the ondulin is made large. To insulate the junction of the roof and the chimney, an apron is used, which is placed under the roof. In this case, elastic self-adhesive tape “Onduflesh” is used, made of bitumen with an aluminum insert.
Brick pipe passed through ondulin Source seaside-home.ru
Installation of a chimney in a soft roof
Soft roofing is a flammable material, so it is important here that there is a gap of 13 to 25 mm between the pipe and the covering. The passage of the chimney through the roof is organized depending on its shape - flat or pitched. The material from which the pipe is made also plays a role. If the roof is flat, consisting of a concrete slab and the pipe is not made of brick, the passage is made as follows:
- Around the pipe at a distance of about 15 cm along the perimeter, everything is removed, right down to the concrete.
- The formwork is being installed.
- Concrete is poured so that a side is formed, the height of which is 15 cm.
- The roofing covering is applied to the walls.
- Where the roofing material connects to the side, a metal strip is installed. Fastening is done using dowels.
- An ebb tide is installed on the side.
If the pipe is brick, there is no concrete side. In this case, roofing material is placed on it and a metal apron is installed on top. A groove is made in the wall of the pipe (depth 1.5 cm), into which the edge of the apron is inserted.
When passing a pipe through a soft roof, many nuances must be taken into account Source teplospec.com
The junction is filled with sealant. In the case of a pitched roof, waterproofing is carried out as on other coverings, that is, using aprons (for square and rectangular pipes), as well as flexible or metal adapters (for round ones).
Fire safety
The wooden rafter system and some layers of the roofing pie (waterproofing, vapor barrier) cannot withstand heat and can ignite or melt. The safety of system elements that are not fire resistant is ensured by installing a special box around the perimeter of the hole in the roof.
Violation of safety rules
The box is mounted from a wooden block; it should be located flush with the sheathing, on the outside of the roof. Along the perimeter of the box, on the outside, the edges of the vapor barrier are fixed - a carpet made of roofing felt or other waterproofing material, as well as the edges of the vapor barrier membrane on the room side, if we are talking about an insulated roof. In both cases, a cross-shaped cut is made in the panel and triangular fragments of material are tucked inside. For fastening, nails with wide heads or staples are used, and sealant or adhesive tape allows you to achieve a tight seal between the materials around the perimeter of the wooden box.
The passage through the roof of the chimney provides for thermal insulation of the chimney with basalt wool or other non-combustible materials. If possible, an air gap of 5–7 cm wide is left between the insulation layer and the chimney itself.
Box insulation with basalt wool
If the installation of a chimney involves the use of a special element - a penetration, when choosing it, first of all, make sure that the element is made of a material that is resistant to temperature changes.
Please note: do not use materials that are not designed to withstand high temperatures, such as pipes and roof penetrations for ventilation ducts.
Installing a chimney in a finished roof
If the chimney is not installed at the construction stage of the house, but in a finished roof, the following is done:
- There is a place for output taking into account the requirements of SNiP. This should be the space between the cross beam and the rafters.
- A box is made of beams, the cross-section of which is equal to the cross-section of the rafters. The box is made such that the width of its sides is 0.5 m greater than the diameter of the pipe.
- A hole is cut in the roof equal to the perimeter of the box. To comply with it, through holes are drilled from the inside in the corners of the box.
- The roofing material is bent outward, a pipe is inserted into the hole and secured.
- The box is sealed with fire-resistant material for thermal insulation.
- The junction of the pipe and the roof is sealed. The flange (adapter) is being installed.
The pipe must be routed only through an adapter Source rinnipool.ru
Final works
Cutting a chimney pipe on the ceiling or roof with your own hands is finished. All that remains is to dry the oven. But before that, we check the draft in the pipe. To do this, we bring the torch to the open door of the firebox; if the flame draws inward, the draft is normal. If there is insufficient ventilation, you will need to remove construction debris from the pipes and only then proceed to the next stage of the final.
We put no more than 3 kg of firewood in the firebox and set fire to it. During the first burning of wood, grease, dirt and paint materials will burn off from the surfaces of the stove, and moisture will be removed from the bricks. Therefore, we recommend opening windows and doors.
After the surfaces have cooled, we dry the stove a second time and check all the joints and the chimney itself for leaks and that there are no leaks of gases into the room. We eliminate possible malfunctions and only after the final check can we begin to operate the furnaces.
Only by qualitatively completing the main stages of work and carefully checking the finished chimney, you will be able to protect your home from fires and inhale the fragrant smell of burning wood, and not carbon monoxide pouring out of the cracks of the chimney.