Multifunctional and ergonomic furniture is an inseparable part of the interior decoration of any room, so installing a sink with a cabinet in the bathroom is no exception. It is believed that, despite the existing understanding of the main and significant characteristics, the sink and the cabinet for it may differ from each other both in design and in cost, as well as functionality.
Even the simplest and most inexpensive washbasin and cabinet must fit gracefully into the overall style of the bathroom and be at least practical and comfortable. Therefore, before installing a sink with a cabinet in the bathtub, it is necessary to carefully select all the main and fastening elements, so that subsequently these pieces of furniture will be compact, comfortable and ergonomic in the interior of the room.
Thus, based on the purpose of installing a cabinet under the sink, it should be selected either for use and storage inside various chemical and household supplies, or in order to simply simply hide the communications line under the sink.
Features of installation on brackets
The wall-hung washbasin can also be installed on brackets.
For this installation option, first, the fastening elements are applied to the sink, determining the distance required for installation, after which they make the appropriate marks on the wall and drill holes in the designated places using a drill. After drilling, dowels are inserted into the holes and the brackets are fixed to the wall. The faucet is inserted into the washbasin, after which the wall-mounted sink is hung on brackets. As in the previous case, the last stages of work involve connecting the washbasin to the water supply and sewerage system. Provided that it is installed correctly, the sanitary ware is firmly fixed to the fastening elements and does not move.
Hanging sinks on brackets can only be attached to strong walls that can support the significant weight of the washbasin. The height of the sink in the bathroom corresponds to the height of the brackets and usually varies between 80-85 cm. If there is no free space in the bathroom, you can choose a corner wall-mounted washbasin model
In this case, it is important to measure the same distance from the floor to the sink level on adjacent walls and position the washbasin symmetrically relative to the corner
What is a built-in wardrobe and what are its advantages?
Cabinets are divided into two types according to the method of opening the doors:
- Hinged - in it one door or several are hung on hinges attached to the side walls and rotated at a certain angle.
- A compartment is a modern version of a closet in which the doors move in a vertical plane along upper and lower guides.
Sliding wardrobes are especially popular.
A built-in cabinet is usually called a cabinet without its own body. It can be installed in a niche or against a straight wall.
A properly selected cabinet can significantly save space.
Important! The built-in wardrobe can be open-framed or framed. In the first case, the body is formed by the walls, floor and ceiling of the room
Shelves, hangers, partitions and doors are attached to them. This is the most suitable option for the niche. In the second case, the cabinet has one or two side walls, which are attached to the wall of the room, floor and ceiling. A similar structure can be created anywhere without restrictions on length and depth.
Advantages of a built-in wardrobe
- Efficient use of space. It is located in the same area as a regular cabinet. At the same time, it occupies the entire space from floor to ceiling, which increases its capacity.
- More opportunities to choose design and functionality to suit your needs.
- The ability to hide features and improve the appearance of the room. For example, fill an empty niche, hide uneven walls or laid communications.
They are located in a convenient niche in the wall and do not take up much additional space.
- Reliability. Since the supporting structures of the cabinet are the walls and floors of the room, it does not become loose during operation.
- Collects less dust. A regular closet accumulates a lot of dust on top and on the back wall, which is why it requires regular cleaning.
- Lower cost. The manufacture of built-in wardrobes in the bedroom requires less material than free-standing ones. The price decreases accordingly.
Today, this is a very practical and stylish alternative to the bulky cabinets that were widely used in the past.
How to choose a built-in wardrobe
- Decide on a location. Since built-in furniture cannot be moved, its installation location should be carefully considered.
- Decide on the sizes. The cabinet in the niche will correspond to its size. If it is installed along the entire wall, all that remains is to choose the depth of the product. And the most independent option is a cabinet that occupies part of the wall.
Any idea can be realized here, it all depends on how many and what kind of things will be in the wardrobe.
- Select the material for making shelves and facades. Popular materials are various boards made from wood raw materials. Doors can be made of glass.
- Select a facade opening system. It can be of the following types:
Roller. The doors are installed in a metal frame and move using a roller mechanism
The system is inexpensive, but requires careful handling - if a foreign object gets into the mechanism or a strong blow, the rollers can slip out of the grooves and cause the door to break. Monorail. Rollers move along the monorail
In this system, foreign objects cannot enter, and the door is reliably protected from slipping. The monorail mechanism is more expensive.
A custom-designed wardrobe will help you save as much space as possible.
Materials
Furniture with a washbasin should be functional and beautiful, but if it is made of low-quality materials, then all its benefits are reduced to zero. Since the quality and service life of the entire structure depend on the materials. The main requirements for cabinet materials are their ability to withstand sudden drops in temperature and moisture resistance. Materials that have such qualities are MDF panels, chipboard, artificial stone and wood. The surface of furniture made from MDF is usually processed using two methods:
- By painting. First, a primer is applied to the surface of the material, and then it is painted with paint in several layers. This makes the furniture highly protected.
- Treatment with a special composition. The material, both outside and inside, is treated with a special moisture-resistant liquid, which prevents the process of reproduction and spread of fungi, mold, etc.
A cabinet made of chipboard is cheaper, and it is not afraid of various mechanical damage. The surface of this material is covered with sheet plastic, which prevents delamination and swelling of the material. There is no doubt about the reliability of furniture and sinks made of artificial stone
The only thing that is very important is that there is no damage to the surface of the furniture, including scratches that could destroy the integrity of the material. If the furniture is made of wood, it must be coated with a special moisture-resistant product
In terms of cost, furniture made from natural wood is slightly more expensive than those made from MDF or chipboard.
The quality of the fittings is of no small importance. Over time, the doors may begin to creak and become loose.
Therefore, the more firmly they are installed, the longer they will serve you.
As for the sink itself, it can be: ceramic, porcelain, earthenware, cast iron, steel, stone and glass. In this case, the materials of the cabinet and sink must be combined.
Depending on what materials the entire structure is made of, its cost changes. At the moment it ranges from 1,050 to 325,600 rubles.
Tabletop installation
Often in modern apartments the bathroom is quite large. In such a bathroom, when equipping it, you can show your imagination. To make using the sink more convenient, you can make a special countertop - a slab into which the sink is inserted. It is difficult to classify such a design as a decorative element, but you should not refuse such a product, especially if the size of the room allows its use. In addition, it can be made quite unique and beautiful. Countertops are made from tiles or special wood that is resistant to water; stone, plastic or marble are sometimes used in other materials.
Scheme of a sink cabinet with wall mounting.
The two most common options worth considering are marble and wood. A wooden product is quite easy to design. First you need to measure the place where you plan to install the countertop, find out the diameter of the washbasin and its height. You should not place the tabletop close to the wall, because... Any wood will swell over time when exposed to high humidity. The wood must be carefully selected, because... it must have certain properties. The selected material must be treated against parasites. When the product is being processed, it is prohibited to put pressure on it, because... the tabletop may crack.
A countertop made of artificial stone will be more durable, moisture-resistant and durable. This material is considered the most modern. In addition, it is the most versatile. The stone will not absorb moisture, which protects against the appearance of mold and fungi. It is easy to wipe and clean, which indicates its high environmental friendliness and hygiene. This material is most suitable for the bathroom. Manufacturing is carried out by cutting and turning structural elements from the original material. The joints of the product should be treated with alcohol to remove bacteria. Then you can use the adhesive backing. After drying, excess glue is removed using a chisel and a grinder. Then the joints are further strengthened with special plates. Then the backing is attached. After sanding, after 6 hours you can install the sink itself.
You can make bathroom furniture yourself using various materials. Using hand-made furniture, you can make your bathroom space individual and unique.
Required Tools
Since installing a sink is not a very complicated process, you don’t need too many tools for this:
- drill or hammer drill. It will be necessary to drill holes in the wall;
- screwdriver or screwdriver. Insert dowels into the holes and tighten the brackets with screws;
- building level. Make even markings;
- tape measure and pencil. Measure the required height;
- hammer. For driving dowels;
- gun for a bottle of sealant. Seal the seams.
Here, in principle, is the entire simple set of tools for fixing the washbasin. Read on to find out what the height standard for installing a sink in a bathroom is.
The following video will tell you what you need to have with you before installing the sink:
https://youtube.com/watch?v=AVjqVh9FW5o
Preparing for installation, determining the location of the fastener
When planning to purchase a wall-hung model, it is important to determine in advance the optimal size of the sink. The dimensions of the bathroom are preliminarily measured, and the future location of the plumbing product is determined
The suspended version of the sink can only be mounted on a solid base, so it is better to avoid plasterboard walls.
If there are water supply and sewer lines, the location of the existing water inlet and drainage must be taken into account. The height of the bathroom sink is selected so that adults can use it comfortably (it is advisable to provide a special chair for children)
Ideally, the height of the sink from the floor should be 85 centimeters. But you can adjust this value up or down. The exception is a wall-hung sink with a bathroom cabinet. In this case, the installation height of the washbasin depends on the size of the piece of furniture.
The following points are important:
To attach sinks to suspended structures, screws and dowels or brackets are used (a desirable option if the sink is made of marble or granite). In the latter case, the height of the sink determines the level of support for the washbasin; You can attach a washbasin to a plasterboard wall only if the sheets are installed on a frame base and tiles are provided on top
Fastening is carried out using “helicopters”, which are drywall bolts with distributed loading; In order for the sink to hang securely on the wall, the fastening elements must be immersed into the wall by at least 70 mm, so you need to select fasteners whose length is at least 100 mm. Also, it is important to pay attention to the diameter of the screws - it must correspond as closely as possible to the size of the mounting holes (minimum 6 mm ).
Components
Installing a sink with a cabinet in the bathroom requires understanding and ability to understand the main components of this furniture.
So, the main elements of a sink with a cabinet are:
- sink or washbasin, or sink (wall-hung, built-in, surface-mounted or on a pedestal);
Sink
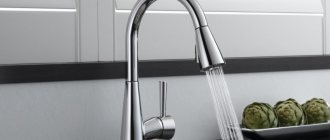
- vertical mixer with flexible or rigid connections;
Mixer
- drain siphon;
Siphon
- fastening the sink (brackets or anchor screws, bolts, rubber gaskets, nuts, FUM tape, metal corners, screws, dowels, metal-plastic pipes, as well as polyurethane foam or silicone sealant);
- cabinet.
Cabinet
In this case, from the tool kit you will need to purchase the following to install a sink with a cabinet in the bathtub:
- screwdriver;
- perforator;
- hole saw or circular saw;
- roulette;
- wrench;
- putty knife;
- pencil and ruler;
- building level.
Choosing a cabinet when you need hanging models
Wall-mounted furniture is considered the best for small spaces. Leaving the floor free, it visually enlarges the room and simplifies cleaning. But this is not all the advantages of fashionable plumbing and furniture.
Wall-mounted washbasin with cabinet
The undeniable advantages of suspended models ↑
A wall-hung cabinet with a sink has the following advantages:
The bathroom floor is equipped with a heating system. This means that the furniture for this room must either stand on legs or be hung on the wall. If you remember how the metal coating of the legs is affected by constant humidity, the choice becomes obvious. A wall-hung cabinet under the sink is the best solution in this case. For those with tall or, conversely, very miniature stature, it is better to adjust the height of the sink mounting to suit themselves. And wall-mounted models are ideal for these purposes. For rooms with a small area, owners often choose a layout in which the washing machine is located under the washbasin. This composition looks more aesthetically pleasing if a hanging cabinet is installed under the sink in the bathroom. In order to place a communications system behind a bedside table that stands on legs, you often have to cut holes in its back wall. Installing a wall-hung sink does not have such inconveniences. The flying design visually makes the room more spacious, adds lightness and weightlessness
This is especially important if a massive, most often double, sink is chosen. The wall-mounted cabinet eliminates the heaviness of the washbasin.
Wall-mounted furniture for a small bathroom
Harmony of Yin and Yang in bathroom design
Installation of a wall-mounted sink, despite all its advantages, has a number of limitations:
- First of all, when installing a bedside table, the reliability of the fastenings is important. Therefore, if the bathroom has flimsy walls, made, for example, from plasterboard, you should not choose a wall-mounted model. But don't rush to despair! If your renovation is still at the planning stage, simply provide embeds in the wall for further installation.
- If it is not possible to hide the sewer pipe in the wall, you should not install a wall-hung sink for aesthetic reasons. After all, the appearance of such a structure under the cabinet is not very pleasing to the eye.
Spacious drawers for small items
Variety of models - what are the types of hanging cabinets ↑
Hanging bedside tables for bathrooms can be divided into several categories:
- by location: corner and classic;
- by type of sink: with mortise and overlay bowl;
- according to the type of material: wooden, made of MDF, chipboard, etc.;
- with and without table top.
For miniature bathrooms, it is better to choose corner models. Bedside tables equipped with a tabletop are much more convenient to use.
Creative metal model with marble top
Compact corner model
Creative ideas and practical tips ↑
Mounted models open up the widest possibilities for creativity. Some interesting ideas for proper organization of space:
- A practical option is to choose a hanging cabinet with a built-in towel rack or an open shelf for storing them. This will help keep the room tidy and make it feel more spacious.
- An additional highlight of the bathroom can be the installation of lower lighting. A pebble path with built-in lamps mounted under the sink will also look very beautiful. This will give the room charm and mystery.
- When choosing a double sink for a bathroom, it is better to choose a long mirror that matches the size of the cabinet. This way the composition will look complete.
- A hanging cabinet with a sink makes it possible to conveniently place a children's high chair! Is it difficult for your child to reach the faucet due to his short stature? Provide a stable stool for him, hiding under the structure with the washbasin.
Stone path under the hanging pedestal
A towel storage unit connects two cabinets into a single structure.
Mobile “steps” for a child are created in the same style as the interior of the room. Wall-mounted sink without a bedside table.
How to design and make bathroom furniture with your own hands, drawings and photos
In fact, furniture for a bathroom, toilet, or combined bathroom means floor cabinets with sinks, cabinets for towels and household equipment, wall cabinets, shelving, mirrors and shelves. All these items are designed for a specific size, and I cannot give any specific drawings. But giving some ideas for storage in the bathroom is fine.
DIY bathroom floor cabinets
If the bathroom is separate, then it is better to implement the cantilever design described above and not to be tricky with making a cabinet under the sink from furniture materials. The proximity of moisture will not lead to anything good.
However, there is an option to complement the tulip sink with shelving or mobile shelves.
It’s very convenient - while taking a bath, move closer to you such a pull-out table with shelves with everything you need for relaxation. Especially if you like to take a bath and read a book, watch a TV series on your laptop, etc.
If the bathroom is combined, then most likely there will be enough space for a full-fledged floor cabinet with your own hands. Since the room is large, the problem with condensation is not so acute and it is possible to implement fairly large structures with a body made of laminated chipboard and a façade made of MDF.
Varieties of cabinets with a design similar to the kitchen one look good. Simply adapting the depth is enough. And the height can be left the same, it is optimal for the level of the sink and the installation of a washing machine.
The filling of bathroom cabinets can be different, just like kitchens. You can use shelves and drawers, bottle holders and mesh storage systems.
For large items (basins, buckets, laundry baskets), larger storage spaces can be provided.
DIY hanging mirrors and shelves for the bathroom
If free space allows, it is better to hang the mirror as far as possible from the shower - then there is less chance that it will fog up. And you spend time wiping it in the morning to complete all the “procedures” for caring for your face and hair.
Also, a traditional mirror above the washbasin can become additional storage space. If you place it on the door of a flat cabinet. Moreover, the sash may not be hinged. And, for example, a compartment or folding one.
Or a stationary one, hiding retractable racks behind it.
The reverse side of open shelves and the bottoms of wall cabinets can be used to hang hooks for towels, washcloths, and brushes. It turns out that a kitchen rail is also appropriate in the bathroom - you can hang towels on it. Or use it traditionally, with mesh hanging shelves for various small items and hooks.
How to use the space above the toilet
There are a lot of options for add-ons over the toilet. These can be open shelves or closed cabinets. If the toilet is combined with a bathroom, you can make an option with a folding table - I think it will be convenient.
If the space between the wall and the toilet allows, you can build a low cabinet into it.
It is especially convenient for the elderly and people with disabilities - it will serve as a reliable support when standing up.
Storage under the bath
Surely you have repeatedly come across photos of various pull-out and folding storage systems under the bathroom.
Alas, such options are far from Russian realities. Unless, of course, you live in a private house. In a city apartment, in the event of a pipe leak, the space under the bathroom should be easily accessible. Therefore, sliding screens are what you need.
In general, there are quite a lot of ideas for storage in bathrooms, small and large, and absolutely the entire space can be used effectively. Do not neglect free corners and the space above the door - you can also place shelves there for storing household chemicals that are unsafe for children. Also use basic ergonomic rules: everything you need for everyday use should be at arm's length.
And good luck to you in selecting and making bathroom furniture with your own hands!
Installing a cabinet with a sink attached to the wall
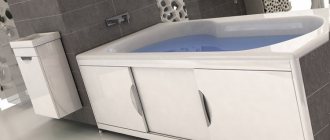
The stand for a bathroom sink can be wall-hung or floor-mounted, which determines the installation features. In the first case, the cabinet is mounted directly under the washbasin and has no support, and in the second, it is equipped with a pair or four legs.
The hanging cabinet has a stylish and attractive appearance. Such furniture is especially appropriate in combination with a washbasin of a similar design in a miniature bathroom, since the lack of support contributes to the visual expansion of the space. In addition, when choosing wall-mounted cabinets with a sink, you don’t have to worry about the negative consequences of the furniture coming into contact with water that gets on the floor during washing or wet cleaning (cleaning itself is greatly simplified). Another advantage that a hanging cabinet under the sink gives is constant air circulation under the washbasin, which prevents the growth of germs and bacteria that prefer a humid environment. Of course, such models are more difficult to install (especially if you choose a corner wall-hung sink with a cabinet), but the result is worth it. Combined hanging models can only be installed on load-bearing walls.
A wall-hung washbasin with a bathroom cabinet of a floor-standing model is convenient because the installation of the piece of furniture does not depend on the type of wall. Both compact corner models and wide rectangular options for washbasins of the appropriate size are available.
When choosing, it is important to correlate the sizes of both elements in advance
Installation of the washbasin is carried out almost similarly to the two previous options. Before attaching the sink to the wall, first check how freely the siphon and mixer are connected and whether the internal equipment of the cabinet interferes with the process. If such a nuance is present, it may be necessary to make special holes for the washbasin elements in the back wall of the furniture.
When all the points have been clarified, they install the hanging fasteners in the form of brackets and fix the cabinet, on top of which the sink itself is installed. After checking the parallelism to the floor and the reliability of the fixation, the washbasin is connected to the water supply and sewerage system. To attach the sink to the wall if there is a cabinet, use anchor screws or silicone (the second method does not require the use of a drill, but is less reliable.)
https://youtube.com/watch?v=8d-LyqQfngQ
WATCH THE VIDEO
Thus, installing a wall-hung washbasin, subject to a responsible approach to choosing a model and preparatory measures, is quite possible on your own, which ensures noticeable savings. The main thing is not to miss important points, securely fixing gaskets, fasteners and threaded connections, and then the operation of the installed plumbing product will not cause any unpleasant moments.
Kinds
Nowadays you can find many types of furniture with a washbasin. They have different shapes, sizes and installation methods, and are made from different materials and parts.
Depending on the mounting method, there are two types of bedside tables with a washbasin:
- floor;
- hanging.
The advantage of the first group of cabinets is that:
- they are easy and simple to install;
- you can move it to different parts of the room as much as you like;
- there are a huge number of floor models of cabinets, designed in different ways;
- they are able to withstand enormous weight, which is why you can see marble washbasins on the floor cabinets.
Floor cabinets can have different bases, for example, models with legs or with a plinth. The second subtype is also called cabinets on a monolithic frame.
Cabinets with legs
The installation process for such models is simple. If the structure does not need to be mounted on the wall, then it is enough to assemble it and simply place it in the right place. Such models can be installed in rooms with a heated floor system. They do not prevent the legs from moving freely and cleaning the room easily and without hindrance. The most reliable cabinets are those with legs, the material for which is chrome-plated metal.
Nightstands with plinth
They are very convenient to use and can be simply placed in the desired location. Such bedside tables are reliable if the base is made of reliable materials protected from moisture. Otherwise, the entire structure may lose its integrity after some time.
Corner cabinets
Ideal for small spaces. They take up minimal space and still perform their tasks perfectly. They look quite stylish and very neat. Despite the fact that they look compact, they can accommodate many items. Corner furniture models with a washbasin are also available as floor-mounted or wall-mounted. It is precisely these cabinets that are in increasing demand today, since they are installed in the most often unused place - the corners of rooms.
Washbasin-moydodyr
It is a washbasin with a large mirror, a built-in washbasin and storage cabinets on legs underneath.
Hanging cabinets
Like corner models, hanging cabinets are becoming increasingly popular among buyers.
Their advantages are obvious:
- They can be installed in small bathrooms. At the same time, they are able to visually increase the space.
- They are easy to use.
- They do not interfere with cleaning the room at all.
- If a flood suddenly occurs, they, including the items stored inside them, will not be damaged in any way.
- They look very fashionable and stylish.
The only drawback is that it needs to be mounted on a very solid wall. Such cabinets must be mounted using dowels or anchors. In this case, the surface must be either a solid panel or a brick partition.
How to do it?
The installation process can take place according to one of two algorithms.
Assembly of furniture from “semi-finished products”. Includes:
- Drawing up a drawing on a computer.
- Purchase of chipboard.
- Sawing and edging workpieces in a carpentry workshop.
- Assembly of finished components into a single structure.
- Installation of accessories.
This method is a little more expensive, but it eliminates unpleasant moments with damage to the material, and also allows you to make a structure that is completely protected from moisture.
Assembling furniture yourself. In this case, the master makes all the parts himself. Build process:
- Drawing up a drawing on paper or computer.
- Marking a single sheet of chipboard onto a part.
- Cutting blanks.
- Machining the ends of parts.
- Assembly of all components.
- Installation of accessories.
In the second case, more time will be required for processing and edging of parts. These are necessary actions. They increase the hydrophobic properties of the final product.
Possible installation problems and methods for solving them
If the water supply and sewerage come out of the floor or are in an inconvenient place, resort to sawing the furniture from below (if necessary, then in the shelf) and from behind in the right places using a jigsaw or an ordinary hacksaw, after which the connection will be made without problems. It also happens that the sink cannot be attached to the wall, since there are no corresponding holes or a pipe runs in a place suitable for drilling holes. This problem is solved by gluing the sink to the lining using silicone. The washbasin will hold quite firmly.
Choosing a vanity unit
When choosing a bathroom vanity, you need to follow some simple but important rules
First of all, pay attention to the interior of the bathroom. If all its elements, including plumbing fixtures, hanging cabinets and shelves, are made in a soft style with smooth lines, a strictly rectangular cabinet will be out of place
If the bathroom is decorated in a classic style, which is characterized by luxury and wealth, installing a sink with a cabinet in a minimalist style will not be acceptable in this case. Ideally, this piece of furniture should match the materials and colors of the overall interior design.
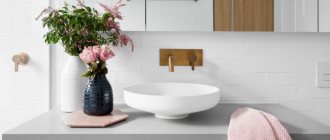
When choosing furniture, consider the overall color and interior of the bathroom.
In addition to design, it is necessary to pay attention to other important points, for example, the correct choice of fittings for the product. Handles, legs and hinges must be made of chromed metal
A bedside table with plastic gold-plated or chrome fittings usually loses its original appearance after a couple of months. When purchasing furniture with a colored coating, you should know that the paint on its surface must lie evenly.
The arrangement of the bathroom is also of great importance. For example, if the room has a heated floor, you should not buy furniture with a plinth; it is better to buy a sink cabinet with legs
Such a thing will not heat up from the floor, will significantly facilitate the cleaning process, and will provide the necessary ventilation of the product, which is important for rooms with high humidity.
In terms of furniture functionality, you can be guided by personal preferences. A good option is a cabinet under the sink with a laundry basket, which significantly saves room space. For small bathrooms, there are corner models that take up minimal space, while being quite practical and functional. It’s good if the shelves in the cabinet are adjustable in height, so they can be adjusted to the height of detergents and cleaning products. A roll-out cabinet is another interesting solution for decorating a bathroom. It can be moved to any place, but it has a significant drawback - the difficulty of installing a sink, because all communications (water supply and sewer pipes) are installed permanently. So, you need to choose this piece of furniture based on the purpose of its installation: it will be used to store all kinds of household accessories or simply hide the pipes to the sink.
Coating
How to make the surface of a manufactured cabinet or other piece of furniture waterproof and waterproof?
I used acrylic latex based rubber water dispersion paint The name is “Rezel+”, the manufacturer is the Sevastopol LLC “Accent”, the price is about 120 rubles per kilogram.
Inexpensive rubber paint made in Sevastopol.
What attracted her?
- Wear resistance. The coating can be cleaned with any detergents, except abrasive ones;
- Absolutely waterproof. Suffice it to say that this paint is recommended by the manufacturer as a roof sealant;
- No odors (composition: water-based acrylic latex);
- Dries one layer in just one hour.
To apply the paint I used a regular soft brush. The painting was done in four layers, with each layer applied perpendicular to the previous one.
If you use a roller or sprayer, the coating will be smoother.
Waterproofing paint isn't the only coating that can withstand splashes and high humidity. For another project (my daughter's changing table) I used alkyd urethane yacht varnish. It emphasizes the texture of the top layer of veneer, which has a very pleasant effect on the appearance of the product.
Yacht varnish is a coating designed for constant contact with water.
There are several subtleties to applying varnish.
- After applying the first (priming) layer with a brush or roller and drying it completely, all furniture surfaces are sanded again. The varnish lifts wood fibers on the surface of the veneer and makes it rough to the touch. Sanding will allow you to get a smooth finish without applying dozens of layers of varnish;
The raised pile made the surface rough.
- Subsequent varnishing is performed in one go. The varnish is not applied with a brush or roller, but is poured onto a horizontal plane and evenly distributed over it with a wide steel spatula . This method of varnishing will allow you to obtain the coveted smooth glassy surface with a minimum number of flaws;
This coating method is often used when varnishing parquet.
- The next surface of a cabinet, cabinet or other product is varnished in the same way after drying the previous wall. Drying at room temperature takes at least two days, so you have to be patient.
How to properly install a sink with a cabinet in the bathroom
When installing a sink with a floor cabinet, the procedure is as follows: Place the washbasin on the cabinet. Using a level, make it strictly horizontal - adjust the legs of the cabinet.
- Mark on the wall where the washbasin will be fixed.
- Make holes in the wall. Their depth must correspond to the size of the fasteners used. For tiles, take a feather drill, for concrete - with a carbide tip, and use the drill in impact mode. Fix the washbasin with anchor screws or metal pins screwed into dowels.
- Install a mixer and outlet with a siphon. Place the washbasin on the cabinet and press it to the wall with nuts, screwing them onto the studs. Be sure to place plastic spacers under the nuts to protect the housing from damage when tightening the nuts.
- If necessary, make holes in the cabinet for laying pipes.
- Connect the washbasin to the utility systems. Corrugations or pipes can be used to connect to the sewer system. Rubber seals are always used. To connect to the water supply, flexible hoses with union nuts are used. Install instrument taps on the water supply pipes. Check if there are spacers on the nuts. Connect the hoses to the taps, carefully tighten the nuts and tighten them with a wrench.
- Seal the gaps between the bowl and the wall surface with silicone sealant.
- Open the tap and make sure there are no leaks in the area of the threaded connections. If leaky connections are detected, disassemble the connection, add a thin braid of combed flax to the threads or apply 5-6 turns of FUM, re-tighten the connection and tighten it.
- If desired, attach a mirror to the wall above the sink. Using a tape measure and a level, mark the location of the holes for the fasteners, drill them to the optimal depth, insert the dowels and screw the hooks into them. Hang a mirror on them and check its horizontalness with a level.
Installing a wall-mounted cabinet under the sink in the bathroom has some features, which we will describe below.
Practical advice
When installing various plumbing fixtures and equipment, the same problem can be solved in several ways. Which one is better is up to you to decide. We give only professional advice from masters, but there is no consensus among them.
Options for sealing a sink with a wall
- Silicone is applied outside around the perimeter of the sink. The traditional method is used in most cases.
Disadvantages - low-quality material peels off over time, dirt gets into the gap between it and the sink and becomes very noticeable. You have to periodically remove the old silicone and apply new one. After a year or two, black spots appear on all types of silicone, even on the most expensive ones with antiseptic additives. In addition, over time, it changes its original color, fades, and various stains appear on the surface. It is impossible to eliminate this drawback by cleaning or washing; you have to completely remove the old silicone and apply new one. You can apply sealant to the joint between the bowl and the cabinet
Advice. Match the color of the sealant to the color of the ceramic tile, not the color of the sink. Due to this, it is possible to make deviations in the width of the gap invisible.
- Silicone is applied around the perimeter of the sink from the back side until it is fixed to the wall. The thickness of the layer and the location of its application are selected in such a way that after pressing against the wall, excess does not appear on the surface. The disadvantage is that over time the cracks have to be cleaned of dirt.
Applying sealant to the back of a sink
- Using rubber seals for windows and doors. They have glue on one side, a thickness of approximately 5 mm, and are characterized by high elasticity and long service life. The seals are carefully glued around the perimeter on the back side of the sink before installation, and after pressing they ensure a complete tight fit. Many professional plumbers consider this sealing method to be the most optimal. Nothing peels off, accumulated dirt can be easily removed if necessary, and the service life of the seals is practically unlimited.
Eliminating the gap between the cabinet and the sink
Some washbasins do not have a lip over the side surfaces of the hanging cabinet; water can get into the ends. Responsible manufacturers complete their products with special self-adhesive tape; it is glued before installation on the sink cabinet and closes the cracks. Unfortunately, for various reasons, the thickness of the tape is not enough to compensate for all the gaps.
It is recommended to use rubber window sealant instead of tape, the same as we recommended above. It is glued around the perimeter of the cabinet, after which the sink is put in place.
Seals
Adhesive sealant
The sealing is complete, the possibility of water ingress is completely eliminated. It is not recommended to use silicone sealant for the same reasons. The disadvantage of this method is that there is no additional fixation of the sink to the bathroom. Factory tapes hold the structures together quite firmly, the cabinet and sink work as a single unit.
Below is shown how to eliminate the gap between the washbasin and the cabinet.
Wall cabinet installation technology
Correct installation of the selected model will help save time and avoid the need to redo everything from scratch. Strictly following the instructions will also protect you from property damage and unpleasant health consequences.
Subtleties of installing mounted models ↑
Installing a wall-hung sink, which comes with a cabinet, requires compliance with several rules:
- Securely attach both the cabinet and the washbasin to the wall (if we are talking about a built-in sink).
- For installation, you must choose a wall made of durable material (not plasterboard). Or install mortgages at the stage of rough finishing work.
- All connections must be tightened very carefully, without fanaticism, so as not to damage the coating of the model - excessive efforts can lead to cracks.
For suspended models, anchor bolts (left) and dowels (right) are used.
Step-by-step instructions with video for proper fastening ↑
After all the necessary communications have been brought to the mounting location, we proceed to the installation of the structure itself. How to install a sink with a cabinet in the bathroom:
- We mark the wall for installation and level the cabinet.
- We remove the internal shelves for ease of fastening and install the cabinet on the wall. To do this, you can use anchors (100–140 mm), dowels or a kitchen hanger with evenly spaced dowels.
- We place the sink on a wall-mounted cabinet and use a pencil to mark the locations of the slots in the wall for fastening.
- We remove the washbasin (and possibly the cabinet) and drill into the wall in the marked places. We install anchors or studs for fastening.
- We fasten the cabinet (if it was previously removed), apply sealant along the side edges, install the sink on it, hanging it on studs or anchors. If there is a gap between the cabinet and the washbasin, place silicone furniture pads in this place.
- Carefully install the plastic bushings, washers and nuts included in the kit. Lightly tighten the nuts with a simple open-end wrench.
- We fill the gap between the wall and the surface of the washbasin with sealant.
- We install the siphon and mixer, return the shelves to their place.
https://youtube.com/watch?v=Xf47zggDHtg
Video: installing a cabinet with a sink in the bathroom
Hanging models of bedside tables for bathrooms, romantically called “floating” in English, are a new step in bathroom design. Convenient and easy to install, they are quickly gaining popularity in world markets. Choose a model to match your interior according to your idea, and be on trend!
Alternative
The financial limit forces the use of chipboard. The first step is to develop a diagram, determine the main dimensions and number of elements. We take a 20 mm sheet as a basis.
Calculation tips:
The author of the following video, using a computer program, received detailed details. By simply adding legs, the design turns into a floor-standing design.
It is problematic to cut perfectly with a jigsaw; you will have to align the edges. Only an experienced carpenter can avoid blockages and maintain straightness and parallelism. Errors will be reflected when edging is performed with an iron. It makes sense to entrust the job to a specialized company; you will be left with the assembly according to the sketches.
Semi-professional chipboard cutting.
Note to experimenters:
We fasten the constructs with confirmations.
We provide a stiffening jumper.
We pull it to the edge of the sidewall.
Let's try on the sink.
Mark the arc of the cut out part using a metal ruler.
We cut out a segment and check by applying it.
Screw the fitted part.
We assemble the frames of the boxes according to the specifications.
Donyas are often made from laminated fiberboard, nailed or stapled. Fiberboard is not durable, nails and staples become loose from shocks. It is more reliable to tighten with self-tapping screws with a diameter of 2.5 - 3 mm through washers. To avoid cracks, the chipboard is drilled with a 1.5 - 2 mm drill, respectively. Spare no expense, buy stainless screws.
We nail the bottoms with laminate inside.
If desired, the uncovered ends of the fiberboard are primed with drying oil 2-3 times and painted with oil paint.
We select ball guides; the video explains the installation nuances:
Mark the middle of the side panel.
We separate the ball guide.
We screw the runner in the middle, maintaining parallelism.
We mark the places for the response nodes and install them.
We drill holes for fastening the facade.
We press the front panel.
Tighten the screws.
The legs of the floor modification are secured from the inside.
It is reasonable to ask to silicone the seams, removing the excess with a dampened glove.
Finally, screw the handles.
Information on assembling the ordered kit:
Design
When choosing furniture for any room, you need to pay attention to the appearance of the furniture. It must match the design of the room
This is not difficult to do; it is enough to know some of the features of various styles in the interior. For example, for a room designed in a classic style, the following are perfect: a marble countertop, a porcelain sink, a natural wood cabinet with elegant legs. A gold-plated faucet will complement this luxurious interior.
For those who want to create a more modern, airy style, we recommend turning your attention to glass models of cabinets. It is better to choose fittings for furniture with a sink in a different color that does not match, but is in harmony with the color of the furniture
For example, if the cabinet is light, then it is better to choose handles for it in dark shades, but if the cabinet is dark, then select elements in light shades. Thus, if you decide to buy a cabinet with a sink, then you need to do it carefully and with love, so that the bathroom becomes not only comfortable, but also cozy. Allow yourself to safely experiment with different styles, having first familiarized yourself with their features.
Features and purpose
Cabinets allow you to keep your bathroom tidy
This is especially important for those who adhere to the philosophy of minimalism. Cosmetics, hygiene items, household chemicals, linen and other things are hidden from prying eyes behind furniture facades
This allows you to fully enjoy the aesthetics of the interior.
There is also a practical side to this decision. Each thing has its own place, which means that finding the necessary item becomes easy and fast.
And finally, the closet can become a decoration for the room. Modern manufacturers offer a wide selection of furniture in different shades, shapes, and sizes. With the help of well-chosen furnishings, you can emphasize the chosen interior style, show your good taste, and create the desired atmosphere.
Of course, not every cabinet is suitable for a bathroom. Special requirements are imposed on such products. The material must be resistant to high humidity and temperature changes, because the bathroom is a place with a special microclimate.
Many companies have a separate section of bathroom furniture on their websites. Items created specifically for such premises are collected here. If you choose a cabinet in a regular store, check with the seller for the characteristics of the options you are interested in.
When using furniture you should also be responsible. If water splashes on the furniture, immediately wipe the surfaces with a dry cloth. Don't forget about ventilation. In a constantly closed bathroom with poor ventilation, even high-quality furniture will quickly become unusable. Therefore, take care to resolve this issue.
Installation
Installation of a cabinet with a built-in sink consists of several stages. To successfully complete all these stages, you need to follow some rules.
Choosing a location
Usually a new sink is installed in place of the old one. In this case, there is no need to rack your brains over how to install water supply and sewerage. If you want to install a cabinet in a new place, you will have to solve this problem. In addition, the furniture itself should fit there comfortably, and its cabinets should open and close freely. If you are going to buy a wall-mounted vanity unit, make sure the wall is strong.
Carrying out calculations and markings
Carrying out calculations and markings makes it possible to lay the pipes exactly, without damaging the cabinet itself. Fittings, that is, connecting parts of pipelines, must be located above the middle shelf. Incorrect measurements can cause them to rest against walls and furniture shelves. This also applies to the sewerage system. For the drain pipe that comes out of the floor, you will have to drill a hole in the bottom and shelves of the cabinet. Then the corrugated hose will stretch from the bottom to the top. Therefore, it is better to measure everything accurately in advance and run all the pipes through the wall.
Purchasing materials and preparing the necessary tools
During the installation process you will definitely need:
- adjustable wrench;
- FUM tape;
- screwdrivers of different sizes;
- screwdriver;
- mixer;
- siphon;
- plastic corrugated hoses.
If you purchased the furniture unassembled, you will have to first assemble it using a screwdriver. The attached furniture assembly instructions will help you with this. During this procedure, make sure that each part is firmly connected to the other. Because after you install the sink on it, it will no longer be possible to tighten the screws any more.
Installing a vanity unit with a sink
Having gone through the previous stages and successfully prepared all the necessary items and tools, you can begin the process of installing furniture with a sink:
- Turn off the water supply. Connect the faucet with hoses and secure the faucet to the sink. The best type of mixer for a cabinet is a modern single-lever model.
- Use FUM tape (fluoroplastic sealing material) to seal the connecting parts.
- Install a siphon on the drain hole.
- Attach the sink to the surface of the cabinet.
- Move the assembled furniture to the installation site. Do not install the sink cabinet close to the wall, as lack of ventilation may cause mold growth. If you need to attach it to the wall, do so using special bolts. But before that, do the calculations and make notes.
- Move the cabinet away from the installation site and drill at the marked points on the wall. Insert the dowels there, return the cabinet back and secure it with bolts.
- Connect the sewer pipe and the water supply system. This completes the installation process.
In the process of installing furniture with a washbasin, difficulties sometimes arise. For example, if the sewer hose prevents the furniture from fitting tightly to the wall, then it will be necessary to saw off part of the shelf, bottom or wall of the cabinet. To do this, use a hacksaw or jigsaw. Or, for example, there are no holes in the sink for bolts to install it on the wall. In this case, you can glue it with silicone glue.
Sink testing
After completing the assembly and installation of the cabinet with washbasin, check the functionality of the entire structure. First, check the reliability and stability of the cabinet, then turn on the water and check that there are no leaks anywhere. If everything works properly, then you can safely hand over the work or enjoy the new furniture.
Where to place
Taking into account the fact that in any bathroom, be it a new apartment or an existing home, there are connections for sewer and water pipes for hot and cold water, it is recommended to install a sink with a cabinet either in the place of the previous one (during renovation) or not far from the water supply (in a new apartment).
In any case, first you need to carefully measure the room, taking into account the further planned location of all other pieces of furniture and possible household appliances, and also, depending on the type of cabinet being installed, pay attention to the material of the supporting structure and the finishing of the floor and walls
When installing a hanging cabinet, it should be taken into account that the greatest load falls on the mounting points with the wall due to its large weight (taking into account what is being filled). Thus, it is advisable to install hanging cabinets under the sink only on durable finishing materials, such as ceramic tiles on a concrete or brick base. Otherwise, at any moment the entire structure may fall under its own weight, which will lead to costly repairs in the future.
Floor cabinets are not recommended to be installed on a soft bathroom floor, as over time, damage caused by its weight will be inevitable.
A cabinet with a lower plinth should not be placed on heated floors, in order to avoid heating the structural parts and their further deformation.
It is necessary to correctly connect the pipes coming out of the wall with the installed cabinet, since they should not come into contact with the internal elements of the furniture, namely, with the end surfaces of the existing shelves, which is achieved by preliminary measuring the distance from the coupling connections of the supplied pipes to the floor covering. For proper installation of the cabinet under the sink, the supply pipe must be level above the middle shelf of the cabinet.
Sewer drainage should be combined in the same way. If the sewer drain is located in the floor, a hole is made in the lower part of the cabinet through which the drain hose will connect the sink siphon and the sewer.
Sources
- https://bezsantexnika.ru/ustanovka/rakoviny-s-tumboj.html
- https://serviceyard.net/stroitelstvo-i-remont/ustanovka-rakovinyi-s-tumboy-v-vannoy.html
- https://vezuvdom.ru/articles/ustanovka-rakoviny-s-tumboy-v-vannoy/
- https://seberemont.ru/kak-ustanovit-umyvalnik-s-tumboj/
- https://krasivaya-vannaya.ru/santehnika/249-ustanovka-rakoviny-s-tumboj.html
- https://www.stroy-podskazka.ru/vannaya/rakoviny/s-tumboj-ustanovka/
Concrete bath
Concrete construction is considered better than brick, but the manufacturing process is also more complicated. The absence of joining seams makes the font strong and durable.
The advantages of a monolithic bath are as follows:
- the bathtub can withstand a lot of weight;
- Over time, only decorative cladding can deform;
- long service life;
- the ability to implement any idea and design idea.
Design disadvantages include:
Selection of cement and preparation of mortar
The choice of materials depends on the further lining of the container. If you plan to leave the surface concrete, then you need to choose a cement mixture with additional plasticizers. This composition will help make the bottom and walls smooth and durable.
In the case where acrylic or tiles will be applied to a concrete base, you can use a cement-sand mixture without additives.
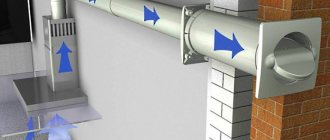
Planning and wiring of communications
To make a concrete bathtub, a plastic mold is used, which helps to choose the size of the future bathtub and correctly carry out the wiring of communications.
It is recommended to approach the location of plumbing fixtures with extreme care. In the future, they will be covered with a layer of concrete, and it will be problematic to redo anything.
Formwork and frame
The construction of the base of the tank consists of 2 stages. At the first stage, a frame is created from reinforcement, the diameter of which should be no thicker than 8 mm. First, vertical rods are installed in the corresponding holes in the ceiling, and then horizontal rods are attached with wire. It is impossible to use the floor as the bottom of a bathtub, so it is necessary to design fittings for these purposes.
At the second stage, the formwork is erected. Most often, smooth wooden slabs are used as a basis, which are easily detached from the concrete and do not leave marks.
Pouring concrete
Before pouring, you need to make sure that there are no cracks, the frame is installed firmly, and all drain holes are closed with plugs. For the first stage, a more liquid version of the solution is used, which corresponds to the consistency of sour cream. It will spread better over the formwork and fill all the cavities of the future container.
When the bottom is completely filled, you can begin to create the sides. To do this, take a mixture of standard density
It is important to complete the entire fill in one go. Otherwise, layers and leaky areas may form.
Now, using vibration, the structure must be rid of air accumulations. If there is no vibrating machine, you can use a simple hammer. Lightly tapping the walls of the bowl will prevent the formation of voids.
Removal of support structures and sanding
At the current stage, the wooden structures are removed and grouting of the container begins. The tool used is sandpaper or a grinder. If further decorative design is not required, after sanding and polishing, the bowl is coated with a special impregnating solution for stone, which acts as a waterproofing agent.
Decorative cladding
Ceramic tiles, acrylic or mosaic are used as a decorative covering for a homemade bathtub.
The first option is considered the fastest and simplest. The tiles are laid with waterproof adhesive, and the seams are grouted with a special grout for bathtubs and swimming pools. This design can only be used for square and rectangular structures. If the font has roundness, it is better to resort to another cladding option. The tile has good resistance to moisture, cosmetics and can withstand heavy loads. Moreover, it does not require special care.
Self-leveling acrylic protects the concrete structure from moisture and gives the surface an elegant glossy shine. When using this type of filling, the bowl is additionally sanded with plastic and moisture-resistant putty.
The most popular method of cladding non-standard plumbing structures is tiled mosaic. It is highly moisture resistant and, due to its small size, easily fits into rounded, curved products. Mosaics, like simple tiles, are glued to a waterproof mortar, and the seams are treated with epoxy grout. The only drawback is the laboriousness of the process.