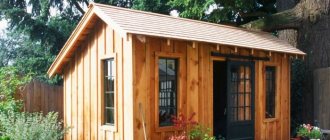
The steam room room should be small; the popularity of projects for small one-story bathhouses is often higher than for full-size buildings 5x7 m or even 8x12 m. According to many experts in bathing, comfort and free space in a small-sized sauna or bathhouse, you get less steam, but the steam produced is significantly greater hotter and richer.
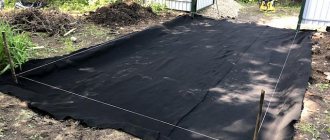
Preparing the area for construction.
Before starting construction, you need to choose a location and decide on the dimensions of the future bath complex. Naturally, the size of the bathhouse will directly depend on the size of the area allocated for it.
Therefore, the first stage is choosing a place for construction. When choosing a territory for development, be guided not only by personal wishes, but also by sanitary and hygienic construction standards.
Consider the presence of slopes in the area. It is not recommended to build a bathhouse in a low-lying area, since all moisture from the site will flow down under the foundation. Naturally, sooner or later the bath complex will become unusable due to constant flooding.
Also, an important point is the nature of the soil on the site being built. For example, if the soil is sandy, then before building the foundation it must first be strengthened.
Consider the location of communications. If you are planning a separate bathroom and electricity in the bathhouse, then include this in the project in advance.
Decide on the seasonality of using the bathhouse. A summer bathhouse at the dacha will require less construction costs, since it does not require additional thermal insulation.
Basics of bath ergonomics
In fact, there is only one specific room in the bathhouse; all the rest can be considered as analogues of well-known residential premises. Therefore, here we will only talk about the steam room.
So, what is a steam room and how is the space organized in it?
Most often we are dealing with a steam room , either Russian or Finnish . They are different. They differ not only in temperature and humidity conditions, but also in the methods of achieving them. This means that the same oven most likely (not always, but often) will not be enough to reproduce both modes. ventilation shelf designs differ .
In addition, the volume of the room is heated non-uniformly; can be distinguished . The dimensions of these zones and the temperature in them depend on the convection of heat flows, and it is determined by the location of the ventilation holes.
But you will find a lot of material about this on our website; we have covered each topic in detail for both types of baths. If we talk about ergonomics, then its subject will be human convenience, determined by the anatomical characteristics of a person.
Or we can say this: ergonomics solves the question of how to adapt furniture and other surroundings to our anatomy. Because sitting, lying down, bending over, squatting, etc. It’s convenient for us only if our dimensions and capabilities are taken into account.
This diagram shows how people usually sit or lie in a bathhouse. You can see that the minimum width of the seat should be at least 40 cm, and 60 cm deep is enough to sit comfortably leaning against the wall. The seat depth of 90 cm is already enough to sit on it with your legs tucked under you.
So, the Finns would have made three tiers of shelves with a width of 40 cm per “step”. Consequently, the depth of their shelves would take up only 3x40 = 120 cm. Its length would vary depending on the size of the room and the number of people in the steam room.
Why would they do this? Because in a sauna it is customary to sit on a shelf, and not lie down. They sit and sweat, that’s the whole bath procedure. The temperature reaches 70-90 degrees, humidity - 5-15%.
They pour very little water onto the stones, the steam is thick, like from a kettle, and the ventilation works in such a way that there is always something to breathe - oxygen constantly arrives from the ventilation and is quickly heated by the stove.
In a Russian bathhouse, shelves 40 cm wide are not suitable . Because it is customary to lie on it. And the other person should float while lying down. The minimum usable width is 60 cm .
But it’s better to start from the size between the paired’s arms, which are freely lying along the body. Only in this case will he really be comfortable lying down. ADVICE! Measure these dimensions for the widest of the frequent visitors to your bathhouse and make shelves according to it.
A Russian shelf is a lounger, often two-level, the first level of which can be used as a step for a person floating, or can be a seat. Therefore, it can be narrow - 30-40 cm in depth. And the second level is just wide, under a lying person. Its length, of course, should be appropriate - 180-220 cm.
Shelves in a Russian bath
You may be attracted to options with footrests, but here you need to proceed from the specifics of your bath; try to calculate this option yourself.
On a note! There are many other materials on our website that clarify various nuances regarding steam rooms. You may be interested in learning about the structure of the Russian steam room, its design, the layout of the bath space as a whole, the optimal dimensions of the steam room, as well as its finishing - lining, processing, insulation, the features of electrical wiring and flooring.
Construction standards
- Consider the distance to a residential building. You can consider the following location options: the bathhouse complex is a separate building, or the bathhouse is part of the house. The best option is to locate the bathhouse separately from the residential building. In this case, the distance from the house to the bathhouse should be at least eight meters.
- The bathhouse can be located no more than 20 meters relative to the water well.
- The minimum distance of the bathhouse complex from the neighbors’ fence must be at least three meters;
- A brick bathhouse should be located four meters from the house, and a wooden bathhouse should be no less than twelve meters away.
- The distance to the street must be more than five meters.
- The distance to buildings made of non-combustible materials is from six to eleven meters.
- Wooden buildings should be eight meters from the bathhouse.
- Extensions for household needs should be 15 meters away from the bathhouse.
- If there is a forest near the dacha area, then the distance from it to the bathhouse complex should be at least 15 meters.
- If there is a natural body of water (lake, river or pond) on the site or outside it, the distance to it should be at least 5 m.
- The bathhouse should be located at a distance of 4 meters from tall trees, 3 meters from small trees, and 1 meter from small shrubs.
Interior finishing work
The walls are covered with certain types of wood. Due to high temperature and humidity, chipboard and linoleum cannot be used. Natural wood - alder, larch, cedar, linden - is suitable for cladding. They retain heat indoors.
Wooden lining is considered the best option for finishing the room. It is mounted on the sheathing to prevent contact with the insulation and waterproofing.
Wood paneling is also used for the ceiling
In the steam room it is important to create the effect of a thermos. And this is achievable with proper installation of the insulating layer
It is attached to the underside of the floor beams and secured with a rough layer of filing. The foil insulation is mounted below and pressed with rolling slats - the basis for fixing the lining.
The stove is the basis for the bath. For small rooms, simple devices that you can make with your own hands or replace with an electric furnace will suffice. The second option is preferable due to minimal air pollution and high safety, but it costs additional and considerable costs.
Important! To avoid fire, the place for the heating elements is lined with non-combustible materials. Distance to wooden parts – from 20 cm.
Project creation stages
- Decide on a building site;
- Note the landscape features and soil characteristics;
- Determine the depth of groundwater;
- Indicate the number of people who can be in the bathhouse at the same time;
- Draw a preliminary plan of the bathhouse indicating the number of rooms;
- Allocate the required area for each room;
- Imagine the location of furniture and internal elements (fireplace or stove, sockets and light bulbs); Decide on the presence or absence of a pool inside the bath complex.
Ventilation arrangement
A well-equipped ventilation system will allow you to fully ventilate the room to avoid the formation of fungus and mold.
The air inlet is located at the bottom of the wall next to the heating boiler. The exhaust vent is located on the opposite wall, right under the ceiling.
During heating of the bath, the exhaust hole must be closed. Open it when it is necessary to ventilate the room.
Calculation of the required bath size.
The dimensions of the bath consist of the following indicators:
- The number of people in it at the same time. According to regulatory criteria, there must be at least 5 square meters of free space per person. Thus, if you have at least 5 friends who like to take a steam bath, allocate at least 25 square meters for the bathhouse.
- Number of premises in the bath complex. The main room in the bathhouse is the steam room. In addition to the steam room, you can provide a relaxation room, a dressing room, a veranda, a summer kitchen and a bathroom. If you plan to build a bathhouse for a family of 4 people, then the optimal area of the bathhouse will be 3x3 meters. Recommended premises: steam room, relaxation room and bathroom.
For a site with small dimensions, a small bathhouse in the country, measuring 4x4 meters, would be an excellent option.
Layout examples
It’s possible to build a country house with your own hands inexpensively if you plan for everything from the beginning. First of all, you should choose a layout. So, if the house measures 6x8 m, then on the ground floor you can place:
- bathroom;
- kitchen-living room;
- hall.
There will be a terrace outside. The bathroom will occupy an area of 2.55 m2, the same space is occupied by the hallway. In the kitchen it will be possible to place furniture and other appliances on an area of 16.8 m2, and the living room will have the same area.
On the second floor there will be a bedroom in the entire area. Since the second floor is smaller, the bedroom will have an area of 25.6 m2. A summer country house can have dimensions of 6x6 m. On the ground floor there will be a hall with an area of 25.28 m2. On the second floor there will be a bedroom of 19.05 m2. There will also be a balcony, while on the ground floor there is also a terrace.
Selection of material for construction.
Various building materials can be used to build a bathhouse:
- Tree;
- Brick;
- Gas block;
- Expanded clay concrete;
- Arbolit;
- Cinder blocks;
- Frame material.
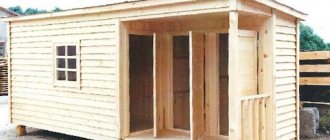
Wooden bathhouse
The traditional building material for a bathhouse is natural wood.
The main advantages are environmental safety, resistance to adverse environmental factors, high thermal insulation index, natural ventilation and durability in operation.
Also, when wood is heated, a huge amount of essential compounds are released, which have a beneficial effect on human health.
Essential oils calm the nervous system and strengthen the immune system. We advise you to give preference to linden, aspen, pine or cedar beams.
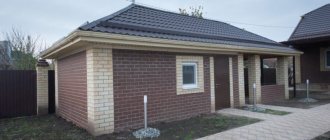
Bath of their bricks
The brick building takes an honorable second place. The positive characteristics of brick as a material for building a bathhouse include: a high level of thermal insulation, durability and environmental friendliness.
A brick bathhouse is a building that will last for many years. Brick belongs to the category of fire-resistant materials, which provides additional fire safety.
Disadvantages of a brick bath compared to a wooden one:
- Longer warm-up time, unlike a wooden bath;
- Poor room ventilation; The need to construct an expensive strip foundation; Long construction time.
Aerated bathhouse
Aerated block is a mixture of cement, sand and foaming agents. Its main characteristics are similar to brick. Advantages: high fire resistance, light weight, low cost of material. Also, the gas block is easy to saw or drill.
Bathhouse made of expanded clay block
Expanded clay block is a mixture of cement, expanded clay, foamed and fired clay. The material has low thermal conductivity, high resistance to low temperatures, but worse moisture resistance than brick or aerated block.
Conventional cement is used to fasten expanded clay blocks, which significantly saves construction costs.
Arbolite bathhouse
Wood concrete is a material consisting of waste wood. Advantages: lowest thermal conductivity relative to the above building materials, low cost. Disadvantages: low moisture resistance.
Bathhouse made of cinder block
Cinder block is a mixture of construction waste filled with concrete. The material is similar in its characteristics to gas block and expanded clay block.
Main disadvantages: high thermal conductivity and hygroscopicity. Consequently, additional costs for waterproofing will be required.
Frame bath
It is characterized by simplicity and speed of construction. The main material is the boards from which the frame is assembled.
An excellent option for those who do not want to resort to the help of professional builders. A frame or panel bathhouse in a dacha is assembled according to the principle of a designer.
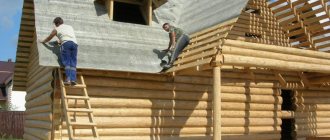
Installing a roof on a bathhouse
After the walls are erected, the installation of the roof begins. The type of roof depends on your preference, but we recommend the gable type as it significantly reduces the load on the walls.
Stages of roof construction:
- Installation of the Mauerlat;
- Fastening to the Mauerlat of the rafter system;
- Laying waterproofing;
- Lathing stuffing;
- Installation of the finishing coating.
When choosing a coating, give preference to lightweight materials: slate or roofing felt. When creating a roof, do not forget about insulation. Foil film is used as insulation.
How to store brooms
By winter, the brooms prepared in the summer have already lost moisture and become dry and brittle. Before the onset of frost, they had to be stored in a dark, dry, ventilated room, such as a barn.
Does anything change with the onset of winter? Nothing. By the time frosts arrive, there will be very little moisture left in the brooms, so there is no need to be afraid of them freezing. The moisture that tears the cells apart when frozen is no longer there.
You can safely continue to store bathhouse brooms in the winter in the room that was previously allocated for them.
Let us remind you that you should not choose it under a modern roof if you yourself feel sick from the heat under it on a summer day. It's good to hang brooms in the barn. The garage is not suitable, because we don’t want organic chemicals, which are full of them in the garage, to be absorbed by a broom?
Another optimal hanging storage option is a dressing room or other dry bath room.
In a house where approximately the same temperature is maintained, without changes, as well as stable humidity, it is enough to choose a dark place. This could be a closet, or it could just be cardboard boxes with holes for ventilation, folded where it is convenient for you.
How to store birch brooms
In principle, it is quite difficult to say anything new (compared to what was said above) about how to store birch brooms for a bath in winter. We understand that we are talking about mass storage, not about one or two brooms, so just for information, let’s say that a quick freezer is also an option for storing birch brooms (and all others too).
When quickly frozen, ice crystals do not form and tear the cells, so the brooms are preserved in their original form. However, at home there is unlikely to be an empty large chamber that you wouldn’t mind giving under brooms. But cellars and basements, which are just asking for storage for brooms - they are usually more humid there than necessary.
Alternatively, you can wrap the brooms in dry straw or paper - this will help to preserve them better.
Finishing facilities
For exterior finishing, plastering and painting would be an excellent option. For plastering, a solution of cement and sand is prepared in a ratio of 1:4.
The walls are plastered twice and then rubbed down. After the plaster has completely dried, acrylic paint is applied to its surface. The choice of colors depends on your taste preferences.
When starting interior decoration, it is necessary, first of all, to insulate the walls. At intervals of 50 centimeters, beams are fixed to the walls. Next, insulation is placed in the gaps.
A vapor barrier membrane or foil is attached to the insulation. Foil is often used as such a membrane, and indeed recommended. The sheathing is attached on top of the foil. The facing material is fixed to it.
Wood is most often used as a facing material for a bathhouse. For long-term use, the wood must be treated with water-repellent impregnation.
Wood sanding
Then we prepare the log house for painting. The log will be processed everywhere, from the end - this is the loosest area that can cause damage to the log.
Start with the simplest and smallest wall. It's worth tinkering with the corners, the circle of the grinder doesn't reach everywhere, you'll have to work with a chisel. The ends are processed at the end, they are sealed with mastic. It is convenient to use white; it will be easier to paint. Sanding allows you to show the beautiful structure of the wood and natural pattern.
Dry the base for 1 day, then apply glaze. After this, it is good to walk over the surface with sandpaper. Then the paint is applied in layers, the first one is dried for half a day, but it is better to leave it for a day, then a new layer is applied, which gives a matte shine.
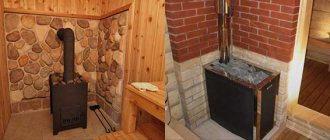
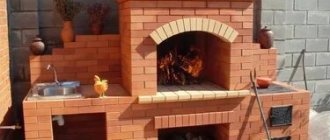
Bath stove
If you are planning to build a stove or fireplace, please note that the foundation for them is poured separately. The stove is a necessary element of the bath complex, since the degree of heating of the bath depends on it. The stove can be purchased ready-made in a specialized store. You can also purchase a homemade stove.
For small bathhouses, an iron stove similar to a potbelly stove is sufficient. The stove can be equipped with a water tank or without it. If the stove does not have a built-in tank, then purchase a horizontal stove on which you can place a water tank.
A brick oven has high fire resistance, but it requires a solid foundation, since its weight sometimes reaches 1.5 tons.
In addition to heating large rooms, such a stove can retain heat for a very long time. But it heats up longer than a metal one, and is larger in size. The metal stove is compact and heats up quickly.
When building a bathhouse, follow the above recommendations. If difficulties arise during the construction process, do not neglect the help of specialists.
Some useful tips
Since stones can crack greatly when heated and pieces will begin to fly off, you need to be careful. It is better to water them with hot water and then it will evaporate almost immediately. At the same time, cold water promotes the formation of fragments.
Regarding the tight-fitting material, it is worth noting that preference should be given to a tent - the whole point is that if you use film, you will need a lot of it and it will take up more space in a hiking backpack than a regular Soviet canvas tent
With all this, the tent will also serve as an excellent sleeping place in the future.
Advice. Prepare round, slightly elongated stones for the sauna stove, without any delamination (other stones may simply burst under the influence of high temperature). River/lake boulders with a diameter of about 20 centimeters are ideal (those that are too small in size will “give off” very little heat, those that are too large will simply not have time to heat up). 5. Advice. If you plan to use a tourist scarf as a bath structure, then in no case should it be of a modern type. The fact is that such tents are not designed for high temperatures; moreover, when heated, they can emit toxic