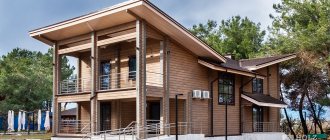
Why winter construction?
Like any wood, CB is not tied to the construction season, due to which you can save a lot - manufacturers reduce the selling price per cubic meter; it is possible to find a good crew out of season.
255givFORUMHOUSE Member
Buying a plot, choosing a visually suitable house (from the collections of our northern neighbors), working on creating an individual project for our own narrowed understanding of what kind of house we would like to live in. And then a comparison of the conditions of about a dozen companies on the market, since my hands are not quite growing from the right place, and time, like many, is running out. In the end, I settled on a large developer, whom I approached first. Closer to winter, he came to his senses and gave reasonable prices, and even a decent total discount, which almost fit into the originally planned budget.
Visualization.
Layout.
The feasibility of winter construction is one of the most popular holivars, but under certain conditions it is quite successful in all respects. 255giv consciously began to be built in January.
255givFORUMHOUSE Member
I approached laying the foundation in the very coldest weather, I read a bunch of horror stories on this topic, but since I plan to move in by the fall, starting now is the only chance to do it within one year, and starting last year was dangerous (it was a leap year...), and even with the GPZU and the construction permit did not work out quickly. Well, at the height of the season, I would not have received such final discounts, and assembling the timber without dirt and rain is a definite plus.
Custom shape
Currently, in addition to the standard rectangular shape for everyone, it is possible to make an energy-saving window of any configuration - round, oval, triangular, trapezoidal and diamond-shaped. The unusual shape instantly changes the appearance of the building and affects the interior of the room. Of course, making a window of a non-standard, or, more simply put, not rectangular shape, will take more time, and the cost will be higher. But the time and financial costs will pay off when you can see the image of your home outside and inside.
Round windows – portholes – can become an original element of the room’s interior. To do this, it is not necessary to decorate the room in a marine style; traditional furnishings or modern style will look harmonious with round window openings.
A window with a curved top can transform any interior. Its production and installation will take more time, but you will enjoy the excellent illumination of the room and the excellent appearance of the room for a very long time, so the costs will have time to be justified.
An arched window perfectly emphasizes the classic lines of the interior and can single-handedly transform the appearance of a room. The contrasting design of the window coverings in dark colors against the background of the light decoration of the room instantly makes it the center of attention, around which the entire space design concept is built.
Construction of a foundation using a greenhouse
Having tuned in to the jackhammer, both 255giv and the builders were pleasantly surprised - after clearing the snow, it turned out that the soil, despite the severe frosts, was soft. Hence the conclusion - the building area does not need to be cleaned in advance. One of the main problems of winter construction is considered to be short daylight hours, but this problem was solved by four LED spotlights on wooden poles. Plus, in this case we were very lucky with the performers.
255givFORUMHOUSE Member
A team of Chuvash worked for me and I can safely say that at this stage I was 110% lucky. The guys have been working with monolithic construction for more than ten years and all the tricky questions of the technical control I invited were crushed by a calm position and knowledge, behind which one could feel experience, experience and once again experience. The day is really short, but the men dug from 9 a.m. to 10 p.m. I say this with confidence, because from the very beginning I built a rotating camera with a twenty-fold zoom and could be surprised, as they say, almost in person. When I came home from work at 21 o’clock and, de-energized, went to dinner (while not doing physical labor), work continued in full swing on the site.
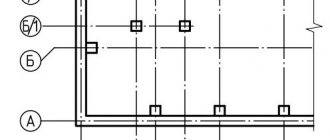
Therefore, literally three days after the start of work, all the trenches for the tape were dug, and after another day they filled it with sand and compacted it. The formwork was also quickly assembled and installed; before installing the reinforcement cage, at the insistence of technical supervision, reinforced film was laid on the bottom of the trenches so that the cement laitance would not go into the sand.
We mounted the frame under the greenhouse, prepared 4 diesel heat guns for heating and poured the foundation strip using a concrete pump. Concrete 255giv was ordered from one of the concrete units with good reviews, B300, with a superplasticizer and antifreeze additive designed for temperatures down to -15˚C. It took about four hours to fill, vibrate, level and set up the greenhouse; the night temperature dropped to that same -15˚С; in the greenhouse it did not stay below +15˚С.
A couple of days after pouring, we installed the embeds for the sewer, laid all 110 pipes, made connections through the future slab (with the required slope) and installed an outlet under the tape in order to build an inspection well when it was warm and lead the pipe into the trench to the sewer hatch. Next, corrugated sheeting was laid and a reinforcement cage was installed for pouring the floor slab. By the end of the fifth day, the technical supervision checked the strength of the concrete with a sclerometer; the strength shown at twenty points M150 was completely satisfactory.
A day later, the slab was poured according to a similar scenario.
The middle of February treated us to warming down to zero, thanks to which the temperature under the greenhouse rose to almost +20 ˚С. But this did not prevent the slab from gaining brand strength not in a couple of predicted days, but in almost a week. We had to get another 400 liters of diesel, as a result of the M200, the greenhouse and formwork were dismantled, the winter foundation was ready.
Useful information for consumers
The classification of stained glass in relation to the manufacturing technique is easier to perceive by non-professionals in this matter and allows you to more confidently navigate the production nuances related to the creation of glass with a mosaic pattern.
Faceted
The creation of paintings takes place using the classical technology of creating stained glass windows.
The only difference is that some of the individual elements are pre-cut.
This treatment turns each piece into a kind of diamond - the light falling on the surface of the fragment “ignites” the element and it begins to sparkle. The more such components, the more decorative the canvas will be when illuminated.
Fusing
For stained glass windows using fusing technology, the overall picture is created using multi-colored glass fragments, combined into a single canvas when processed at high temperature. Before each fragment is placed in its intended place, the glass is ground. After processing, all mosaic units are laid on a glass base substrate.
Laying out the painting in separate processed fragments is the penultimate step in the process of obtaining the finished stained glass window. After removing the blank from the fusing furnace, the stained glass window is ready for sale. A distinctive feature of stained glass made from sintered glass fragments is its wavy surface.
Tempered glass can be used as a substrate. However, it should be borne in mind that after heat treatment it will no longer have any special shockproof qualities.
If you need to get a stained glass pattern on a double-glazed window with anti-vandal properties, then it is better to use the appliqué technique, fixing the fragments to the base using transparent glue.
When professionally executed, a stained glass composition will not be inferior in beauty and attractiveness to paintings obtained using classical technology.
Tiffany
A stained glass pattern is created using separate fragments wrapped around the edge with metal braid for subsequent soldering of the elements into one whole. The finished compositions are always bright in color and have an intricate plot.
Stained glass with mirror effect
Basic stained glass is made using one of the classical methods, and then the back side of the picture is covered with a thin layer of sodium nitride. The transparency of the product and how strongly the stained glass window will have reflective properties depend on the thickness of the layer.
Painted stained glass compositions
The image on the glass is obtained by applying paint with a brush or using an airbrush, after which the substrate with the pattern is exposed to high temperature.
Examples of using stained glass at home in the video:
Engraved
The drawing is obtained purely by hand, processing the surface with an engraver or other tool for a similar purpose.
The basis for stained glass of this type is a base obtained by mixing multi-colored liquid masses from molten glass. United into one substance, which is then rolled out on a flat surface. Components of different colors form glass with a unique coloring - it will not be possible to make a second exact copy.
Matte
The glass is given a matte finish using a sandblasting machine. Sand flying out under high pressure creates scratches on the glass surface, causing it to become dull. A pattern of areas with a matte and transparent surface is obtained by applying a stencil to the glass before sending it under a sandblasting unit.
Imitation stained glass is very similar to a drawing obtained using classical technology. But its production is less labor-intensive, since a machine controlled by a computer program is used. To combine individual fragments, not lead gaskets are used, but materials similar in color to this metal. The finished composition is transferred to a glass substrate, previously coated with transparent glue. The result is a stained glass window that is more resistant to mechanical stress than one made according to the classical scheme.
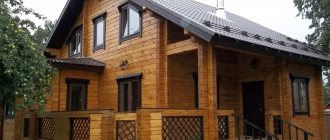
Box assembly
Although pine laminated timber is more common, 255giv preferred spruce.
255givFORUMHOUSE Member
I deliberately ordered spruce, because although I’m going to paint the inside with glaze paint, it will be done so that no yellowness or deliberate texture of the wood is visible, plus, visually, small spruce knots are less noticeable. At the beginning of autumn they explained to me that they do not have pure spruce timber (the internal lamellas are pine, and spruce only the front ones), but another advantage of construction in winter is that not only pure spruce timber appeared, but also at the price of a regular one they made a “selected” one with a minimum the length between splicing onto a minispike is 3 meters. I liked it very much.
I accepted timber 255giv personally, having previously agreed that the foreman would have a device for checking humidity - everything was within the limits of GOST, 11-12%, in some places 9-14%. The assembly began with waterproofing (glass insulation), larch underlays were laid on top, they were not treated with an antiseptic, since this wood does not absorb even when completely immersed. The assembly technology of this particular CB manufacturer does not involve the use of inter-crown insulation.
255givFORUMHOUSE Member
The timber is placed without insulation between the crowns, limiting itself to sealant in the two outer grooves “to be on the safe side.” And even in recuts they use sealant for insulation. Every four (from memory) crowns, the timber is forcibly tightened with pins, and even if uneven shrinkage then occurs, the sealant stretches perfectly up to half a centimeter without allowing air and moisture to pass through. Immediately during installation of the beam, drilling is done for future hidden wiring. After the second crown, they brought out the level, it is much easier to do this with larch “boots” than with a solid board, according to the foreman, the control was accepted without comments.
In a couple of days, the team “mastered” all three truckloads of brought timber.
Nezhdanchik manages the closure of the road to heavy trucks for several weeks. As a result of the “mobilization”, the site became like a warehouse - all the remaining timber, rafters, clapboards for filing, tiles, a drainage system, and everything else were brought in to complete the construction. Instead of an expensive crane with an hourly rate, to lift the beam, the workers made a frame from a board and equipped it with an electric winch. In addition to saving equipment, it actually contributed to increased productivity. By mid-March, the outlines of the house were clearly visible, and by the end the box was assembled.
Price
The cost of a panoramic stained glass window depends on the size and configuration of the window itself. Frameless designs are much more expensive than the more familiar frame ones.
The presence of additional opening modules also increases the final cost. It is also worth considering the characteristics of the window (profile, double-glazed window), the design itself (pattern, method of applying it) and additional options (shading films, additional fittings).
Approximately, the price of a window 2200x2700 with a metal-plastic profile, double-glazed windows, six sections, one of which opens and a simple film ornament will cost from 40,000 rubles . The price of huge protected structures can exceed 300,000 rubles .
Interesting review from the owner:
Subscribe
Problems with the rafters
If up to this point everything had gone unusually smoothly, at the stage of assembling the rafter system the first serious problem emerged - instead of dry planed boards of the first grade, which were specified in the contract, the company tried to sell lumber of an order of magnitude worse quality.
Taking into account the significant weight of cement-sand tiles and the snow load in the region, 255giv had reasonable doubts about the load-bearing capacity of the rafter system, assembled from boards “with knots, cracks and other delights.” The company manager was very surprised by the presence in the contract of a line about first-grade boards, since this is an export item, it is impossible to find it and the prices are completely different. And it is physically impossible to completely change the entire volume due to the ban on the passage of heavy trucks. I had to look for options.
255givFORUMHOUSE Member
As a result, a compromise was worked out: together we go through the entire board and discard all that has knots or cracks that are incompatible with the high rank of the rafter board and it will be replaced with a new one selected in production. Plus, they will do a couple of things for free, which at first they were going to evaluate as additional work.
As a result of the bulkhead, almost half of the entire volume was rejected, but the replacement board did not raise any complaints about the quality.
Corner window
Not so long ago, designers around the world began to use this interesting design technique, with the help of which two windows are connected at right angles, forming a glass corner. If the windows are large enough, then the line between the external environment and the interior of the room is practically erased, creating the impression of the presence of a portal into nature.
Roof, estimate
While they were dismantling and changing, the weather turned bad, but as soon as the opportunity arose, the team quickly assembled the rafter system using sliding ties and installed a drip line.
We sewed up a vapor barrier, laid insulation, waterproofing, made sheathing over the drip edges and waterproofing, hemmed perforated protective tape, and installed fasteners under the gutters. Next, we installed another drip so that the water flows into the drain, but leaves a gap for ventilation. We installed the aerial element and laid the tiles.
Ridge aerator, ventilation outlets, filing.
A box under a roof, cooperation with the manufacturer-developer ended even earlier than the terms specified in the contract - 2.5 months for the foundation, box and roof. Finally, 255giv agreed to have neat holes cut in the timber for the supply and exhaust ventilation outlets and boarded up the window and door openings. Bottom line.
255givFORUMHOUSE Member
What I would like to say is that winter construction has not only disadvantages, but a lot of tangible advantages associated with the fact that you are going in antiphase with all the other construction projects and, in addition to the price, you have the opportunity to select the best performers! I felt this now when I’m looking for someone to do electrical and HVAC work. True, there are not a lot of normal responses to the finishing of wooden houses. I would like to add that I am pleased with the developer, with the exception of the nuances with the materials for the rafters, in everything else they worked 5+, and as my technical supervision said, the teams that worked for me are among the rare 5% of builders who know how must be done, and professional conscience does not allow them to do it differently. And from communicating with the foreman of the foundation work team, I feel not only professional, but also human respect.
As for the budget, high quality and fast work is never cheap. And in this case, there is also a complex winter foundation, a roof from the premium segment, and more than two hundred square meters of total area. Total:
- The foundation, taking into account the difference in heights, slab flooring on corrugated sheets and winter work - 1.5 million rubles.
- A box with assembly, components and work - about 35 thousand rubles per cubic meter of timber.
- The roof, taking into account the insulation of the roof and attic and branded cement-sand tiles - approximately 1.5 million rubles.
Classification of stained glass windows by functionality
Decorating window bays with stained glass is the most popular option for using products made using stained glass technology.
Popular objects for installing stained glass windows:
- light-transmitting openings in the facade walls of residential and public buildings - for such cases, stained glass windows are required that practically do not reduce the amount of light penetrating into the premises, i.e. transparent;
- interior partitions for various purposes - both frosted and transparent colored glass additions are equally popular (the purpose of the partition sets the priority);
- walls without windows in rooms where the illusion of the presence of light-transmitting openings and daylight is necessary.
Algorithm for creating a sketch and selection of materials
How to make a sketch yourself? Is it possible to make stained glass yourself? Can.
When you start creating a sketch, do not ignore a number of recommendations and remember the following technical nuances:
- The stained glass windows that are most resistant to mechanical loads are those in which cross-shaped connecting lines predominate;
- if the design includes connecting seams of large width, then exclude from the sketch long and narrow fragments, elements with sharp or retracted corners - this will reduce the risk of cracks appearing in the glass when you warm up the connecting plates;
- Having settled on a completely satisfactory option, make a copy in color;
- write a list of parts that you will use, number each one taking into account its color;
- before printing the sketch, you need to make seam allowances (0.126-0.127 cm) in which the tin solder will be placed;
- prepare a table for mounting the composition and secure boundary barriers from glazing bead at the edges;
- decide on the types of glass, choosing a material that is suitable in color, thickness, transparency, color intensity;
- cut glass fragments with maximum accuracy, immediately mark the finished elements so as not to get confused later;
- cut pieces of textured glass only on the smooth side, treating the cutter and the piece being processed like a child - such glass is very sensitive to excessive pressure and sudden impacts;
- When finishing cutting out the next fragment, use a cutter to cut out the last centimeters with less impact on the glass - this way there will be fewer damaged pieces with chips;
- To obtain recesses, you need to use a grinding machine with a stone attachment of the required diameter.
We work with decorative details for stained glass
The next stage of the process of creating stained glass has been completed: all the glass fragments are in front of you.
Now we need to process each one and prepare it for placement in a permanent place.
Algorithm of actions:
- pull on your gloves;
- examine each piece for chips, crooked edges and irregularities and remove all flaws with a grinding machine;
- process all ends of the fragments;
- make sure that each piece of the “mosaic” is dry, then wrap everything with adhesive tape, placing the Velcro along the perimeter of the thin edge;
- when purchasing a foil, choose the most expensive one you can afford - the strength of the future stained glass window largely depends on it;
- the adhesive layer of adhesive tape can be transparent or black (if the patina is black, then choose the second type, then the finished work will look neater);
- after wrapping the fragment, the surface with the tape must be ironed with a plastic stack;
- lay out the future composition, starting work from the corner of the drawing (there should be a distance of a millimeter or a little more between the pieces, then the tin will hold all the parts together more reliably);
- use a brush to treat the seams, applying soldering acid-flux to them (the oxide will be removed from the tape, and the tin will solder the stained glass parts).
How to perform soldering correctly: advice from professionals
When choosing solder, consider the purpose of the stained glass window. It is better to fasten compositions for equipping external window openings with POS-61 tin solder.
Technological algorithm for soldering a stained glass composition:
- use a stained glass soldering iron, holding it in the same way as a regular writing pen;
- When passing seams with solder, do not hold the tip anywhere - so as not to overheat the glass;
- after a rough pass with a soldering iron, do final soldering using a tin layer;
- prepare a brass profile frame, walk around the perimeter of the stained glass window, securing the strip with flat soldering;
- wash the composition using suitable household chemicals;
- dry the painting and then polish it with dry flannel;
- apply patina with a brush;
- after a quarter of an hour, wash the stained glass window again and dry it;
- treat the surface with an antioxidant agent that will protect the seams from oxidation;
- let the stained glass “finish”, leaving it alone for a while so that all the moisture is completely removed;
- wipe the composition with polish, after which the work can be used for its intended purpose.
Tips for making stained glass in the video:
Engineering and rough finishing
255givFORUMHOUSE Member
The time has come to evaluate from your own experience the statement that putting a roof on a house is less than half the battle, and all the delights are yet to come. I started with an engineer, and through the exchange I selected a team that would do my electrical wiring, HVAC and network connections. They will also make a heated floor pie under the screed. The first rationalization proposal received was to make waterproofing with reinforced polyethylene instead of coating waterproofing on top of the slab. The effect is similar, but 10 times cheaper.
Rough-finish plywood floors in the attic.
Wiring, boxes with hidden wiring and drilling.
Another team was simultaneously doing ventilation (supply and exhaust with a recuperator).
We laid water supply pipes, installed a heating circuit, assembled a collector, and hung radiators.
They laid the first layer of EPS, installed the 50th sewer pipe (the 110th went under the slab).
The finishing team caught good weather and managed to prime the pre-sanded walls.
Grounding - in the places where the pins connect, they were coated with graphite conductive lubricant, the resistance was measured, everything was in accordance with the standards.
255givFORUMHOUSE Member
An important life hack: if it is possible to use an excavator to dig, you should definitely do it, especially if the excavator operator has the appropriate experience. In a couple of hours, the excavator dug a trench 1.7 meters deep and almost 40 meters long, and perfectly level! It would take several days to dig by hand. And I feel sorry for the people and the cost is not in favor of the manual method!
To accommodate the manifold cabinets, a carpenter from a neighboring village, under the strict guidance of technical supervision, assembled a pair of frame partitions. Due to the minimal shrinkage of the timber, the frame was secured with slippers.
The facade was painted with white covering paint. After assembly, the ends were covered with a specialized paraffin composition, thanks to which cracking was avoided.
We laid the second layer of EPS, covered it with polyethylene, laid a heated floor contour and installed a floor convector under the panoramic windows.
The laying of street communications was completed with the installation of an inspection sewer well. The photo shows the “draft” version; later the bottom was concreted and waterproofed.
The semi-dry screed was done using a mechanized method throughout the entire house literally in one day, no complaints, the level was perfect, the differences between rooms strictly corresponded to the finishing coating (tiles, boards).
Kinds
More and more owners of large houses are using a glazing technique that was borrowed from the French. In addition, this technique is also used in apartments. Previously, this was an advantage of those who live in warm latitudes. Today the situation has changed; panoramic windows can be installed in different regions, regardless of weather conditions.
This is the merit of modern technology. A special layer is applied to the glass unit area, which helps reduce the heat transfer process. This allows you to use panoramic windows in a private home even in cold climates.
It is worth considering the main options for designing housing using different materials.
Finishing and heating
When ordering a house kit, 255giv deliberately overpaid for timber in order to minimize frame partitions - the house is stronger, there are fewer problems with finishing. The existing three pieces were lined with imitation timber, although the width was missed by 5 mm, but after painting all the walls the difference was practically leveled out. I ordered the ceiling lining painted at the factory to prevent the appearance of unpainted joints after shrinkage.
The casings for the windows are finished - made of glued, sanded and painted pine, which is why we had to make “sliding” embedded bars and attach the casing to them.
Panoramic window units of facade glazing were mounted directly into the frame, without casing, citing the actual absence of walls, and therefore the absence of shrinkage as such. To reduce heat loss, we ordered an energy-saving “sophisticated” double-glazed window.
We finished piping the boiler room and did a test run of the combined heating system (radiators, heated floor) through a backup electric boiler. If it is not possible to connect gas, which is quite possible in domestic realities, the house will be heated with electricity.
Subtleties of use
Choosing energy-saving glass for a panoramic window is considered the most correct decision, however, it can also bring trouble from an unexpected direction. The point is the enhanced ability of the film or coating to reflect the sun's rays.
On the coast Source 1.bp.blogspot.com
Under harsh reflected light, plants can wilt, siding walls can fade, and plastic furniture can warp. The stone or concrete surface of the yard can also become very hot.
Glazing with access to the terrace Source i0.wp.com
The solution will be preliminary planning of the location of buildings and planting, selection of materials resistant to solar radiation.
Option with transoms Source stroimir21.ru
An important element that influences the final cost of a panoramic window is the fittings. It is preferable to use tilt-and-slide fittings with the following parameters:
- The system is designed for easy and smooth movement of window sashes (weighing from 100 to 150 kg), equipped with a closer function.
With rotating elements Source drsurajdhirwani.info
- All windows are potentially susceptible to burglary. The design of high-quality fittings includes parts that securely fix the sash in the frame.
For fans of cubism Source lampiri.com
- The sash can serve as a point of entry into the house during ventilation. To prevent this from happening, special fittings with a parallel displacement function have been developed. In this case, the sash moves along the perimeter of the frame by 5-6 mm. This mode minimizes heat loss, eliminates drafts and ensures fresh air circulation.
For a relaxing holiday Source www.sunhouse.fi
With panoramic glazing on both floors Source payload.cargocollective.com
Blind area and parking
The first step was to make a standard insulated blind area.
- Sand preparation (150 mm).
- Eps boards (50 mm).
- Crushed stone backfill (50 mm).
- Reinforcement with metal mesh (100×100×4 mm).
- Pouring concrete M300 (100 mm).
During the construction of the blind area, storm water inlets were installed under the gutters and corrugated pipe outlets for storm drainage. The EPS release was specially designed for further insulation of the base.
The choice of a warm blind area is not accidental.
255givFORUMHOUSE Member
Why did you make a warm blind area? So that scary stories about frost heaving will pass this house by the side of pah-pah-pah. Perhaps it would have worked out if I had saved money and made a regular one, but, firstly, when doing it for yourself, it’s difficult to resist perfectionism. And I don’t want to play roulette with a house on the line. And secondly, I already saved money at the very beginning by refusing to waterproof the foundation and convincing the technical supervision that the insulated base would not be so afraid of cycles of water saturation followed by freezing.
Since, according to the project, the house has three open terraces, in order for the insulation to make sense, we had to go to the trouble of removing 20 cm of soil, laying geotextiles, making sand preparation, laying EPS slabs (50 mm) on the “bottom” and lining the base with them. Crushed stone was poured into the resulting “basket”.
Next, the parking lot was improved, combining it with a barbecue area - a classic technology.
- We chose fertile soil.
- Geotextiles were laid.
- They poured a sand cushion and compacted it.
- They covered it with crushed stone and reinforced it with a mesh of 12 mm rod.
- Concreted with self-mixing.
To prevent cracking, both the blind area and the platform were covered with polyethylene while it was standing.
Features of choice
In addition to reliable fittings and burglary protection, when choosing panoramic glazing, the following facts are taken into account:
- For high-quality thermal insulation, you need a profile with a width of at least 70 mm
In a bright interior Source static.wixstatic.com
- Double-glazed windows are chosen 2- or 3-chamber, the glass is better energy-saving. If a double-glazed window is installed on the southern facade of the house, it will be tinted.
Kitchen-living room Source legko.com
- Panoramic windows made of wood and fiberglass have the lowest heat loss through the profile; options made of PVC and aluminum are significantly inferior to them.
Dining area in a bay window with panoramic glazing Source st.hzcdn.com
- For heavy structures, profiles made of aluminum or PVC, which are additionally reinforced with metal, are recommended. To reduce heat loss, it is necessary to order a warm aluminum profile.
Metal-plastic construction Source www.bg.by
- Beautiful plastic windows must match the architectural style of the house outside and the interior design inside. To achieve the goal, decorative bindings (shpros), laminated and colored profiles, and stained glass are used.
French windows instead of a balcony Source static.tildacdn.com
Light and air Source i.pinimg.com
Improvement and housewarming
Landscaping of the site before moving:
- We installed a fence lined with metal profiles, 0.5 mm thick, painted on both sides, and installed automatic sliding gates. The pillars were dug 1.2 m into the ground; to prevent distortions, perpendicular jibs were welded across one pillar. Entrance group supports (gates and wicket) on screw piles.
- We paved the paths, blind areas and entrance with paving stones, “so as not to stir up the dirt.”
After the move, in September, we finished insulating the basement with façade panels (PPU with cladding) and laid WPC on the terraces.
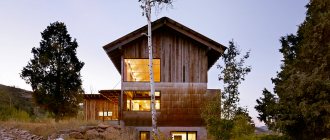
At the end of February 2021, the house looked like this.
Installation nuances
A glass roof begins with design, which includes a competent calculation of the permissible loads on load-bearing walls, as well as the parameters of the selected materials. Particular attention should be paid to the panoramic glass roof. Its weight may require strengthening of load-bearing walls; additional construction work may turn the roof into a more expensive project than planned. In order for the roof to be strong and durable, the following requirements must be taken into account during design and installation work:
- Safety . Something you should never skimp on. For glazing, only impact-resistant materials are suitable that can withstand snowdrifts, a broken branch or an accidentally thrown ball or stone.
- Snow accumulation . There are two ways to combat this problem. You can install an electric heating system (which must be foreseen at the design stage). Another, more rational option is to choose a design with an increased angle of inclination of the slopes, more than 30°C, or a dome (spherical) version.
Installation of a glass roof Source pinterest.ch
- Tightness . Transparent parts cannot be laid overlapping, like slate or tiles. So that the roof can serve as reliable protection from water and dirt, the joints are sealed with special colorless sealants.
- Dust protection . For glazing, you can use glass coated with titanium oxide, which protects against organic and other contaminants. Water on such a surface does not collect in drops, but forms a film, which then slides off without leaving streaks. Otherwise, the roof is designed so that it is easy to wash.
- Multifunctionality . The use of lifting mechanisms for glass elements will make it possible to open them without problems automatically. You will provide access to fresh air and direct sunlight.