Making semicircular steps for a porch with your own hands requires calculating the depth, length and height of the steps. The choice of material for their cladding affects the ease of movement around the porch. But the smooth lines of the porch look so attractive and harmonious! At the end of the article there is a thematic video on this topic, see for yourself.
- Foundation
- Materials and equipment
- Tile for stairs and its features
- How to lay tiles for steps with your own hands: simple recommendations
- 4 ways to cut tiles
- Creating a semicircular staircase
- Tiling the stairs
- Interesting ideas
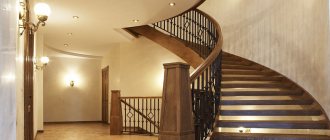
Beautiful entrance ensemble with a semicircular porch
Foundation
Laying the foundation
The process of constructing semicircular steps for the porch involves arranging the foundation:
- The space for the foundation is being cleared.
- A 20-centimeter pit is dug. The pit is filled with crushed stone to the middle of the level.
- The remaining space is filled with cement mortar.
- Formwork is being constructed for the round steps of the porch, where the board thickness is at least 2 cm.
You can clearly see the process in the photo. Types of cladding of concrete marches: stone, pebbles, wood, brick, marble, ceramic tiles - the most popular.
Calculations
Calculation of steps for a do-it-yourself porch involves determining the height corresponding to the base of the foundation (the segment from the door threshold to the ground). 3 cm is subtracted from the upper level. This is due to the swelling of the door during high humidity (especially wooden ones). Next, set the angle of the porch.
Cozy design of a deliberately casual red brick porch
According to SNiP regulations, the slope of the flight of an individual building should not exceed 45-50 degrees. A convenient option would be round steps of 22-37 degrees.
Dimensions
Optimal size: 300 mm deep and 170 mm high (min=100). Width - 700 mm. The smallest number of steps is 2.
How is the data calculated?
Let’s say the height of the steps is 50 cm, the slope is 30 degrees, and the string size is C=B/sinB=50/sin30=50/0.5=100 cm. A three-stage porch assumes a string length of = 33 cm.
Techniques for laying tiles on a semicircular porch: a master class for “dummies”
You always want to make the porch in a private house spectacular, because the main entrance begins with it. The design of the steps attracts special attention. To make the porch look more luxurious, some owners give the steps a semicircular shape. True, you will have to work hard on the cladding. The arched shape of the steps is a headache for the tiler, because he will have to cut almost every tile. Let's take a step-by-step look at how to properly lay tiles on a semicircular porch.
Preparatory work
What to consider before covering the porch
It often happens that some builders (or the owners themselves) fill the steps, and others finish them. And when facing, you have to simultaneously correct defects in the base. It would be good if during concrete work the steps were calculated taking into account the dimensions of the future decorative covering. The most common size of street tiles is 30 x 30 cm. This means that the depth of the step should be 28 cm (+2 cm is the gap, which will then be closed by the riser). Then when laying you will have to cut fewer pieces.
You can also make the step depth 31 cm. Then you need to buy tiles measuring 33 x 33 cm. But it is more difficult to find. The best option is to buy the facing material in advance and use its size as a guide when pouring the steps.
When choosing a coating, pay attention to the degree of roughness. The surface should not slip, even if it is wet.
Another nuance is color. On the street, those colors that hide dirt and traces of dust indoors work differently. For example, light gray betrays every stain of soil brought on shoes, since the soil has a brownish color. Black is covered with a light coating, which is clearly visible under the sun's rays. Your best bet is to get a few tiles of different designs and try them on your porch. Then you will know exactly how this or that shade will work in your conditions.
We learned about the flaws of the flowers after the lining. Now the housewife has to do a wet cleaning of the porch every day so that the tiles do not lose their spectacular appearance.
Materials and tools for laying tiles
To cover the porch you will need the following materials:
- Tiles in two colors (for steps and risers) + decor for the baseboard.
- Tile adhesive solution (25 kg bag).
- Fugue for filling joints (to match the main tile).
- Mounting tape.
- Cement for leveling base defects.
Tools:
- Grinder for cutting tiles with a diamond blade.
- Level for checking a level surface.
- Rope for marking.
- A bucket or other container for mixing the adhesive solution.
- Drill with a “mixer” attachment for mixing glue.
- Notched trowel for applying adhesive to tiles.
- Rubber spatula for filling joints between tiles with fugue.
- Sponge for washing off excess fugue from tiles.
- Construction pencil for marking.
- Crosses for laying between tiles and plastic wedges for risers.
- Reinforcing mesh for leveling the curvature of risers.
Porch tiling
Getting started: fitting and cutting
Since the steps are semicircular, the first thing you need to do is try out the layout of the tiles so that after laying their pattern will look beautiful. We decided to lay out the tiles so that solid squares alternated with pieces. In this situation, the edge of the step does not look like a perfect semicircle, but with small edges, but you will have to cut much less.
- Whole tiles were laid out on all 4 steps so that they were located strictly one below the other (creating straight lines from top to bottom).
- Tiles were placed between them, which will then be cut. Moreover, the whole ones should lie on top, and future pieces should be under them.
- Using a construction pencil, we marked the cut location on each tile that will have to be cut.
Important! First, we draw the cut location along the edge of the whole tile that lies on top, and then move the marking 2-3 mm to the center so that there is room for the seam.
- On the back side of all the tiles, place numbers one by one with a marker so that after cutting you do not confuse where each part should lie.
- For cutting, use a small grinder with a diamond blade.
- Before cutting, glue adhesive tape or tape along the lines marked on the tile; during cutting, the pencil is almost invisible on a gray or dark surface.
You need to cut away from yourself so as not to be injured by fragments.
Place the prepared ceramics on the steps to see if you have cut the individual tiles correctly.
Laying tiles on round steps
The first step is to line the area near the entrance doors. They start laying from the outer edge of the area so that the pattern looks symmetrical.
The first outer row is laid out according to the markings, stretching the thread from one edge of the site to the other. The string serves as a guide for the center of each tile.
To make the seams even, crosses are used.
The thickness of the adhesive mortar layer may differ at different edges of the site if the concrete was poured unevenly. The plane must be checked with a level.
The entire site is laid out at a time only if people will not go into the house for a day.
The tiles on the steps are laid out in the order in which they were signed, starting from the top step to the bottom.
Design of risers
For the risers on the semicircular steps, we chose black tiles of the same design as the gray ones.
Since the gray tiles protruded much forward, and it was undesirable to lay the risers on a very thick mortar, the flaws in the base had to be corrected. A reinforcing mesh was screwed to the concrete.
Cement leveling mortar was laid over the mesh. Left it to dry for a day.
Next we started cladding. Each piece of black tile for the riser was sized by the gray tile above it to match the grout lines.
When laying from below, plastic wedges were placed under each piece so that the tiles would not slide off with fresh mortar.
The outer edge of the platform was reinforced with a metal corner so that the covering would not break off when walking.
The inner wall of the site was decorated with a plinth made of red tiles, cutting pieces of equal height. They were covered with a white plastic corner on top.
The same red tiles covered the window sill of the window overlooking the porch.
We diluted the light gray fugue to the consistency of thick sour cream and, using a rubber spatula, filled all the joints between the tiles.
We waited for the fugue to dry and washed off the excess with a wet sponge.
All that remains is to wait a day until the fugue has completely dried and thoroughly wash the porch so that it sparkles with brand new tiles.
101dizain.ru
Materials and equipment
You can make this porch yourself
When thinking about the question of how to make semicircular steps at the porch with your own hands, you need to stock up on important components of the process:
- facing material;
- crushed stone or gravel;
- concrete mixture 1 x 4;
- board 20 cm wide;
- wooden beam 10 cm wide.
Tools: shovels, pick, chisel, hammer, level, measuring tool.
Layout
Like any construction, the construction of a porch should begin with a layout. The best option is to develop a drawing and calculate the required materials.
Also, do not forget that for maximum convenience and minimal time consumption, SNiP rules or parameters for steps have been developed, which are:
- height – 17 cm
- width – 30 cm
- length – 1.5 m
Photo of round brick steps for your home
Tile for stairs and its features
Facing semicircular steps with ceramic tiles will be more successful if you first decide on the purchase of materials. Due to the constant load on the product, the influence of aggressive environments, ultraviolet radiation and unstable temperature conditions on it, the choice of finish must be approached taking into account practicality and reliability.
We must not forget about safety. The use of a glossy coating with a sliding effect is excluded. A reasonable solution would be to purchase matte decorated products or clinker cladding for steps. The latter option includes clay content and sealing ingredients that promote high resistance and durability.
Design work: staircase made of broken tiles
Reasons for repairs
The entrance porch of an apartment building, like any structure, requires periodic or major repairs.
The reasons for its wear may be:
- Washing out concrete with rainwater;
- The appearance of microcracks under the influence of temperature fluctuations. When moisture gets into them, which expands when freezing, the crack enlarges, and the porch begins to gradually deteriorate;
- Often, the renovation of a porch in an apartment building is brought forward by the residents themselves: with constant physical impact, gradual abrasion of the facing material occurs, which significantly accelerates the destructive effects of natural factors;
- Natural aging of materials;
- Mechanical damage that occurs from falling heavy objects, as well as shrinkage of the building.
At first glance, minor damage to the steps seems to be minor defects that do not lead to complete destruction of the structure. But their repair in this case is simply necessary.
- Due to the increase in the area of cracks, chips and other defects, the time will come when it will be impossible to operate the staircase of a front office building, or the porch of a house - and especially at a school - due to safety regulations.
- To avoid such problems, timely routine repairs of concrete steps, carried out at the initial stage of the occurrence of cracks, chips and potholes, will help. Moreover, its price will be significantly lower than a major overhaul - and even more so, a complete replacement of the structure.
- When ordering the repair of steps immediately after discovering even minor damage, the owner of the building, simultaneously with the restoration of the flight of stairs, receives a full inspection of the structure, allowing to identify hidden defects in it.
Repair estimates are prepared by contractors, and all work must be performed by experienced, qualified specialists.
How to lay tiles for steps with your own hands: simple recommendations
There is a video on the topic “how to make semicircular steps” at the end of the article. Below are instructions for installing a porch with your own hands:
After the formwork is erected, the concrete is filled to the level of the cladding. Laying the tiles occurs after the mortar has dried. Using a building level, the evenness of the surface of the steps is determined: horizontally and vertically. If you plan to lay out the lining of the round steps of a wooden staircase, it is important to use a spacer partition that is attached to all structural elements. Afterwards, work is carried out on tightness.
Next, you need to take measurements of the entire surface of the porch, make an accurate calculation and go to the store. Semicircular steps made of tiles require the purchase of related building materials: decorative tiles, dry mortar, tools for laying tiles (trowel, trowel), glue, etc.
Laying ceramic tiles with your own hands in a semicircle is done from top to bottom. After installation, it is not allowed to step on the structure for 24-48 hours.
How to veneer round (oval) porch steps.
Most often, the question of cladding a round porch arises when the concrete base is already ready. Time passed, the concrete became familiar and began to deteriorate. You need to do something, plus you want change.
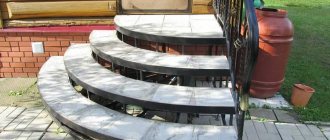
Round porch
This is a standard situation. And the most dead-end one. Concrete steps (round and non-circular) are usually made by some people, and finishing (tiled) is left to others. This is where the delayed explosion charge is placed. And it will have to explode. Because the fundamental rules were not followed.
When building a round porch, it is important to determine the center of the future structure. This point must be the same both when installing formwork and when tiling. Concrete workers never adhere to such subtleties. It is rare that even the correct calculation of steps in height and width is made.
Therefore, when the tilers begin work, the concrete work is resumed or, often, when this is not possible, everything is left as is. In this case, it is difficult to call such a structure round.
Remodeling a finished round porch
The second problem when tiling a round porch is “How to lay tiles on round steps and what to use to cover the riser of an oval staircase?” (The riser or tread is the vertical portion of a step or the vertical distance between two adjacent horizontal planes of steps.)
When laying tiles on the horizontal part of round steps, you can repeat an oval from whole tiles ground into a cone. The disadvantage of this method is a large number of non-factory (cut) seams and the absence of one seam line - which creates disharmony in the porch.
The first method of cladding an oval porch
But there is another way. The direction of the seams of the tiles laid on the upper landing of the staircase is continued and coincides along all steps of the porch. A disadvantage of this method may be the appearance of small pieces of tile in the cladding.
The second method of cladding the porch
To cover the riser, the tiles have to be cut into strips. The narrower the stripes, the smoother the oval on the steps. But you can fill this part of the stairs with mosaics. The mosaic perfectly follows the oval surface of the oval steps. The only problem is to choose the color of the mosaic to match the tiles laid on the horizontal part.
Discrepancy between tile and mosaic can be minimized by using the same grout.
For a round porch, it is necessary to initially construct a circle (semicircle) or oval, correct in geometry, in place. Moreover, the opportunity to mark the circle should be at any stage, from concrete work to the end of the cladding.
You can make a porch with round steps yourself. The main thing is to know the details and sequence of all processes, to follow the technology. When building a porch, there are important points that, if missed, cannot be made up for later. For example: waterproofing the base, installing reinforcement with corrosion protection, correct proportions of concrete and screed.
The most common mistake in the construction of porches is the low strength of concrete and screed. The reasons for this phenomenon are different: old cement, improper care of concrete, wrong sand.
Due to seasonal fluctuations, the tile comes off along with such a screed. Incorrect grouting of joints can also ruin all efforts.
The site has previously shown the reconstruction of the old oval porch.
Where the oval steps had to be re-filled with concrete and a screed was installed at the same time.
SOME MOMENTS OF CONSTRUCTION OF A ROUND PORCH ^^^^^
All stages of the construction of the round porch are recorded in detail. (73 photos and several videos). With a detailed explanation of the details. You can get it here.
Questions from letters and consultations on Skype:
1. Is it necessary to slope the steps when building a porch?
The inclination of the step is required. If you do not do this, then in some places a reverse slope is possible. It is difficult to trace horizontality. The error can be noticed after rain. The water sits for a long time in the depression on the steps. When it gets cold, this water freezes. Walking on such a porch becomes dangerous. Penetrating under the tiles, in places with poorly done grout, frozen water undermines the porcelain tiles. Therefore, an inclination of the tile of 3-5 mm (per the length of the tile) will eliminate these surprises.
2. In what order should the tiles be laid on the steps?
First lay out the steps. Then (in two days - when the glue gains strength) - under the steps. This is true when facing with ceramic tiles or porcelain stoneware. In the case of facing steps with clinker tiles (in some variants), the manufacturer recommends the initial installation of the riser, and then the steps with gaps.
3. How to install a corner and which one, on round steps?
The corner can be installed. It may be approximately the same or similar to it.
oval corner for tiles
But, at the junction of the corner and the tile, a gap will appear through which water will constantly penetrate. If in the summer this has no effect on the tiles, then in the winter the water freezes. When water freezes, it becomes ice and expands. The fate of such a tile is shown here.
101ohibka.ru
Creating a semicircular staircase
A brief recommendation on how to lay tiles in a semicircle:
- Clean cracks, depressions and irregularities using thick mortar or primer.
- Apply the sheathing to the wood decking of the porch. It is important to spread the glue with a notched trowel before doing this.
- Experienced craftsmen prefer to glue the tiles onto the spacer.
- Insulate seams and joints from penetration of moisture and dirt.
You need to apply a small amount of mortar at a time, as it dries quickly.
Stages of work on facing steps
Who should repair the porch of an apartment building - Housing and Communal Services
Porch for an apartment building
Sooner or later, in a multi-storey building, it is necessary to repair the entrance porches. Although most structures are equipped with canopies, they do not completely protect concrete from exposure to harmful weather conditions.
Over time, the porch begins to lose its attractiveness, and pieces of cladding that fall off can cause a person to fall and, ultimately, get injured. Therefore, it is necessary not to delay the repair of the structure, which will be discussed in the article.
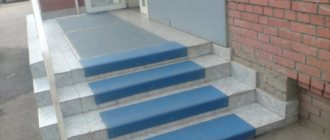
Repair of 4 porches in an apartment building
Work on the objects consisted of the renovation of four porches, decorated in accordance with the principles of Soviet “design”. An unpresentable metal edging bordered the dilapidated base.
It was necessary:
- carry out restoration of concrete steps;
- prepare the base for the porch steps, assemble an installation kit of C3 overlays made of densely reinforced thin-walled composite based on quartz and granite filler; additionally prepare slabs from a similar material, designed for finishing platforms and side areas;
- clad 4 porches with innovative trims and panels;
- seal the seams with a sealed fugue;
- enhance the moisture resistance of the coating.
In a matter of days, our specialists completed the entire range of work without harming the residents of the apartment building.
Tiling the stairs
The round steps of the porch shown in the photo were faced by applying an adhesive composition to the surface. Excess was removed using a spatula. Clay tiles were laid on top.
Single ensemble - facade and porch
The success of creating the semicircular steps shown in the photo was influenced by the following factors:
Designer tiles
- A high-quality base, impeccably level.
- The correct consistency of the glue solution allows you to make a thin and even layer.
- Using separators (crosses).
- Products were checked for size compliance and absence of defects.
- The cutting was carried out with a special device.
A day after installation, it is necessary to cover the joints of the ceramic panels with grout of a suitable shade.
Preparatory stage
An uneven base can lead to certain difficulties during the cladding process. Of course, you can try to eliminate surface unevenness with tile adhesive by applying a thicker layer, but this will ultimately cause the tiles to crack and increase your costs, because you will have to buy more adhesive than is needed for the job.
Laying porcelain stoneware on an uneven layer of mixture will cause uneven shrinkage due to prolonged hardening. The edges of the tile will harden at different times, giving the tile a tense state that is more likely to cause it to crack.
A flat surface is, of course, the most important thing when laying, but not in the case of stairs. In addition to this main indicator, one more equally important one must be observed - the angle at which the base is poured, so that rainwater does not linger on it and flows off calmly. Often this slope is made on the steps using tile adhesive, but the porch area cannot be arranged this way. For this purpose it is necessary to use beacons.