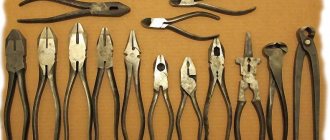
A vice is an indispensable partner for any master. Various configurations of this tool allow you to clamp workpieces and parts, significantly reducing labor costs and increasing safety during operation.
In order to learn how to use a vice, you do not need any special skills, but the question remains of how to choose a high-quality and reliable tool among the variety of models on the market.
Rating of the best vices
| Photo | Name | Rating | Price | |||
| Machine vice | ||||||
| #1 | Caliber 10035 00000021652 | ⭐ 4.9 / 5 | Find out the price | |||
| #2 | Rock FORCE RF-6540403 | ⭐ 4.8 / 5 3 - votes | Find out the price | |||
| #3 | Wilton Q75 75mm | ⭐ 4.75 / 5 2 - votes | Find out the price | |||
| Holdfast | ||||||
| #1 | Wilton WWV/150 150 mm | ⭐ 4.95 / 5 | Find out the price | |||
| #2 | STANLEY 1-83-069 75 mm | ⭐ 4.85 / 5 5 — votes | Find out the price | |||
| #3 | BISON EXPERT 32731-175 | ⭐ 4.7 / 5 1 - voice | Find out the price | |||
| The best bench vise | ||||||
| #1 | WILTON 1765 WI63201 | ⭐ 4.8 / 5 14 — votes | Find out the price | |||
| #2 | WILTON WI21400 | ⭐ 4.7 / 5 6 — votes | Find out the price | |||
| #3 | WEDO TSCH-180 | ⭐ 4.7 / 5 13 — votes | Find out the price | |||
| The best vise for pipes | ||||||
| #1 | RIDGID 25 40100 (1/8-4) 29674 | ⭐ 4.95 / 5 | Find out the price | |||
| #2 | Zubr 32611-2 2438 | ⭐ 4.85 / 5 | Find out the price | |||
Which vice would you choose or recommend?
Take the survey
Precautionary measures
Do not exceed the loads that the device can withstand, otherwise it may quickly fail.
It is necessary to fasten parts exclusively on flat surfaces (this is important for safety reasons and to avoid the appearance of kinks), and also to avoid sudden changes in the volume of parts. The handle of the part should not be lengthened, as this may significantly increase the load on the device.
In some cases, destruction of the housing may occur not only due to increased load, but also due to the poor quality of the metal from which the device was made. In this case, repairs can occur by welding the base and the damaged part at home or in a service center. In case of other malfunctions, it is recommended to contact the manufacturer during the warranty period or replace the parts yourself with similar ones.
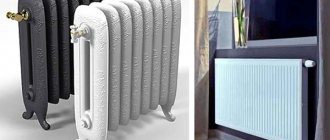
Cast iron or steel?
| Material | Advantages | Flaws |
| Steel | First of all, steel is considered to be quite light in weight and at the same time quite durable material. Tools made from steel are quite easy to transport, again due to the lightness of the steel itself. In addition, steel is considered more adaptable to difficult conditions. And with a steel vice, small parts can be processed more accurately. | Steel is a material that is not very resistant to rust. In addition, this material does not like high humidity. It is also worth noting the high price of steel vices due to the ability to work with small parts, which cast iron vices do not have. |
| Cast iron | Firstly, cast iron has always stood out for its hardness and strength to the limit of the possible. Strong shocks and vibrations - cast iron does not care about all this. In addition, it is easier to process medium and large parts on a cast iron vice. Another advantage of the cast iron alloy is resistance to corrosion, or rather, immunity to it. | Huge dimensions and weight typical of cast iron. In addition, static loads have a bad effect on the cast iron itself. |
Each of the two materials has its own pros and cons
Clamping mechanism type
Mechanical. The most popular option is where the compression force is adjusted by the operator's muscle force using special mechanisms such as a screw. They are easy to use and affordable.
In turn, they are divided into the following types:
- Screw. A classic vice, the design uses a through screw, which is turned by a special handle at the end.
- Quick release. There is no longer a screw here, but it is possible to quickly change the position of the jaws, for which a special lever is used.
Eccentric. As the name implies, the main clamping mechanism in this type of vice is an eccentric device with a handle, and the position of the jaw can be freely selected until it is locked.
Pneumatic. These vices are used in production or for processing a large number of products, significantly speeding up work and saving physical effort. In this case, the vice is connected to a pneumatic drive, and due to the energy of compressed air, the part is quickly clamped.
Hydraulic. In many cases, the most efficient ones in terms of speed and clamping force are connected to special hydraulic pumps. These models are best used at industrial facilities when working with a large number of products.
How to choose a vice
Most vices are usually similar to each other. They have the same design, but they differ in specific criteria. For example, the difference can be found in the size of the jaws, the length of the working stroke, the material used, and the like.
Most factors require consideration, since they can be used to understand whether one or another vice is worth taking or not. Let's look at them briefly.
As a rule, the body material is steel or cast iron. Each of the materials is good in its own way. Steel is lighter, cast iron is heavier and more stable. Cast iron is impervious to corrosion, but steel is the opposite. In general, material is the first factor to consider.
Case material – the main selection criterion
You should also pay attention to the purpose of the vice. As a rule, people purchase universal vices that work with any material, but there are also more specialized options. The same can be said about the size of the workpieces. Some can only work with small ones, others can work with anyone, no matter what size they are. It is important to know only one thing about the appointment. If the vice is for metal, then it is better not to use it to fix wooden workpieces.
The purpose of the vice is an important point to consider
The weight and size of the vice is another important factor to consider. Understanding how much a vice weighs and how large it is, you can determine where to place it, how to carry it and transport it.
As a rule, many vices have additional options that make work more comfortable and expand the capabilities of the tool. 360 degree rotation, replaceable jaws and much more - all this can make your work more efficient.
Additional features make your overall job easier
Criterias of choice
The wide variety of tools makes it difficult to find the right vice. The main criteria that predetermine a useful purchase will help you solve the problem.
| Manufacturer | When considering a particular vise model, special attention is paid to the brand. Products from a well-known manufacturer are wear-resistant and durable. Among the leaders are the following brands that produce tools: SPARTA, DEXX, BISON, WILTON, SIBRTECH, STAYER, Triton. |
| What type | Vices are available in several types, taking into account the nature of the work performed on the tool. There are various types of devices: plumbing, machine tools, carpentry, pipes. |
| Positioning mechanism | This function allows you to change the position of the workpiece when clamping. The mechanism comes in the following types: 3-axis, rotating base, hinged, cross. There are also non-rotating models based on the type of positioning. |
| Mounting method | The tool is attached to the support in different ways: with screws, on clamps, using a vacuum suction cup. The first option is more suitable for installing a vice in a specific place, the second allows you to use the tool without a workbench, the third is recommended for use on a flat, smooth surface. |
| Material | Vices are made of steel and cast iron. Preference should be given to tools made of high-strength alloy. Also worthy of attention are models whose working elements are made of hardened steel. |
| Jaw width | The size of the jaws, in particular their width, is the main factor that ensures strong clamping of the workpiece and high quality work. For metalworking tools, the jaw width range is from 45 to 200 mm. |
| Is there an anvil | A metalworking tool is characterized by an anvil. Despite its small size, it is quite functional. It is used to trim parts with a hammer. |
| Weight | Most models are compact in size and light in weight. Such models facilitate the processing of parts. But weightless structures do not have sufficient strength. The average weight is determined by the range from 2 to 6 kg. There are models weighing less than 1 kg. |
When choosing a bench vice, advice from experienced craftsmen will help.
- To perform plumbing work, preference should be given to a vice made of steel. The entire body or operating elements must be made of hardened alloy. Such models cannot cope with very large workpieces due to rapid wear of the lead screw.
- Do not choose a tool that is too light. Its strength leaves much to be desired.
- To process vertical parts, choose a vise with a rotating base.
- Often, workpieces need to be adjusted with a hammer. The anvil located on the machine body will simplify the task.
- It is better to work with round parts using a vice equipped with prisms.
It’s easier to choose a bench vice if you know what parts and workpieces you’ll have to work with. It is important to know their parameters, type of material, nature of processing.
Voting: best vices
Which vice would you choose or recommend?
Caliber 10035 00000021652
0.00 % ( 0 )
Rock FORCE RF-6540403
6.82 % ( 3 )
Wilton Q75 75mm
4.55 % ( 2 )
Wilton WWV/150 150 mm
0.00 % ( 0 )
STANLEY 1-83-069 75 mm
11.36 % ( 5 )
BISON EXPERT 32731-175
2.27 % ( 1 )
WILTON 1765 WI63201
31.82 % ( 14 )
WILTON WI21400
13.64 % ( 6 )
WEDO TSCH-180
29.55 % ( 13 )
RIDGID 25 40100 (1/8-4) 29674
0.00 % ( 0 )
Comparison table of characteristics
In the comparison table below you will find the main characteristics of the vise models under consideration. Thanks to it, it will be easier to choose a product in accordance with your wishes and requirements.
| Model name | Weight, kg | Material | Working stroke, mm |
| Glazov plant Metalist TSS-80 80 mm | 1,5 | steel | 80 |
| Sibrteh 18672 65 mm | 1,78 | cast iron, steel | 55 |
| CALIBER TPSN-100 100 mm | 5,5 | steel, cast iron | 100 |
| BISON mini Master (32485) 60 mm | 2,62 | steel | 50 |
| COBALT 910-010 63 mm | 4 | cast iron, steel | 58 |
| Matrix 18506 70 mm | 1,5 | cast iron | 50 |
| Sparta 186275 150 mm | 11,7 | cast iron | 125 |
Varieties
For metalworking yews, GOST 4045-75, which came into force in 1977, provided for only three types of these technical devices:
- general purpose;
- with rotating jaws;
- with additional jaws for attaching pipes.
However, over the past decades, manufacturers have significantly expanded the range of such devices for both domestic and professional use. For example, the rotation of the clamped part in some vise models can be carried out in several planes.
According to the method of use, vices are divided into:
- hand-held devices that are held in the hands with a part clamped in them;
- stationary devices that are attached to a workbench or work table.
What size and weight are vices and where are they used?
The production of vises continues to this day, and one of the main criteria for choosing these tools is their size. The size of the tools used determines the ability to fix the relevant parts. For example, it is simply not possible to tighten the bolt at “22” in small devices, since this will not allow for a small stroke of the jaws.
The situation is similar when using a large vice. In such devices, it is possible to fix a small part, but with the slightest increased impact, it can be crushed.
That is why today manufacturers produce stationary clamping devices in the following sizes:
- Small - their weight reaches 8 kg. The dimensions also do not go beyond the following values: height - 140 mm, jaw stroke - 80 mm, length - 290 mm
- Medium - the weight of such devices varies from 8 to 14 kg. Tools for fixing workpieces do not exceed the dimensions: height - 180 mm, jaw stroke - 125 mm, and length - 372 mm
- Large ones are special units whose weight reaches 30 kg. However, there are even larger vises that weigh up to 60 kg, but these are used exclusively in industrial settings. The dimensions of large tools are within the following range: length - 458 mm, height - 220 mm and jaw stroke - 160 mm
One of the main parameters of the devices under consideration is the stroke of the jaws, which determines the possibility of fixing parts of different sizes. For a home garage, options are selected from the category of small and medium-sized devices, which allows you to fix workpieces of different sizes for subsequent processing.
This is interesting! Vices can be rotary or non-rotary. Rotary models are equipped with a double support plate, which has the ability to change the angle of the tool. Such models of devices allow you to attach workpieces of different lengths to the jaws.
Suorin Reno
Many vapers began to switch to POD systems and try vaping liquids with salt nicotine on Suorin devices. One of the company's latest developments is Suorin Reno, which is perfect for lovers of strong liquids. The device is quite strict and practical, operating at a constant power of 13 watts. Due to the low power and 800 mAh battery, the vaper's autonomy is guaranteed. The device operates on replaceable evaporators with a resistance of 1 Ohm, and the evaporators use mesh and natural organic cotton, thanks to which the taste transfer will be at the highest level. Suorin Reno is the choice of those who want to enjoy good taste and at the same time get the most simple and convenient device.
Care instructions
In order for the tool to last as long as possible, you need to take care of it:
- Keep parts, especially those with threads, clean. To do this, wipe the vice with a soft cloth to remove dust.
- Periodically lubricate with special oil. It is applied to the screw part and to the threads of the plates, and to all moving parts of the vice. After this, they need to be closed and opened again.
- Remove rust stains. When it forms, machine oil is applied to the stains and left for several hours. Then the rust is cleaned with a metal sponge, washed off and wiped dry with a soft cloth.
Restoration of the USSR vice with alteration, electrolysis and painting
After these vices appeared, there was a desire to restore them. The vice was made back in Soviet times. after some failures, it was possible to return the clamping jaws to their place (the threads were torn off, they were M9, the bolts were practically unusable), but it was not possible to drill out the jaws themselves to a diameter of M10 (hardened).
Because of these difficulties, I came up with the idea of making a different type of pressing jaws, and making them so that there was a small flat surface on top for straightening small pieces of iron (strips, corners, etc.)
Materials and tools:
- old vice
- metal sheet 25mm
- screws (internal hexagon) m10x25 (6 pcs.)
- brush for angle grinder (grinder)
- grinding wheel for angle grinder (grinder)
- cutting wheel for angle grinder (grinder)
- flap circle for angle grinder (grinder)
- marker for marking (or marking pencil)
- spray paint
- sewer pipe cleaner
- degreaser (acetone, thinner, etc.)
- construction basin 90 liters (plastic)
- tin metal (sacrificial)
- clamps (G and F shaped)
- work vice
- Angle grinder (grinder) 125 and 230 circle
- drill
- drills 8,11,17 mm
- car charger 12 volt
- Allen keys (hex keys)
- wrenches (open-end or box-end)
- tape measure, ruler, square (anything suitable for marking)
- work vice
- thread cutting kit
RESPIRATOR, SAFETY GOGGLES, HEADPHONES and SAFETY KNOWLEDGE MANDATORY
Step 1: Marking and cutting off excess
- Once all the excess has been removed (the support on which the stationary part of the vice rotates, the screw), we proceed to marking the perimeter in place, so that we can cut off the place where the old jaws are attached and get a plane on which the plate will be installed.
- Once everything is marked, we begin sawing. BUT! if you have no or little experience, then it’s better to ask someone who has experience in cutting such thick plates with a grinder! Maybe contact organizations that can cut with laser, plasma, etc. Because When cutting, the cutting wheel may “bite” and you may be injured.
These are the sawn-off jaws that should remain after the sawing process
- Now you need to grind the resulting surface until approximately a plane begins to appear..... If you overdo it and remove the excess layer of metal with a grinding wheel, it’s okay, cracks or pits can be corrected either by welding, or by placing pieces of metal of a suitable thickness. To control the plane you are grinding, it is best to use a metal ruler or square. They will best show the irregularities that need to be either removed or welded (if necessary, in case you overdo it).
- After grinding we get the desired surface. There is no need to grind to an ideal surface; this plane will still be covered with new sponges. The main thing is that the sheet of metal does not “dance” on this surface.
Step 2: Marking and cutting on 25mm sheet metal
We take sheet metal (it can be easily found at scrap metal collection centers, that’s where I found it), put it on the table and place our vice upside down on top.
- First we outline the formed sole. Next, we make an outline after the first marking with a margin of 5-10mm (as you like). This is necessary because casting in those days was not ideal (but the quality of the metal was excellent) and if we do it “back to back”, we can end up with a crooked design in the final. The main thing is not to forget to increase the length by 10-15mm on the side that will be located along the body of the vice; this must be done so that the cast iron of the vice under the jaws does not participate in clamping the part. If you pay attention to any vice, there is a gap of 5 to 10mm under the jaws when clamped. Track. photo (below) shows an example.....
- Once everything has been marked, we begin cutting. Follow safety precautions! The cast iron was cut off quite easily, but the 25mm metal itself gave in hard and “bite” the disk so that the washer on the cutting wheel was, one might say, chewed.
- Now we get a piece of metal, which will later become new jaws for our restored vice.
Step 3: Installation of metal for further work
- Once everything has been cut out and put in place, now we need to mark the drilling locations. As was written, I will use M10x25 screws so that the heads are hidden in the thickness of the metal of the jaws.
- I decided to screw three screws into each of the jaws, I think that will be enough.
- First, we fix a piece of sawn metal in the desired position on the vice itself as it will be at the end of the work. First of all, we drill a hole with an 8mm drill (under m10) both parts, sheet and vice, in one pass, drill all three holes. Then we remove the sheet and expand it, in it, into the finished hole 8mm to 11mm, this is necessary so that the M10 screw can be twisted easily and does not encounter obstacles in the face of the thickness of the metal. After drilling with the 11th drill, we drill 17mm into the same place to the depth of the height of the screw head, this is necessary so that the head is “hidden” under the plane of the jaws and is “flush” or level with the surface. In the cast iron of the vice itself, we cut a thread for M10.
- After we cut the thread in the stationary part of the vice, drilled all the necessary holes, and secured the sheet with 3 screws, we move on...... we drill holes on the moving part as described above.
- The sheet that has not yet been sawn into jaws is attached, and we pull out the moving part so that its future jaw does not lie on it, we make markings for sawing into two parts. And once we have marked it, we begin to cut, making sure to try as hard as possible to keep the grinder at a right angle to the plane of the jaws. Otherwise, when clamping the part, there will be a slope. Well, after sawing, we screw on the second sponge.... and check the accuracy of the cut with a square.
Everything worked out.....
Step 4: Rough cleaning before electrolysis followed by painting
- To clean pieces of rust from an accessible surface, it is better to use a grinder brush. It removes rust like a charm, but for hard-to-reach places electrolysis is needed. First you need to “fray” the visible rust. There is only one photo, but everything is clear on it.
- Before cleaning, I decided to sand the rough areas after casting into the mold, so that the final result would look more or less neat.
- All other purification work was carried out under electrolysis.
Step 5: Electrolysis
- In order for all the parts to fit into one trough, I had to buy it for 400 rubles. plastic construction basin 90 liters. This decision was made to clear everything at once.
- How are all the parts placed and connected to the wire (all parts must be connected to the wire, the better the contact, the better the metal is cleaned), connect to the “-“ wire, then cut the sheet metal (sacrificial) and place it along the walls of the pelvis, they will be connected to wire “+”. The most important thing is that the parts (-) and the sacrificial metal (+) do not come into contact, otherwise there will be a short circuit.
- Once everything is ready, fill in water (regular) and add a sewer pipe cleaner (there should be sodium hydroxide, you can use the cheapest one, I did that and the result was obvious). Mix. We connect the terminals from the battery charging (described above).
- We connect the battery charging to the network and set it to 5A. Everyone has different chargers, if you have a cool charger (not cheap), then you can immediately set it to maximum. In my case, the charger was bought for the purpose of charging the battery, so I bought it, as they say, cheap and cheerful. At first I set it to maximum (about 8-10A), it quickly overheated, the fuse tripped, and I had to wait until it cooled down, but at 4-6A, for the last 12 hours, I set it to 5A. Worked great until the end of the cleanse.
- Cleansing is visible during the process. Places of metal that were dark or rusty will begin to lighten and acquire a characteristic metallic tint, which means that the process is successful. At the same time, it will seem to boil, hiss, etc.
Step 6: Painting
- After turning off the battery charging, drain the water, and it is advisable to rinse the parts with water after such cleaning. The product itself has a soapy consistency; you can feel it on the details.
- We wait until the water dries, or you can use a compressor (if you have one) to blow it off.
- Next, we degrease these parts and prepare the place where they will be painted, so as not to spoil the surrounding areas with paint, I used the cheapest bath curtain.
- Apply a primer layer.
- Before applying paint, it is better to wait almost a day and a half, despite what manufacturers write on paint cans (in short, I have already encountered the fact that after drying according to the manufacturer’s instructions, the primer-paint wore off and did not harden). After paint the same conditions.
- I painted it in two colors: blue and red.
And finally, the already assembled vice in a new form
The result is obvious. I was glad that I was able to restore the tool, and actually already used them (clamped the bearings for disassembly, I needed an outer race from it, and other work)
Foundry qualities
Most people have not seen cast iron or steel in a molten state, which is understandable since cast iron melts at about 2,300°F and steel at 2,600°F, and both are poured into molds at even higher temperatures. People who work with liquid iron and steel often note that they vary greatly in the degree of fluidity and shrinkage.
Cast iron is relatively easy to cast, pours easily and does not shrink as much as steel. This means it easily fills difficult mold voids and requires less molten material. This fluidity makes cast iron an ideal material for architectural or decorative metalwork, such as fencing and outdoor furniture.
Pouring became much more difficult. It is less fluid than molten cast iron and more reactive to mold materials. Steel shrinks more when it cools, which means more molten material must be poured into it - usually into a reserve reservoir called a riser, from which the casting is drawn as it cools.
However, castings usually cool unevenly. The outer areas and thinner parts will cool and shrink much faster than the inner areas and bulkier parts, often creating internal tension or stress that can only be relieved through heat treatment. Steel is much more susceptible than cast iron to shrinkage stresses, and in some situations these stresses can lead to significant internal and/or external voids and possible fractures.
For these reasons, cast steel requires more attention and control throughout the casting process, making production more resource-intensive.
What types of workbenches are there?
Three types of workbenches are usually installed in the garage:
- For metal processing or metalworking.
- For woodworking or carpentry.
- Universal - for all types of work in the garage.
The products differ in the material used to make the countertops. For plumbing work, it is made of metal, otherwise machine oil spilled on wooden surfaces will leave oil marks.
In addition, the processing of metal products requires great effort and the use of fairly sharp tools, which can harm the wood.
Do-it-yourself carpentry workbenches for the garage are used for processing wooden parts; they can be made of less strength, which means their price will be lower. The cover for such models can be made of wood or covered with linoleum.
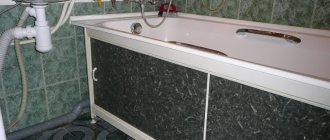
The best option for a car enthusiast is a do-it-yourself universal workbench for the garage. The advantage of such products is the different configuration of shelves and drawers, for storing all kinds of tools, for the work of a mechanic or carpenter.
Excellent appearance guarantees reliable surface coating with powder material, as shown in the photo, for a long time.
Ducati Panigale V4 R
Price: about 3,600,000 rubles
| DUCATI |
Ducati Panigale V4 R. It is equipped with a liquid-cooled Desmosedici Stradale R engine with a volume of 998 cm 3 . With a volume of less than 105 cc, it can compete in World Superbike (WSB) competitions. Despite its smaller capacity, the R version is more powerful than the production Panigale V4.
When it comes to equipment, the V4 R comes with extensive traction control, six-axis IMU, anti-lock ABS, quick up and down shifting, wheelie control, engine brake adjustment, multiple riding modes and DSC (Ducati Slide Control).
The Panigale V4 R demonstrates its sporting ambitions down to the last detail. The car has additional wings on the sides of the fairings. This solution was taken from Superbike and MotoGP racing. Suspension was provided by Öhlins - NPX 25-30 inverted fork at the front and TTX36 shock at the rear. Braking is provided by Brembo Stylema calipers and a 330mm disc.
Power ► 221 hp at 15,250 rpm. Torque ► 112 Nm at 11,500 rpm. Weight with fluids ► 193 kg* non-approved version has 234 hp. and weight 165.5 kg (dry).
I make wooden parts
- First, I cut a piece of board measuring 5.08 x 15.24 cm, which exactly matches the height of the table surface as a mounting base.
The vise itself will be attached to the table leg, and its length will provide more reinforcement.
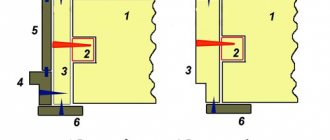
- I also needed a second piece of 5.08 x 15.24 cm, and a clamping board 60 cm long.
- Next, I mark and drill a hole for installing a threaded bushing and a hole for the screw itself
The higher the bushing is to the edge of the vise, the greater the clamping force, and the lower it is, the greater the range.
- I insert a nut into the hole for the screw and drive it in tightly. When tightening the vice, the nut must be securely fastened.
Safety precautions
When performing any welding work, cast iron is no exception; it is important to follow safety rules:
- if work is performed indoors, it must be well ventilated and have high-quality lighting;
- Grounding must be used;
- cast iron parts should not cool quickly, so when working with them they must be protected from moisture;
- The welder must work in a fire-resistant suit and shoes, gloves, and a protective mask.
Cast iron vices should not cool quickly.