Over time, any wood loses its original appearance and darkens. In some cases, the cause of darkening and even blackening is mold bacteria, which multiply very quickly in undried wood. But even completely dry wood becomes dark over time due to exposure to sunlight and moisture. That is why the wood is sanded before applying the coating.
Sanding a log frame allows you to remove the top blackened layers and prepare the wood for further processing.
Purpose of grinding
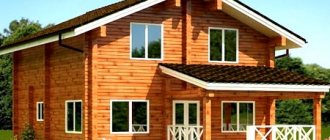
When building wooden houses, many developers want to emphasize the pristine beauty of the wood texture, rejecting this type of finishing such as painting. To do this, the log house is treated with transparent or tinted products, which, along with decorative functions, also protect the wood from rain and snow. Often the substances included in the coating form a kind of ultraviolet barrier that protects the tree from exposure to the sun.
The problem with wood processing is that the log house cannot be immediately coated with protective agents. Any house cut from a log or timber of natural moisture must first shrink. In this case, the wood will dry out and the humidity will be no more than 20%. Only in this case is it possible to apply various protective coatings. However, under natural conditions, wood drying takes months and even years. During this time, the log house will definitely darken and become gray. In this case, grinding will help, which will precede treatment with protective compounds.
Do I need to sand?
There are several types of wooden houses, which are subsequently subject to treatment with protective agents:
- frame houses covered with wood materials;
- log, from natural or rounded logs;
- lumber, from sawn or profiled timber of natural moisture;
- lumber, from laminated profiled timber.
Frame houses are usually sheathed with dry materials that can be processed immediately. These can be sheets of moisture-resistant plywood or planed profiled boards. Often such materials are treated with protective and decorative agents in advance, before they are mounted on the frame. In this case, grinding is not necessary.
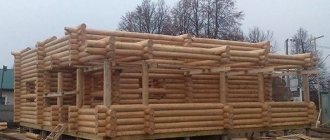
Natural and rounded logs
Houses from natural logs are made using debarked timber of natural moisture. They shrink for a very long time, and drying takes 2-3 years. To reduce drying time, log houses made from such logs are usually installed in winter, when the moisture content of the wood is lowest. But in any case, processing of such a log house will occur only after drying and polishing.
A rounded log is made from a regular log by processing it on special machines. According to the principle of operation, they are similar to lathes. In this case, the top layer of wood is removed, and the log has the same diameter along its entire length. Removing the outer layer removes the strongest fibers. Protection of such a log from external influences is mandatory. But since the humidity of the rounded log is high, it also has to be dried naturally, that is, already laid in the log houses. During drying, the surface of the log may take on a uniform brown color, so treatment with protective compounds is possible only after sanding the rounded log.
Natural moisture timber
The timber is obtained by cutting a log at a sawmill. Drying of such logs occurs under natural conditions. In this case, the core is used to make timber, and the layers lying closer to the outer fibers are used to produce boards. Often the timber is then passed through special machines that give it a special profile. Thanks to this, it acquires grooves on the lower surface and tenons on the upper. When assembling a log house, the tenons are tightly inserted into the grooves, thereby ensuring the installation of warm, waterproof and windproof seams.
Since ordinary logs with natural moisture are used to produce timber, a log house made from such material must also be dried. Due to the fact that the density of the timber is usually less than the density of the surface of the log, drying occurs a little faster. However, during drying the timber still manages to darken. And in this case, before treating the log house with protective agents, it must be sanded.
Glued laminated timber
Glued laminated timber is obtained from boards or their scraps. In appearance and structure it resembles a layer cake. Such timber is very convenient to work with, since the fibers of the boards that make it up are located in different directions. The timber does not warp or behave when exposed to temperature and humidity.
Before gluing, the boards are usually dried and planed, since smooth surfaces adhere better. After gluing, the timber structure is kept for some time in the drying chamber, and then subjected to profiling, as a result of which, as in the case described above, the product acquires grooves and tenons.
Note! After several dryings, the wood of laminated veneer lumber already has low moisture content, so a log house made from this material can be treated with protective agents immediately after assembly.
However, even in this case it is not always possible to do without grinding work. The fact is that while the frame, rafters are being installed, the roofing, windows, doors are being installed and the outside is being processed, the surface of the timber inside the room can still change its appearance. Therefore, during finishing work inside the house, the walls made of timber are polished. As a result, the surface becomes perfectly flat, smooth and light.
Treatment of log timber with protective compounds
Wood is a soft and fibrous material. Humidity and microorganisms turn it into an unusable material over several years, so after sanding logs and beams, their surfaces must be coated with antiseptic and fire-retardant compounds. The former are responsible for the safety of lumber from the negative effects of mold and fungi, the latter increase fire resistance.
Protective liquids are applied using conventional painting tools: brushes and rollers. If the treatment area is large, then use a spray bottle. First of all, an antiseptic is applied, after it dries and is absorbed into the wood, a fire retardant is applied.
There is another composition that gives the wood certain shades. It is called glaze material. There are more than 40 varieties of glazing compounds on the market today that give wooden walls different shades, including colorless options.
It should be noted that protective liquid materials are divided into two categories: for interior use and exterior use. They cannot be swapped, because the compositions are very toxic for external use, although they have higher protective properties.
Coating the log house with an antiseptic using a spray bottle
Grinding rules and techniques
The process of polishing a log frame is simple. It can be done with your own hands, and if you have the necessary tools, even a novice carpenter can handle it.
You will definitely need a grinding machine. Depending on what type of log house is to be sanded, you will need to use either an angle grinder (grinder), a belt grinder, or a vibratory grinder. In addition, you will need disks and circles. Again, each type of log house and each type of grinder will require its own consumables.
Note! When choosing a grinder, you need to pay attention to its power. It should be no more than 1000 W.
There is also a relatively new tool for sanding logs, such as a nylon brush. It allows you to better highlight the wood texture, leaving more wood without erasing excess. You can use it in the same way as a grinder.
Using an angle grinder
To polish a log frame, especially a natural one, it is better to use a grinder. Discs with wire hairs, similar to a round brush, are used as consumables. Another option is a flap wheel with pieces of sanding paper. With such discs and wheels, grinding is done very quickly, but roughly. They are convenient to use when it is necessary to remove old worn-out coating. The disk rotation speed should be chosen low - about 8-10 thousand revolutions per minute. The same tool can be used for primary grinding of timber frames.
For finer grinding, special attachments are used, to which round discs made of sanding paper are attached. The reverse side of the paper is covered with lint, and the attachments have many nylon hooks in their design. The sanding disc is simply applied to the attachment and secured like a Velcro fastener on clothing. Primary grinding can be done with discs with a grit of 40-60, finishing grinding is carried out with discs of 80-100. The number shows how many abrasive grains there are per square centimeter. Obviously, the higher the number, the finer the grind and the smoother the surface.
Application of an orbital sander
It is unsafe to grind with a grinder near the joints of logs, since a disk caught in the joint may “bite.” Another unfavorable factor is the presence of a jute or moss gasket between the crowns. If the brush disk gets caught on this gasket, the angle grinder can easily be torn out of your hands. In these conditions, it is better to use an orbital sander.
If the log house was cut with a residue, that is, the ends of the logs protrude beyond the outer line of the log house, internal corners are formed, which are very difficult to process. In this case, using an orbital grinder with a working surface in the shape of an iron can help out. The sharp angle of such a machine can reach even the most inaccessible places. If this does not help, the internal corners at the intersections of the logs can be processed with a chisel.
Very often, when profiling, a chamfer is made at the corners of long edges of timber, that is, the corner is cut off a little. This is done in order to give the timber a more interesting look and prevent rainwater pouring down the wall from flowing into the joint between the crowns. To process such a chamfer, it is also best to use an orbital grinder.
Working with a ribbon machine
A log frame can be sanded with a belt sander. In this case, it is necessary to ensure that the direction of movement of the tape coincides with the direction of the wood fibers of the beam. Otherwise, transverse scratches will appear on the surface, which will give the surface a not very attractive appearance.
Whitening
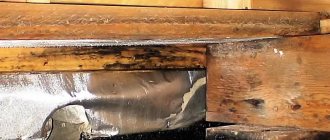
It often happens that log wood becomes infected with mold fungi during drying. After sanding, the surface becomes smooth, but some areas acquire a gray or blue tint. On dry wood it may be barely visible.
If such a surface is wetted, then black and blue spots will appear very clearly, ruining the appearance of the log house. The same thing will happen during the application of the protective coating. To avoid this, special products are used - wood bleaches.
These compositions usually contain chlorine-containing substances. They treat the affected areas of the surface, dry them, and after that the grinding is repeated. Usually one or two applications of bleach are enough to restore the wood to its original appearance.
Step-by-step execution of grinding work
Grinding the timber
Let's start sanding the building:
- We put on goggles, a respirator, and gloves to protect ourselves from dust;
- We do the work from top to bottom;
- we divide the surface into areas so that the work is done more efficiently;
- inspect the walls;
- we remove the pieces that have begun to peel off, otherwise we will damage the instrument;
- we treat the areas with peeled pieces with an adhesive composition and take a technical break so that the substance dries;
- we check the caulk, if there are gaps or cracks, fill them with a special sealant for wood;
- We begin to grind the surface with large nozzles to remove unevenness and roughness;
- we use fine-grained nozzles to remove lint;
- We carry out the work carefully: we do not press too hard on the surface of the walls with the tool, otherwise we will “burn” the wood, we do not make large turns so that furrows and unevenness do not appear;
- We pay special attention to polishing the ends of the log house, because they are most susceptible to the destructive effects of climatic and biological factors;
- We begin to process the ends using nozzles - from No. 35 to No. 120;
- We treat corners and hard-to-reach places with a chisel;
- thoroughly clean the surface from wood dust with a vacuum cleaner;
- we apply protective agents to the walls - antiseptics - help prevent the development of fungus and mold, glazing substances - make the wood more beautiful, fire retardants - increase resistance to fire, acrylates - protect against the harmful effects of climatic factors;
- We paint the frame after sanding (if desired).
In principle, sanding a log frame with your own hands is a simple but painstaking process, so if you are not confident in your abilities, use the services of masters of construction art.
By the way, watch the video below. Conventional sandblasting is used here. I used this method to make drawings on mirrors 10 years ago. One friend and I used this method to clean the old sides of his GAZ car and clean the rusty metal garage doors. The result is good, you just need a powerful compressor and a large amount of fine, clean quartz sand.
Sanding, done meticulously, will allow your home, bathhouse or any other structure to look flawless, causing incredible delight among guests, indescribable joy among household members and the greenest envy of neighbors!
That's all. I would like to believe that someone found the article useful. Bye! Bye!
Wisdom Quote: It is better to be the subject of envy than compassion (Herodotus).