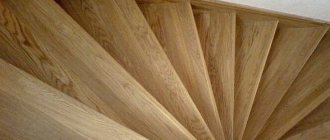
A winder staircase or a staircase with winder steps is an L- or U-shaped structure with steps close to a triangular-trapezoidal shape on the turning sections.
The structure is distinguished by the most compact dimensions among flight stairs and is used in conditions of limited opening, when the placement of other types of structures is impossible or irrational from the point of view of ease of movement.
This article will discuss the advantages and disadvantages of winder stairs, basic configurations, as well as design, installation and error features.
Types of structures and their features
Winder steps are widely used for the following types of stairs:
- Screw. The most compact options for lifting structures. The recommended width of the total opening is up to 3000 mm.
- L-shaped. Devices with 90˚ rotation. They take up less space than straight marches or marches with platforms.
- U-shaped. They have a 180˚ rotation and are more compact than the previous version.
- Curvilinear. Features smooth turning lines. Winder steps (treads) are more often used with the same parameters, which creates additional comfort when climbing.
The shape of the turning tread in such structures has the shape of a truncated triangle. Due to the compactness of the device, the useful space of the house is saved.
Diagram of the staircase rotation device
Winder steps can be located at the bottom, at the top, or in the middle of the flight of stairs. For safe movement, the first two options are recommended. They have good visibility of the turning area, which allows you to orient yourself in time and change the position of the foot or the length of the step.
Schemes of winder stairs are more difficult to complete than straight structures or with platforms for transition. Therefore, there are often drawings with incorrectly executed structures.
This not only reduces the comfort of movement, but also increases the risk of injury from a fall.
“90° Run + March”
This staircase begins with a slight 90° turn to the right or left through the winder steps, followed by a straight section that forms the main part of the staircase and determines its direction.
The required opening for such a staircase differs little from the opening for a straight flight. This configuration allows you to choose a convenient direction for entering the stairs if it is not possible to start moving straight.
This design option is often used with low ceilings, since the first stage of the run can already be within the ceiling opening, which provides the necessary passage height even with a low ceiling.
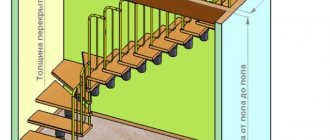
Despite the external similarity of this staircase to a straight one, its structure is much more complex, since it contains an axial pillar, a complex-shaped external stringer - (or two stringers separated by a stand) and a corner post.
Elements of a wooden staircase on stringers with a 90-degree turn at the beginning of a straight flight
Basic requirements for winder stairs
Comfort and safety are the basic principles that any building structure must meet. The staircase is no exception. A number of the presented technical requirements are also typical for straight march structures:
Scheme of a wooden staircase with winder steps
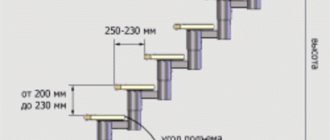
- The height of the steps should be the same throughout the entire flight of stairs. Approved range 100-180 mm. Optimal recommended 100-150 mm;
- Depth of ordinary (straight) steps. Is in the range from 200 to 400 mm. It is considered safe when 70% of the foot rests on the support (250-320mm);
- Depth of the running tread. It will be: in the narrow part - from 100 mm, in the central part - from 200 mm, in the widest part - up to 400 mm;
- It is necessary to provide baluster railings for stairs with a height of 900-1200 mm;
- The width of the flight of stairs is from 900 mm. The parameter depends on the technical feasibility of placement and design requirements (intensity of traffic in two directions, the possibility of bringing furniture to the second floor, etc.). So that two people can safely separate, the width of the march is set at 1250 mm;
Drawing with dimensions of the width of a flight of stairs - Passage height. The size from the tread to the ceiling in the direction of travel is established by standards of 1900-2000 mm. The calculation is based on the height of the tallest family member, to which 100 mm is added. This is how the desired passage height is obtained;
- Slope angle. Around 30˚ is considered optimal. Maximum angle - 45˚;
- The recommended number of steps for a winder staircase should be up to 16 pieces. Due to the lack of a recreation area;
- The ladder must be reliable and can support its own weight and several people at the same time. It is recommended to use tread material with wear-resistant characteristics;
- Overhang of the tread is permissible up to 5 mm. Thus, the depth of the step increases. Used to maintain the recommended parameters (stair slope angle, tread height and depth).
All of the listed characteristics and data will ensure comfort and safety of movement between floors.
“March + 90° run + march”
This staircase consists of two straight flights connected to each other by a winder section. In plan, the marches are located at right angles to each other.
The staircase has two full-size directions perpendicular to each other, which must be ensured by certain conditions: a sufficient ceiling height, or a considerable opening width to maintain the passage height.
Elements of a wooden staircase on stringers with a 90-degree turn
This staircase option is used when it is necessary to use the width of the opening when its length is insufficient. That is, with a low ceiling, narrow and long opening, such a staircase cannot be made. A characteristic difference of this option is the fact that the width of the staircase is slightly or significantly narrower than the width of the ceiling opening.
The structure rests on four points and is attached to the upper ceiling at two points. Such ladders do not need to be attached to the walls.
Wooden stairs on stringers with a 90 degree turn
Advantages of winder designs
The main advantages of a winder staircase include:
- Compactness. Often the area or dimensions of the opening to the second floor do not allow the placement of a straight structure. In order to overcome these difficulties with minimal losses, winder steps are installed in turning flights.
- Aesthetics. A flight of stairs with turns adds a special charm to the interior of the house.
- Saving materials. As the slope angle (steepness) increases, the consumption of materials decreases slightly.
The disadvantages include a decrease in the level of comfort and safety of movement. The winder treads differ in size, you will have to adapt. And it is more difficult to disperse on such a flight than on ordinary stairs.
Classic look of a winder staircase
Conclusion
You can calculate and make a corner staircase yourself if you follow the instructions given above step by step. Making your own design provides a number of advantages over purchasing a finished product. In particular, such a staircase will meet all individual wishes.
However, if you are not confident in your abilities, then in order not to spoil the material or waste time and energy, it is better to install the finished product. For more information on this topic, watch the video in this article.
Technical data for drawings
To correctly draw up a diagram of a winder staircase, it is necessary to take into account all the standards listed above, the dimensions of the premises and link them to the plan. To do this, proceed to the following steps:
- Determine the location of the structure.
- Make the appropriate measurements: the width of the opening, the height from the finished floor of the first floor to the surface of the floor of the second.
- Draw a plan of the first or basement floor on a scale with detail. If there are openings, windows, ledges, niches in the place where the stairs will be mounted, they are marked on the drawing with reference to the walls and floor.
- Select the type of structure and building material for it.
- Make preliminary calculations on the number, height and depth of steps.
Diagram and drawing of a winder staircase
This data will help make the correct selection of a design that will ensure compliance with building codes.
Parameters required for design
To create a drawing of the staircase to the second floor, you must have an accurate plan of the lower room. It should include niches, doors, windows and projections. Window and door structures are measured using the frames. The location relative to the floor must be taken into account. The following parameters are also taken into account:
- Opening height. In other words, the distance from the first to the second floor. The final floor covering is taken as the reporting point.
- Opening width. Depending on the type of stairs, it can be presented in different configurations. The simplest solution is rectangular.
- Distance from ceiling to first floor. This parameter allows you to calculate the height of the passage.
- If there is no technical plan of the premises, it is drawn up manually. A schematic drawing of the first and second floors is drawn onto paper in accordance with scaling.
Preliminary data calculation
Knowing the height between levels and the formula for comfortable movement, you can calculate the length of the flight of stairs and the number of expected steps. For example, the specified height between floors is 2600 mm. We will select the height of the degrees from the recommended range of 120 mm. Let's make all the calculations to build the drawing:
- Tread depth. Let's take as a basis the formula for comfortable movement (2A+B=C), where A is the height of the riser, B is the depth of the tread, C is the average statistical step length of a person (620 mm), transforming, we get the data: 620-2*120=380 mm. The depth of the steps exceeded the recommended range (up to 320 mm). Therefore, in practice it is possible to change the height of the riser;
- Number of steps. Knowing the height of the opening and the size of the riser, by dividing the first parameter by the second, we get the result: 2600/120 = 21.66 pcs. Round up to 22 pcs. The recommended number is 16. By revising the riser height, you can reduce the number of steps to the optimal value;
- Length of flight of stairs. Knowing the depth and number of steps, multiplying them, we get the result: 22*380= 8,360 mm. The length of each march will be: 8,360/2=4,180 mm.
The example shows that it is better to reconsider the parameters of the steps. This will significantly save space. For example, with a riser height of 150 mm, the tread depth will become 300 mm, and the length of the staircase will be 5,400. This will save 3 sq. m. usable area of the house.
Nuances of preparation
You can make a high-quality wooden staircase to the second floor in a private house with your own hands only if you select the equipment and make accurate calculations.
List of tools and materials
To make an interfloor structure yourself, you will need:
- beams with a cross section of 40 mm;
- boards 40 mm thick;
- beams 30 mm thick for treads, 25-30 mm for risers;
- material for the stringer and bowstring – timber measuring 5x25 cm;
- handrails and balusters;
- fasteners for wood.
Tools that will be useful are an electric jigsaw, a screwdriver, a hammer and a chisel. To take measurements and transfer them to lumber, you will need a pencil, tape measure, level, plumb line and square.
Settlement operations
For each design option, an individual calculation is made upon request or in a special program. Before making a wooden staircase, you will need to calculate several parameters. It is worth considering them using specific examples.
Tilt angle
About 40 degrees would be preferable, but you need to take into account real conditions - the space to fly and the height of the ceilings.
Product height
With a ceiling height of 250 cm, you need to add the thickness of the ceiling between floors. Its average thickness is 35 cm. Adding up the data, we get the height of the structure 285 cm.
Number of steps
The average height of the footrest is 17 cm. The height of the structure must be divided by it. The result is 16.67 cm. The result is rounded up to a larger parameter, so you need to make 17 steps.
Step width
The maximum tread width is from 22 to 40 cm. Russian masters calculate this figure based on the fact that the total width of the steps and riser is 47 cm. So, 16.67 is subtracted from 47 and the result is rounded. The footrest will be 30 cm wide.
The value is a multiple of the step width, i.e. for this case 120, 90 or 60 cm.
Stair length
Calculated based on the number of steps multiplied by their width. In this case, the staircase to the second floor with your own hands will be 480 cm in length.
Drawings and methods for calculating winder steps
Taking into account modern realities and obtaining quick results, you can use several ways to draw up a design diagram.
Project programs
The best option for design. There are software that, based on the drawing, issue specifications for materials with cutting. This option is not provided for free software products. But after completing a detailed drawing, it will not be difficult to calculate the amount of material. The disadvantage of this method is the time spent searching and mastering the software product.
Ready solutions
Drawings posted on the Internet allow you to choose the appropriate option. But you should check them for compliance with technical requirements in order to protect yourself from someone’s design illiteracy.
Winder staircase drawing
To do this, you can use online calculators or master one of the methods for calculating winder steps.
The main difficulty when working with such drawings is to fit a ready-made solution into the required space. You may find that a window or a ledge on the wall ends up in the place where the stairs are installed.
You will have to either adapt the design to the interior of the house, or look for another suitable option.
Online calculators
They will help you make calculations and give recommendations for correcting the structure if it does not comply with building codes. Based on the received data, a detailed drawing is automatically generated. This is the easiest and most affordable way to develop drawings for individual sizes. But in the future you should make a connection to the house plan.
Interface of an online calculator for calculating a winder ladder
Otherwise, the resulting structure may close the window or doorway.
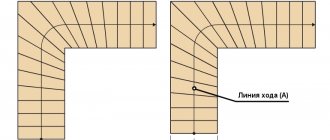
Proportion Method
The main difficulty in independently designing a staircase with winder steps is calculating the number and developing the shapes of the rotating elements. Calculation using proportions. This method is suitable for stairs with a rotation of 90˚, 180˚. First, you should draw a top view of the future structure, fitting it into the intended area. Next, perform a series of operations:
- Mark the middle of the march, draw a line. Draw segments on it equal to the width of the tread (in our example, 380 mm).
- Mark the boundary between the straight and winder steps and draw a straight line.
- Determine the middle of the turntable and draw a segment. The resulting intersection with the previous line is defined as T1.
Elements of a winder staircase - From the line defining the middle of the turn, in the narrow part, set aside half of the recommended size of the winder steps (100/2=50 mm), and make similar markings for the wide part (400/2=200 mm). Draw segments until they intersect with the center line of the turn, mark as T2.
- The number of straight steps obtained from the drawing is subtracted from the estimated number of steps (22 in the example). The remainder is proportionally marked on the segment T1T2. At the same time, the depth of the tread in the middle section of the march is controlled. If it turns out to be less than recommended (200 mm), reduce the number of steps.
This is the simplest and most accessible way to construct a drawing. There are three other methods: Danish, sweep and line lifting. The listed technologies are complex and require deeper knowledge of mathematical analysis. These methods require taking into account the horizontal and vertical curvature of the structure.
An example of a metal frame for a winder staircase
It should be noted that the drawing using any of the above methods is performed with a certain degree of error. Therefore, even professionals adjust parts at the assembly site. A winder staircase is a more complex design, so if you are not confident in your abilities, then it is better to entrust the calculation, design, and installation to specialized enterprises.
Online calculators
If you have difficulties with independently calculating the winder steps for a wooden staircase, you can use these calculators for turns of 90° and 180°. The advantages of this design approach:
- It is enough to indicate the required dimensions, and you will receive a diagram with all the parameters without unnecessary divisions and multiplications;
- the result can also be prepared in 3D, which will allow you to visually evaluate the design and simplify its manufacture.
- By specifying the materials, you will also receive a construction estimate.
Material and installation features
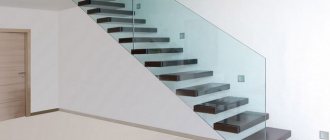
There are no restrictions on the choice of material as such. It could be concrete, glass, metal. A combination is often used. For example, the design is based on a steel frame, and the risers and treads are made of wood. The most popular building material is the classic of the genre - wood. Wooden carved stairs add coziness and warmth to the interior. The resulting structures are lighter compared to metal and concrete, which reduces the load on the foundation.
An example of the design and design of a wooden winder staircase
Drawings and reality often diverge, so you will have to adjust the blanks during assembly. It is worth noting the main difficulties that may arise during installation:
- Poor quality material. Directly affects the service life of the structure. If a tree is selected, it must be dried and have a class of at least first (one knot per linear meter is allowed), without visible cracks or defects.
- Cutting accuracy. Taking into account the fact that the drawing is made to scale, there will still be a percentage of error, so when installing it yourself, you should have a carpenter's tool on hand to fit the parts.
- Level. Each stage of assembly must be performed strictly according to the level. This will ensure the evenness of the frame, and subsequently the quality of the structure.
- The capital staircase is erected only after the house has completely settled. Otherwise, it threatens to distort the structure, cause cracks, and creak.
The quality of installation depends directly on the prepared drawing and the blanks made on its basis. The complexity of the assembly depends on how accurately the detailing and dimensions are worked out and the material is cut. A winder staircase made with your own hands, according to your own sketch, is a special source of pride for the owner. But you should objectively assess your strengths. And if there is no practice in working with drawings, this stage should be entrusted to professionals.
Useful tips
Wooden stairs require special care. To achieve this, the following measures are being taken:
- Cleaning is done with a wet cloth without using detergents.
- The surface is wiped with a dry cloth with added wax.
- The structure must not be allowed to dry out.
- It is necessary to correct all problems in a timely manner: creaks, unsticking joints and loosening of fasteners.
Luxurious wood construction
Helpful information! Such a system shrinks. Therefore, you should not mount it tightly right away. It should sit for several weeks.
Do-it-yourself installation and proper care will create a durable and beautiful product that will last for many years.
We develop drawings of semicircular concrete stairs
Have you decided that you must have a staircase of the original design? Great. Let's consider the option of a semicircular staircase and try to make it with our own hands.
Drawings of a semicircular concrete staircase, like any other, must be carried out by a qualified specialist. In order to avoid accidents during the operation of the stairs, try to ensure that your stairs comply with architectural and construction codes and regulations.
Semicircular staircases are often used to decorate the facades of a house, porch, platform at the base of a round, marching, or spiral staircase.
What is taken into account when developing a round staircase project:
- The height of the future staircase;
- The area of space that a semicircular staircase can occupy;
- The material from which it will be made;
- The functions that your staircase will perform.
When making stairs, do not forget about safety precautions. Try to make sure that the edge of the steps is clearly visible to whoever is going down it. A non-standard design can cost the health of your guests who arrive at your home for the first time.
Assembling a staircase to the second floor with a turn
Unlike fastening supports, temporary fixation of steps is carried out from below - subsequently, after adjusting all the parts, the structure is disassembled and, after processing, laid again. They make a string for the lower flight - a board based on the stringer principle, but without coal cuts for laying steps. In the inner part of the wooden element, grooves are knocked out or cut out into which the steps will be inserted.
A short wall bowstring is made similarly to that described above. The upper end of the outer string must reliably hide the end of the winder step, and the lower end is cut off perpendicular to the floor for subsequent installation of the riser. Having installed the first straight elements on the screws on the outside and adhesive paste on the inside, we begin laying the radius ones. They are fixed in the same way. Straight steps are laid, cutting out grooves at the ends for insertion into the stringer. Before fixing to fasteners, all elements are glued.
The risers also lead from below. Inexperienced craftsmen make the mistake of making blanks that fit tightly between the steps. There is no need to do this - the house will live a rich life where moisture and steam are present. Having swollen, the elements can break the entire structure or, at least, deform it. A 5 mm gap is enough to ensure that the staircase model remains strong for many years.
Sawing stringers
For the load-bearing parts of the staircase, a template is made - a right triangle with the dimensions of the step depth and riser height marked. It is cut out of plywood or using a square. They mark with a pencil, check the rule - the thin part of the width of the board is no more than 15 cm - and cut out the excess.
It is better to use a jigsaw - it will carefully cut the parts along the intended lines. The ends of the prepared boards are immediately sanded to prevent them from splintering.
Fastening stringers
The work starts from the top so that all the shortcomings fall on the bottom, where it will be incomparably easier to correct them. Stringers are attached to the ceiling using steel angles, bolts or self-tapping screws. The lower part must be inserted into the support beam. To do this, a groove is hollowed out or cut out on it. Its dimensions are 2 cm in depth, and its width and length are 1 mm less than the end. This is necessary so that the stringer fits tightly. To ensure reliable fixation, prepare a paste of sawdust and wood glue. It is placed inside and the stringer is beaten with a mallet.
The wall element is fastened similarly at the top, and at the bottom it is fixed to a metal corner to a support of a smaller cross-section, having previously cut out the end for laying the winder step. All work is carried out with strict observance of the level, otherwise future steps will not lie parallel to the floor.
Important points when making and installing stairs with your own hands
During construction and subsequent installation, the advice of professional workers should be followed. Here are the most important of them:
- Fastening is done only using stainless steel connecting elements (so as not to damage the main part over time).
- You need to use not only self-tapping screws. Hidden glue fasteners will increase the durability of the structure and have a positive effect on its strength.
- Keep an eye on your creation. In some places, over time you will have to tighten the fasteners a little or install additional supports.
Using the above tips, the owner of a private house will be able to independently build any type of staircase.