Heating costs largely depend on how well the house is insulated. And special attention should be paid to the concrete floor, which is known to be the coldest. There are quite a lot of materials that can be used for thermal insulation, but in recent years extruded polystyrene foam (also called extruded) has become increasingly popular.
Insulation of concrete floors with extruded polystyrene foam
General information
Extruded polystyrene foam is a thermal insulating synthetic material created in the fifties of the last century in the USA by specialists from The Dow Chemical Company. It was then that a more modern technique of foaming a special “cocktail” of polymers during extrusion (extrusion through a die) was first used.
At first, the foaming reagents were carbon dioxide and freon. But since 1999, due to the fact that freon has a detrimental effect on the ozone layer of the planet, they began to use a freon-free method for manufacturing the material.
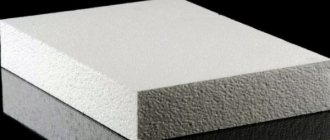
Extruded polystyrene foam
Technical characteristics and types of extruded polystyrene foam
| Index | Polyspen | Polyspen Standard | Polyspen 45 | Control method |
| Density, kg/m3 | 30-38 | 30-38 | 38,1-45 | 5.6 each |
| Bending strength, MPa, not less | 0,4 | 0,4 | 0,4 | 5.8 each |
| Water absorption in 24 hours, % by volume, no more | 0,4 | 0,4 | 0,4 | 5.9 each |
| Thermal conductivity at 25+-5 degrees Celsius, W/m * °C, no more | 0,028 | 0,028 | 0,030 | at 5.10 |
| Toxicity, Hcl 50, g/m3 | T2 moderately hazardous | T2 moderately hazardous | T2 moderately hazardous | at 5.11 |
| Flammability group | G-3 normal-flammable | G-4 highly flammable | G-4 highly flammable | at 5.12 |
| Flammability group | B-2 moderately flammable | B-3 flammable | B-3 flammable | at 5.13 |
| Smoke coefficient | High smoke generating ability | High smoke generating ability | High smoke generating ability | at 5.14 |
| Compressive strength at 10% linear deformation, MPa, not less | 0,2 | 0,2 | 0,3 | 5.7 each |
Disadvantages of polystyrene foam
Polystyrene foam is far from an ideal material; it also has its own disadvantages, which you need to know about in order to draw your own conclusion whether or not to buy such material for floor insulation. The main ones are the following.
- Low strength indicators. The material is easy to damage or break. But at the same time it is easy to cut.
- The material is afraid of the effects of varnish or paint - it is destroyed because of them.
- This is not a breathable coating, although it is full of air in itself.
- If there are mice or rats in the house, they can greatly damage this type of insulation. Therefore, it is best to cover foam blocks with plaster.
- This is not an environmentally friendly material, and if it is set on fire, it releases a huge amount of toxic fumes into the air. But the foam itself is absolutely safe for humans.
- You still need to create a frame for foam plastic, but in the case of this material it can not be made as powerful as when using the same mineral wool.
The use of polystyrene foam for floor insulation has its disadvantages
Expanded clay
This material is quite popular for screeding in private homes on a pre-prepared soil base.
This option has a number of advantages:
- Non-flammability. The material does not burn, does not support combustion and does not emit toxic substances when exposed to temperature.
- The created layer of thermal insulation does not contribute to the appearance of mold and mildew. No rotting occurs when exposed to water.
- Excellent soundproofing effect.
- Ability to withstand large temperature changes without changing characteristics.
- Reasonable price making it affordable.
Expanded clay is clay boiled at a high temperature, therefore the material is absolutely harmless
The material is laid according to the following scheme:
- The base is being prepared. If the work is carried out on a foundation made of soil, then a foundation pit is built with a layer of sand, everything is carefully compacted.
- Depending on the necessary requirements for thermal insulation, a layer of expanded clay is poured.
- Additionally, a reinforcing layer is made.
- The prepared solution is poured over the structure.
Thus, the screed is created quite quickly, and the result is of high quality.
Bulk insulation materials are more suitable for arranging a dry screed; in the wet version, expanded clay is better used as a mortar filler (expanded clay concrete)
Basic properties of the material
Thanks to its unique characteristics, extruded polystyrene foam (EPS) can significantly reduce heat loss. Of course, if the installation was done correctly.
Video - Comparison of EPS
Among the many positive qualities of the material, it is worth highlighting the following.
- The vapor permeability index of extruded polystyrene foam is 0.013.
- Floor insulation using EPS provides reliable protection from the cold and improves the quality of waterproofing. The moisture absorption of the material is quite low, which is especially important in matters of thermal insulation, because if the insulation is wet, it simply will not be able to perform its main function.
- The material is produced in the form of slabs, which weigh quite little due to closed air capsules.
- The density of extruded polystyrene foam is high; it can withstand loads of up to 400 kg per 1 m². There are even special types of material (they can withstand even greater loads) that are used to insulate runways and roads. In short, you don’t have to worry about the floor settling after pouring the concrete screed.
- The material perfectly tolerates humidity and temperature changes (from -500ᵒC to +750ᵒC), it is resistant to microorganisms and deformation.
- Finally, it goes well with water or electric underfloor heating systems.
Important information! The cost of EPPS is on average 4,000 rubles per cubic meter.
Thermal insulation of floors with extruded polystyrene foam
Ecowool
This material is very similar in characteristics to mineral wool, but is made from cellulose fibers, therefore it is absolutely safe for health. Just like mineral wool, ecowool is afraid of water and is easily deformed. Therefore, in most cases it is used to insulate wooden floors between floors.
The big advantage of ecowool is that it is installed by spraying under pressure from a special pipe. Thus, the insulation can be “blown out” under the already assembled floor; for this you only need to make several small technological holes.
The required thickness of the ecowool layer corresponds to the thickness of the mineral wool layer, all other things being equal.
Characteristics of basalt and ecowool
Fire resistance: myths and reality
Both manufacturers and distributors of extruded polystyrene foam unanimously insist that this material has no disadvantages. But in reality this is not the case. It’s not for nothing that the use of XPS in construction is prohibited in America and most European countries, and there is more and more criticism from the media. The cause was a fire in a recently renovated building in Frankfurt, Germany. As it turned out, the house was insulated with extruded polystyrene foam and it was this heat insulator that, for unknown reasons, caught fire and led to the rapid spread of the fire.
Extruded polystyrene foam production line
It is quite obvious that in light of these events, the attitude towards XPS in many countries is ambiguous. After all, even materials that contain fire retardants are very dangerous for others in the event of a fire. Yes, fire retardants prevent the spread of fire, but during smoldering, polystyrene foam releases toxic substances that can lead to poisoning and even death.
Flammability of extruded polystyrene
However, the popularity of this thermal insulator is still growing, and it is still used to insulate buildings. Let's look at how to use it to insulate a concrete floor.
Work on mistakes
In order to correctly and efficiently organize the work, it is important to avoid the following mistakes:
- Do not ignore the line of the first floor and basement. The appearance of defects on the plaster layer may indicate incorrect installation of the plinth strip. To eliminate this flaw, it will be necessary to remove about ten centimeters of a layer of plaster along the lower edge. In addition, you will need to cut off a fragment of thermal insulation that covers this structural element. Then the rail is securely fastened and covered with a mesh for reinforcement up to the bottom edge. Fragments of the old and new mesh covering are connected, taking into account an overlap of ten centimeters. The final stage is re-plastering.
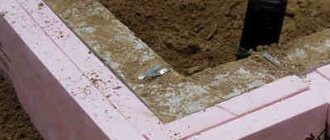
- Securely insulate extruded polystyrene from contact with the ground. Contact with the ground leads to wetting of the material and significantly reduces its performance properties. The base rail will serve as a kind of protection in such a situation. To correct such an error, you will need to remove the bottom heat-insulating layer and replace it with extruded polystyrene foam, which is less sensitive to moisture.
- It is important to consider weather conditions during installation. It is recommended to carry out work at ambient temperatures ranging from 20 to 25 degrees Celsius.
- The insulation layer should be made as thick as possible. If thin sheets are used, the floor surface will be cold.
- The building material in question is not recommended for use for thermal insulation of wooden residential buildings. The reason lies in the fact that eps prevents the effective removal of moisture from wooden surfaces, as a result of which the process of their deterioration is activated. Therefore, take note that it is necessary to insulate floors in wooden houses using other types of materials for thermal insulation.
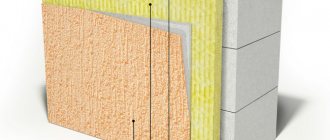
Insulation of concrete floors with extruded polystyrene foam
Insulation of a concrete floor with polystyrene foam
Often the heat insulator is laid on a bare concrete base and filled with screed. Of course, you can put wooden logs on the base (we'll talk about this a little later), but in this case all the advantages of concrete are lost. Therefore, everyone must decide for themselves which option suits them best.
Important information! Below is only a general diagram of the “pie”, but it may vary depending on the level of humidity, the presence of a basement (if we are talking about a private house or the first floor of a multi-story building), the screed used, etc.
Now - directly to the workflow.
Equipment and consumables
Before you begin installation, you need to prepare everything you need. The work will require the following materials:
- Eps boards;
- cement, sand;
- reinforcing mesh;
- liquid Nails;
- waterproofing primer mixture;
- polyethylene film;
- self-leveling floor (for initial and finishing processing).
Important information! EPS slabs are lightweight, so the floor will not be subject to additional load. And the use of special fire retardants makes the material non-flammable (but do not forget about toxic smoldering).
Eps boards
We also add that the material is easy to install, because it can be cut with a regular knife. As for the equipment, it should be as follows:
- perforator;
- sealant gun;
- electric drill;
- a screwdriver (although a regular screwdriver will do);
- pencil;
- level;
- roulette;
- knives.
After preliminary preparations, you can begin preparing the base.
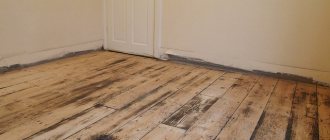
Stage one. Floor preparation
Step 1. First, the old floor covering is dismantled (down to bare concrete).
The first step towards insulating the floor will be dismantling the old covering
Step 2. All debris is removed, the surface is cleaned of dust and dirt.
Preliminary preparation
Step 3. The floor is treated with a primer mixture in accordance with the manufacturer's instructions.
Primer screed
Step 4. Once the primer has dried, the floor is checked for differences using a building level. If differences of more than 0.5 cm are detected, they are filled with a leveling mixture.
Checking the levelness of the base
Step 5. After this, a finishing self-leveling floor 3-5 cm thick is poured (as an option, a geotextile fabric with a density of at least 300 g/m² is laid; both methods will allow you to effectively level out minor unevenness).
Important information! Despite the fact that initial setting requires about 6-10 hours, further work can be carried out at least 48 hours after pouring.
Stage two. Laying extruded polystyrene foam
Step 1. First, a damper tape is glued along the perimeter of the room at the bottom of the walls, which is necessary to compensate for thermal expansion.
Attaching the edge tape
Step 2. The surface is covered with a waterproofing layer - you can use polyethylene film for this. Waterproofing is necessary to prevent the penetration and condensation of moisture, otherwise the insulation may lose its properties. The film is laid with an overlap of 10-15 cm and extends onto the walls to a height corresponding to the thickness of the entire “pie”.
Step 3. Next, polystyrene foam is laid (it should be dense - about 100 microns). Laying is done manually; there are special mounting grooves along the edges of the slabs, so there will be no difficulties with this. The slabs are installed end-to-end, no additional fastening is required. If necessary, the material is cut into the required pieces using a regular knife.
Laying extruded polystyrene foam
Step 4. Upon completion of installation, the insulation is covered with a layer of vapor barrier film. The canvases are laid with the same overlap of 10-15 cm and with a similar release on the walls. All joints are sealed with mounting tape.
Important information! Insulation sheets should be installed as tightly as possible, otherwise the technology will not be effective enough. If cracks have formed, they should be filled with polyurethane foam.
Stage three. Screed
Step 1. A reinforcing mesh is laid on top of the vapor barrier film.
Reinforcement
Step 2. The surface is filled with a concrete screed 3-5 cm thick. The solution can be prepared yourself (preparation - sand + cement in a ratio of 3: 1) or purchased ready-made.
Filling the screed
At this point, the installation work is almost complete. Laying the floor covering can only be carried out after the concrete has completely dried, otherwise the technological strength of the covering is not guaranteed.
Grouting screed
By the way, for structural rigidity, you can lay OSB boards, and this can be done directly on top of the screed if the floor surface is level.
Video - Installation of OSB boards on a concrete base
Looking for energy efficient solutions?
Pay attention to FORUMHOUSE geothermal heat pumps
Ground source heat pump EU (start/stop)
Geothermal heat pump IQ (pseudo-inverter)
IQ ground source heat pump (inverter)
This is part of a training course on “Extruded Polystyrene Foam Insulation”. You can complete the course in full at the FORUMHOUSE Academy.
The constant increase in energy prices and the desire to build a comfortable and economical home have led to a surge of interest in the construction of energy-efficient housing. But how to make sense of the sea of insulation materials, since each of them has its own characteristics? Extruded polystyrene foam is a material that is constantly gaining momentum in the insulation market, and in this article, with the help of specialists, we will help you figure out how to make calculations when insulating with this material.
So we'll look at:
Energy efficiency: basic principles
When an ordinary, unprepared developer mentions the phrase “energy-efficient housing,” an image of a premium-class cottage that requires significant investment appears in his head. Hence the reluctance to invest in the construction of a well-insulated and energy-efficient house.
Practice says otherwise. If we summarize our experience, we can say that building an energy-efficient house increases the construction cost by 15-20%. Moreover, the operation of such a home, on average, costs 50-75% less than traditional construction.
If you build an energy-efficient house, then savings on the funds invested in its construction begin already in the first heating season.
To understand the basic principles of building an energy-efficient home, you need to understand how energy is spent in the house.
The main energy consumers are electrical appliances, the hot water supply system and the heating system. Because Since a cold climate prevails in our country, the lion's share of expenses (up to 70%) in a standard house, with large heat losses, goes to heating.
The main sources of heat loss in a building are the floor, walls, windows, doors, roofing and ventilation system.
A “cold bridge” is a structural part of a building (concrete lintels, joints in walls, etc.) through which, due to the low thermal resistance of this unit or material, heat loss occurs.
For clarity, the percentage of heat loss is presented in the following figure.
The energy efficiency of a house can be judged by the coefficient of seasonal thermal energy use - E.
In European countries, the EP coefficient is used to determine the energy efficiency class of a home. The starting point is EP = 1 and energy class D, i.e. standard.
The main task of additional thermal insulation of a building is to increase energy efficiency and, as a result, reduce heating costs. This results in cost savings and a lower cost of owning a home in the long run.
How to choose insulation and calculate its thickness
Having understood the basic characteristics of an energy-efficient house, you can move on to determining the optimal insulation thickness. Judging by the requests on the portal, this is one of the leading questions among our users when building a warm and comfortable home.
As mentioned above, heat loss through walls accounts for about 20% of all heat loss. Therefore, to insulate a house, you need high-quality and durable insulation that will not lose its properties over time. To choose him, you need to understand what qualities he should have.
Effective insulation is a heat-insulating material that, having a small thickness, increases the heat transfer resistance of enclosing structures (denoted R), i.e. prevents the transfer of heat from a room with a higher temperature (from the room) to an external environment with a lower temperature (outside).
Starting from this definition, we move on to thermal conductivity, because This is the main characteristic of insulation. The coefficient of thermal conductivity is expressed in the ability of a material to conduct heat from a more heated part to a less heated part. Let's look at this parameter in more detail.
Any material passes thermal energy through itself. A good example is wood and steel. If you heat these two materials, steel, due to its high thermal conductivity, will heat up quickly, while wood, due to its lower coefficient, will remain warm. To illustrate this process, imagine a frying pan with a wooden handle placed on a gas stove.
Let's move on. The thermal conductivity coefficient is denoted as λ. Each building material has its own thermal conductivity coefficient. This coefficient determines the amount of thermal energy passing through 1 square meter in 1 second. m of material area with a temperature difference of 1°C. λ is measured - W/(m*°С).
The lower the thermal conductivity coefficient - (λ), the lower the heat transfer, i.e. higher thermal resistance of the structure - (R). This directly affects the thermal insulation qualities of the building envelope.
Knowing the standards for thermal resistance (R) for different regions of Russia (depending on the climatic zone) and the thermal conductivity coefficient of the material (λ) used in the construction of walls, you can calculate the required thickness of the insulation.
Table. Standardized thermal resistance of walls.
Note: for floors and coatings, the normalized thermal resistance has different values. According to the standards SP 50.13330 “Thermal protection of buildings”, the calculation must be done for a temperature of + 20 °C. (In winter, the temperature in residential premises should be maintained at 18...22 °C).
An example of calculating the insulation of a house using extruded polystyrene foam (XPS)
Due to its characteristics - low thermal conductivity coefficient (0.028-0.034 W/(m*°C), high compressive strength (200-1000 kPa) and minimal water absorption coefficient (0.2-0.4%) - this material is used for insulating the following structures:
Knowing what materials are used in the construction of the wall, you can calculate its thermal resistance and compliance with standards.
For example, let’s take a wall made of solid brick 0.3 meters thick. According to the standards, the thermal resistance for walls in the Moscow region should be: R - 3.065 (m²*°C)/W. From here, using the formula, we find the actual heat transfer resistance of the brickwork.
Is it possible to install a load-bearing wall on floor slabs?
d—material thickness;
λ is the thermal conductivity coefficient of the material.
Rф = 0.3/0.81= 0.37 (m²*°С)/W
Based on this value, we determine the difference between the standard and actual heat transfer resistance (Rt):
d—thickness of insulation;
Rt—heat transfer resistance;
λ is the thermal conductivity coefficient of the insulation.
d = Rt * λ = 2.69 * 0.03 = 0.08 m
Convert to cm, round up (taking into account the multiplicity of the thickness of the produced thermal insulation of 10 mm) and get – 8 cm.
Conclusion: to bring the thermal resistance value of a brick wall to the standardized value, it is necessary to install a layer of extruded polystyrene foam (XPS) 80 mm thick on the outside of the wall.
Using this simplified algorithm, you can independently calculate the required insulation thickness. If the wall structure consists of several layers, for example - plaster - aerated concrete - thermal insulation - facing brick, etc., then to calculate and obtain the total value of the wall's thermal resistance (R), you need to add up the indicators of each layer.
Thus, a thin layer of insulation makes it possible to achieve the required standard for the thermal resistance of enclosing structures (R). And when insulating from the inside, through the use of effective insulation, we can reduce the overall thickness of the wall structure being built up, without “eating up” the internal usable area of the house.
Engineering systems for an energy efficient home
The main principle of building an energy-efficient house is the construction of a sealed (closed), airtight shell inside the building. Those. - construction of a kind of thermos house in which all the heat is retained and is not released outside due to heat transfer, which is possible during the migration of air masses in the so-called “breathing walls.” Thus, anticipating the question from developers, we can immediately say that the so-called. “breathing of walls”, i.e. air exchange between the indoor and outdoor environments, which supposedly provides a healthy microclimate in the house - a myth! Load-bearing structures should not “breathe” and allow air to pass through; they should retain our heat inside. Appropriate systems must be responsible for “breathing the house” (removal of exhaust air and supply of fresh air).
Vinyl wallpaper, a layer of plaster, laminate, clinker brick and other finishing materials, even simple oil paint - in themselves are good layers that ensure the tightness of the system. Ventilation must maintain the microclimate in the house and ensure the flow of fresh air, which, unfortunately, is forgotten in projects. After all, a person’s well-being and the level of comfort in the home depend on the air quality and air exchange rate. In a cottage with properly installed ventilation, it is easy to breathe.
Modern standards regulate: the entire volume of air in a living space must be completely renewed once every 60 minutes.
Here lies the pitfall. Heat loss through an inefficient ventilation system can be over 30%. Those. — providing the influx of the volume of air we need in winter, we “throw out” heat outside and spend additional energy on heating the newly received air.
How to proceed? In order not to reduce the volume of incoming air, we are installing a system that will heat the cold street air using exhaust air removed from the premises. This system is called a recuperator, and it is one of the possible options for installing a ventilation system in an energy-efficient house.
This is part of a training course on “Extruded Polystyrene Foam Insulation”. You can complete the course in full at the FORUMHOUSE Academy.
Source
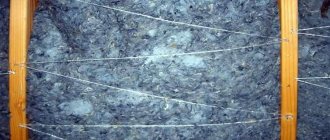
Insulation of concrete floors using joists
This method of thermal insulation involves laying insulation between the joists, which are installed on a concrete base. The algorithm of actions is given below.
Step 1. First, the old floor covering is dismantled, the surface is cleaned of debris and dirt. Then the base is leveled in the same way as described in the previous paragraph of the article.
Step 2. Waterproofing material is laid (polyethylene film is suitable) with a minimum overlap of 10 cm. All joints are sealed with mounting tape.
Step 3. Next, the logs are installed. The pitch depends on the width of the extruded polystyrene foam sheets, and the height depends on the thickness (5 cm, 10 cm or 15 cm). To fix it on the supporting plate, holes are made in the logs, then the guides are installed according to the previously made marks and secured with driven dowels.
Step 4. Insulation boards are laid, a regular knife is used for cutting.
Insulation of concrete floors using joists
Photo of how to properly lay insulation and joists on the floor
Step 5. A vapor barrier material is attached to the joists on top of the insulation.
Step 6. Next, a durable material is laid (often OSB boards), on top of which the flooring will be laid. The plates are fastened with self-tapping screws in increments of 30 cm; between them (the plates) you need to leave a small gap (about 3 mm) for temperature and humidity compensation. This installation method is called “floating” and it provides for a gap between the walls and slabs of at least 1.2 cm.
An example of attaching a floorboard over insulation
Important information! For greater reliability of fastening, the slabs can be glued to the guides using special wood glue.
All that remains is to lay the flooring.
Video - Thermal insulation with polystyrene foam on joists
If there is no basement
*
Here all processes are carried out from the premises.
- The so-called cranial bars are packed along the joists along their lower edges.
- The logs are laid across them and boards, plywood, OSB, chipboard, etc. are attached.
- A waterproofing membrane is laid along the joists and formed niches so that it exactly follows the contours of the assembled joist structure. Pay attention to the photo below. This is how waterproofing should be installed.
Waterproofing a wooden floor
All other operations are carried out in exactly the same way as in the previous case.
Adding polystyrene chips to concrete
To give the concrete layer additional protective characteristics, granules of extruded polystyrene foam can be added to the solution (the latter can be purchased for about 1000-1800 rubles per cubic meter). This is done as follows.
Foam balls for concrete can be purchased pre-packaged
Step 1. A little water is poured into the prepared container, then dry cement is poured into it. All this is mixed with a mixer attachment until the consistency of thick sour cream.
Mixing the solution with polystyrene balls
Step 2. During the mixing process, polystyrene foam granules are added. The proportions of concrete can be very different - both 1:3 and 1:6.
The more granules there are, the more efficiently the floor will retain heat. But there is also a downside to the coin - this will deteriorate the strength, and the surface will begin to crumble under load. In short, the required ratio of polystyrene foam depends directly on how hard the floor covering should be.
Foam chips (expanded polystyrene granules)
Parameters for choosing insulation, what we pay attention to
When purchasing floor heating from expanded polystyrene, you should take into account indicators such as: quality and variety.
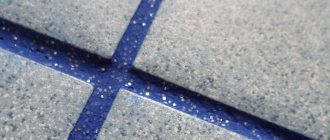
Initially, the quality of polystyrene foam boards for heated floors is determined by their appearance. The following points should be taken into account:
- Color - should be bright and uniform, which indicates compliance with the technological process. Most often sold in blue or orange. The color scheme itself does not affect the characteristics of the product.
- Smell – a strong odor is unacceptable, a slight, slight specific odor may be present.
- The shape is clear geometric, and the edges are smooth and do not crumble.
- The granules are the same size without voids.
- The surface is flat, otherwise the thermal insulation qualities will be reduced.
For your information! Experts recommend especially inspecting the place of the cut or break. If the granules are intact in this area, we can talk about their poor adhesion to each other. In a high-quality slab, when broken, the granules should also be destroyed.
Features of application for thermal insulation of floor subfloors
The cost of insulating the floor base under a screed with polystyrene foam is slightly higher than the work required to insulate the floor with standard polystyrene foam. This is primarily due to the fact that this material is more expensive.
Expanded polystyrene is ideal for rooms with increased load on the flooring. This material can even be used for industrial premises.
Extruded foam plastic has reduced water absorption and thermal conductivity, which allows it to be used in houses built in areas with high groundwater levels.
There are several types of polystyrene foam, differing in density. Material with a minimum density is used for finishing walls, with a higher density - for laying on the floor.
The technology for laying polystyrene foam boards under a floor screed is practically no different from insulating a floor using conventional polystyrene foam. This material can be used for wooden, concrete bases, on the ground.
The main stages of slab laying work
- Leveling the subfloor
- Forming a 10 cm cushion from sand and crushed stone
- Filling voids with fine-grained expanded clay sand
- Laying polystyrene foam boards
- Waterproofing of insulation material with a special film
- Laying reinforcing mesh
- Making a concrete screed
Expanded polystyrene sheets should be stacked tightly to each other so that no cold bridges remain. Additionally, the seams are sealed with self-adhesive foil tape. During the process of laying the waterproofing film, the joints are completely taped.
Results
Insulation with EPS boards is one of the most popular technologies, despite the fact that under certain conditions this material can be dangerous. After all, expanded polystyrene has many advantages, including low installation costs, excellent noise and thermal insulation properties.
Nikolay Strelkovsky editor-in-chief
Author of publication 07/25/2015
Did you like the article? Save so you don't lose!
Question asked:
andrey22
Good afternoon
In your article I read that the thickness of the EPS layer is determined by calculation “(Floor insulation on the ground. As insulation for the floor on the ground, we recommend using EPS with a density of 28-35 kg/m3, or polystyrene foam with a density of 30 kg/m3 and higher "The thickness of the insulation is determined by calculation (depending on the climate zone)."
Please tell me what thickness is needed for Zaporozhye. If possible, provide separate figures for EPS with a certain density and for polystyrene foam. Thank you.
Some advice from professionals
Despite the fact that creating a screed with foam plastic is not a very complicated process and even an amateur who carries out all the technological steps can cope with it, there are several nuances that need to be remembered:
- The optimal thickness of the foam used in screeding is considered to be 5 cm, but this rule applies to apartments located above the second floor. If the apartment is on the ground floor or we are talking about renovating a private house, then the material should be taken with a greater thickness, for example 10 cm;
- As a rule, the foam layer is located between the waterproofing material and the floor screed, that is, as if “under the cement.” However, sometimes it is laid on a screed under the finishing floor covering; this approach is possible when using wood as the last layer;
- When choosing a reinforcing mesh, you definitely shouldn’t save money, because it will serve as a frame that takes the main load on the floor and protects the heat-insulating layer from deformation.
Screed diagram with foam plastic
Taking into account the opinion of experts and following the stages of technology for arranging an insulated screed, you can make your home much more comfortable to live in. It is not for nothing that polystyrene foam is considered the optimal material for thermal insulation, because a 12 cm thick slab retains heat no worse than brickwork 2 meters thick. Foam boards are not afraid of high humidity, since they practically do not absorb water.
Speaking about the environmental friendliness and safety of polystyrene foam, it is worth noting that it is in boxes made of this material that donor organs are transported and food is packaged. In addition, it does not cause allergic reactions. There is no more effective material for insulating concrete floors yet, which explains the popularity of this design, which can last for many years, maintaining all its performance characteristics and providing a comfortable room temperature.
Do-it-yourself styling features
The gaps between the joists and the insulation are sealed with polyurethane foam.
The technology for laying EPS on a concrete floor involves installing slabs followed by pouring a screed up to 5 cm thick. An exception to this rule is made for apartments in multi-storey buildings, where the load-bearing structures are designed for a certain load.
Laying penoplex on a concrete floor is carried out in the following order:
- Checking the condition of the slab. Remove debris and dust from its surface and wipe with a damp cloth.
- Mixing the adhesive composition. A volume is prepared that can be used until the mixture begins to thicken.
- Installation of the first fragment. This is done in one of the corners opposite the entrance opening. The panel is lubricated, brought to the base and pressed firmly against it. Leveling is done by hand and a mallet.
- Lubricating and attaching the second fragment, and subsequent ones. Before joining, sealant is applied to the locks. This will ensure a tight fit of the slabs and a guarantee against cracks.
- The last panel in the row is cut to size so that it fits flush against the damper tape. Cutting is carried out with a stationery knife or a hacksaw with fine teeth. As a rule, pipes run in the corners. Plastic rings are installed around them. The material cut into the groove is attached to it with glue.
- The next rows should be laid in a similar manner, each time shifting by half the figure. The last row is adjusted separately for each fragment, since the floor may have irregular geometry. In order not to damage the insulation, you should lay a sheet of plywood or chipboard on the floor and work on it.
- Sealing cracks with polyurethane foam. After it hardens, the protruding places are cut off flush with the surface with a stationery knife.
- Attaching the covering to the base. This is done with disc-shaped dowels in the center and corners of the foam boards.
- Sealing seams with aluminum tape. This technique provides additional insurance against leaks.
The coating is monolithic and waterproof. If this is provided for in the project, you should proceed to arranging the screed.
If penoplex is laid under a screed, waterproofing is placed on it
This event is carried out in the following sequence:
- Carrying out priming, laying vapor barrier film. Gluing the areas of strip overlays. Extending the edges of the canvas onto the wall to a height of 20 cm.
- Installation of beacons. For this purpose, tripods or profile pipes glued with mortar are used, laid at intervals of 100-120 cm.
- Laying steel reinforcement. It is placed with a clearance of 15-20 mm from the base on plastic supports.
- Preparation of concrete solution. The recommended proportion of water, sand, cement and small crushed stone is 1:3:1:3.
- Filling the mortar along the beacons from one of the far corners. Level the surface using a rule and a wide spatula. The finished strips are rolled with a needle roller.
- After a day, the guides are removed, and the remaining openings are sealed with cement mortar.