Often, a technology such as self-leveling floors is chosen for floor finishing. And for good reason - such bases are distinguished not only by their ideal evenness, but also by their originality, especially when it comes to creating drawings on them. Making a self-leveling floor is a responsible process, but not too complicated. Let's figure out how this happens in practice, and perhaps you will decide to make such a coating in your home.
Manufacturing of self-leveling floor
Types of self-leveling floors
A self-leveling floor is created by pouring special mixtures onto a carefully prepared base, which, after hardening, turn into a monolithic coating that is distinguished by its evenness, accuracy and beauty. This flooring has a lot of advantages - it is very durable, not afraid of water or temperature changes, durable, and not afraid of exposure to various chemicals . However, its properties may vary to some extent depending on what type of mixture was used to create the base.
Main types of self-leveling floors
All compositions can be divided into two main types - polymer and mineral. The latter are made on the basis of cement, some kind of filler (usually purified sand) and modifying additives, which allow accelerating the hardening process of the coating and the fluidity of the material. As a rule, these types of compositions are used to create a perfectly smooth self-leveling floor, which serves as a rough base for laying various floor coverings that are demanding on the quality of the subfloor. But sometimes they can also act as a finishing coating in an apartment.
Self-leveling floor, monochrome
All mineral compositions for the manufacture of self-leveling floors are divided into:
- basic ones , which are used specifically for leveling the rough base. The thickness of their layer can be quite large and allows you to hide large unevenness in the floor.
- mixtures for the middle layer , which are characterized by a high drying speed, are used to level out smaller irregularities (up to 3 cm).
- finishing mixtures - necessary for the design of the top decorative layer. Their thickness usually does not exceed 1 cm.
Polymer compositions are usually used only to create the finishing coating. Depending on their composition, they are divided into:
- epoxy;
- epoxy-urethane;
- methyl methacrylate;
- polyurethane.
Each mixture has its own qualities and properties, depending on which the choice is made in favor of one or the other. As a rule, the future operating conditions of the floor play a large role when choosing a composition.
White glossy self-leveling floor
The epoxy composition , when polymerized, creates a very durable antistatic coating that is not afraid of liquids and chemicals, which is quite easily cleaned from a wide variety of contaminants. These floors are often created in apartments and residential buildings, as they are relatively easy to fill.
Epoxy self-leveling floor in a turning shop
Epoxy-urethane floors are distinguished by significant strength indicators and are often installed in rooms where the load on the base is quite high. They are also resistant to mechanical damage, as they are very elastic compared to other types. The main disadvantage is the high price.
Epoxy urethane floors
Floors based on methyl methacrylate are demanding in terms of compliance with the installation process and are capricious. They dry very quickly and have an unpleasant odor until they harden, but they are highly resistant to temperature changes and can even be used outdoors.
Methyl methacrylate flooring - layers
Polyurethane floors are expensive, but of high quality and beauty. They are easy to use, so they can also be installed in an apartment or house yourself.
Polyurethane floor
On a note! Self-leveling floors were previously installed only in industrial premises. Relatively recently, they began to be used to decorate residential buildings.
Pouring self-leveling mixture
Polina Yavorskaya
The strength of the floor is the main indicator of its long-term operation. In Russia, low winter temperatures create a constant risk factor when installing floors on the outside of buildings and structures.
Extreme operating conditions in winter force manufacturers to solve the problem by creating especially durable frost-resistant coatings. A modern, sought-after solution is self-leveling floors with the necessary characteristics.
What is 3D flooring?
3D floors deserve special attention. This is also one of the types of self-leveling floor, but in this case a three-dimensional pattern is created on the surface, which can turn the base into a real picture. Such floors look great in apartments, offices, and even in a retail space. The design can be absolutely anything; sometimes lovers of unusual apartment design even choose images that may shock at first glance.
Self-leveling 3D floor
The technology for arranging such a layer is based on creating the effect of a three-dimensional three-dimensional image of varying depths. Drawings printed on special paper or other decorative elements created by the artist (shells, coins, stones, etc.) can be used.
Floor decorated with multi-colored flocks and glitters
On a note! The depth of the pattern directly depends on how thick the finishing layer will be made.
Original 3D floor
Self-leveling floor 3D
To achieve such a floor, it is important to properly prepare the base and not violate the manufacturing technology. If something goes wrong, the expected effect will not be achieved.
Optimal layer thickness for self-leveling compounds
Polymer floors are quite expensive. At the same time, the thickness of the coating can be very small. Thus, polyurethane-based compositions make it possible to make layers up to 2.5 mm thick, which is optimal. If it is necessary to give the floor a gloss or paint the surface in different colors, apply only 0.3 mm of the composition. The maximum for this coating is 5 mm. You can do more, but it’s more expensive and doesn’t make much sense.
As for epoxy-based compounds, the optimal value here is also 2.5 mm. This thickness allows you to obtain sufficient strength characteristics without the floor being fragile.
Methyl methacrylate or quick-hardening mixtures can also be used with small thicknesses. But it's not worth saving here. For a high-quality coating, the layer must be at least 8 mm.
Components for manufacturing. Making the right choice
It is not difficult to find mixtures for creating self-leveling floors on the building materials market. Demand creates supply and now there are many different variations of such compositions. Let's get acquainted with the most popular brands and manufacturers.
Table. Brands of mixtures for creating self-leveling floors.
| Brand/Name | Characteristic | Consumption |
| Knauf | These are the most commonly purchased mixtures for arranging self-leveling floors. The company has gained particular popularity due to the quality of the materials produced. Mixtures are often used to create a finishing layer, as they have good spreadability. They set quite quickly. | Consumption depends on the type of mixture and layer thickness, but in general it is about 1.6 kg/m2. when laying a floor with a thickness of 1 mm. |
| Ivsil | The company offers a large selection of different mixtures for creating floors. Ivsil Express and the Thermolight line are especially popular. | The thickness of the floor layer can be no more than 10 mm. With a layer thickness of 1 mm, the consumption will be 1.4-1.8 kg/m2. |
| Bergauf | The company also produces fairly high-quality mixtures for creating foundations. The compositions are convenient for use by beginners, as they are easy to work with. Allows you to level strong differences in bases (up to 10 cm). | Typically, floors are installed with a thickness of up to 7 mm. Consumption is 1.6-1.8 kg/sq.m. to a thickness of 1 mm. |
| Hercules | The mixtures of this company belong to the category of inexpensive, but high-quality, although not standard. Typically used to reduce the consumption of more expensive compounds. | The thickness of the floor created from this mixture can be 20-100 mm. Consumption – 1.5 kg/sq.m. with a layer thickness of 1 mm. |
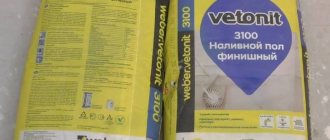
| Vetonit | Mixtures suitable for repairs and for creating self-leveling floors. Not suitable for creating thin layers (less than 2 mm). The composition contains various components that allow you to achieve a high rate of hardening of the mixture. They are not used as a finishing layer; they usually replace screeds. | Consumption is about 5 kg/sq.m. with a floor thickness of 1 mm. |
| Bolars | The mixture is produced in Russia, therefore it has a reasonable price, which is why it is in high demand. It hardens quickly and can be used at different stages of pouring the floor. | The mixture consumption is 1.6 kg/sq.m. with a layer thickness of 1 mm. |
| Horizon | Mixture option for the finishing layer. Also suitable for creating a screed before laying laminate flooring. The layer thickness can reach 1 cm. The mixture is compatible with various types of rough substrates. | The mixture consumption is 1.5 kg/sq.m. when laying a layer of 1 mm. |
| Ceresit | Such mixtures are used to level bases. Often used to decorate concrete and cement floors. The thickness of the floor can vary from 3 mm to 8 cm. Not used for arranging the finishing layer. | The mixture consumption is 1.6 kg/sq.m. with a layer thickness of 1 mm. |
CERESIT CN 68. Self-leveling mixture
Calculator for calculating dry mortar for self-leveling floors
Go to calculations
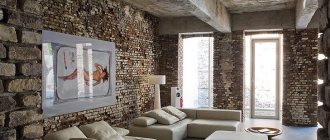
Self-leveling cleanroom flooring
How to make a self-leveling floor with your own hands. DIY shoes for self-leveling floors
This material is used in a room where the number of microorganisms in the air and the concentration of aerosol particles are maintained within the appropriate cleanliness class. As a rule, it is used in areas of the pharmaceutical and food industries, electronics, precision mechanics, etc. The coating ensures a tight surface, smoothness, evenness, ease of cleaning in various ways, and completely eliminates the release of contaminants.
The self-leveling floor is applied to concrete. The material for the clean room is made on the basis of polyurethane, epoxy, methyl methacrylic resins, selected in accordance with the work conditions to ensure the required cleanliness class from P0 to P9.
Requirements for work
Making beautiful and neat self-leveling floors with your own hands is not a difficult task, but it requires a careful approach. Haste is needed here, but only in moderation, and it is only due to the fact that the mixture polymerizes quite quickly. But as for preparation, there is no need to rush here.
The process of pouring self-leveling floor
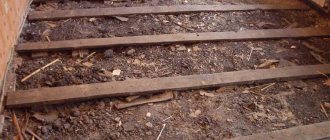
Preparatory work consists of thoroughly cleaning and leveling the base on which such a floor will be poured. The best option is a concrete screed. Such foundations cannot be installed on floors. There should be no stains of paint or grease, sand, or debris on the screed itself. In this case, the base should not be wet - the permissible level is only 4%. If the humidity is higher, the subfloor must be thoroughly dried before starting work. Otherwise, all your efforts will go down the drain.
Attention! It is better to pour self-leveling floors at an air temperature of at least +10 degrees.
Preparing the screed for installing a self-leveling floor
All cracks in the foundation must be sealed with sealant or mortar. Only in this case will it be possible to minimize the consumption of the bulk mixture. It is also recommended to sand the surface well and coat it with a primer designed for the use of mixtures to create self-leveling floors. The main thing is to pre-dust the base.
Repairing cracks in concrete floors
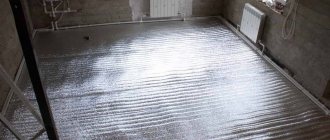
On a note! The self-leveling floor goes well with a heated floor system. Therefore, it is worth thinking in advance about whether it is needed in the house. And if necessary, then make it inside the screed.
Warm floor under self-leveling coating
Also, before starting work, you need to take care of acquiring all the necessary tools. These are a squeegee, containers for mixing mixtures, paint shoes, a needle roller, and a construction mixer. If 3D self-leveling floors are created, the desired design is selected in advance and printed.
Tools for self-leveling floors
Types of squeegee blade sizes
Paintshoes
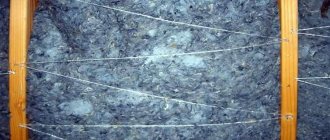
Waterproofing in the house
Waterproofing floors is a set of works that will protect any room from moisture entering it. In an apartment, in particular, we are talking about protecting neighboring homes from accidental flooding. Waterproofing is also an excellent way to protect your own floor from moisture penetration. The fact is that both wooden and concrete floors, exposed to water day after day, begin to collapse. The wood rots, and the concrete begins to lose its strength and crumbles.
Features of floor waterproofing in an apartment
Attention! Waterproofing the subfloor is especially important in rooms that are constantly exposed to moisture. This could be a bathroom, toilet, or those rooms where any communications take place. Waterproofing is also necessary for houses located in regions with high humidity and frequent heavy rainfall.
Typically, waterproofing is a separate layer of waterproof material that is laid or applied to the subfloor before installing the finishing material. The latter can also be a self-leveling floor.
Painted floor waterproofing
Pouring technology
Step 1. The subfloor is prepared. It is cleaned of debris and dust (it is most convenient to use a construction vacuum cleaner for these purposes). All cracks and holes larger than 10 mm in diameter are sealed with building mixtures.
Preparing the subfloor
A construction vacuum cleaner is used to remove debris.
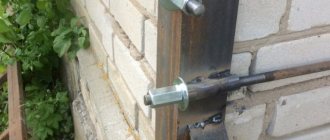
Step 2. Along the perimeter of the room, damper tape 5-10 mm thick is glued to the walls along the floor. Its width should be greater than the thickness of the floor being installed. The purpose of its use is to prevent thermal expansion of the floor or its expansion under the influence of moisture. Otherwise, during such processes the floor will be deformed and destroyed.
Gluing damper tape
Step 3. The base is primed with a special primer for self-leveling floors. The primer is applied carefully over the entire surface of the floor. The primer will provide better adhesion of the mixture to the surface of the subfloor, prevent the appearance of bubbles and the absorption of moisture by the concrete base from the mixture solution, and additionally remove dust from the base. The primer is applied in a thin layer. Porous surfaces are processed twice.
Applying primer
A roller is used to apply the primer
Step 4. Prepare the solution for the self-leveling floor. The mixture is mixed with water and thoroughly stirred with a construction mixer until smooth. First, water is poured, and then the mixture is poured. The mixed solution is kept after stirring for about 5-10 minutes until it matures. This is necessary so that the organic additives included in the composition are completely dissolved. The solution is mixed again.
Preparation of solution for self-leveling floor
The components are mixed
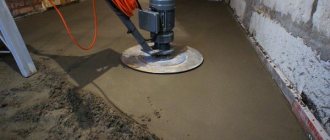
Step 5. The time until the solution hardens is about 40 minutes at a temperature of +23 degrees. The solution is poured onto the prepared base.
The solution is poured onto the prepared base
Step 6. The solution on the base is distributed with a squeegee over the entire surface.
The mixture is distributed over the surface
Step 7. The poured solution is rolled with a needle roller to remove air bubbles from it.
The solution is rolled with a needle roller
Step 8. If it is necessary to apply a second layer, the surface of the first is thoroughly dried and then primed. Only after this can the second layer of the mixture be poured. The drying time for the first layer is 24 hours.
Filled first layer
Video - Filling the self-leveling floor
Preparing the base
First you need to prepare the base surface for the planned floor. It must be horizontally level, dry and clean. In case of unevenness, the floor is leveled with coarse levelers, which are poured using pre-set beacon slats. Further work can be carried out only after the solution has dried.
The surface must be cleaned of peeling coatings, impurities, paint, oil stains, dirt, and also removed from dust so that nothing can interfere with the adhesion of the material to the surface. Sinks, cracks, depressions should also be leveled with cement plaster. The corners of the room should also be processed: a small radius is rounded, no more than 3-4 cm.
3D floor manufacturing process
Step 1. The base is thoroughly cleaned of dust and debris and, if necessary, leveled. All cracks are sealed with building mixtures or sealant.
The subfloor is vacuumed
Step 2. The floors are sanded with a sanding machine. This will help get rid of the bumps on them.
Sanding the base
Step 3. The epoxy primer mixture is mixed and applied to the rough base. The primer is applied in a thin layer without leaving any spaces. The drying time for this layer is 24 hours.
Applying epoxy primer mixture
Step 4. If there are still any cracks or potholes on the surface, they are puttied.
Puttying base defects
Step 5. Mix the mixture to create a base layer. Then it is poured onto the prepared base and carefully distributed over it using a wide spatula.
Preparing the mixture for the base layer
Pouring the prepared mixture
Spreading the mixture with a spatula
Step 6. In order to remove air from the mixture, it is rolled with a needle roller. The layer is then dried for 24 hours.
Rolling with a needle roller
Step 7. Cutting, fitting and gluing of the film with the pattern are carried out. The film must be carefully smoothed over the surface of the base layer and there should be no bubbles on it. And the image must be adjusted literally down to the millimeter.
Unpacking film rolls
The film is being tried on
The film with the pattern is smoothed over the surface
Pasting film with a pattern
Step 8. The last, finishing layer of the self-leveling floor is poured onto the surface of the film. It is transparent and the design will be clearly visible through it.
Filling the finishing layer
Step 9. The layer is also leveled with a wide spatula and then rolled with a needle roller. After finishing the work and drying the last layer, the floors can be coated with a protective varnish.
The finishing layer is leveled
Another roll with a needle roller
Prices for self-leveling floors "Starateli"
self-leveling floors prospectors
Features of self-leveling compounds
As you know, Russian SNiPs allow the formation of a screed with a cross-section from 20 to 150 mm. But bulk dry mixes are a slightly different product. They are mobile and highly mobile compositions of:
- Binder (cement, gypsum);
- Filler (quartz sand, perlite);
- Various modifying and plasticizing additives, additives and other components that improve the workability of the solution, spreadability, drying speed, lack of shrinkage and other characteristics.
Let us remind you that self-leveling floors are often also called decorative finishing polymer compositions. This is a series of household 3D and industrial protective coatings, the content of components and characteristics are similar to varnish for wood or stone. They are special film-forming compositions based on high-strength acrylic, epoxy, and polyurethane resins. They are applied with a roller or spatula onto a prepared mineral base, and after curing, a varnish layer is obtained that is exceptionally resistant to impact, abrasive and foot traffic.
In this article we are talking about sub-level self-leveling floors. Available in three variations: Basic compositions for rough leveling on a cement base.
Self-leveling floors for preliminary leveling.
Designed for preliminary leveling of foundations with significant unevenness and differences. Due to the fairly large fraction of sand or other mineral filler - up to 2 mm - the finished surface is rough. The consistency of the solution is thick, but plastic, almost like a screed. The blur spot is small, so the product must be distributed with a spatula. The permissible layer thickness is from 10 to 100 mm. Levelers for interior and exterior use are available on sale.
Complex mixtures for preliminary and final leveling.
Complex self-leveling floors are universal.
These are cement-based, cement-gypsum and gypsum-based compositions, working in thicknesses from 1 to 100 mm. They are produced for rooms with normal and high humidity, for fragile, loose and low-grade substrates, as well as for the installation of industrial floors. The products in this series are universal and not too difficult to use, so they can be used by both professionals and beginners.
The mixture uses a fraction of sand up to 1.5 mm; after mixing, the solution resembles liquid sour cream, spreads well, but requires additional leveling with a spatula or rule.
Finishing compositions for the final leveling of the floor for laying laminate, parquet, linoleum and other materials.
Thin-layer self-leveling floors.
This type of product is designated as thin-layer self-leveling flooring. The thickness of the fill is really minimal - from 1 millimeter to 3 cm. The surface is really smooth and even due to the use of fine sand - up to 0.6 mm, as well as special additives, thanks to which the consistency of the solution is liquid. The composition spreads easily without additional effort on the part of the master.
It is made on a cement, gypsum-cement or gypsum base, despite the minimum cross-section of the layer, it has a good strength indicator - at least 15 mPa. Scope of application: interior work only.
Optimal layer
Despite the high cost of self-leveling polymer floors, they require a minimum thickness. Optimal compositions sometimes reach only a few millimeters, such as polyurethane compositions. On top of this you can even apply the composition together with colorant, with a thickness of no more than 0.3 mm. Even adding shine and beauty to the surface does not take up much space on the entire surface.
Layers of self-leveling floor
No one makes such floors larger than five millimeters, since all the characteristics still remain at the same level. Only money goes down the drain. Such thickness parameters are also typical for epoxy compounds. However, if you want to paint such a surface, then the layer should be large due to the high fragility of the epoxy.
Methyl methacrylate compounds dry quickly and can be applied in a layer of 1 mm. This height will be sufficient for minimal loads. When the mixture is based on cement, the optimal layer will be 8 mm.