The most necessary appliance, both in an apartment and in a private house, is a refrigerator. And it’s hard to disagree with this statement, isn’t it? It's difficult to find a home that doesn't have one. Like any appliance, refrigerators can break down. But there are situations when a breakdown can be diagnosed independently.
Almost all household refrigeration equipment is equipped with a single-phase motor. To start it you have to use a starting device. If this simple but important part fails, the compressor will no longer start. But, knowing the principles of operation of the device, you can identify the problem and fix it.
This article will talk about how the start relay for a refrigerator works and the signs of its malfunction. We will tell you how to troubleshoot refrigeration equipment. The videos we present will help you understand the principle of operation of the starting device, and also, if necessary, identify its malfunction.
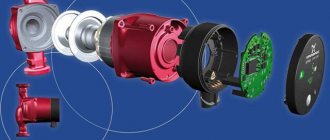
Refrigerator compressor device
A fundamental physical rule also applies in everyday life: heat is transferred from a body with a higher temperature to a body that is less heated.
In order for the reverse process to occur and cold to be created in a household appliance, external energy must be applied in the form of mechanical work. This is exactly how refrigeration systems operate. Electricity powers a special device that creates pressure and compresses the refrigerant gas to convert it into a liquid state. Such a part is the compressor, which is often called the “heart of the refrigerator.” After all, if it stops working normally, the process of generating cold is impossible. In addition to compression, other types of installations are known (absorption, thermoelectric), but they cannot be found in household solutions for the home.
By design, compressors are most often an electric motor driving a single-cylinder piston pump with a valve mechanism. Less common are linear-type installations, where there are no rotating parts, and the pump piston vibrates from the reciprocating movements of the electromagnetic coil core. However, these devices are not so common; they are practically not found on older models of refrigerators.
Inverter compressors are considered the most advanced type of technology, having a number of noticeable advantages over previous models. They are produced today by leading companies in the industry:
- LG;
- Liebherr;
- "Bosch"
- "Indesit".
However, the downside is their excessive complexity, which does not allow diagnosing and repairing the system at home with your own hands.
When a refrigerator with an inverter compressor breaks down, you should not try to do anything with it yourself; contact qualified service technicians. If the installation is of a conventional type with direct power supply from 220V, there is a chance to start a jammed refrigerator compressor without resorting to outside help. Traditionally, domestic brands of equipment (Atlant, Sviyaga) are more suitable for DIY repairs.
Where is the compressor located?
The compressor engine, together with the piston pump, valve mechanism and freon receivers, are usually installed on damping springs inside a hermetically welded metal casing. This part is usually painted black for better heat transfer and looks like a round tank with tubes coming out of it. Place it in the back wall of the refrigerator on a metal frame near the condenser (a coil of tubes that dissipates excess heat).
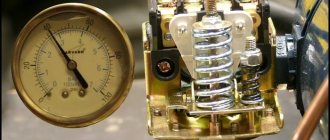
The pressure inside the sealed compressor housing during normal operation is 10 atmospheres. Power is supplied to the motor through contacts on the outer wall of the tank.
Checking the compressor for functionality
The result of normal operation of the compressor is the creation of the required refrigerant pressure in the pipe system. This indicator varies for different models, but it is fundamentally believed that if the output pressure is less than 4 atmospheres, the device is unsuitable for operation.
If the purpose of the repair is an attempt to restore normal operation of the refrigerator, the condition of the compressor will have to be assessed by indirect signs (noise, vibration). According to reviews from experts, the two most common breakdowns are:
- malfunction of electrical equipment, including failure of the start-up relay;
- jamming of the mechanical part of the compressor (the rotor of its engine or the piston in the pump cylinder).
The system is checked separately for each of these problems to understand which part requires repair or replacement. To do this, you will need to directly start the refrigerator compressor without a relay.
The longest-running device in our apartments is not a computer or TV, but an ordinary refrigerator. The refrigerator operates around the clock, and we evaluate its operation 2-3 times a day. If the refrigerator is made with high quality, then we don’t have any problems with cooling food for at least 20 years. Many people still have old Soviet-made refrigeration units. And like everything in this life, the refrigerator suddenly breaks down, but instead of throwing away the device that has served faithfully for so many years, you can make an attempt to restore it. Due to the repair, the fact that the new thing will be good on the outside, but the reliability is unlikely to compete with the Soviet apparatus.The principle of operation of a refrigerator can be considered using the example of a filled gas cylinder. The cylinder is filled with gas under high pressure and the temperature of the gas and the cylinder are the same and correspond to the street temperature. If you open the valve, the gas will begin to escape and at the same time the valve will begin to cool sharply. This is due to the fact that gas in a cylinder under pressure has a very high boiling point, and outdoors at low pressure this point is very low. As if you boil a kettle of water and start climbing a mountain, the water in the kettle would continue to boil, because as the pressure drops, the boiling point decreases. So it turns out that the gas in the cylinder is a liquid, and as soon as it leaves the cylinder, the gas immediately boils. When boiling, the gas evaporates, and the surface from which it evaporates freezes, because the gas takes heat from this surface. So, back to the balloon. If we now connect the cylinder to a cooler, where the products we need will be cooled, and a pump that will drive gas from the cylinder through the cooler into the cylinder, then nothing will work. You need to somehow create a pressure difference. The pressure difference can be achieved using a throttle - a thin tube. The tube will not allow a large amount of liquid gas to pass through, it will become a narrowing, and after passing through the tube, the gas enters the evaporator, where there is a lot of space and where the gas will boil.
So, this refrigerator worked for me until it suddenly stopped and started leaking. By the way, if water flows from under the refrigerator, this is not a breakdown, it’s just that the condensate drain hose from the chamber has shifted. The hose connects the chute for draining condensate from the refrigerator chamber and the container on the compressor.
The rear panel does not provide any particularly interesting data. The refrigerator cost a huge amount for that money - 355 rubles, which was 3 monthly salaries of an engineer. The refrigerator is powered by an AC mains frequency of 50 Hz with a phase voltage of 220 V and consumes 155 W.
The general electrical circuit is shown in the figure. The circuit contains two temperature relays with temperature sensors (RTS). One sensor monitors the temperature of the refrigerator compartment and turns the refrigerator compressor on and off. The second sensor contains a button called “defrost”. If you press this button, the relay will turn off the compressor, but it will turn back on only after the temperature in the refrigerator reaches approximately +10 C.
Freon-12 is used as a substance that takes heat from products. Freon is a gas, but if you compress it, the gas will transform into its other state - liquid. The essence of the refrigerator is very simple: warm food is placed in a heat-insulated cabinet, the walls of which are equipped with tubes through which cold liquid flows. As a result of the fact that there is no heat exchange with the outside room, the heat from the products heats the liquid inside the cold tubes and the products are cooled. As a result of the circulation of liquid in the refrigerator, the substance heats up and turns into a gas. To maintain the desired temperature, the compressor must operate periodically. Periodic operation is influenced by the temperature sensor with which we increase or decrease the temperature in the refrigerator.
First, the superheated refrigerant compressed by the compressor in a vapor state enters the condenser - a long zigzag tube. Here it gives off its heat to the surrounding air and, upon cooling, turns into liquid. Then the liquid refrigerant enters the evaporator, which is located inside the freezer. There, at low pressure, it begins to boil and evaporate. And since it evaporates, it means it takes away heat from the chamber and creates cold. The evaporated refrigerant is again sucked into the compressor, and the cycle repeats.
The main consumer of electrical energy in the refrigerator is the light bulb and the compressor. A light bulb in the refrigerator is needed to illuminate food for those categories of citizens who eat at night. The light comes on when the refrigerator door is opened. It has no effect on the operation of the compressor.
The compressor is used to transfer the refrigerant from a gaseous state to a liquid state. The compressor is a sealed tank in which an electric single-phase motor and a gas liquefaction mechanism are located.
The compressor is a sealed and non-separable device. Freon is a gas circulating in a closed ring inside the entire hydraulic system of the refrigerator. Usually, when freon leaks on the evaporator - a plate inside the refrigerator - a fur coat grows - a large block of ice, and the compressor switches to almost round-the-clock operation. Local shabashniks treat this syndrome by pumping in freon and thereby eliminating the consequences of the breakdown for some time. After a little time, the freon comes out again and the fur coat grows again. In a good way, in case of such a breakdown, you need to look for the cause - bad soldering or a cracked tube.
Compressors are available in many modifications. Remove the presented compressor from the Minsk-15 refrigerator.
You can disassemble the compressor using a grinder. If you cut off the top of the cap, you can see a vertically located engine and a block with one cylinder. The freon tube is bent into a spiral so that there is play in the tubes during vibration. If the tubes are tightly secured, vibration will cause them to break.
Cutting the top will do nothing to remove the engine, so you can cut off the bottom of the compressor. The bottom view gives an idea of the cooling of the entire compressor during operation. At the bottom there is a tube through which freon is circulated, cooling the engine itself. In addition to the tube, shock-absorbing fasteners on which the engine is mounted are visible on the sides. As a result of the fact that the engine converts the rotating movement of the shaft into the translational movement of the compressor piston due to the eccentric on the engine shaft, vibrations occur in the entire mechanism. To compensate for vibration on the shaft next to the eccentric, metal was selected in such a way as to level the masses during rotation, balancing the entire system. The engine is also placed on springs placed on pins. Nuts are not used. The engine is limited at the top by a cap. The motor connection connector is also located here.
The first cut went through the bottom of the cap and was useless for disassembly, just like the second cut. To remove the engine from the housing, you need to make a cut under the head or in the middle of the tank. The removed engine is covered in oil. The windings are clearly visible on it - working and starting. The starting winding is made of thick wire and has low resistance. The working winding is the exact opposite of the starting winding: small diameter and high resistance.
After removing the casing, the engine and compressor present a deplorable sight.
By removing the four screws holding the compressor housing in place, the compressor and motor can be separated. The eccentric and balance plate are visible on the engine. On the compressor you can see the piston itself with a hole for the eccentric, which pumps freon into the system.
There are only 4 chambers on the compressor. Through some, freon is taken from the system, through others, with the help of a piston, freon is compressed and pushed back into the system.
This is roughly how a refrigerator compressor works.
A single-phase electric motor has two windings connected in series with an output from a midpoint.
To start such an engine, you need to apply either phase or zero to 0 common, and either zero or phase to 1 start and 2 working, respectively. In other words, the voltage between pins 1 and 0 should be 220 V, between pins 0 and 2 - 220 V, and between pins 1 and 2 the voltage should be zero. If the voltage is applied correctly, the engine will jerk and the rotor (the part of the engine that rotates) will begin to rotate. The direction of rotation depends on which end of the working winding is connected to the common terminal. In a refrigerator, it is impossible to start the engine in the other direction, because the common terminal is located inside the hermetically sealed compressor.
After the rotor begins to rotate, you must immediately turn off the starting coil. Otherwise, the motor will overheat and the winding insulation will burn out, which will cause an interturn short circuit and damage the motor. To disconnect the starting coil, it is enough to disconnect pin 1, then the voltage between pins 0 and 2 is 220 V and the engine will not stop.
The starting coil is only needed to start the engine and is not needed at all while it is running. To accurately determine the health of the engine, use an ohmmeter; the resistance values are visible on the device.
The starting current of the refrigerator compressor motor is 4.8 A, and the operating current is 1.02 A. At the same time, the resistance of the starting winding is 13.1 Ohms and the operating winding is 47.5 Ohms. Small fluctuations of 0.5 ohms are acceptable. It should be taken into account that the more powerful the refrigerator, the higher the resistance and current values will be.
All manufacturers see their compressors differently and the starting winding is not always higher in resistance than the working winding. Many foreign manufacturers have a working winding larger than the starting winding. This difference is only a few ohms. It all depends on the manufacturer and the specific compressor. On the compressor label you can see three connection points similar to the compressor connector.
C - COM, means the point of connection of two windings, i.e. center point;
S - START, starting starter winding;
R - RUN or M - MAIN, working winding.
For comparison, I present the resistance of the compressor windings of refrigerators from different manufacturers.
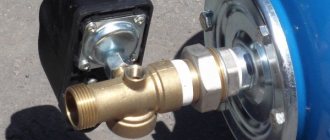
The engine is controlled by a starting relay. The relay is located in a plastic box to the right of the installation junction box.
When a single-phase electric motor is turned on, a large starting current flows through the working winding. The starting current is 3-7 times the rated current of the motor, it lasts only for a while until the motor rotor begins to rotate and reaches the rated speed. The relay coil is connected in series with the working winding of the motor, so when the current is high, a magnetic flux will appear in the coil, which will push the coil core up. At the end of the core there is a contact plate that connects the starting winding of the motor to the network. As soon as the rotor rotation speed reaches the planned value, the starting current in the working winding will drop, the magnetic flux in the starting relay coil will drop and the plate will lower, disconnecting the starting winding of the engine from the network.
If the engine overheats, that is, if the engine rotor does not have time to pick up rotation speed, or if the engine itself is faulty, an emergency shutdown of the electric motor from the network is provided. The protection is made in the form of turns of nichrome wire. Nichrome is an alloy of the metals nickel and chromium. When current is passed through it, the nichrome heats up and releases heat, but does not burn. That is why most electric heating devices contain this metal.
When large starting currents flow, nichrome heats the bimetallic plate located underneath it, the plate heats up and bends, disconnecting both motor windings from the network. After some time, the nichrome will cool down, the bimetallic plate will return to its normal position and the relay will restart the refrigerator again. If you have a refrigerator at your dacha and during a thunderstorm, or when a welding machine is working nearby, the refrigerator growls and does not turn on, then know that there is not enough voltage for the rotor to gain the required speed and the protection is triggered.
The start and shutdown of the refrigerator is controlled by a temperature sensor, which gives the start command by applying a potential to the common terminal of the motor. The temperature sensor is a sealed tube filled with gas, a housing with a rod for regulating the temperature at which it operates and leads for connecting wires.
Sometimes two sensors are installed - one on one camera, and the second on the second camera. Or the second sensor is used for the defrosting function, which means that the refrigerator will not turn on until it is completely defrosted.
When assembling and connecting all wires, you must observe the correct electrical diagram. For clarity, all wires are marked. 220 V (brown and blue) comes from the network. The compressor motor is also powered by 220 V. Power is supplied to the motor from the brown power wire through the blue wire (3). The second wire to the engine is taken from the brown network wire through the gray wire to the temperature sensor, the output from the sensor is a white wire connected to the black wire (0). To check whether the compressor is working without a temperature sensor, you need to apply a voltage of 220 V to the blue (3) and black (0) wires suitable for the start relay.
For those who are especially meticulous and don’t have a start relay, you can take three pieces of wire. Connect one to terminal (0) on the compressor plug, the second to the end of the working winding (2) and the third to the end of the starting winding (1). The free ends of the wires (1) and (2) must be connected together. It is advisable to equip the wire to terminal (1) of the compressor with a toggle switch, but it is possible without it. Now you need to apply power. Insert the wire to terminal (0) into one contact of the socket, and the wires connected together to terminals (1) and (2) into the other. Almost immediately you need to disconnect the wire to terminal (1) from the network. The relay response time is approximately 0.5 s. It’s better to disconnect it with a toggle switch, but you can also use side cutters with insulated handles. The compressor will start working. To start it again you will need to cut the wire again. There are never too many wires, so if there is no relay, assemble a switching circuit through a toggle switch or circuit breaker. The engine runs on 220 V, which is supplied to contacts (0) and (2). Just to start, you should connect to contact (1) the same wire that goes to contact (2).
Almost all single-phase motors can be started from a capacitor. The fact is that single-phase motors operate from brushes (one stator winding and one armature), starting relays (two unequal stator windings) and a capacitor (two stator windings). The capacitor is connected between the ends of both windings according to the diagram below.
On average, the capacitor capacity is taken at the rate of 22 μF per 1 kW of engine power. It turns out that a 155 W refrigerator motor needs a 3 µF capacitor. You need a paper capacitor. The supplied 160 V capacitor did not heat up or explode, but it did crack, so we are looking for a capacitor of at least 250 V. The heating of the windings will serve as an indicator of operation. The reason why a relay is used to start the refrigerator compressor is higher starting reliability. And indeed, during tests, the engine started when the power cables were switched sharply, but when started using a switch, sometimes the engine did not rotate, but hummed. This is due to the fact that a starting capacitor was not used. The starting capacitor is connected in parallel with the working capacitor and only when the engine starts. The capacity of the starting capacitor is 3 times higher than the capacity of the working capacitor.
Have a nice renovation. Be careful with electricity.
Malfunction
| Cause | Elimination | |
| The refrigerator is not freezing | Compressor burned out | Replace compressor |
| Start relay burnt out | Replace start relay | |
| The power cable is faulty | Fuse the breakdown site and isolate it | |
| Works and doesn't turn off | Temperature sensor faulty | Disassemble and replace the sensor |
| It buzzes and turns off immediately | The motor starting winding does not start | Clean the contact plate of the start relay |
Starting an asynchronous motor with a single-phase 230 volt network
Voltage 380 volts - three phases of 230 volts each, both cases consider the effective value. Causing a similar thermal effect on passive resistance. The alternating voltage changes continuously, the figure is averaged over time. The result is called the effective (effective) value of the quantity.
For an induction motor to operate correctly, the stator field must rotate. It is easy to ensure (proven by Nikola Tesla): apply the corresponding phases to three windings. Vector addition of fields occurs. The resulting vector rotates smoothly, dragging the rotor. The efficiency of three-phase motors on a 380 V network is the maximum among other varieties and types of inclusions. In industry, voltages that are unusual for residential buildings are used. Can a tenant get 380V? Hypothetically, yes. A professional electrician will find three phases shifted relative to each other at the desired angle (120 degrees).
Phase one. Rotation of the field is fundamentally impossible. Motion is obtained by adding at least two vectors. You have to use the services of a capacitor that shifts the voltage by 90 degrees. In fact, with a star or triangle circuit, one winding acts as a starting winding and causes the field to rotate. Subsequently, the value changes linearly, since the engine has gained speed, the inertia is enough to maintain rotational motion. The alternating field will rhythmically push the rotor in the desired direction. The smoothness is inferior to the resulting addition of three vectors; the functioning of home appliances is sufficient.
What does the starting winding do? The engine will not enter operating mode, creates a second vector, which, to a first approximation, allows us to consider the field inside the engine to be rotating. It’s enough to move the uneven circle and spin the rotor. The speed is up, the starting coil must be turned off, there is minimal use, a lot of energy is wasted, reducing the efficiency of the device.
Why does the motor not turn on?
If suddenly a household appliance breaks down, then you need to know exactly how to check whether the refrigerator compressor is working or not. After all, these actions and their results will help determine where to start repairing the device.
Fundamentally, compressors are no different from each other. They are an electric motor with a piston or plunger injection system.
There is a whole range of problems that can lead to equipment stopping working:
- Instability of the electrical network, which leads to interruptions in operation.
- Failure of the thermostat. In this case, there are clicks when switching modes, but it does not even try to start working.
- If the failure occurs after defrosting, then most likely there is a freon leak or the entire cooling system is clogged.
- If the light bulb inside works, and the device itself makes sounds in the form of clicks, but cooling does not occur, then most likely the reason is that the device has stopped working. Carrying out repairs yourself in this case, without certain skills, will be quite problematic. Therefore, in the vast majority of cases, they try to call a qualified technician for help.
Why you shouldn’t hesitate to replace a faulty relay
Of course, folk “craftsmen” have already learned how to start a refrigerator without a start-up relay by connecting the contacts directly. However, experienced craftsmen categorically advise against doing this. In the refrigerator, each part carries its own payload. And the exclusion of any component from the electrical circuit is fraught with overloading of the mechanisms, overheating of the engine and, at best, breakdown of the motor-compressor, and at worst, a fire. Actually, the name of the part itself suggests that it is necessary for the correct start-up of the unit. And the protective part of the relay just saves the equipment from excessive thermal load. Simply put - from overheating.
So don't put off replacing it. When choosing, be guided by the brand and characteristics of the spare part removed from your refrigerator. Ideally, you should purchase exactly the same modification of the part and connect it to the refrigeration unit in the same way.
We hope you found our instructions for diagnosing and troubleshooting useful.
Classic causes of high heat
There are several common problems that lead to overheating:
- Malfunctions in the operation of the temperature sensor, as well as a compressor that does not turn off after reaching the set temperature in the chambers.
- Failure of the indicator or backlight, as well as wear of the electric motor.
- Heat exchanger malfunction or refrigerant leak.
- Excessive loads on refrigeration equipment in the summer season, when it is difficult to lower the temperature in a timely manner.
In addition to the above, the reasons why the compressor heats up excessively may include violation of the operating rules of the unit, which are specified in the instructions for it:
- The doors of the freezer and refrigerator compartment are opened frequently and for a long time.
- Refrigeration equipment is located close to the heating radiators.
- The unit was placed close to the walls of the room, which disrupts air circulation.
- A freezer that has not been defrosted for a long time (more than six months).
The last factor leading to compressor overheating does not apply to refrigeration equipment with the NoFrost system, which automatically defrosts as needed.
Connection according to instructions
The electric motor used to drive the pump is equipped with a double excitation winding. To start the equipment, increased power is required, so the motor design includes a starting winding. After starting work, the power is automatically switched to the working winding, which reduces energy consumption. Additional relays that maintain the required temperature background are located upstream of the compressor housing.
To connect the refrigerator compressor according to the factory circuit, you will need to use a cable equipped with a plug socket. The wires are connected to the terminals on the relay body; since alternating current is used for power, the polarity of the connection is not taken into account. To ensure reliable contact, terminals are installed on the cables; the type of elements depends on the modification and manufacturer of the relay. After plugging the plug into the socket, the motor should start; if the start is unsuccessful, then you should start checking the components in the power circuit.
Starting the engine
At their core, the drive motors used in compressors are single-phase asynchronous motors (IM) equipped with a starting winding. The basis of their design is a stationary stator with a set of coils and a rotating rotor. The moving part of the engine, or rotor, is a hollow cylinder made of aluminum (also called a “squirrel cage”).
The stator of the motor unit contains a pair of working windings, one of which is the main winding, and the second serves as a starting winding. They are located in relation to one another at right angles, or are wound in opposite directions, forming a kind of “bifilar”. The current flowing through the main winding creates an electromagnetic field with a changing vector direction. When the rotor rotates, according to the law of electromagnetic induction, a resultant magnetic flux (EMF) is created in the motor. As a rule, it is enough to support its rotation due to the current flowing through the main coil.
If the rotor is stationary in the initial position (which is considered normal), then the resulting EMF approaches zero. In this case, to start the engine, additional force will be required to provide the required starting torque. For these purposes, a starting coil is needed.
For the motor to start and operate normally, the currents in the coils must be out of phase with one another. For this reason, its design includes an additional phase-shifting element (choke or capacitor). As soon as the engine develops the required speed, the need for a starting coil disappears.
Conclusion: To start the blood pressure normally, you need to use both coils at once (main and starting). On the other hand, for regular rotation of the rotor, only one is enough - the main one. For timely switching of these circuits, a starting relay is used, which is switched on directly in front of the compressor.
How to connect the refrigerator compressor relay?
To connect the refrigerator compressor relay, you need to follow a few simple steps. This uses a windshield washer hose. Finding it won't be difficult. It is available in almost any store that sells spare parts for cars.
Regarding the operation of the device, it is important to monitor the oil level. This will avoid overheating
In this case, the duration of operation of the device should not exceed forty-five minutes. Otherwise, it may quickly fail.
This device is electric. Therefore, when using it, it is necessary to observe safety precautions. Before starting operation, the quality of the wire insulation must be checked. In this case, only special material is used. Hands must be dry when using the device.
It is also worth noting that you should not hope for a long service life of such a device. Since no one can provide guarantees for this. This must be taken into account, so sometimes it is better to purchase a new compressor than to use a homemade one.
Voltage control relay
One common voltage relay is used, installed for all consumers, for the entire apartment. Such a relay must provide the ability to set a turn-on delay of at least 5 minutes. This delay is provided by voltage relays DigiTOP and ZUBR . The latter can have a delay of up to 600 seconds (10 minutes).
The disadvantage of this solution is obvious - in case of power surges, power supply in the entire apartment will appear only after a delay. But if voltage drops are regular, then this is very inconvenient.
Main symptoms of a malfunction
There are two main “symptoms” of a relay failure. This is an undercharge or overcharge of the battery. Also, a malfunction of a part can be determined by the dim glow of the headlights or by a change in their brightness when the engine speed increases.
If undercharged, the car will start with great difficulty. However, the manifestation of this “symptom” may not be related to the generator. Therefore, first of all, you should make sure that the battery is in good condition.
If the battery is overcharged, there is no doubt that the problem lies in the damaged relay. There are other possible causes of overcharging, but they are extremely rare. Overcharging may cause the battery to boil over. This can be determined by the decrease in the amount of electrolyte in the jars and the appearance of a white coating on the battery.
If you suspect that the battery is overcharged or undercharged, you should diagnose the generator.
Group voltage control relays
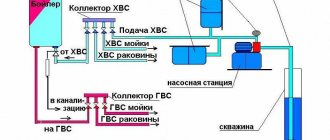
To get rid of the shortcomings of the previous method, several voltage control relays are used. I have already looked in detail at circuits with multiple voltage relays , what they are used for and how they work. To solve our problem, we can use one of the voltage relays to protect a group with compressor equipment - refrigerators, freezers, air conditioners. When the supply voltage is restored, the group with refrigeration equipment will be connected to the power grid after the time delay has expired. At the same time, all other consumers of the home electrical network can be connected much earlier. It is very comfortable. In addition, you can set your own settings for the refrigeration group voltage relay.
When connecting a circuit with several voltage relays, it is convenient to use a cross module . The disadvantage of this method is the high cost and the need for additional space in the distribution board .
Refrigerator relay replacement
Replacing the relay in the refrigerator is carried out at a service center or independently at home. To carry out the work, a tester and a screwdriver are required to dismantle the element.
Removing the relay
You can remove the device yourself, taking into account the following points:
- Before carrying out any work, the device must be disconnected from the network, after which you need to wait some time to de-energize the entire system.
- The RTP type can be removed by simply disconnecting the contacts. A relay on a refrigerator for starting an engine is often installed without insulating the contacts, which causes the appearance of oxide on the contacts. Therefore, problems with dismantling may arise.
- You can replace the device depending on how it is attached. Rivets, screws and latches are used. You can unscrew the screws with a screwdriver; the latches are pressed out.
The type of mounting method used largely depends on the refrigerator model. You can replace the mechanism yourself only by selecting a relay taking into account the characteristics of the equipment.
Relay selection
After checking the mechanism, you can often find that it needs to be completely replaced. The refrigerator starting relay is selected taking into account the following points:
- Technical characteristics specified in the operating instructions.
- According to the parameters of the installed engine.
- The mechanism is sold at different prices: from 500 to 3000 rubles.
Manufacturers indicate what mechanisms should be installed.
Relay connection
You can connect to the compressor yourself. The work is carried out according to the following scheme:
- disconnect the electrical appliance from the network;
- wait a few minutes for the equipment to completely de-energize;
- unfasten the water supply hose from the back wall and move it away so as not to accidentally damage it;
- Unscrew the fasteners securing the protective panel and put them aside;
- remove the old start relay; if it is not there, find the location on the compressor;
- connect the connector to the new device;
- insert into place;
- connect the wires according to the markings;
- secure the trigger mechanism with screws and latches;
- put the back panel in place, screw it on;
- attach the water supply hose, secure;
- plug into the electrical network for testing.
After this, a working device is installed. A complex connection diagram involves connecting additional wires, through which the device is controlled.
If the refrigerator does not operate stably and the relay has been checked, there is a possibility of failure of one of the important components. The low cost of the mechanism allows you to replace it quickly and without significant costs. When installing a new device, you need to be careful, as incorrect connection can lead to malfunction.
Price
All stabilizers that meet the declared characteristics and have quality certificates have a fairly high price - from 6,000 rubles and much higher (up to several tens of thousands of rubles, depending on the power). The table shows the most popular models of the current year:
| Model | Power | Range | Type | Price |
| Calm R 500i | 500 W | 90…310 V | double conversion | 6400 rub. |
| RUCELF SRWII-12000-L | 10 kW (12 kVA) | 140…260 V | relay | 14300 rub. |
| PROGRESS 8000TR | 6400 W (8000 VA) | 120…245 V | thyristor | RUR 38,500 |
| Lider PS10000W-50 | 10000 VA | 128…320 V | thyristor | RUR 46,700 |
| ENERGY ARS-1500 | 1500 VA | 140…260 V | relay | 6500 rub. |
| Calm R 800 | 800 VA | 165…265 V | relay | 6300 rub. |
| BASTION SKAT-ST-1300 | 1300 VA | 145…260 V | relay | 6250 rub. |
If purchasing such devices is beyond your means, you will have to lower the bar and look at Chinese-made equipment. But here you need to be very careful when choosing. Here is a list of Chinese products that, judging by reviews, have proven themselves very well on the Russian market:
| Model | Power | Range | Type | Price |
| RESANTA LUX ASN-500N/1-C | 500 W | 140…260 V | relay | 2000 rub |
| Defender AVR Initial 2000 | 955 W (2000 VA) | 175…285 V | relay | 3140 rub. |
| SVEN AVR SLIM 2000 LCD | 1600 W (2000 VA) | 100…280 V | relay | 3100 rub. |
| Era STA-1000 | 1000 W | 140…270 V | relay | 2900 rub. |
| Powercom TCA-2000 | 1000 W (2000 VA) | 176…264 V | relay | 1800 rub. |
| SVEN AVR SLIM 1000 LCD | 800 W (1000 VA) | 140…260 V | relay | 2200 rub. |
| Ippon AVR-3000 | 3000 VA | 140…280 V | relay | 3950 rub. |
All of the listed single-phase stabilizers have a wire with a plug and output sockets. Connecting a refrigerator through the stabilizer is very simple - plug the refrigerator plug into the socket on the stabilizer body and turn on the device.
Devices with a power of up to 2 kW do not have fans, since natural air circulation through the ventilation holes in the case is sufficient for them. Therefore, the only noise they make is when the power relays switch. Stabilizers with electronic stabilization (using thyristors) operate completely silently.
Poorly assembled stabilizers can hum like old Soviet transformers.
Depending on the design of the device, they are placed next to the refrigerator or on the floor or on the wall. Can be placed directly on the refrigerator. All low-power stabilizers are quite compact and do not take up much space.
Operating principle of the start relay
Despite the large number of manufacturers of components for refrigerators, the operating scheme and design of starting relays are almost the same. Having understood the principle of their operation, you can independently find and fix the problem.
Device diagram and connection to the compressor
The relay circuitry has two inputs from the power supply and three outputs to the compressor. One input (conditionally zero) passes directly, and the other (conditionally phase) inside the device is split into two:
- the first passes directly to the working winding;
- the second passes through the disconnecting contacts to the starting winding.
If the relay does not have a seat, then when connecting to the compressor you must not make a mistake with the order of connecting the contacts. Methods common on the Internet for determining winding types by measuring resistance are not correct in general, since some motors have the same resistance of the starting and running windings.
The electrical circuit of the start-up relay may have minor modifications depending on the manufacturer. For example, the protective block can be placed on the core, which is located below in the figure
Therefore, it is necessary to find documentation or disassemble the compressor to understand the location of the feed-through contacts. This can also be done if there are symbolic identifiers near the outputs:
- “S” – starting winding;
- “R” – working winding;
- “C” – general output.
The relays differ in the way they are mounted on the frame of the refrigerator or on the compressor. They also have their own current characteristics, so when replacing it is necessary to select a completely identical device, or better yet, the same model.
Closing contacts using an induction coil
An electromagnetic starting relay works by closing a contact to pass current through the starting winding. The main operating element of the device is a solenoid coil connected in series with the main winding of the motor.
At the moment the compressor starts, with the rotor static, a large starting current passes through the solenoid. As a result, a magnetic field is created that moves the core (armature) with a conductive strip installed on it, which closes the contact of the starting winding. The rotor begins to accelerate.
As the rotor speed increases, the amount of current passing through the coil decreases, as a result of which the magnetic field voltage decreases. Under the action of a compensating spring or gravity, the core returns to its original position and the contact opens.
On the cover of the relay with the induction coil there is an “up” arrow, which indicates the correct position of the device in space. If it is placed differently, then the contacts will not open under the influence of gravity
The compressor motor continues to operate in the mode of maintaining rotor rotation, passing current through the working winding. The next time the relay will work only after the rotor stops.
Regulation of current supply with a posistor
Relays produced for modern refrigerators often use a posistor - a type of thermal resistor. For this device, there is a temperature range below which it passes current with little resistance, and above which the resistance increases sharply and the circuit opens.
In a starting relay, a posistor is integrated into the circuit leading to the starting winding. At room temperature, the resistance of this element is insignificant, so when the compressor starts operating, current flows unhindered.
Due to the presence of resistance, the posistor gradually heats up and when a certain temperature is reached, the circuit opens. It cools down only after the current supply to the compressor is stopped and starts skipping again when the engine is turned on again.
The posistor has the shape of a low cylinder, which is why professional electricians often call it a “tablet”.
Operating principle of the starting protection relay
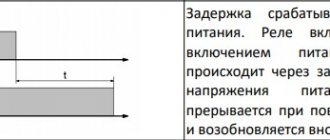
The starting coil must be turned off when the speed is up. At the moment of start, the windings consume a large current, the effect allows you to track the moment of recommutation. The refrigerator start relay performs protective functions (not always). The option is implemented by heating the sensitive element with electric current. The threshold is exceeded - the circuit breaks, regardless of whether the desired refrigerator mode has been reached according to the thermostat readings or not. Two schemes for the operation of the starting relay have been invented (at the same time it can be protective):
- "Tablets" work on the basis of a material that expands by heat. Initially, the working element is cold, the starting winding consumes current, ensuring a smooth start of the asynchronous motor. Gradually, the temperature of the tablet rises, causing the contact to open, and the working coil remains switched on. We believe that to maintain the mode, a mechanism is installed inside the relay to prevent the tablet from cooling. Operating winding choke, heating element. If a button relay breaks, you can often hear the rustle of scattered powder inside, changing the position of the device body.
- Induction relays are based on the action of electromagnets. When starting, the current is high and due to this the core presses the contacts of the starting coil. Over time, engine consumption drops. As a result, the current will no longer balance the spring, and the contacts of the starting coil open. Please note: it is important to orient the relay in space correctly. Often the core falls, carried away by the force of gravity. But testing such elements is much simpler: turn from side to side so that the contacts of the starting relay change the resistance from zero to infinity.
The tablets often come with thermal relays on a bimetallic plate in the same housing. The current of the working coil passes through it. As soon as the value exceeds the response threshold, the contacts open, stopping the compressor. The bimetallic type refrigerator relay circuit is based on heating the sensitive element.
There is nothing complicated about it! The two plates are welded tightly to each other. The coefficient of expansion of metals in them is different. When heating occurs, the double plate bends towards the material that elongates less. It becomes possible for the relay to operate. This scheme is often used in household appliances.
Induction relays often use a heating coil. There is already one material here. But it heats (!) the bimetallic plate. The current of the working coil passes through the spiral. If the amperage is too high, the bimetallic strip breaks the contacts. The inductive start-up relay has the following types of faults:
- the spiral has burned out, in this case the contacts will not ring in any position;
- the core is jammed, the engine does not start, or the engine stalls after 5 - 10 seconds;
- The operating mode of the plate is disrupted, the refrigerator turns off even in normal mode.
We would like to draw your attention: thermal protection is completely emergency. In normal operation, the relay should not operate. At the same time, the starting function accompanies the refrigerator during the operating period. The switching process is accompanied by a slight click. We often hear the start-up relay in the refrigerator when the appliance is running.
The start-up relay resembles a tablet or an indeterminate shape in appearance. This is such a small element located directly next to the black barrel-shaped compressor housing. Have you ever wondered why this soot color was chosen to paint the heart of the refrigerator?
The answer is simple: black absorbs heat, but also radiates well. In which direction the process moves determines the direction of the temperature difference between the compressor and the environment. When the motor is hot, the black housing gives off heat to the air. In addition, there is a fan nearby that creates forced cooling of the compressor.
Read more: Why the refrigerator does not freeze, common causes and their solutions
Switching diagram of the refrigerator start-up relay:
- Phase 220 V.
- Earth.
- Starting winding of an asynchronous compressor motor.
- Working winding of an asynchronous compressor motor.
- Earth.
You can usually find out what is connected where and by the color of the wires. In any case, repairs should be carried out carefully. It’s easier to find out the compressor ground if you scrape a little paint off the housing and ring the three contacts. But this method is left for last when the others have not helped.
DXR induction start-up protection relays are mounted on a fixed frame and work in tandem with DXM compressors. The designation may be followed by a number that is the same for both devices. The difference in designs is in the operating voltage and operating and releasing currents. To speed up the breaking of the circuit when overheated, a magnet is located behind the bimetallic plate.
The induction relay for the RTP refrigerator compressor differs in that it can also be located on a wire. Doesn't have to be attached to the frame. The work is carried out with compressors DXM 3 and 5. The difference from DXR is a slightly lower operating current. This will better protect the compressor. The release current is the same. Craftsmen use refrigeration compressors to manufacture high-pressure apparatuses and receivers. Tires are inflated and pneumatic equipment is used.
Before you buy a relay for your refrigerator, make sure that the product matches the type of compressor. The element must then be installed correctly. It is better to take exactly the brand that was available before the repair. If the relay of the Biryusa refrigerator is equipped with the RTK type, it is better to take this, despite the fact that both RTP and DXR are also suitable for the DXM engine. Lookup tables can help determine device compatibility. Indicate the necessary technical information.
Checking the compressor's performance
You can check the motor using a test device switched to resistance measurement mode. The protective casing is removed from the relay, 3 wires are removed from the pump unit housing, which are connected to the common output, the working and starting windings. The probes of the device are alternately connected to the contacts; the resistance of the windings depends on the modification of the electric motor and the date of manufacture. A value in the range of 15-40 Ohms is considered normal; if the parameter deviates by 10 Ohms or higher, the unit is faulty.
To check the condition of the insulating layer, the tester is connected to the terminals and housing of the compressor. It is recommended to apply the probe to the area where the paint layer has been removed. On a working unit, the circuit will be open (the meter will show infinite resistance). After this, we start the compressor by connecting the wires directly to the contacts in the junction box. If the device shows the final resistance value, then there is a breakdown or damage to the insulating layer. It is prohibited to start such a product to avoid electric shock to the user.
What to check first
There may be several reasons why the above-described operational disturbances may occur. If you have at least minimal knowledge of the structure of household appliances, you can identify the breakdown yourself. Professionals advise sticking to the following operating algorithm, but here you need to take into account the type of thermostat.
For devices with a mechanical thermostat, there are 3 possible causes of failure:
- damage to the start relay;
- thermostat failure;
- Compressor malfunction.
The order in which all the listed details should be checked is not very important. You can start with the node that is most accessible. This rule applies to those devices that stand against a wall or in a niche.
The thermostat should be checked after turning off the device. All those parts that may interfere with the inspection are removed. First of all, these are lampshades and covers.
The next stage is connecting the wires to each other (those that go to the contacts). In this case, the ground wire should not be touched (most often it can be recognized by the green winding). The types of thermostats located in the lighting shade also have a blue wire, which is also not used. After completing this work, the device is connected to the mains. If startup occurs, then the problem lies in the thermostat. If there are no changes, then proceed to checking other elements.
If the refrigerator has an electronic thermostat, then it can be classified as a more complex device. To identify faults, it may be necessary to check the entire module electrically. This kind of work should be entrusted to a specialist.
However, some details can be checked on your own. This is the presence of burnt out elements, the absence of damage to the cable, as well as the strength of the contacts. All these manipulations are carried out only after disconnecting the device from the electrical network.
If a breakdown has not been detected and the equipment does not want to start, then you should proceed to checking the start relay.
In this case, the refrigerator will have to be moved away. In addition, some models are equipped with a partition that completely covers the engine compartment - this must be removed. In most models, the relay is located on the left. After opening the lid you can get to the inside. If no external damage is observed, the connections are removed from the contacts and checked using a multimeter. The problem may lie in the compressor winding.
Video of replacing a relay in a refrigerator
In case of malfunction and suspected malfunction of the start-up relay, immediate replacement of the start-up relay of the refrigerator
, otherwise the consequences may be irreversible, and the compressor will have to be completely replaced.
However, some sources claim that the start-up relay can be repaired. This is absolutely not true. To restore the refrigerator to normal operation, only replacing the start-up relay
.
The main signs of a problem with the start relay
Uncharacteristic sounds occur when the compressor is turned on: rattling, clicking, creaking, strong hum.
The motor-compressor suddenly turns off immediately after starting or does not turn on at all.
The start relay switches on very frequently, either starting or stopping the compressor at varying intervals.
If you begin to notice that such signs are occurring, you need to call a technician to your home as soon as possible and carry out diagnostics to determine the exact cause, and then repair the refrigerator inexpensively.
Cost of replacing the start protection relay
Replacing the start-protection relay
- the work is not particularly expensive. Other repairs associated with eliminating malfunctions caused by the breakdown of this component are much more expensive. A faulty relay can cause a more serious malfunction, in particular, damage the compressor. Replacing a compressor will cost several times more, so at the first sign of a relay failure, you must contact service for help. Thus, you can save a lot and protect your equipment from irreversible consequences.
Speaking about the cost of the master’s services, everything is individual and it depends on several points:
Makes and models of your faulty refrigerator.
New component prices.
Difficulty in handling, because some models require disassembling the refrigeration unit housing.
The year of manufacture of the household appliance and the period of its use (for models older than 5 years, it is difficult to find a suitable part).
The final price of the work will be known only after the diagnosis has been carried out. Our specialist will definitely tell you the cost of the upcoming repair and begin replacing the start relay, if you agree. Upon completion of all procedures, the technician will start the refrigerator in test mode and issue a warranty card.
How to replace a refrigerator relay
To visualize and detect the relay, you need to turn the refrigerator around the back wall. The relay is located on the compressor and has a protective plastic box. To replace it, you need to remove it, first disconnecting the wires and terminals. Check contact groups for charring. If necessary, clean them with a sharp knife and remove excess. After this, replace the start relay, put the protective cover in place and connect all the wires in their places. Replace the refrigerator relay yourself
It’s not at all difficult, however, you need to know the basics of using the tool, and most importantly, correctly and accurately diagnose that this particular component is faulty. Watch the video for details.
Solution
To protect the refrigerator from power surges, certain rules must be followed:
- use of special units;
- compliance with the basic rules for operating electrical appliances;
- repair of all sockets, plugs and other electrical components;
- To turn on the refrigerator, you should use an individual outlet, which cannot be connected to other electrical appliances.
The optimal solution to the problem would be to install special units that will protect equipment from power surges. These include:
- Voltage control relay. One device is used to protect all equipment in the house. It independently turns off the power when the reading changes below or above the normal limit. The relay turns on the electricity after the voltage normalizes. Additionally, there is a pause. Its duration can be set independently or set automatically.
Voltage control relay
- Group voltage control relays. Consists of several voltage control relays. A separate relay is used for the refrigerator. One turns on with a certain delay, while the rest of the equipment in the house can turn on faster. The advantage of this method is its high reliability. The disadvantage is the high price and the need for space in the electrical panel.
- Surge Protectors. It is a fairly expensive piece of equipment, so it is recommended to choose it if power surges frequently occur or if expensive equipment is installed in the house.
Voltage regulator
- Network filters. Protects against minor voltage surges. Can only be used for one device. The use of such a filter requires high-quality grounding. If you do not connect it correctly, the surge protector will only act as an extension cord.
Network filters
These are the main methods of protecting your refrigerator from power surges. Simple ones can be implemented independently. Installing complex devices may require the assistance of a professional.
Triggering of the protective relay
Often, a protective relay is triggered when the current in the motor winding circuit increases. This is necessary to protect the motor winding from combustion. Such single relay operations do not affect the operation of the refrigerator or the cooling of food.
In the event of a malfunction, the protective relay starts to operate too often. This can be signaled by characteristic clicks that are heard when the contacts open.
Depending on how often and for what reason the relays are triggered, the motor may either turn on periodically and cool the chamber, or not work at all. You can verify the frequent operation of the protective relay using a test light. The ends of the light bulb wire should be connected to the protective relay and fixed in the operating position. If the motor-compressor switches off due to the relay being activated, the indicator light will light up. If the motor-compressor turns off due to a faulty thermostat, the light will not light up.
The reason for the frequent activation of the start-up relay may be insufficient voltage in the network, weak fastening of the part itself, or its malfunction. If the part is in working order, the protective relay can very often be triggered due to jamming in the compressor or breakage of the starting winding. In this case, the engine does not turn on at all and the refrigeration unit does not function.
It is not recommended to connect the motor-compressor directly to the network during testing.
Causes of failure
Often the cause of failure is due to natural wear and tear of certain elements of this part or generally incorrect operation of the equipment.
There are 2 main signs of malfunction of this particular refrigerator element:
- The motor of the device turns on, but after a short time it turns off, or does not start at all. It is likely that the contacts in the winding have shorted out.
- The engine does not start, but current flows to it. A possible reason is a weakened spring, which requires prompt replacement of the starting relay.
Read more: Septic tank for high groundwater, the best models, methods for determining groundwater level
Compressor malfunction: symptoms
Quite often, refrigeration equipment breakdowns occur due to a compressor malfunction. Most often, this problem can be recognized by the following signs:
- noticeable blocks of ice freeze on the walls of the refrigerator (this often happens in the absence of a No Frost system);
- When the compressor is running, a loud sound is heard, but the refrigerator does not freeze;
- When the refrigerator is turned on, there is strong vibration;
- the compressor does not turn off;
- The refrigerator freezes food.
No Frost System
In order to deal with the problem, it is necessary to consider the signs of failure in more detail.
Table 2. Signs of compressor failure
| Breaking | Causes |
| The compressor works, but does not freeze | The cause of the problem is often a refrigerant leak due to improper transportation of the unit. In addition, this occurs in the event of a malfunction of the heating element. |
If the refrigerator has an inverter-type compressor, then after reaching the desired temperature, it still functions, but only at minimum speed.
There are other reasons for the malfunction:
| The compressor does not stop working | This problem occurs for the following reasons:
|
| The compressor hums but does not function | Extraneous noise during compressor operation often occurs when there are bolts that must be removed after transportation. However, this only applies to new devices. |
- pipe deformation;
- thermostat failure.
Refrigerator compressor turns on and then immediately stops The following causes of malfunctions are identified: - breakdown of the starting relay, which is responsible for starting the engine;
- break of internal winding;
- The start relay winding is broken and the compressor overheats.
Troubleshooting
Taking into account the fact that the number of elements in the relay is insignificant, their serviceability can be checked using the method of sequential elimination. To do this, just stock up on a flat-head screwdriver and a multimeter. During repairs, it is important to pay attention to the following points.
Purely structurally, e/m relays are devices with contacts that are open in the normal state. The posistor version of the switching device has contacts that are initially closed. In the first case, when the motor starts, no current flows through the starting circuit, but in the second case, vice versa.
If a compressor that is known to be working does not start, this means that voltage is not supplied to the starting coil. The reason in this case is as follows:
- Triggering of the current protection relay.
- A break in the circuit through which current should initially flow.
- PTC fault.
Let's look at each of these problems in more detail.
Malfunctions in the current protection relay (RZT)
In a situation where the refrigerator turns on for a while (5-20 seconds) and then turns off, this means that the relay switch has tripped.
The reasons for its disabling are listed below:
- operation is associated with damage to the working winding (the relay is triggered by overcurrent);
- the starting relay does not open the contacts in the starting circuit;
- The current relay is faulty and is triggered by minimal heating.
If, when testing with a multimeter, a break in the power supply circuit of the windings is detected, most likely the protection relay itself is faulty. This is usually caused by poor contact in the bimetallic strip. The easiest way out is to replace the damaged device with a new one.
Problems in the starting circuit
Faults of this type are detected using a conventional multimeter, with which you will need to test the following electrical circuits:
- If a break is detected in the area up to the working winding, it is necessary to check the serviceability of the PZR.
- In this case, special attention is paid to sticking or oxidation of its contacts.
- If there is no continuity in the area up to the start coil, in addition to an open circuit, malfunctions of the PZR or lack of contact in the connecting strips are possible.
In a device with an induction coil, to restore contact, you will have to manually lift the contact bar with the return spring.
PTC fault
To make sure the posistor is working, you will need to check its resistance in various states. To do this, wait until it has completely cooled down and test its circuit with a multimeter or similar device. If the tester shows a complete absence of current or a significant resistance value, the posistor should be replaced with a new sample.
To check the shutdown mode, you need to connect some load to the posistor (for example, a 100-watt incandescent lamp). To do this, you will need a plug with terminals connected to the input circuit of the device. The wires coming from the lamp are connected to a connector, the contacts of which are connected to the power supply zero and the phase end of the starting winding.
When turned on, current begins to flow throughout the protective circuit and through the lamp and it lights up. Since its value is significantly lower than when starting the engine, the protective element heats up for a very long time (for the selected lamp this period will be about 20-40 seconds).
If over time the incandescent light bulb goes out, then you can be sure that the element being tested is in good working order. If nothing happens and the circuit does not break over time, this means that the posistor is faulty. In this situation, the easiest way is to purchase a new device.
Problems with contacts
There are two known causes of the malfunction in question. This is the absence of current in the circuit with seemingly closed contacts and their sticking due to loss of elasticity of the plates. The first case is typical for a situation where the contact heels are heavily oxidized. The problem can be solved by cleaning them using sandpaper. Another reason is the deformation of the clamping bar itself. In this case, it will be necessary to restore its shape to ensure normal pressure and contact.
A more complex malfunction is the sticking of the bar with the pin, which is triggered when current flows through the solenoid and does not come off when it is turned off. To resolve this problem, you will need to clean the elements that control the switching unit.
Operating principle of the start relay
Despite the large number of patented products from various manufacturers, the operation schemes of refrigerators and the operating principles of starting relays are almost the same. Having understood the principle of their operation, you can independently find and fix the problem.
Device diagram and connection to the compressor
The relay circuitry has two inputs from the power supply and three outputs to the compressor. One input (conditionally zero) passes directly.
The other input (conditionally – phase) inside the device is split into two:
- the first passes directly to the working winding;
- the second passes through the disconnecting contacts to the starting winding.
If the relay does not have a seat, then when connecting to the compressor you must not make a mistake with the order of connecting the contacts. Methods common on the Internet for determining winding types by measuring resistance are not correct in general, since some motors have the same resistance of the starting and running windings.
The electrical circuit of the start-up relay may have minor modifications depending on the manufacturer. The figure shows a diagram of the connection of this device in the Orsk refrigerator
Therefore, it is necessary to find documentation or disassemble the refrigerator compressor to understand the location of the feed-through contacts.
This can also be done if there are symbolic identifiers near the outputs:
- “S” – starting winding;
- “R” – working winding;
- “C” – general output.
The relays differ in the way they are mounted on the frame of the refrigerator or on the compressor. They also have their own current characteristics, so when replacing it is necessary to select a completely identical device, or better yet, the same model.
Closing contacts using an induction coil
An electromagnetic starting relay works by closing a contact to pass current through the starting winding. The main operating element of the device is a solenoid coil connected in series with the main winding of the motor.
At the moment the compressor starts, with the rotor static, a large starting current passes through the solenoid. As a result, a magnetic field is created that moves the core (armature) with a conductive strip installed on it, which closes the contact of the starting winding. The rotor begins to accelerate.
As the rotor speed increases, the amount of current passing through the coil decreases, as a result of which the magnetic field voltage decreases. Under the action of a compensating spring or gravity, the core returns to its original position and the contact opens.
On the cover of the relay with the induction coil there is an “up” arrow, which indicates the correct position of the device in space. If it is placed differently, then the contacts will not open under the influence of gravity
The compressor motor continues to operate in the mode of maintaining rotor rotation, passing current through the working winding. The next time the relay will work only after the rotor stops.
Implementation of current type protection
An asynchronous motor is a complex electrical device that is prone to breakdowns. If a short circuit occurs, the circuit breaker installed in the distribution panel will trip.
If the fan, which cools the winding and mechanical moving elements, fails, the built-in thermal protection of the compressor will react.
The internal thermal protection of the electric motor is based on posistors. It responds to a general change in temperature inside the device, which can have both internal and external causes.
However, a situation may arise when the motor begins to consume 2-5 times more rated current for a long time (more than 1 second). Most often this occurs when there is an unplanned load on the shaft resulting from a jammed motor.
The current increases, but does not reach the short circuit values, so the machine selected for the load will not work. There is also no reason for the thermal protection to turn off, since the temperature will not change in such a short period of time.
The only way to quickly respond to the situation and avoid melting of the working winding is to trigger the current protection, which can be installed in different places:
- inside the compressor;
- in a separate current protection relay;
- inside the start relay.
A device that combines the functions of turning on the starting winding and current protection of the motor is called a starting protection relay. Most refrigerator compressors are equipped with just such a mechanism.
The action of current protection is based on three principles:
- as the current increases, the resistance decreases and the heating of the conductive material increases;
- under the influence of temperature, the metal expands;
- The thermal coefficient of expansion differs for different metals.
Therefore, a bimetallic plate is used, which is welded from metal sheets with different expansion coefficients. Such a plate bends when heated. One end of it is fixed, and the other, deviating, opens the contact.
To heat a bimetallic circuit breaker, a coil is usually placed nearby through which electricity passes. Although sometimes they implement a “direct” version in the form of a conductive plate
The plate is designed for a temperature response when a current of a certain strength passes. Therefore, when replacing the start-up relay, it is necessary to check its compatibility with the installed compressor model.
What to do if the compressor overheats
The first thing that needs to be done is to provide the compressor with proper operating conditions. That is, follow all the recommendations of the refrigerator manufacturer.
- The correct installation is done. The refrigerator is leveled using adjustable feet.
- The correct ventilation distances are set. There should be at least 15-20 cm between the wall and the heat exchanger (grid at the back).
- The rubber bands are being serviced. They are washed thoroughly. After which, if the rubber is dry, they can be removed and soaked in hot water to restore flexibility.
- The chambers are defrosted and washed.
It would be a good idea to check the temperature sensor if you have the skill to use a multimeter. After all the work, the refrigerator is loaded with an average amount of food. If the manufacturer offers a layout for them, it is reasonable to follow it.
The answer to the question of what to do if, even after servicing the refrigerator, its compressor overheats, is obvious: the blower needs to be changed. To do this, it is recommended to contact a qualified service, since the necessary work involves handling substances that are potentially hazardous to health.
To check the refrigerator, it is better to contact the service
The compressor replacement procedure includes the following steps.
- Removing the working fluid, freon, from the circulation system. To do this, the route of its passage is interrupted, forcing the liquid agent to accumulate in the condenser, from where it is pumped out with a special apparatus.
- Replacing the filling tube by soldering with a gas torch.
- Removing the compressor and dismantling old fasteners.
- Installation of a new unit.
- Connecting the compressor to the circulation system.
- Freon injection.
After this set of operations, the refrigerator is started and its operation is checked. It is wise to contact a service to replace the compressor for another reason. Specialists will also check all related systems: test temperature sensors, examine the condition of the heat exchanger and ensure that the refrigerator returns to optimal performance.
Source
Compressor overheating protection when using regenerative heat exchangers
In order to avoid freezing of the pipeline, regenerative heat exchangers are used to raise the temperature of the refrigerant on the suction line side, the use of which does not allow the liquid refrigerant to overcool, protecting the liquid line from the formation of throttle vapor. In cases where the compressor is installed in the same room with a regenerative heat exchanger, a critical increase in the temperature of the steam in the suction line is observed. In turn, this leads to heating of the lubricant and overheating of the compressor parts, significantly reducing the service life of the unit as a whole and its rubbing parts individually.
How hot can a compressor get?
The refrigerator compressor is an electrical appliance. It, like other devices of the same class, has a parameter for permissible operating temperatures. It depends on the type of compressor, its design and usually ranges from 60 to 90 degrees Celsius.
It is normal for the compressor to heat up during operation. The specific temperature also depends on many factors. For example, ventilation characteristics, ambient air parameters, distance to neighboring objects.
If the compressor is clearly overheating, that is, its temperature rises above 90 degrees, this indicates either specific problems with the device or a violation of its operating conditions. If we consider the first factor, physical malfunctions, they can also be diagnosed by, so to speak, related phenomena.
Symptoms of compressor problems include current leaks. That is, when you touch the body, your hand stings a little. Also, malfunctions in the operation of the supercharger are indicated by the inability to provide the set temperature in the chambers or, conversely, the formation of ice on their walls.
If, when monitoring the operation of the refrigerator, the indicated variants of abnormal behavior are detected, you should contact the service. Especially if the warranty on the purchased device has not yet expired. It is worth remembering that a device with signs of physical damage may not be accepted for warranty service. Therefore, from the moment of purchase, including bringing the refrigerator home, you need to be as careful as possible.
Dismantling and replacing the compressor
If a problem is detected, the part should be replaced. To do this, you can use the services of a specialist or arrange all the repair work yourself. This is done when the winding becomes unusable or any other component breaks down.
We hope that there are no dark spots or uncertainties left for you in the question of how to check the refrigerator compressor.
It is also necessary to fill the compressor with oil after repair work. This is a necessary condition for the normal operation of bearings and to prevent rapid wear of parts as a result of friction.
Even if you are not able to completely eliminate all the breakdowns yourself, you will receive accurate information about the faulty parts.
All the steps described above will help you replace the compressor in the refrigerator yourself. But if for some reason some points remain unclear, then you can use the video presented, where all the manipulations are discussed in detail.
Mains voltage
To find out the voltage in your home electrical system, the easiest way is to use a multimeter, measuring and recording the results obtained over different periods of time. The more accurately you find out what the minimum and maximum voltage is in your apartment or house, in addition, measure how intensively it changes, whether there are sudden jumps or whether the changes are quite smooth, the more suitable a stabilizer model you can choose.
CONCLUSIONS
To summarize: if you have problems with voltage in your apartment, house or country house, you notice changes - surges or drops, problems in the operation of electrical equipment or lamps - installing a voltage stabilizer for the refrigerator is simply necessary.
In this case, it is best to choose inexpensive single-phase relay stabilizers with a power of 1500-2000 VA, or calculate separately for a specific refrigerator model. In addition to what is indicated in the Resanta article, I also advise you to take a closer look at the ELITECH ASN 2000 or QUATTRO ELEMENTI Stabilia 2000 , which have good reviews and are deservedly chosen by consumers.
I also ask that if you have experience in selecting, purchasing and using stabilizers for refrigerators, be sure to write about it in the comments to the article, even if it is not very successful. In addition, as usual, any opinions, criticism, questions are welcome - I will try to answer everyone promptly!
Source
resistance of the ATLANT refrigerator motor windings
| compressor marking | Working winding resistance in Ohms | Starting winding resistance in Ohms |
| S-K 100N5 | 18,94 | 27,88 |
| S-K 100N5-02 | 18,94 | 27,88 |
| S-K 100N5-10 | 17,61 | 27,88 |
| S-K 120N5 | 18,29 | 21,08 |
| S-K 120N5-02 | 18,29 | 21,08 |
| S-K 140N5 | 15,1 | 20,1 |
| S-K 140N5-02 | 15,1 | 20,1 |
| S-K 160N5-02 | 14,74 | 19,6 |
| S-K 160N5-1 | 14,74 | 19,6 |
| S-K 160N5-1-02 | 14,74 | 19,6 |
| S-K 175N5-02 | 14,29 | 19,08 |
| S-K 175N5-1 | 14,29 | 19,08 |
| S-K 175N5-1-02 | 14,29 | 19,08 |
| S-K 200N5-02 | 11,87 | 17,61 |
| S-K 200N5-1 | 11,87 | 17,61 |
| S-K 200N5-1-02 | 11,87 | 17,61 |
| S-KO 60N5-02 | 40,4 | 63,47 |
| S-KO 75N5-02 | 26,4 | 43,41 |
| S-KO 100N5-02 | 27,88 | 48,94 |
| S-KO 120N5-02 | 18,29 | 21,08 |
| S-KO 140N5-02 | 15,1 | 20,1 |
| S-KO 140N5-1-02 | 15,1 | 20,1 |
| S-KO 160N5-02 | 14,74 | 19,6 |
| S-KO 160N5-1-02 | 14,74 | 19,6 |
| S-KO 175N5-02 | 14,29 | 19,08 |
| S-KO 175N5-1-02 | 14,29 | 19,08 |
| S-KO 200N5-02 | 11,87 | 17,61 |
| S-KO 200N5-1-02 | 11,87 | 17,61 |
| S-KO 200N5-03 | 11,87 | 17,61 |
| S-KN 60N5-02 | 23 | 35 |
| S-KN 80N5-02 | 23 | 35 |
| S-KN 90N5-02 | 18,94 | 27,88 |
| S-KN 110N5-02 | 18,29 | 21,08 |
| S-KN 130N5-02 | 18,29 | 21,08 |
| S-KN 150N5-02 | 15,1 | 20,1 |
| CKHA61H50 | 43.35 | 43,25 |
| CKHA68H50 | 33,41 | 37,58 |
| CKHA72H50 | 28,35 | 34,98 |
| CKHA81H50 | 28,65 | 34,47 |
| CKHA96H50 | 26,33 | 35,72 |
| CKHA101H50 | 19 | 21,2 |
| TLX4 KK.3 | 61 | 19 |
| TLX4.8 KK.3 | 46 | 22 |
| TLX5.7 KK.3 | 37 | 21 |
| TLX6.5 KK.3 | 30.00 | 15 |
| TLX7.5 KK.3 | 29 | 30 |
| TLX8.7 KK.3 | 19 | 13 |
| TLY4 KK.3 | 48,06 | 15,69 |
| TLY4.8 KK.3 | 38,25 | 17,65 |
| TLY5.7 KK.3 | 34,33 | 20,6 |
| TLY6.5 KK.3 | 2775,00% | 24,62 |
| TLY7.5 KK.3 | 23,24 | 20,69 |
| TLY8.7 KK.3 | 17,06 | 14,42 |
Diagnostic methods
To conduct a detailed investigation, you will need to inspect the compressor from the inside. Here the meaning of the numbers displayed on the multimeter display may have a different meaning. To carry out diagnostics, you will need to remove the protective casing and get to the compressor filling. To do this you will need to do the following:
- Disconnect the wires from the motor contacts
- Snip the connecting tubes
Compressor disassembly process
- Unscrew the bolts securing the casing
- Remove the screws holding the relay
Dismantling the relay