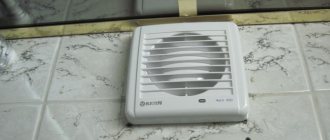
The small dimensions of the kitchen force us to select compact options for its arrangement, which can be placed in one of the furnishings. Such options, which allow you to significantly save useful meters and centimeters, include a built-in hood. It takes up minimal space and does not affect the interior.
You can handle the installation of built-in exhaust hoods with your own hands if you know all the rules and subtleties of the work. We will tell you how to choose a unit for extracting exhaust air in the kitchen, and we will tell you how to install your purchase correctly.
Step-by-step instructions for installing a hood
Step 1. Calculate the height
To understand at what height the device should be, you need to take into account the user’s height, the location of the kitchen furniture and the manufacturer’s recommendations.
For an electric stove, the height will be 45-75 cm. And if you are installing a gas hood, it will be 55-85 cm. Also note that devices with a direct orientation are higher than models with an angle.
The height rule is due to the fact that during the operation of the hood, fatty deposits accumulate on its filter. And if the fat gets too hot, it can ignite and cause a fire.
Step 2. Apply markings
Marking should not be neglected. For a wall hood, just mark the locations for the fasteners. But to install a built-in hood, you need to make nests for the air duct in the kitchen cabinet.
Apply the markings according to the template supplied with the hood. Plus, the instructions tell you how to do the markings.
General rules for wall models:
- Determine the middle of the slab and draw a vertical line along the axis from it. To make it more convenient, you can stick the tape on the wall and draw on it with a pencil. Then draw a line at the already calculated height - this will be the bottom of the hood.
- Secure the template with tape and use a pencil to mark the drilling locations. If you don’t have a stencil, you can take the mounting bracket and determine the location for the drill using it.
General rules for embedded models:
- Remove the cabinet in which the hood will be installed above the stove.
- Remove the bottom and secure the stencil to it with tape. Mark the fastening points with a pencil, as well as the middle of the hole for the corrugation or pipe.
- Take a compass and calculate the radius of the pipe using the template. Draw such a circle - this is the future hole in the cabinet wall.
- If you don’t have a template, place the hood in the closet so that it aligns with the facade, including the doors.
- Place a socket at the end of the duct and fill it with sealant.
- Attach the bottom and outline it with a pencil.
- If the duct is located above the cabinet, do the same, but in the top cover.
Step 3. Preparing the cabinet
Important! If you are installing a wall-mounted hood at home, then skip this step!
How to install a cabinet under a hood:
- Use a drill to make a hole through which the jigsaw will fit.
- Use a jigsaw to make a circle for the corrugation or pipe according to the markings.
- To protect the edges, apply a plastic edge or profile. You can also treat the cut areas with sealant.
- Make holes for the cord in the back wall.
- Install the kitchen hood into the cabinet, securing the shelf with screws.
Step 4. Install the hood
General installation rules for wall-mounted hoods:
- At the marked points, make holes with a hammer drill and place dowels.
- Place the fastening plate on the screws. Or screw the fastener into the wall, leaving 1-2 mm on the surface.
- Hang the device on a bracket or screws.
- Thread the cable so that you do not change its location later.
- Align the hood and check the secure fit again.
General installation rules for built-in hoods:
- If the cabinet is heavy, hang it on the wall first.
- Press the device to the shelf by threading the cable through the hole.
- Secure the hood with screws.
If the cabinet is light, you can install a hood on the floor and then hang it on the wall.
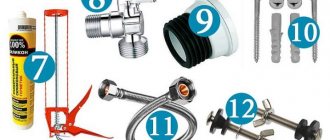
Step 5. Understanding the duct design
When installing a hood on a gas or electric stove, an aluminum corrugated pipe or a plastic pipe with a round or rectangular cross-section is needed to connect to the ventilation.
Corrugation is cheaper and easier to handle, because... The angle of the air duct can be made at any angle and no additional connecting part is needed for this. But the corrugation does not look beautiful, creates unnecessary noise during operation of the device and becomes covered with grease.
The pipes are distinguished by their aesthetics, low noise level, and if the profile is rectangular, they can be hidden under the ceiling. But they cost more, plus the expense of fittings.
When installing the hood with your own hands, take into account the cross-sectional diameter of the air duct; it should coincide with the socket or differ only slightly. Usually 120-150 mm. If you artificially reduce the diameter, you will reduce the power of the device and increase the noise.
Step 6. Laying the air duct
The first rule is that the air duct must be of minimal length and have fewer creases. The connection is tight and the joints are precisely secured.
If you are worried about excess noise, cover the air duct with soundproofing material when installing the hood above the gas stove.
General rules for installing corrugations:
- To begin with, straighten the corrugation to the maximum, this will remove unnecessary creases and reduce air resistance.
- Attach one end of the corrugation to the pipe and secure with a clamp. If the diameter of the corrugation is different, take an adapter.
- With a minimum number of creases, stretch the corrugation along the wall or cabinet until ventilation. To make air flow better, raise the horizontal part of the corrugation towards the channel by 10 degrees.
General rules for pipe installation:
- Attach a bell or outlet to the end of the hood to collect air before venting.
- Connect elbows and other fittings with pipes. At the same time, maintain a slight angle towards the ventilation.
- After assembling the dry structure, go over the joints with silicone to seal it. Do not take glue, etc., otherwise you will no longer be able to disassemble the air duct.
Step 7. Connect to ventilation
This is the most difficult step in installing a DIY kitchen hood. Errors lead to disruption of ventilation, while the device operates very noisily and does not cope with its tasks.
General rules for connecting with two channels:
- Remove the grille from one of the channels.
- Connect the duct using a flange.
General rules for connecting with one channel:
- Connect the air duct using a flange and grille or install a tee with a valve.
The disadvantages of the first option are weak draft, steam goes back into the room.
If you select a tee when the device is not turned on, the valve is open, and natural ventilation follows all the rules. If you turn on the hood, the valve will be closed and the fan will exhaust the fumes.
Disadvantages - the design is large and there is no aesthetics if the air duct is visible.
Step 8. Connect to the power supply
When installing a hood over a gas or electric stove, there is no need to lay a separate network line. As a rule, all that remains is to insert the plug into the socket.
If your model does not have a plug:
- Install the plug.
- Select a circuit breaker.
- Use the terminal block.
Step 9. Checking the work
After all work, you need to check the hood. But before that, make sure that there are no foreign objects in it (instructions, fasteners, etc.). Reinstall filters, light bulbs, etc. according to the instructions. And turn on the hood to make sure it is working properly.
To understand the installation process even better, watch our video.
Features of installing a kitchen hood
How the hood will be installed largely depends on its design:
- If your model operates in two modes - circulation and exhaust, you need to route the air duct into ventilation. Carefully calculate the diameter of the air duct (standard – 120-150 mm). In this case, the air duct is not reduced in diameter, is not twisted or stretched. Otherwise, the hood will work at less power. The air duct is mounted in the shape of a square or circle; the main thing is to choose a smooth material so as not to increase the noise of the operating hood.
- When a device with a carbon filter operates only in circulation mode, there is no need to exit into the ventilation duct. The model works as follows: the air goes into the hood, is filtered and returned to the kitchen. Installing such a hood correctly is not difficult, you need to be careful and follow the instructions. But do not forget that such devices have less power.
The installation process also depends on whether you have a built-in or wall-mounted hood. When installed, a built-in hood is not hung on the wall, but is mounted inside the furniture frame.
Reviews
These and many other hoods require self-assembly, so they will cost much less than similar hoods from other manufacturers. Read reviews of Ikea hoods - and find out about other models with equally effective performance.
Maria, Ryazan: I ordered a kitchen set from Ikea, and in the same catalog I also chose built-in exhaust hood appliances. I settled on the Lagan model with a capacity of up to 400 cubic meters, since there is not always a need for regular ventilation.
The hood is built-in, i.e. it is completely built into the surface of the furniture, it is controlled manually, all control keys are located at a convenient distance from the edge of the cabinet, so they can be switched with a light touch of the hand. On the same side of the keys there are also two small lamps: lighting along the back wall would also be nice, but such lighting is enough to see the hob area normally.
Among other advantages of the model, I can highlight the ease of dismantling the built-in filter: the grease removal panel can be easily removed from the body, so special efforts are not required to clean the hood in a timely manner.
Design - black durable glass: it will be an excellent choice for both modern and traditional kitchens, but it will look more successful in combination with a dark glass-ceramic stove.
Oleg, St. Petersburg: I was looking for a simple hood without bells and whistles, so that it would work properly and not make noise. We took a closer look at some options from IKEA, but they all differed in power.
Experts advised choosing a model with a “reserve” of performance, so I purchased a hanging dome hood for 10 thousand rubles. The selected model can work both using an internal filter system and in a standard way, through an air vent: then the power will be higher, although it is possible for unpleasant odors to get back into the kitchen.
I assembled the hood myself, and called specialists for installation, who also installed a valve that blocks the return flow of exhaust air. The hood is made of metal and painted white, matching the rest of the appliances in my kitchen. I was afraid that over time the light-colored body would no longer look like new, but so far everything is in order, so I can only say positive reviews about the operation of the hood.
If earlier I did not consider IKEA a worthy substitute for leading technology brands, today I will confidently give preference to the equipment of this particular manufacturer.
Sources
- https://ru-remont.com/kvartira/kuhnya/tehnika/krupnaya/vytyazhka/brend/ikea.html
- https://otzyvy.pro/reviews/otzyvy-vytyazhki-dlya-kuhni-ikea-339399.html
- https://ikeazakaz.ru/index.php?route=product/product&product_id=23724
- https://ikea-kitchen.ru/items/item-2144/
- https://irecommend.ru/content/kolpak-vytyazhnogo-shkafa-ikea-lagan-70304588-0
Popular mistakes when installing a hood
We told you how to properly install a hood in the kitchen.
Now let's look at the mistakes that users often make when deciding to act on their own:
- Blind connection of an air duct with natural ventilation. Some owners, although they install a grill, still completely cover it with an air duct.
- For a powerful hood, use a small-diameter corrugation or pipe that does not coincide with the socket.
- Installing a hood in the kitchen above the stove without taking into account the height. Which can lead to a fire.
- Exiting the air duct to the street through a hole in the wall of the house. What is prohibited in apartments.
- Long duct with many turns. This affects both the operation of the device and the noise level.
- Installation of a powerful hood (800 m3/h and above) with a connection to conventional ventilation, which is capable of 300 m3/h.
- Connecting the channel parts with glue. After that, such a channel can no longer be disassembled.
- No outlet near the hood. And then you have to resort to tees and other methods of connecting the device to the network, which looks ugly and is inconvenient to use.
- Errors in installing the check valve. Angles and inclinations must be taken into account to ensure that the valve operates smoothly.
- Incorrect placement of slots in the grille. Sometimes you need them to be at the bottom, not at the top.
Summary
Having chosen a hood by carefully selecting it to match the color and design of the kitchen unit, you are faced with a choice: turn to professionals for help in installation, paying a substantial fee for installing a kitchen hood; or hang it yourself, after reading our article.
The most important thing when installing a kitchen hood is: objectively assess your strengths and the possibility of receiving help from household members; evaluate the instrumentation before starting work; understand the instructions included with the hood and believe in yourself.
Source