Stretch ceilings are very popular today. And this is not at all surprising, because they can radically transform any room and have many advantages. But after installing the base covering, there is often an unsightly gap left between the new ceiling and the adjacent walls. To disguise it, a special tape for stretch ceiling is used. In addition to the fact that the plug will close the gap, it will also perform a decorative function, giving the room a finished and harmonious look.
Reasons for the formation of a gap near the wall
Upon completion of the installation work, the question immediately arises about the correctness of the measurements taken and the installation technology, if as a result of the work a gap has formed between the ceiling and the walls. In fact, the reason for its appearance is that the canvas is not attached directly to the walls, but on a special connecting profile that has certain parameters of thickness and width. Therefore, it will not be possible to install it close to the wall. In addition, the profile strips have a cavity into which the tension covering edging is inserted during installation.
This is why a gap forms at the wall. However, it can be hidden using a special masking tape for stretch ceilings. The need to use such an element is also due to the aesthetic side. After all, with a decorative plug the room becomes much more attractive.
To install the ceilings yourself or entrust it to professionals is, of course, your business. Only specialists have much more knowledge and experience in this field. You will also be able to demand a refund for the work or redo it if an error occurred and you were unhappy with the result.
First of all, first of all... the partitions, and then the ceiling!
For the first time, the builder is faced with the issue of interfacing the ceiling at the stage of erecting partitions. The top joint causes stress for many. In the case of a block wall, it is common to first coat the top edge of the block or brick with glue, and then “press” it between the wall and the ceiling. As a result, the glue or solution partially remains on the block and is partially squeezed out. A gap will form that needs to be filled with putty. And even if the putty was successful, a gap may still appear. The best, in my opinion, is to use polyurethane foam. You can use it when the partition has gained the necessary strength.
Using polyurethane foam to seal cracks
Purpose and advantages of decorative plugs
Masking tape for suspended ceilings used as a finishing element in appearance resembles a thin profile that bends easily, is soft to the touch, but does not break. It is made from PVC, like film sheets. With the help of such a universal accessory, you can bypass even the most complex curved structures.
The tape has the following advantages:
- reliably masks the gaps left after installing a suspended ceiling;
- used when two canvases are spliced together if the room is large in area;
- serves as a decorative element for finishing and decorating multi-tiered ceiling systems;
- the variety of colors makes it possible to choose the best option for any texture and tone of the coating;
- the tape can be dismantled and reused after this;
- the material used in the manufacture of camouflage plugs is resistant to chemical compounds;
- products have a long service life without losing their original appearance;
- ease of fastening does not require specific knowledge and skills. The tape is simply inserted into a special profile;
- Available in different lengths, which allows minimizing joints between individual elements;
- does not take up additional space from the premises compared to ceiling plinths. This is true for compact rooms;
- It's inexpensive.
As for the minuses, there are only two of them. And both of them relate to interior design:
- using tape will not hide too obvious defects in the walls;
- The plug does not allow the installation of hidden lighting. If you are faced with such a task, you will have to use baseboards or curtain rods designed for this purpose.
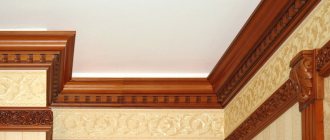
Ceiling plinth
This is also a fairly common method for closing the gap between a suspended ceiling and a wall. Ceiling plinth also has several names: fillet, border, decorative baguette, molding, frieze, interior cornice, etc. Compared to the previous version, it is characterized by a longer, although not very complicated installation, as well as the use of glue and tools for installation .
Most often, fillets are made of polystyrene foam and polyurethane; you can also find models made of plaster, wood and plastic, but they are rarely used with stretch ceilings. The design is quite varied, decorative borders are available in different sizes with all kinds of designs and patterns that imitate stucco. There are not many color options; mostly white skirting boards are sold, but you can paint them yourself in any color.
There are special models of curtain rods on the market, equipped with a recess for the LED strip and a reflective layer that creates beautiful diffused light. The eaves lighting can be of any color, thanks to which it is possible to obtain an original effect and achieve good compatibility with the shade of the ceiling.
Advantages of ceiling skirting boards:
The disadvantages include:
The most inconvenient thing about using ceiling fillets is that they cannot be easily removed and installed several times. If it is necessary to temporarily remove the suspended ceiling, for example, to access communications behind the canvas, then you will also have to dismantle the baseboard.
On average, the price for one strip of a product (usually 2 m) is 50-60 rubles. When purchasing, you need to consider the height of the room. If the ceiling is higher than 3 m, then it is advisable to purchase a border with a width of 10 cm; for a room less than 2.5 m, the baseboard should be about 3-5 cm. For a ceiling height of 2.5 to 3 m, fillets from 5 to 10 cm are chosen.
Installation of the plinth is carried out using glue or putty. The main difference with a suspended ceiling is that the border is attached only to the wall. You must first prime the surface and make markings. In the corners, the plinths are joined at 45 degrees, but here a more precise fit of the parts is required using a miter box. After installation, it is necessary to putty the joints and paint the fillets.
Important! Heavy interior curtain rods made of polyurethane require special glue and a well-prepared surface, otherwise the product will break. Additionally, such skirting boards are secured with screws.
Types of plugs
In addition to the plugs under consideration, two more elements are used for finishing tension coverings: decorative cord and ceiling plinth. They are also available in a variety of colors and textures and act as decorative elements.
Read about suspended ceilings with texture.
Masking tape
Masking tapes for suspended ceilings are divided into three main types according to their shape:
- T-plug. The main material used in its manufacture is rigid PVC. This texture makes it possible to decorate only smooth wall surfaces with it, for example, tiles, porcelain stoneware;
- L-shaped or L-shaped. For its production, PVC of a softer and more elastic texture is used, so with the help of such a decorative element, cracks in wall surfaces with significant unevenness can be masked. Very often, this type of tape is used to design transitions from one tier to another in curved plasterboard structures.
The versatility of the element allows it to be installed very quickly. However, there is a small feature that experienced specialists warn about. The special geometric shape prevents reliable fixation of the tape to the wall if a plastic baguette is used under a suspended ceiling. Therefore, over time, the product begins to sag, and the walls look uneven. Another thing is an aluminum profile that does not bend. When used as the basis of a suspended structure, the tape will not lose its original shape;
- F-shaped. It serves as a kind of connector between several canvases when the installation of a stretch ceiling is carried out in large areas. Moreover, it can be safely used for both aluminum and plastic baguettes.
On a note! When purchasing masking tape, consider the information provided by the manufacturer. High-quality products do not have a strong rubber smell, and perform the tasks assigned to them perfectly.
Decorative cord
One of the types of decorative tape for suspended ceilings is a special cord. It is also installed upon completion of installation work. The cord can be made in different weaves and from different materials. It can be a regular rope or with added metal threads. The thickness of the models varies and is 8, 10 or 12 mm. Today, this decor option is more widespread than classic ribbons.
The main advantage of a decorative cord is practicality. Any dirt can be removed from the product using regular washing. The cord is simply removed from the ceiling and just as easily installed back.
Ceiling plinth
Its fastening is carried out as close as possible to the suspended ceiling, so careless handling can damage the coating. Other disadvantages include:
- impossibility of reuse. For example, if it is necessary to dismantle the film covering during flooding, the film can be returned to its place, but the baseboard will have to be purchased new;
- Installing a plinth is more difficult than installing tape or cord. It makes it very difficult to get around corners in a room;
- high temperatures can cause cracking of the baseboard;
- lack of flexibility allows the products to be used only on flat surfaces;
- ceiling plinth costs more than masking tape.
But the plinth has one important advantage - you can install LED lighting under it. Using this technique, floating stretch ceilings are created.
How to seal a shallow interpanel seam
Not deep interpanel joints can be sealed with a simple cement-sand mortar. If it's just a matter of aesthetics and nothing is blown out of the seam, then that's enough. If the seam is blown out, then most likely you need to unstitch it and before that contact the management company so that they can look from the outside to see what’s wrong with it.
If nothing is blown out, you can pour polyurethane foam into the seam for reliability and plasticity of the structure if the tip of the gun (or tube) fits into the seam. The main thing is to leave room for plaster.
Masking tape installation technology
If we talk about installing a plug, then there is no specific technique in this case. With each type of tape used, it is carefully pressed into a special groove. Such places for fixing decorative elements are called slot connectors. Installing the tape will save you not only from the technical gap, but also from the accumulation of dirt and dust between the wall and the tension covering.
The plug for suspended ceilings is mounted around the perimeter of the room. However, experts do not recommend using glue. For an even seam, craftsmen advise maintaining an angle of 90°.
The plug is installed using a conventional spatula. Before you begin attaching masking tape, check the evenness of the walls and structure. If possible, correct all defects.
Installation is carried out as follows:
- determine and cut the required length of the element by measuring the length of the wall surface;
- apply it to the gap formed;
- Using a spatula, carefully tuck the plug between the wall and the profile;
- Gently press the product and trim off any excess parts.
On a note! If you are installing an F-shaped tape, secure it using special wall corners or a PVC fastening profile.
When installing the tape, make sure that it does not stretch. When installing, it is better to compress the product lightly, since it will be exposed to different temperatures during operation. If the tape stretches, then over time the joints may separate (if two pieces of fabric are connected with it), and the plug will simply fall out in some areas.
Professionals advise fastening the product in small sections (3-5 m), joining individual parts at these intervals.
After the tape is installed, the ceiling will acquire a finished and harmonious appearance. An important advantage of a decorative plug is that it can be used repeatedly. To dismantle, just carefully pry off the tape with a screwdriver. After which she will effortlessly exit the profile.
Installing tape in the corners of the room
It is also very easy to install stretch ceiling edging in the corners. In this case, a spatula is also used. An alternative can be a rubber hammer.
The technology will be as follows:
- cut the product to the required length;
- connect two elements to each other. It is important that they form a strictly right angle of 90° between themselves. An exception is curved structures, when finishing which the angle formed with masking tape can be large;
- secure the tape with a spatula;
- Use a utility knife to cut off any excess parts.
Attaching corner masking tape
Installation of corner masking tape for suspended ceilings is carried out without the use of sharp objects to prevent damage to the canvas. For work you will need: a tape measure, a stepladder and a stationery knife.
On a note! All plugs are attached almost identically - at an angle of 90° into special grooves.
After purchasing the tape, without cutting off its individual pieces from the roll, insert one end into the opening resulting from the installation work. Carefully tuck it along the entire wall.
When you approach the first corner, use a utility knife to carefully cut the product so that its edge fits into the corner. Continue inserting the plug around the perimeter until the technical gaps are completely closed.
Such inserts are used not only for single-level ceilings, but also for multi-level structures when it is necessary to close the joints between adjacent panels. Stretch ceilings of all levels will undoubtedly transform any room.
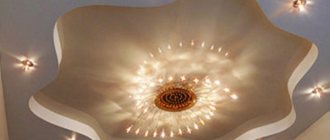
Lighting
The level of lighting in the room is of particular importance. It is necessary to create the most correct additional lighting system. Spotlights are ideal for this; they can be distributed not only around the perimeter of the tension structure, but also in a zigzag pattern. A suspended ceiling, supplemented with these elements, looks attractive and laconic. An interesting design approach to interior design allows you to adjust the level of lighting based on the time of day, as well as individual needs.
If you decorate the ceiling with built-in lighting, you can get the illusion of realism and volume. For a special effect, you can create a pattern on the canvas using the built-in LED strip. You can decorate the tension structure in different ways. Moreover, if you take diode light sources as a basis, you can combine them with wall decoration. For example, a good solution would be to illuminate a tension structure with a transition to the wall. In this case, the lamps can be placed around the perimeter of the structure.
Selecting the color of the decorative plug
When decorating the interior, important attention must be paid to the colors that are planned to be included in the decoration. This applies not only to the shades of walls, floors and ceilings, but also to decorative elements. As for the decorative tape, designers advise choosing colors that will organically complement the basic tones used in the interior.
If you choose the color wisely, you can not only solve the design problem, but also eliminate a number of defects. In general, the shade of the decorative tape is selected according to three parameters:
- in the color of the ceiling. This technique is used in small rooms. By focusing on a decorative element, you will be able to visually expand the boundaries of space;
- in the color of the walls. This method, on the contrary, raises the ceilings and narrows the room;
- in the color of the ceiling and walls. The color of the tape should contrast with the main shades of the ceiling and wall surfaces.
An interesting solution can be achieved if you paint the tape the same shade as the furniture or large accessories.
On a note! Masking tapes for suspended ceilings can be painted in any tone with acrylic compounds. Only painting work is carried out before installing it to the ceiling.
A wide selection of colors allows you to choose the appropriate plug option for any type of decorative fabric.
The edging border for a stretch ceiling has differences not only in colors, but also in textures:
- glossy has good reflective ability, so designers often combine it with decorative lighting. Mainly used under glossy fabrics;
- matte tapes organically complement matte stretch ceilings;
- Patterned and embossed ribbons play a decorative role in the room.
Perfect angle or a bummer?
Don't be alarmed, everything is fine! In architecture, a bummer is a decorative element that varies in cross-section.
Many people have heard these terms:
However, professional builders usually call this element a fillet (aka a plank covering the joint between the wall and the ceiling). There are many materials from which this decorative element is made. This can be classic plaster stucco (there are workshops that still make it by hand), wood, modern plastic fillets, and even luxurious marble.
When choosing, it is important to remember that the width of the cornice affects people’s perception of the room. A wide element will visually reduce the height of the ceiling and the volume of the room. While narrow, on the contrary, increases the height of the ceiling and the volume of the room. And the choice of color should be done carefully - a color that is too contrasting will “rip” the cornice out of the interior.
Depending on the material, installation methods also differ. If plastic parts are glued, then wood, plaster stucco and other heavier materials are attached with nails or screws.
Ceiling fillet
Current methods
Today, there are many ways to eliminate unwanted gaps in the space between the wall and the ceiling. Here are several popular options that are distinguished by their availability, cost-effectiveness, durability and ease of execution.
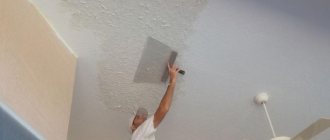
The simplest and most common way is to fill the cracks with mineral wool or polyurethane foam. As the experience of specialists shows, polyurethane foam in this case is more practical and convenient to use. It is best to use high-quality non-flammable material for these purposes, because electrical wiring may be located in the cracks being processed. You need to carefully fill all cracks and joints with foam. When dry, this material expands and tightly closes all the cracks between the wall and the ceiling. An important advantage of polyurethane foam is its elasticity. Over time, the building will shrink, and the foam will move along with the structure of the house, taking the desired shape. To make such a coating more reliable and durable, it is recommended to protect the outside with a thick layer of high-quality plaster. You can see in the photo how this popular method is carried out.
You can also get rid of unwanted voids between the surfaces of the wall and ceiling using a solution of ordinary gypsum or synthetic putty created specifically for these purposes. These practical materials provide excellent protection against moisture and other influences. In addition, they are absolutely safe and environmentally friendly. In order for the composition to better bond with the surface being treated, the crack is first moistened with water, then filled with paste or gypsum, after which it is dried and treated.
Instead of plaster, you can also use moisture-resistant putty. Today, construction stores sell such ready-made putty, specially created for sealing cracks. The material is applied to the surface to be treated with a spatula in a fairly thin layer. You can see how this process occurs in the photo.
Sufficiently large and noticeable cracks between the wall and the ceiling can, in addition, be repaired using reinforcing mesh (see photo). It must be placed in the existing voids, and securely laid on top with plaster and wait for it to dry completely. After the plaster has dried, it is necessary to apply a layer of putty to level the ceiling. At the final stage, the surface is ground to perfect smoothness.
Another simple and very popular method involves using linen or cotton fabric. Like the previous method, it is more suitable for eliminating fairly large cracks. Prepare special textile bandages. To prevent the fabric from shrinking during work, it must first be washed and ironed. After this, each piece of fabric is dipped in an adhesive (you can use ordinary paste, wood glue, cellulose or any other glue), carefully squeezed out and placed on the crack. Then the fabric is straightened with a spatula, and after drying it is treated with putty.
All of the methods listed above are easy to implement, accessible and effective. By choosing one of these methods, you can easily repair cracks and make your home more cozy and comfortable.
Source
Preparing the surface for painting
First you need to clean the damaged area from peeling elements. If this is not corrected, the crack will not be hidden for long.
There is no need to be afraid to expose the entire problem area, even if a lot of plaster falls out. It is better to effectively hide a defect once than to carry out unplanned repairs several times. The work of sealing a crack that has appeared is very dusty, so it is better to cover furniture, equipment and other valuable items with film in advance.
How to get rid of cracks on the ceiling or walls if they appeared after finishing
The task is difficult. You may have to redo the entire wall or ceiling, but that's your choice. In its simplest form, the crack is first opened along the edges; if wallpaper is glued, then the wallpaper is first removed. The crack is filled with silicone sealant and plastered or puttied over a serpyanka mesh or fiberglass. You can also glue paper tape for the gypsum board joints after the serpyanka, but it’s not a fact that a crack won’t tear it. Ideally, this is the best method of sealing, a “triple strike”, so to speak.
How and with what to seal the joint between the panels so as not to crack
And now let's look at how to make sure that our sealed interpanel seams no longer crack and spoil the finish. Such cracks are especially offensive on painted ceilings; they are not visible under the wallpaper, although with strong cracks they can tear the wallpaper.
Interpanel crack in the ceiling
The first is to seal the interpanel seams with silicone or polyurethane sealant (which is specially designed for sealing seams) instead of insulation.
We apply plaster on top and reinforce it with sickle mesh. We take the most durable plaster, for example Fugen or Perlfix glue (Knauf). You can use cement-sand mixture M300 or tile adhesive.
Firstly, it is necessary to reinforce all interpanel seams with sickle mesh and seal it with plaster - this will partially protect the seam from cracks.
Everything about installing and repairing ceilings with your own hands
Regardless of what type of ceiling is installed in the apartment - suspended, plasterboard, covered with tiles or wallpaper, or simply painted, to make it look complete, it is necessary to complete the final touch - to decorate the joint.
The gap where the ceiling meets the wall looks untidy, and the structure itself looks unfinished. Therefore, it is necessary to choose a way to decorate this area so that it does not stand out from the overall composition.