Why prepare a wall for decorative plaster?
Wall preparation is an integral stage of finishing work. Decorative finishes often imitate stone, concrete, etc. Professionals do not advise laying the solution on an unprepared base, because this will significantly reduce the service life of the decorative coating.
Preparing walls for decorative plaster is an important stage of finishing work.
Walls made of aerated concrete, foam concrete, wood absorb moisture well, as they have a porous structure. Because of this, they will draw moisture from the applied solution. Therefore, before applying plaster, the surface must be cleaned and primed.
Smooth walls, due to low adhesion, adhere less well to the plaster, so it will peel off over time. The solution will not stick at all to old wallpaper or whitewash.
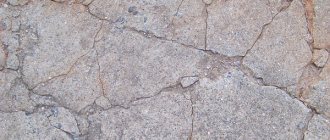
When applying the mixture to an unprepared base, cracks or chips may appear on the coating. This will entail a deterioration in aesthetic appearance and a reduction in service life.
Cracks and chips - consequences of applying a plaster mixture without preparing the base
Ensuring maximum adhesion
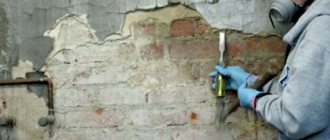
The master needs to resolve all issues about creating optimal conditions for excellent adhesion of the plaster solution to a certain surface. Each wall has its own adhesive properties, which is why certain technological standards must be observed. A metal mesh is attached to concrete structures, which provides optimal adhesion. To do this, using a hammer and chisel, you should make small notches 6 mm deep and 8 cm long. After this, apply a primer with a small brush or textured roller. Due to this, several important issues can be resolved at once:
- After hardening, a film is formed, which is a specific adhesive element between the plaster and concrete.
- The wall is saturated with moisture as much as possible and does not draw it out of the finishing coating.
Important! If the structure is built from different materials, then it is imperative to fix the plaster mesh. Fastening to wood is carried out with nails; for concrete, stone and brick, dowels with self-tapping screws are chosen.
Primer coating
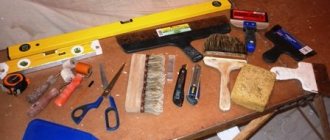
Tools and materials for preparatory work
To complete the preparatory work you will need:
- Scraper and trowel. Required for cleaning the base from wallpaper and paint.
- A brush with metal bristles for removing whitewash.
- Several spatulas for applying and leveling putty.
- Hammer, chisel, trowel, chisel or hammer drill with an attachment for dismantling old plaster and ceramic tiles.
- Needle roller. Needed for removing vinyl wallpaper.
- Sandpaper or sander to remove paint and smooth the surface.
- Electric drill with a set of attachments (abrasive, brush and mixer).
- Containers for primer and putty.
- Brushes and roller.
- Graters and graters.
- Sponges.
- Plumb and long level.
- Special products for softening wallpaper and dissolving paint.
- Steam stripper.
- Rule for leveling plaster.
Tools for preparatory work
In addition, for work you need to prepare a protective mask or goggles, a respirator, gloves, plastic bags for garbage and polyethylene to protect the floor.
The procedure for preparing walls
To properly prepare the surface for decorative finishing, the following must be done:
| 1.Remove old finishing material (paint, whitewash, plaster, wallpaper, tiles) from the base. | |
| 2. Eliminate defects on the walls (cracks, differences). | |
| 3. If necessary, level the base using drywall, putty or plaster. | |
| 4. Coat the surface with a deep penetration primer. |
Only after completing these works can the base be covered with decorative plaster.
Cleaning walls from layers of old coatings
At the first stage of preparatory work, you need to protect the floor from dirt. To do this, it must be covered with polyethylene, on which heavy objects must be placed to secure it.
Then you need to turn off the power to all switches and sockets in the room, because a short circuit may occur as a result of exposure to moisture or working tools. If you are going to work with a power tool, then it must be connected to the power supply using an extension cord, which must be removed from the room while working with water and liquid solutions.
All wiring is de-energized before plastering.
After completing these procedures, you can begin the main preparatory work.
Removing old plaster and ceramic tiles
Often you have to remove old plaster and ceramic tiles from the walls.
These finishing materials can be removed as follows:
| Thick plaster that has begun to peel off the walls is easy to remove. It needs to be pryed off with a spatula, chisel or chisel, which needs to be knocked down with a hammer. | |
| If the plaster is thin, then it needs to be wetted with water. After this, you need to wait until the layer to be removed is completely saturated with water, then you can use a spatula to separate it from the wall. You can also use an electric drill and a brush attachment for this. True, in this case there will be a lot of dust in the room, which will need to be removed with a vacuum cleaner. Thin plaster can be easily removed with a sander. | |
| You need to remove ceramic tiles with a chisel and hammer or a hammer drill with a special blade. As a result of dismantling this finishing material, a lot of garbage is generated, so you need to prepare bags or plastic bags for it in advance. |
The easiest way to remove tiles is with a hammer drill with a special attachment.
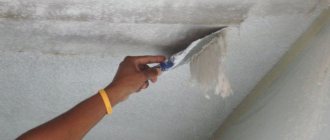
Cleaning a wall from a layer of whitewash
Lime impairs adhesion and absorbs moisture, so it must be removed from the walls.
They are cleaned of whitewash in the following ways:
| 1.Wet. The surface of the walls is moistened with a damp sponge or sprayed with a spray bottle, then the wet whitewash is cleaned off with a spatula. This method is suitable for small spaces. | |
| 2. Dry. Used to clean a thin layer of whitewash. Lime is removed with a metal brush, grinder or electric drill with an abrasive attachment. |
To protect your respiratory system and eyes, you should wear a respirator and goggles before work.
Removing old paint from walls
Sometimes it is not necessary to remove the old paint (for more information about such situations, see the link), in this case the plaster is applied to the paint. If you still need to get rid of old paint, we recommend using the following coating removal technology:
| If the paint layer is not thick, then it can be scraped off the wall with a spatula or chisel. | |
| Burning paint is more effective. This method is suitable for walls made of non-combustible materials. Using a gas torch, simply heat the paint until it burns and darkens, then remove it with a scraper or wire brush. A hair dryer is also used for this, but due to the low heating temperature, this procedure will take more time. | |
| Special chemical solutions (removers) are also provided for removing paint. They are applied to the painted surface, then after a certain time (indicated on the packaging) the paint softens and is removed with a spatula. When working with these products, you need to wear a respirator, goggles and gloves, since the solvent used in them is toxic. In addition, after cleaning the surface, the room must be well ventilated. | |
| You can also remove paint from the base using an electric drill with an abrasive attachment or a sander. |
After removing the paint, it is necessary to prime the base to improve adhesion and putty to eliminate any defects on it.
Removing old wallpaper
Old wallpaper that has begun to peel off is simply removed from the walls, while stubborn areas are moistened with water and cleaned with a spatula or knife. To make the wallpaper stick better from the base, you need to add soap or dishwashing detergent to the water. If you need to remove vinyl wallpaper from the wall, you need to make holes for water on it with a needle roller so that it gets wet.
There is another quite effective way - a special steamer. It allows you to heat up the glue under the wallpaper, causing it to come off the walls on its own.
You can remove old wallpaper using a special steamer.
You can also purchase a special chemical solvent that is used by specialists.
Wall surface repair
After removing the old finish, many defects (chips, pits, bulges, cracks, etc.) that were made during the construction stage or appeared during the operation of the building will be visible on the base. They must be eliminated, otherwise the decorative plaster will peel off or crack. Only after this is it possible to prime and level the base.
To seal thin cracks, they need to be widened and deepened by 15-20 mm. This is done with a chisel and hammer. You can also use a grinder with a diamond blade or a hammer drill with a spatula. This will allow the putty to penetrate deeper into the crack. Then remove dust and small crumbs from the crack with a brush or vacuum cleaner. After all defects have been treated, the wall is primed to seal all pores and improve adhesion.
In order for the putty to penetrate deeper into the cracks, they are deepened with a chisel and hammer.
To seal cracks, it is better to use putties made from the same materials as the base. For example, cement, gypsum, polymer putties, as well as special polyurethane and silicone sealants.
Large cracks are strengthened with iron ties, which are installed perpendicular to the defect. It is allowed to use pieces of reinforcement, staples and metal strips as such.
Roughness is removed from the surface with a grinder, and large irregularities are chipped off with a chisel.
After all defects have been eliminated, the surface must be treated with a primer to improve adhesive properties.
After sealing the cracks, the surface is sanded and treated with a primer.
Primer solution (selection and application)
To treat walls with a primer, it is necessary to select the optimal composition and study the technology of its application.
The most popular types of primers are:
- Perchlorovinyl mixtures. Ideal for treating brick and concrete walls. They penetrate deeply into the material, improve adhesion and dry quickly. The only negative is that they smell unpleasant. Therefore, they are most often used for exterior decoration; when used indoors, they must be well ventilated.
- Alkyd compositions. Suitable for processing concrete, brick and wooden walls. They penetrate deep into the material and allow you to create a leveling layer on it.
- Acrylic primers. Designed for processing any surfaces. Almost odorless. They are often used to strengthen old plaster and treat the surface before plastering on drywall. On average, a layer of this composition takes 5 hours to dry.
- To treat concrete walls, it is better to use the “Concrete-Contact” primer, which will create on them the roughness necessary for high-quality adhesion of the plaster.
- If the room is damp, then the walls need to be treated with a primer with antiseptic additives so that they are free of mold and mildew.
Popular types of primer mortar for wall treatment
The primer must be selected taking into account the type of room and the material to be treated.
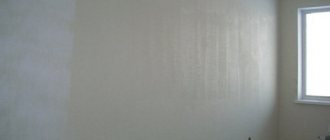
The primer will clog the pores on the walls and improve adhesion, so the plaster will adhere better to the surface and dry more evenly. In addition, the primer will protect the base from mold and mildew that will appear on it as a result of excessive exposure to moisture.
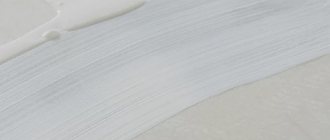
The walls are coated with 1-2 layers of primer using a brush, roller or spray gun. Each coat of primer needs to dry for approximately 12 hours.
The primer is applied with a brush or roller
Anti-pollution
All traces of greasy oil, soot and paint negatively affect the adhesion of the plaster. That is why you need to get rid of contaminants. Classic dust and dirt are removed with a wire brush. Oily clay removes traces of oil perfectly. It covers all dirt and allows it to dry. You can remove the resulting crust using a spatula. In wooden structures, oily stains must be cut out, since after some time they will inevitably protrude and destroy the plaster.
If you can’t get rid of stains with clay, then you can use a 3% hydrochloric acid solution. After such cleaning, the walls must be washed with clean water several times. Brickwork can also be cut out with a chisel and hammer. To fill cavities, craftsmen prefer to prepare a cement solution. Surfaces can be plastered only after all basic manipulations have been completed.
Controlling the evenness of walls and the main methods for leveling them
You can check the evenness of the base using a long rule, which is applied to the wall and the amount of difference is determined by the gap between them and the surface under study.
Permissible deviation is 1-1.5mm. In this way, the entire area of the wall is checked. When large differences are detected, they are leveled in different ways.
Leveling walls with plaster
For differences of more than 5 mm, the walls can be leveled with thin plaster. It is necessary to install beacons for even application of the solution to the surface. When eliminating differences of more than 20 mm in height, it is necessary to reinforce the plaster with a mesh so that it does not crumble. How to plaster on beacons: the solution is thrown onto the wall, and then leveled with a spatula or trowel. Then this layer must be coated with a primer. There are also ways to level walls without beacons.
To prevent the plaster composition from crumbling, it is reinforced with reinforcing mesh
Peculiarities
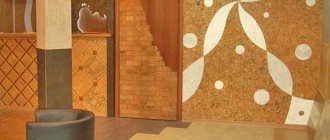
Construction market experts distinguish three types; their classification is based on the components included in the composition.
- The first type, this includes the simplest mixtures. The surface after their application does not require additional processing. They do not require any special equipment, just a simple spatula to apply evenly to the wall, or pneumatic equipment. The surface after them acquires a slight roughness.
- The second type includes materials that contain mineral granules. Due to them, abstractions are obtained.
- The third type, this group includes materials that require additional processing. After application, a relief roller, sponge or brush is passed over it, creating a pattern or the desired relief.
The texture is divided into 2 types: smooth or embossed. These two species are further divided into subspecies.
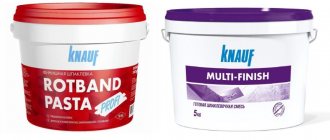
Important! When choosing the putty you need for decoration, carefully read the conditions of use and storage.
Decorative coating testing
After completing all stages of the preparatory work, a test layer of the decorative mixture is applied to the walls. This will allow you to check how ready the surface is for finishing.
They do it like this:
| 1. Select a small area on the wall located near the corner of the room. | |
| 2. Apply a layer of plaster on it. This will allow you to determine its structure and color. Particular attention should be paid to the transitions between smooth and textured plaster; they should be smooth. | |
| 3. If stamps are used during the work process, you need to check how high quality the embossing will be. |
These procedures must be completed, otherwise, as a result of mixing a large volume of solution and problems with the quality of the applied layer, the diluted mixture will have to be thrown away, which will lead to unnecessary costs.
Useful tips
Before carrying out preparatory work and in the process of preparing walls for decorative plaster with your own hands, you must take into account the following expert advice:
- Use masking tape or plastic film to protect the areas of the floor, walls and ceiling adjacent to the wall. Windows, doors and pipes also need to be covered with polyethylene so as not to get dirty during work.
- Each layer of primer and putty must be completely dried before further work can be carried out.
- To prevent the formation of cracks, you need to use a reinforcing mesh.
- When choosing a putty, you must take into account that it must absorb moisture. Oil and alabaster based mixtures should not be used.
- The primer layer on the walls should be approximately 2 mm thick, because otherwise it will not be possible to improve the adhesion of the treated surface.
The thickness of the primer layer should be 2 mm
Thanks to these tips, you can properly prepare the room for finishing with decorative plaster.
It is not difficult to prepare almost any walls for decorative finishing if you adhere to the rules for removing old facing materials from them, technologies for eliminating defects on the surface, priming and leveling the base. In addition, you need to prepare the required tools and materials, and also follow the recommendations of professionals. This will allow you to complete the work accurately and efficiently.
Have you ever had to prepare walls yourself for applying decorative plaster? What coating had to be removed? Share life hacks for different stages of work in the comments.
General rules
Before filling, the walls must be leveled very well so that they are smooth and free of flaws. It does not matter which base material is subjected to the processing process. In any case, it may be necessary to apply a preliminary layer of putty to get a good result.
Evenness is checked with a laser level and other measuring devices. Excess protruding layers are scraped off with sandpaper. Before puttying, you need to determine the quality and composition of the mixture itself. Usually the work is carried out in two stages:
- Working with starting materials. Putties with a layer thickness of 0.5 cm are suitable, or more is possible. These mixtures have a coarse fraction, so these are suitable materials when working with large areas. Coarse-grained mixtures harden quickly without spreading over the base.
- Working with finishing materials. In this case, it is better to use putties with a layer thickness of 0.5–4 mm. In this version of the work, soil may be required, which will serve as a polymer waterproofing agent that penetrates deep into the pores. The soil is also useful for impregnating the base, strengthening it, increasing adhesion and strength.
Important
The soil is applied with a brush. It is not recommended to use a roller.
After applying the primer, it must be given time to dry. You can check the coating for drying strength by hand. If there are no traces of dust on it, then the base is ready for further work.