A screen for a bathtub made of tiles allows you to close the niche under the tank, in which sewer drains and supports are located. The structure is attached to the floor covering and walls, and provides a folding or secret hatch for access to the highways. In addition to monolithic screens, you can use removable shields made of plastic, painted in the color of the decorative covering of the floor and walls.
Why make a screen under the bathroom?
The walls and floor in the bathroom are tiled, and the plumbing is installed in its place and connected to communications.
Everything looks great. The only problem that spoils the view is the space under the bathtub from its side down. In order for the interior of the room to look harmonious and complete, it is necessary to somehow close the bathhouse itself and the pipes connected to it.
If the bathing plumbing is made of acrylic or plastic, then in most cases it looks quite decent from the outside. On the contrary, cast iron or steel products do not please the eye. They must be decorated from the outside, otherwise the bathroom will not look too neat.
Housewives often store detergents and other household essentials under the bathroom. It is advisable to cover all this, as well as communications, with a decorative screen. A screen like this is a great way to hide what is unnecessary and not too beautiful to look at. All these jars, bottles, rags and pipelines will be securely hidden behind it from people’s view.
If the bathroom is tiled, then it is recommended to make the screen under the bathtub from it as well. This way the design of this room can be decorated in a single, complete style. The main thing when installing this decor is not to forget about the need to have access to communications. You will need to make a hatch in the screen, through which in case of leaks you can get to the pipes for repair.
Style decision
The most common style that is most often used when decorating modern bathrooms is classic. This style involves the use of the so-called “dark bottom - white top” technique, when darker shades are chosen for cladding the lower part and floor than for the upper part of the walls and ceiling. At the same time, the black and white solution looks more organic in bathrooms with a large square footage than in small bathrooms.
Classic combination of dark and light tiles
A design solution in a classic style also involves using tiles of other sizes and colors for decoration and combining them. In general, classic design always looks cozy, stylish and harmonious; there are no flashy elements or elements that fall out of the overall design solution - everything from the shade of the tiles to the light in the room is thought out to the smallest detail and is in harmony with each other, creating a complete picture.
Designing a bathroom in an antique style will cost a little more in terms of costs for purchasing materials. Typically, design in this direction is used when creating the interior of spacious rooms. The most commonly used technique is alternating wide format tiles in beige colors with light splashes.
Antique style bathroom
The bathroom can be decorated in Greek or ethnic style. In the first case, warm beige and sand tones are traditionally combined, and in the second, designers resort to decorating the cladding in the style of cultures of other nations.
Stages of making a tile bath screen
First, a frame is made. Special markings are made on the walls and floor. Using a plumb line, a line is drawn from the corner of the bathtub to the floor and point A is placed. Then 2 cm is retreated from this line towards the bathtub, point A1 is placed and another parallel line is made.
In the same way, from the corner of the bathroom that is not adjacent to the wall, use a plumb line to place point B on the floor and place a second point B1 2 cm deep into the bathtub. The points A are connected to B, as well as A1 to B1. This will be the line for installing the frame on the floor. Points C and C1 are placed in a similar way at another corner where the bathtub joins the wall. Points C and C1 are connected by lines to points B and B1.
In the upper profiles, which lie under the edges of the bathtub, 3 mm holes are first made and threads are cut. In a cast iron bath, holes are made with a metal drill no more than 5 mm deep. The upper profiles are attached to the bathtub with M3 bolts 3 mm long, coated with liquid nails, at a distance of 16-18 mm from the edge of the bathtub. Profiles are attached to acrylic bathtubs using liquid nails.
We cover the frame with moisture-resistant (green) plasterboard. We leave only the part where the inspection door will be located.
We make an inspection door. We attach 50/50 cm wooden blocks to the plasterboard sheet along the width of the door using a wood screw. Two furniture roller latches are first cut into the sides of each block, and clamps are installed on opposite sides. They are fastened with screws included in the latches. The removable compartment is inserted into place and held tightly by furniture latches. The inspection door can be opened and closed using a suction cup.
How to install on corner models?
For corner bathtubs, mounting is most often provided not with self-tapping screws, but with special magnets and metal plates. Such magnets are initially attached to the legs of the font.
STEP 1. Height adjustment. Just as in the case of the rectangular model, we adjust the height of the legs based on the screen parameters.
STEP 2. How to attach the plates? On the back side of the panel, in the places where the magnets will rest, we glue the metal plates from the kit with double-sided tape or silicone sealant. While drying, you can secure them with regular tape.
STEP 3. Installation. We apply the front panel and check that the magnets grab the metal plates.
This installation option is convenient because the question: how to remove the screen and then put it back on again does not arise. Everything is extremely simple, you need to apply a little force by pulling the panel towards you, and you can just as easily return it to its place. The previous method is no different from this simplicity; there you will first need to unscrew the screws.
Important nuances
During the installation of the bathtub, you should be extremely careful so that the product can fully perform its functions and last as long as possible
Pay attention to the following points:
- the legs are mounted in such a way that the outlet element of the siphon (piping) can be installed into the sewer pipe without any problems;
- the bathtub must be installed with a slope;
- It is imperative to take into account the parallelism of the sides relative to the floor.
The tightness of the junctions between the bathtub and the sewer must be monitored. When planning to start using a plumbing fixture, you should fill the bathtub with 10 liters of cold and hot water.
When installing a bathtub, you should also take into account the main problems associated with the material from which the product is made. Acrylic options have the following disadvantages
- When hot water is added, the walls of the sanitary ware begin to “play.” This is caused by the fact that heated acrylic walls lose their original rigidity.
- Legs are another weak point of acrylic plumbing fixtures. Standard legs don't offer impressive stability. Even if you set everything to the ideal level, you still won’t be able to save the situation.
- The bottom of such a bathtub feels great under light loads, but it can sag greatly due to its significant weight.
- When water is drawn in, a drumming effect occurs, caused by the thinness of the walls of the acrylic bathtub. This deficiency is noticeable in any bathtub, but in acrylic it is most pronounced.
Foaming is carried out as follows:
- the bathtub is turned upside down, and cardboard or other protective material is placed under it (this insert is needed to prevent the acrylic surface from being scratched);
- the surface is cleaned of dust and dirt;
- foam is applied and residues are removed from the surface.
It is much more economical and comfortable to use a foam gun, but if you don’t have one, you can limit yourself to a simple cylinder.
Most of the products on the market are made of polyvinyl chloride or propylene, which are reliable, attractive in appearance and durable. The latter material is much more expensive, but the walls are smoother, which greatly reduces the likelihood of blockages.
The idea of purchasing cheap models of drain fittings should be abandoned immediately. The fact is that budget models are non-separable, so they are not suitable for repair. After just a couple of months of use, the rust grabs the bolt so tightly that it is impossible to unscrew it.
Instructions for assembling a screen from panels
Panels for screens are made of hardboard, chipboard, MDF, metal, glass or mirrors, and the frame is made of steel, aluminum or plastic. Design solutions have no restrictions regarding color and print. For convenient movement, the doors are complemented with slots decorated with edging or miniature handles. If you choose a model with legs, it would be better if they are adjustable.
What you will need
To install a screen on legs with two sliding doors, you will need the following tools:
- roulette;
- level;
- wrenches and screwdriver.
If the finished profiles are longer than necessary, then a cutting or sawing tool will also come in handy - depending on the material.
To fasten the frame, self-tapping screws with dowels are used, so you will need a drill with a drill bit.
Step-by-step instruction
Installation of a panel screen begins with measurements and markings
It is important to accurately determine the locations for fasteners. If the partition is located at an angle, then it must be parallel to the sides of the bathtub
Next, in accordance with the calculations, the frame is mounted. First, a frame is attached under the bathtub, a profile that acts as runners. Then the legs are installed. At the same time, connections between structural elements must be reliable.
The top bar is not attached to the bathtub itself. To give rigidity to it and the screen as a whole, the gap under the side is filled with moisture-resistant foam. The sashes are inserted into the grooves of the horizontal frame elements. After this, if provided, the fittings are attached.
Preparing the floor
The quality of the final floor covering directly depends on the preparation of the subfloor. The optimal solution in terms of price and quality would be to level the floor with a cement mixture. It is strictly not recommended to leave a wooden base, as in some old houses. Wood is a material subject to a high degree of deformation when exposed to moisture. On such a surface, the ceramic coating will adhere very poorly. In addition, this will significantly reduce the service life of the tiles.
Experts do not recommend laying tiles on boards or plywood
Making a screen frame
The size of the profile is determined by the width of the material used and the thickness of the decorative finishing - for drywall and OSB it is mandatory, and MDF panels or plastic do not require additional decoration. If you plan to install a sliding system, you should also purchase guide rails similar to those used in sliding wardrobes. To create a convenient approach to the bathtub, you should either provide a special indentation of 5-10 cm from the edge of the bathtub inwards or install an inclined version of the frame.
Access to communications can be provided in two ways: immediately behind open doors or behind an additional internal panel, for example, made of MDF - in this case, the external space has a more presentable appearance. But access to communications can also be arranged in an original way, for example, by installing a drawer in the technological window, which, if necessary, can be easily pulled out completely.
The photo shows a sliding screen for bathtubs
Decorative finishing methods
Many people want to implement non-standard solutions in arranging the bathroom interior. Therefore, they choose materials and technologies that are unusual for us. The positive effect of such actions can be seen in the photo of the bathroom decoration, and the decoration options themselves are as follows:
Linoleum for walls. Initially, such material was produced for medical institutions. And therefore it is moisture resistant, it can be washed even with aggressive compounds. For installation, a special soldering iron with a glue-type cord is used. There is no color variety yet, but you can choose calm shades or make the surface matte.
PVC panels without joints in the form of 2-3 mm plastic sheets with printed patterns. Pre-cut canvases are attached with glue.
Use of natural and artificial stone. For example, you can fix tiles of non-hygroscopic granite flagstone on the walls and then coat them with a protective varnish.
Wood is an expensive and not the best option, although it creates a unique and original look. Wood reacts poorly to moisture and quickly deteriorates. Therefore, careful impregnation with special compounds is required.
Tempered glass tiles are a durable and hygienic material that can visually expand the area. It has different textures and colors. Can be used in combination with other materials. But at the same time it is characterized by high cost.
There are many ways to decorate a bathroom. They can be traditional and unusual, strict and extravagant, expensive and budget. Each customer must independently choose the most suitable option for themselves. And then the interior will delight you for many years.
We build the screen ourselves
To build a tiled screen, you first need to build a base. This can be done using various materials, but it is most convenient to use moisture-resistant plasterboard or tongue-and-groove boards.
We build a screen from plasterboard
First you need to assemble a frame on which the sheets will be attached. To do this, use wooden beams or a metal profile.
The frame is built like this:
- Marking in progress. To do this, use a plumb line and a level to mark points, which are then connected in lines leading from the corner of the bathtub, located near the wall, to the floor.
- Then, parallel to the first two lines, one more is drawn, departing 2.5 cm from the first ones towards the bathtub. Using a plumb line, mark similar points on the floor.
- Next, a plumb line is applied to the corner of the bathtub, which is not adjacent to the wall, and a point is also marked; it will be the outer vertex of a square with a side of 2.5 cm, which will need to be built on the floor.
- From the corners of the square, lines are drawn connecting the vertices of the square with the previously constructed lines.
- A frame of timber or profile is assembled along the marked lines; metal corners are used to connect the horizontal and vertical posts.
- Sheets of drywall are hemmed onto the finished frame, not forgetting to leave an inspection hole. The door can be hung on the inspection hole using hinges.
Tiling the screen
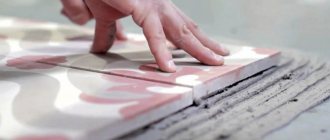
After the plasterboard screen is ready, the bathtub is tiled. It is more convenient to glue tiles using “liquid nails”; you can also use regular tile adhesive:
- The first tile is installed in the upper left corner, leveling it.
- The distance between the tiles is adjusted using mounting crosses.
- After gluing the slabs, the joints are grouted.
- If the screen has a door, then the tiles must be glued to it as well.
If the bathtub has a complex shape
By installing an acrylic bathtub of complex shape, you can make the interior more interesting. But a standard screen will not fit such a bathhouse. If you plan to close the space under the bathroom, then it is best to make it out of plasterboard. At this stage there should not be any particular difficulties. Almost any plasterboard structure can be made from plasterboard.
But it will be difficult to lay out the finished screen with large-sized ceramic tiles. After all, ceramics are rigid and cannot be bent at a given angle. What can be done in this case? One of the most visually attractive options is to cover the finished screen with small-sized tiles - mosaics.
To cover a curved plasterboard structure, you can use a mosaic of individual pieces. However, this option is more complex. If you need to do the finishing as quickly and simply as possible, you should use ready-made mosaic modules.
They consist of small tiles attached to a flexible mesh. Such modules easily follow any contours, so even an inexperienced craftsman can do this type of finishing.
If the space under the bathroom is not pleasing to the eye, then it can be successfully hidden by installing a screen. You can buy it ready-made, but in order for this part to fit perfectly into the interior, it is better to make and finish the screen yourself.
If the floor and walls in the room are finished using ceramic tiles, then it is advisable to use the same material for covering the screen. For cladding, you can use standard size tiles or mosaics. The second option will be appropriate if the mosaic is also used to decorate other interior elements.
Types of installation
The calculation of the required amount of tiles depends on the layout of the bathtub tiling. The classic method of laying, “seam to seam”, forms even horizontal or vertical rows. In this case, vertical seams are plumb, and horizontal seams are level.
The “bonded” cladding method is a laying in which each ceramic tile is located in the middle of the seam separating the two tiles of the bottom row. Finishing with tiles diagonally, the seams between the tiles are perpendicular to each other, and the tiles are laid at an angle of 45 degrees. This is a more complex way of tiling surfaces because many well-calibrated tiles are required.
The combined technology of wall cladding with ceramic tiles combines several types of cladding. This method is suitable for spacious bathrooms, and you can combine mosaic tiles with regular ones, smooth ones with embossed ones in various color combinations, it is important to maintain the harmony of the ornament and thoughtfulness of the combination.
Tile laying options
Materials and requirements for them
The screen for the bathtub is made with your own hands from:
- galvanized profile covered with sheet material: moisture-resistant plasterboard;
- moisture-resistant or laminated plywood with a thickness of at least 10 mm;
- GVL (a good choice, as it is absolutely not afraid of moisture and does not deform);
All of these structures, except the last one, require finishing. Most often this is porcelain stoneware or ceramic tiles, the same as those laid on the walls of the bathroom.
The most common version of a homemade bath screen is made from profiles and drywall. In order for the structure to be reliable and not sag under loads, the profiles must be taken with a thick wall, or reinforced ones can be used. Also a prerequisite is good quality galvanization. If possible, you should take branded profiles so that there are no problems later - after all, high humidity in the bathroom is the norm.
Frame made of galvanized profile for sheathing with sheet material
Sheet material for the frame must be moisture resistant. This is a must. And even in this case, before installation, it won’t hurt to prime it with a compound that increases water-repellent properties. It’s not bad if this composition is also antibacterial - protection against mold and fungi will not hurt.
Brick screens are made mainly for acrylic bathtubs - so that part of the load can be transferred to the brick wall. Although, if desired, the profile frame can be made with sufficient load-bearing capacity - double reinforced racks can be made.
If you decide to make a screen for a bathtub from brick, you should use a red ceramic one. It is better not to take silicate because of its hygroscopicity. Ceramic brick is also hygroscopic, but its absorbency is less. To minimize possible problems (painting due to high humidity), it is advisable to cover the inside of the masonry with a layer of plaster. This is not easy, but if desired, it is possible to apply the solution as the screen is being erected. No special care is required, the main thing is to protect the brick from moisture.
Brick bath screen ready for tiling
Another option for a bathtub screen that you can make yourself is from aerated concrete. This material is easy to process. The required relief is formed easily, even with a sharp piece of iron, and the block is cut with a regular saw. With all this, the blocks have good load-bearing capacity. So this material can also be used for a homemade screen for an acrylic bathtub. In addition, the blocks are large, so this small wall folds up very quickly.
Laying a screen under a foam concrete bath
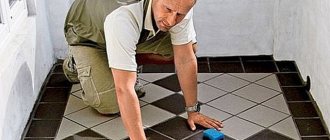
Note! In the photo above you see a block worked on one side. This is done so that after laying the tiles, they will be flush with the sides of the bathroom and not protrude outward.
For the same purpose, when installing, the blocks are recessed a little, leaving a gap equal to the thickness of the tile and tile adhesive.
In the photo, the master is holding the underworked part pointing down, but when laying the block, the block is turned over. In this position, glue is applied to its lower part, which fixes the block to the floor. Glue is applied to one more side face and to the top. This ensures fixation with the side of the bathtub and the previous block. The technology for making a screen for a bathtub from aerated concrete is not difficult; if you have at least some experience in masonry, you can do it.
Possible design options
Bathtubs vary in shape, material and functionality. But the methods of decorating the space underneath them using tiles are the same in all cases. It is necessary to make a reliable base for the tile, and then glue it according to all the rules and rub the seams.
When installing a decorative partition, you must remember the need for a niche for the feet, and also do not forget about the hatch, which facilitates access to sewer pipes
Structurally, screens under the bathroom can be:
- with hinged or sliding doors;
- removable or permanent;
- with retractable drawers, designs with or without shelves;
- deaf and with a niche at the bottom for feet.
The easiest way to lay tiles is under the side of the bathtub. When using it, you do not have to waste effort on carefully aligning the new edge.
It is enough to lay the top row of tiles under the side of the bathhouse or vertically flush with it. An additional plus is that the frame and rough surface for gluing ceramics in this case will also be easier to make.
If you decide to use ceramic tiles to line a niche under the bathroom, then the easiest way is to make a blank solid screen out of it without any frills. However, in case of blockages and leaks, it will not allow access to communications. It will need to be torn down and then re-decorated. It’s difficult to call such a decision thoughtful.
A blank tiled screen is easy to install and looks elegant, but if the bathtub siphon gets clogged or the pipes under it burst, then this decor will have to be destroyed without the possibility of restoration
A more practical option is with an inspection door or window. When installing such a screen, a technological hole is provided, closed with a plastic hatch or a removable panel the size of one tile. It turns out both presentable and practical.
Screens with sliding or swinging doors made of tiles are extremely difficult to make. The tile must be glued to a strong and undistorted base. But in the case of openable and closed door leaves, this is impossible to achieve. The tile will inevitably fall off from such a surface.
The bathtub is often used for bathing babies and washing clothes. At the same time, you have to stand close to her. If there is no niche made near the floor or the screen does not have a downward slope downwards from the edge of the bowl, then there will be nowhere to put your feet in this situation.
Standing nearby, you will have to bend deeper, unnecessarily straining your back. When decorating a bathtub, be sure to provide a recess for the feet.
Criteria for choosing the type of screen for the bathroom
A screen in the bathroom is needed not only for decorative purposes, but also to protect the space under the bathtub from water leakage. Its presence causes the appearance of unpleasant odors and fungi. This means that when choosing a specific screen, choose the option that completely prevents water from getting under the bathtub. Water can enter not only during water procedures, but also as a result of pipeline breaks.
The screen must hermetically seal the space under the bathtub
Do not forget to always provide access to the siphon, shut-off valves and other utilities. Today's plumbing products and equipment guarantee many years of use when installed correctly. Periodic cleaning of siphons is done with very effective means; there is no need to disassemble them, this relaxes the plumbers a little. But some cleaning products, if not used correctly, can increase the temperature to such values at which plastic pipes become soft, deform at the joints and, as a result, leaks appear. In addition, small valuable jewelry can get into the bathtub siphon; they can only be removed from there after disassembling it. Conclusion - when choosing a screen, always ensure that you have access to the bottom of the bath. If having a space under the bathroom for storing detergents is voluntary, then emergency access is a prerequisite for all options for bath screens.
It is important to provide an inspection hatch
Screen with inspection hatch
The screen should be as strong, durable, beautiful and easy to clean as possible. Ceramic tiles best meet these conditions; all other materials, including plastic, are significantly inferior to them. But ceramic tiles can be laid both on durable brick surfaces and on plasterboard slabs. We strongly advise you not to use drywall to make screens; according to professionals, this is the worst option of all possible.
Screen covered with ceramic tiles
Mosaic bathtub
Conclusion - a screen made of bricks or foam blocks, trimmed with ceramic tiles, is considered optimal. Access for inspection and storage space for bathroom accessories is provided in this option.
Screen made of foam blocks with cladding
And one last thing. Only this option can be used for acrylic bathtubs; they are so fragile that even with a slight load they change their shape. All screens, except stationary brick or block ones, have an extremely negative attitude towards any fluctuations in linear dimensions. As an example, we will take the most successful version of a bathroom screen - made of foam blocks lined with ceramic tiles.
Painting
Painting is a traditional way of decorating walls in wet rooms, almost forgotten for some time due to the impracticality and unattractiveness of the resulting coating. The paint was only oil, the walls were not very smooth (to put it mildly), and in general the appearance was poor. New technologies and materials make it possible to achieve a perfectly smooth surface, a variety of colors - different effects. All this at low cost. This is gradually reviving a forgotten option for finishing a bathroom - painting the walls.
Preparing the walls
A perfectly flat surface is required for painting and it can be made this way using moisture-resistant putty. It can be applied to plaster or drywall. Regardless of the base, with sufficient skill, the surface becomes truly ideal. Not a single flaw - it's possible.
The surface to be painted must be perfect
The prepared walls or ceiling are primed with a composition with an antibacterial and water-repellent component; after drying, you can begin to apply paint.
Types of Bathroom Paints
But not all paints can be used in the bathroom, since not all of them are moisture resistant. The following paints and varnishes are suitable:
- Water-based paints based on latex and acrylates. Acrylic water emulsion is an inexpensive option that can withstand high humidity, but it should not be used in close proximity to a bathtub, shower or washbasin. Latex emulsion forms a dense waterproof film on the surface and even slightly “tightens” unevenness, if any. See how to paint walls with water-based paint here.
- Alkyd paints. In appearance they are very similar to oil ones, but have better characteristics, they can be glossy, semi-glossy, matte. Among the advantages - it has average vapor permeability and low price. Disadvantages - emphasizes all the irregularities, changes color over time - acquires a yellowish tint. Another drawback is that they are made on the basis of organic solvents (white spirit, gasoline, turpentine), so the smell is strong before drying.
- Silicate paints. The main advantage is that fungus or mold will not appear on walls and ceilings painted with this paint. There are also advantages: very high vapor permeability, strong and durable coating. Disadvantage: until the composition has dried, it is very harmful to humans. As soon as crystallization has occurred, the coating becomes absolutely harmless, but you must work in protective clothing and a respirator and leave the house before it dries. Another unpleasant point: no other paints “stick” to silicate paints. If you want to change the type of paint, you will have to clean everything off.
- Based on silicones. This compound is 100% waterproof. It does not conduct water in any form - in the form of steam either. Therefore, when finishing with this type, you will have to do very powerful ventilation.
- Chlorinated rubber. Paints of this type are used in swimming pools to paint bowls, so they are even suitable for walls near the bathtub or shower stall. But you will also have to take care of good ventilation and removing the coating before the next painting.
As you can see, there are many options for finishing a bathroom with paint. Most can be used on a limited renovation budget, but chlorinated rubber and silicone are not very cheap.
What are they?
Modern manufacturers offer a wide range of products to suit every taste.
There are different types of protective panels:
- deaf;
- with sliding doors;
- with accordion doors;
- with hinged doors;
- with shelves.
- with fabric curtain.
Which option to choose is up to each person to decide for himself. If you want to save free space, you should choose the option with accordion doors, which fit best into small spaces. For a comfortable location of household chemicals under the bathtub, it is better to choose a product with shelves. But blank panels are distinguished by their aesthetics. They are very simply attached to the frame, but their installation limits access to plumbing connections, since not all models can be easily and quickly removed.
Find a full overview of all screens in our special article.
The most popular options among users of acrylic bathtubs are:
- front panel.
- continuous screen made of ceramic tiles;
- sliding
In our article we will take a closer look at installing an acrylic panel, because consumers most often prefer this method of decorating the space under the bathroom.
For detailed information about installing a screen made of tiles and sliding panels, see the relevant articles
Sequence of work on constructing and installing a bath screen with your own hands
The bathtub must be installed in the designed position and secured to the floor and wall.
Acrylic bathtub installed on a standard frame.
A wooden screen frame is made. Its dimensions are determined based on the length of the bathtub and the height from the floor to its side. The jumpers between the upper bars must provide the necessary rigidity of the product. It is worth providing at least four jumpers for the length of the bath, which is quite enough to ensure the required conditions.
We attach the manufactured wooden frame to the concrete floor, and the upper part of the frame should fit tightly under the side of the bathtub. On the front side we leave a gap equal to the thickness of the plasterboard and ceramic tiles that will be installed in subsequent operations.
We cover the wooden frame with moisture-resistant plasterboard.
When attaching drywall, the possibility of installing an inspection hatch under the tile to service the bathtub siphon in its front part is taken into account.
After covering the screen frame with plasterboard, all that remains is to cover it with ceramic tiles.
After waiting for the tile adhesive to dry completely, it is necessary to seal the seams with a fugue.
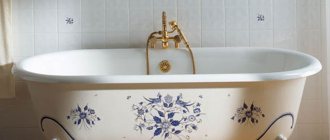
The screen for the bathtub is ready (photo of the screen for the tile bathtub at the beginning of the article). It is made in an original and exclusive version, the color scheme of which can be developed independently to suit the design conditions of the bathroom itself.
The product is a harmonious addition to the interior; the screen is easy to care for and keep it perfectly clean at all times. Ceramics differs from other types of finishing materials in that they are easy to clean and last a long time. And the very construction of a screen for a bathtub made of tiles with your own hands is simple and inexpensive in terms of material consumption. You can carry out your plans without difficulty if you only have the desire and initial skills of a finisher.
Beautiful examples
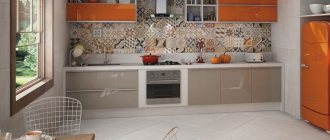
The modern use of tiles in the bathroom is akin to art. The finishing material is suitable for use in apartments and private houses. Examples of photo galleries will help you evaluate the possibilities of using tiles in the bathroom.
An example of accenting a wash area with modular tiles. Good choice of texture and color, matching the overall style concept.
An original choice of flooring for the Provence style. The texture, pattern and color fit perfectly into the design of a bathroom combined with a toilet.
An extraordinary solution for decorating a bathroom in an oriental style. Combining different textures, using dark tones.
Highlighting a niche with tiles with a three-dimensional ornamental pattern. A stylish way to decorate the wash area, a successful combination of shades.
Isolating a wet area around the bathtub fits into the Japanese style. Using wood texture.
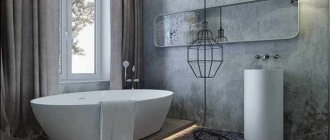
A loft-style bathroom attracts with its combination of rough textures. A spectacular interpretation of an industrial facility. A combination of concrete and brick tiles.
Neutral version of high-tech style. The use of tiles does not create a fragmented effect. Selecting a bath area.
Chalet style bathroom. The abundance of tiles is smoothed out by the design of the ceiling.
Decorating a shower stall with tiles and accents. A combination of two textures and playing with a niche.
How to use bath and floor tiles. The cladding looks impressive against the background of wall slats in the form of panels.
A bright solution with a patchwork interpretation. Using mosaics to accent niches and walls near the toilet and sink.
Another solution in the loft spirit. Matte type of tile texture in combination with a concrete surface. The atmosphere of the industrial facility is fully conveyed.
Finishing the bathroom ceiling with relief tiles with a metallic sheen. Ceiling tiles combined with floor and wall tiles. Bathroom zoning.
You will learn how to lay tiles in the bathroom from the following video.