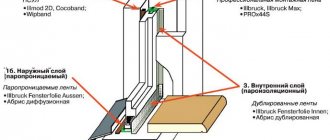
Every person should know how to remove glazing beads from a plastic window on their own. This element plays a special role in protecting the room and window frame from cold air flows. A small long rail acts as a protective ball against dust, cold air flows and unnecessary sound from the street. And, of course, without it today it is difficult to imagine the aesthetic compliance of a window with generally accepted standards. A long strip for fixing the glass makes the window more harmonious and aesthetically complete.
Today, almost every apartment has plastic windows. They captivate people with their convenience, reliability and affordability. During installation, few even pay attention to the number of components. But when replacing glass becomes relevant, you have to understand and understand what a glazing bead is and how it is mounted and dismantled.
Removing glazing beads
What it is?
A bead is a long strip used to strengthen glass. It can be narrow or wide, and must be complemented with a thick elastic band.
Shapes:
- rounded;
- in the shape of a square or any other shape.
The element is distinguished by its dimensions. A certain size of the structure will be relevant for different window frames. Narrow - installed on a double-glazed window with 3 chambers, as wide as possible - on a stained glass window with one chamber.
Plastic window bead
Production is characterized by the following stages:
- production of solid frames;
- stretching a soft elastic band onto a slatted base.
What is a glazing bead?
The material is made from polyvinyl chloride, but today many companies delight customers with new products made from pultruded fiberglass. This is an innovative material with maximum plasticity, filled with fiberglass and a binder.
Carrying out finishing work
Taking into account the rules for installing plasterboard slopes under Euro-windows, the corners of the openings must necessarily have maximum evenness, which is why it is necessary to fix the perforated corner at their location. Its use makes it possible to strengthen them and also protect them from various mechanical damages. Trimming the corner should be carried out in accordance with the length of the slopes, using metal scissors.
Attaching the perforated corner
To install them, it is necessary to use finishing putty, the preparation of which must be done in small quantities.
The first step is to cover the corners of the slopes with the mixture, and then install the prepared perforated corner.
Puttying drywall
This also requires the use of gypsum-based putty, which must be applied to the surface of the material, having previously opened it with a primer. The process of leveling plasterboard slopes should be carried out in two stages:
- First of all, using a spatula, you need to apply the optimal amount of the mixture to its surface perpendicular to the plasterboard blank.
- Next, you need to tighten the composition using a wide spatula along the length of the slope.
Installation and dismantling, when and where to start?
Most often, dismantling is carried out to replace the slats with new ones, due to the formation of defects or chips. Like any thing, glazing beads have a service life. After its expiration, the tightness is lost and the rail requires replacement. It must be removed when replacing glass structures and performing any repair work on the outside of the house.
Installation and dismantling
Corners for protecting wall corners: selection options
Plastic corners for protecting wall corners or other materials do not seem like an aesthetically beautiful element to everyone. However, to prevent the corner parts from deteriorating, there are no other options for strengthening the wallpaper. Or you have to start rounding the corner in advance.
Corners made of plastic, foam plastic and other materials will look more attractive in the interior if you follow the rules for selecting them for the design, choose as follows:
- To match the shade of the wall decoration, if you can match the texture, the result will be optimal;
- The shade of the doors works well in corridors where there are many doors;
- Match the color of the baseboards;
- Color option, when one shade is selected and with its help you place accents around the room, not only in the corner part;
- A uniform flooring option in structure and color.
Accordingly, the choice of material should occur after the completion of the repair work, and when the furniture is in place. Then it will be easier to visually understand which shade is best suited.
There are colorless options on sale, used when the owners couldn’t decide on a shade.
How to remove a long rail for strengthening?
Initially, the material is removed when replacing the glass structure. Some experts believe that the process lasts a maximum of five minutes. But this approach will only lead to deformation of the slats and the sealing of the window as a whole.
To prevent such an outcome, it is rational to choose one of the presented proven dismantling methods.
The first method is to call a professional, pay for his service and not understand the dismantling methods.
The second method is more affordable - carry out all the work yourself. According to information on numerous forums, it is better to carry out dismantling from May to September, because in November, air temperatures drop to sub-zero levels, which affects the plasticity of the material. The likelihood of damage increases.
To dismantle a long strip to strengthen the glass and not deform it, you need to purchase construction tools. These are: a sharp stationery knife, a tool with a steel flat blade pointed at the end and a hammer.
Removing the rack
Useful recommendation. Before dismantling, you need to mark the removal side of the rail. This will simplify the further installation procedure
Table No. 1 - How to remove glazing beads from a plastic window: step-by-step instructions.
| Step | Description |
| The stationery knife is installed in the gap where the rail and frame are joined. | |
| Using a minimum of effort, strike the knife handle . Before striking, it is important to make sure that the tool is not installed at a right angle, but with a minimum slope from the glass unit. | |
| Once there is enough free space, you can grab the rail with your fingers. At this stage, the tool is put aside and the glazing bead is carefully pulled out. The main thing is to do everything without sudden movements . | |
| After dismantling the first rail, the second one will be shorter. A tool with a flat steel blade pointed at the end is inserted at the edge closer to the side of the previously removed strip. The same dismantling procedure is performed. | |
| If the rail is then installed back, you need to do everything extremely carefully so as not to damage the frame and the element itself. The edges of the rail are inserted into the required angle so that the antennae of the rail are in the groove of the profile frame. The glazing bead carefully snaps into place. If necessary, tap the glazing bead a little with a hammer . It is extremely important to initially dismantle the slats, located along vertical lines and then along horizontal lines. The top long rail is the last to be removed. To install in a designated location, you need to work in a different sequence: first the top, then the bottom, then the vertical. |
Summing up the first results, we can say that it is possible to dismantle the rack yourself; you don’t even need professional, expensive tools for this. Dismantling is carried out from the vertical area, then the bottom and finally from the top. It is also worth remembering that before dismantling you need to mark the removal side to prevent the formation of voids.
Prices for plastic windows from popular manufacturers
Plastic windows
Prices for the service
For window owners who cannot, for some reason, remove and replace glazing beads on their own, there is the opportunity to order this service from a specialized organization.
It would be better if it was the company that installed the window. You can also find a company in your area online.
Average prices for removing and installing window slats by region are practically the same. To a greater extent they depend on:
- window brand,
- its size,
- slats material and their configuration.
The cost of removing the installation of the slats is calculated per linear meter; for standard windows and PVC slats, this work will cost 180 rubles. m.p., and for KBE, REHAU and Proplex windows when changing a 24 mm thick package to 32 mm - 390 rubles. m.p.
Replacement of double-glazed windows and removal of glazing beads
At any stage of repair of stained glass, doorways made of polyvinyl chloride and aluminum, it is often necessary to face the replacement of glass structures. You also have to straighten the sash that is sagging. This problem is solved by installing a series of gaskets.
To carry out such repairs, it is important to dismantle the glazing beads. You will learn how to remove an element in a polyvinyl chloride window on your own and without deforming the window frame from the material described below.
Removal tool
To complete the work, it is important to purchase the following components:
- a carpentry tool with a steel flat blade pointed at the end (its width directly depends on the dimensions of the window or doorway) or a stationery knife;
- plastic percussion instrument.
Initially, glazing beads of maximum length are dismantled; as a rule, in classic windows they are located vertically. In the central area of the window, the selected tool is carefully inserted between the long glass reinforcement strip and the profile. If necessary, you can tap its handle with a hammer.
Useful recommendation! If a long rail is being dismantled to strengthen the glass in order to adjust the sash, dismantling begins from the handle area.
When the long glass reinforcement strip moves a millimeter away from the window profile, it is important to tilt the tool so that its blade points towards the dismantling area. When the tool hits, the rail moves further and further from the window sash.
When the rail is at a sufficient distance from the sash so that it can be grabbed in your hands, the tool is put aside and the rail is removed by pulling. After dismantling the first rail, you need to remove a couple of small beads. For classic window frames, the upper elements are removed first, then the lower elements.
Removing the lower elements
A stationery knife is inserted from the very edge on the side of the part that was dismantled earlier. Working carefully with a tool and a hammer, the rail moves away from the sash. Now it is possible to dismantle the last fasteners that remain.
Attention! It is important to hold the glass structure at any stage of dismantling to prevent it from falling out, deformation and, as a result, injury. Everything must be done very carefully and slowly.
After replacing the filler or carrying out regulatory work, all elements are returned to their place. Fastening is carried out in the reverse manner. The edges of the rail are inserted into the required corner and the antennae fall into the void in the profile. After installation, the bead is driven in with an impact tool.
The blows must be applied parallel to the glass unit. It is important to pay attention to the impact force, because excess will cause deformation, chips and cracks.
Note! If the slats were removed to make adjustments to the sash, it is often better to leave them in the area of the fastenings. They will not interfere with the installation of linings. After installing the last bead, its edges are inserted into the corners of the product. The lath is tapped with a percussion tool; the edges of the beads must be connected to those already installed. After installing the corners, the bead is pressed against the glass structure and additionally driven in from the edge to the central area until completely installed.
If the windows are made of aluminum, to dismantle the slats, it is important to slowly remove the rubber seal for the glass. Then, with minimal pressure on the rail in the direction of the glass, the glazing bead should unhook from the frame.
Requirements
The PVC glazing bead must be shaped to fit the groove of the profile, where it is firmly fixed due to the teeth and elasticity of the PVC, with a welded seal.
In order to guarantee the protective qualities of the block, it must have a number of important characteristics:
- Durability is no less than that of the main frame - 50 years.
- Plasticity, so that it is easy to remove it from the grooves for dismantling and replacement; thanks to this characteristic, it is less susceptible to deformation, and during impacts, it is more resistant to fracture.
- Moisture resistance - the ability to not allow moisture to pass through.
- The ease of installation is ensured by the flexibility of the material and the design of the groove, which allows you to insert and remove the bead without auxiliary fastening material.
- Decorative – the smooth and even surface of the product with different colors provides a special appearance to the window.
- Multifunctionality for various modifications of window and balcony systems. Heat resistance so as not to create cold bridges in the frame.
- The operating temperature range is from -60 °C to +60 °C, at T = 100 °C the material begins the decomposition process.
- Environmental safety, must be harmless to the health of others.
- Fire safety - must be self-extinguishing and not spread fire.
- High biological stability, does not contribute to the formation of mold and the spread of bacteria.
- Resistant to ultraviolet radiation and household chemicals.
Step-by-step recommendations
To dismantle the glazing bead from a plastic window, you need to arm yourself with a strong stationery knife with a sharp end. It’s better to purchase a new one in advance so that you don’t have to sharpen it further later.
The tool is inserted and pressed into the center of a more massive glazing bead! Its dismantling is carried out last. There must be another person in the house who can hold the double-glazed window.
Video - How to nail glazing beads correctly
There is a long strip in the center that is as flexible as possible and can be easily removed from the groove of the profile plastic. And then, from the center, the glazing bead protrudes along its entire length. The next slats are already removed by pressing the tool towards its edges.
The rail placed at the top, if the specialist does not have an assistant, for the integrity of the entire structure, is slightly lifted, but not protruded. If it is impossible to open the window, some flat plastic seals protrude, placed along the border of the glass structure.
Next, the structure is held with the left hand, and the rail is protruded with the right.
Window bead
If the density of the glass structure is not as strong as in the PVC profile, it is permissible to lightly pick it up from above with a knife and push it forward, intercept it with your right and left hands.
In any case, you should not neglect safety precautions, underestimate or overestimate the strength of the master! The weight of a double-glazed window is often underestimated; if its area is more than a square meter, it will be difficult for a person to handle it himself.
Removing blockages
Sometimes the fittings of a plastic window do not work correctly. The first time this happens, it appears that the window is broken, although this is usually not the case. This situation cannot even be called a repair. We just need to get everything back to working order.
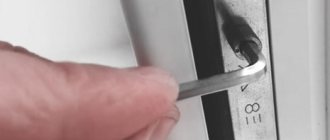
The handle does not turn
Sometimes, in some position, the handle of a plastic window “gets stuck” and does not want to turn. Usually the reason is the activation of the blocker. This is a plate that is located near the handle on the side of the frame. The shape of the plate varies among different hardware manufacturers.
Reinstalling the glazing bead
Before installing the insulated double-glazed glass ball, it is necessary to treat the seals, rubber bands on the sash and the borders of the slats. Silicone or lubricant is used for this. It is important to facilitate installation and extend the life of the structure.
Initially, a plastic seal is installed along the edge of the glass unit. This prevents the glass from being deformed by the profile connections.
Then the glass unit is installed directly. It is important to ensure that chips or accordion do not form on the canvas.
Do you want to know how to properly putty walls before painting? Detailed step-by-step instructions.
To install the top ball of the glazing bead, it is necessary to hold the glass structure with your right hand so that it does not suddenly deform; your left hand tightly presses the structural element of the plastic window profiles. It is important to do this with one edge in the right corner, the other edge in the left corner. At the same time, the entire glazing bead is pressed so that it is completely driven into the narrow recess.
If the rail fits in tightly enough and it is not possible to press it in with your hands, the glass unit along the entire border is treated with silicone grease. In this case, the rubber sealing strips will slide perfectly and can be easily driven into the groove.
Attaching a new bead is not difficult.
Scope and advantages of window corners
The plastic window corner is suitable for both internal and external finishing of slopes. At the same time, it goes well with all the main facing materials - wallpaper, painted putty or plaster, plastic sandwich panels, plasterboard lined with various materials and decorative panels based on MDF. Thanks to these elements it is possible to:
- form ideal joints between walls and internal or external slopes;
- reduce the negative visual effect that uneven surfaces adjacent to each other sometimes create;
- protect internal and external corners of slopes from impacts and precipitation;
- maintain assembly seams.
The corners have an affordable price and a long service life, and also retain their color during use. The disadvantages of such elements include the impossibility of their use in areas where there is a risk of fire, and the fragility of the material, which requires careful handling of these products when cutting and installing them. However, these disadvantages are conditional in nature, since they do not affect the main characteristics.
As an alternative to window corners, it is recommended to consider the platbands included in the set of special slope systems. However, you must immediately be prepared that such finishing will cost more.
Before installation
The choice of glazing beads must be approached responsibly so that they fit tightly to the window frame and seal it. The material from which the glazing bead is made must be identical to the material for the sash and window. The glazing bead fastener also plays an important function. It must fit closely to the structure to prevent drafts.
Window bead fastener
Structural element of wooden window profiles
If the owner of the apartment decides to replace or install a new double-glazed window, then he cannot do without purchasing slats made of wood. This element is dry, planed, and secures the glass unit or sash in the window frame or door opening.
Wooden slats are supplied to the market in different sizes, with 8-10 mm being the most popular. Advanced lumber was used in the production of slats. The product is exposed to environmental influences, so during production it is important to follow some rules and requirements.
Despite its minimal dimensions, the slats determine the effectiveness of the window frame. If the rail is not attached tightly, this can seriously deform the window and negatively affect heat retention, because cold air will penetrate into the area between the glass unit and the rail.
Such a minimal and affordable part plays an important role. A lath is often associated with a decorative frame that secures a glass structure to the frame. Usually it is supplemented with a groove. It is necessary to install an additional sealing ball, not a contour one.
Window with installed glazing bead
To produce such filler, innovative and improved window rubber is used. In other words, a glazing bead is a strip of wood. It varies in shape and is used to fasten the glass unit.
To replace wooden slats, you need to use a flexible abrasive material, a utility knife, a spatula, a hammer and nails.
What varieties are there?
The outer edge of the product can have a different configuration, which is mainly determined by the design project of the window unit: square, circle, rectangle or complex shape. In addition, they differ in different widths, allowing you to install double-glazed windows of any size into the window frame without the need to modify the design and replace the sash.
To size
The size of the bead affects the overall energy efficiency of the window unit; the thinner it is, the lower its thermal resistance, and the lower the price. Therefore, thin slats can only be installed in multi-chamber double-glazed windows, which have increased heat-protective characteristics. On the contrary, the widest products are installed in single-chamber double-glazed windows.
Average price of window slats by width:
- wide - 30.5 mm, length 3 m, price 669 rub. for 1 product;
- medium - 13.5 mm, length 3 m, glass thickness 24 mm, price 560 rub. for 1 piece;
- narrow - 6.5 mm, length 3 m price 520 rub. for 1 piece
By shape
The most popular types of glazing bead sections are rectangular, rounded and curly. Manufacturers, most often, install a rectangular rail by default; if the buyer wants a different cross-section of the product, he must indicate this in the order for the window unit.
The main advantages and disadvantages of glazing beads of various shapes:
- Rounded ones are often used for structures installed in private residential buildings; they have a perfect aesthetic appearance, are easy to use, and due to the round surface they are less subject to impact deformations.
- Rectangular ones are used by default for public and residential multi-storey buildings. The sharp edge acts as a stiffening rib and provides the highest strength to the slats; they also have increased protective properties, but are inferior in aesthetic appearance to round structures.
- Curly ones are used to create an original window shape; as a rule, they are installed in the private residential sector. The products are expensive, difficult to maintain and quite impractical because they have low shock protection.
Average prices for different glazing bead configurations:
- semicircular for 24 double-glazed windows, 3 lm, 13.5 mm, 341 rub.;
- beveled for 32 double-glazed windows, 3 lm, 13.5 mm, 286 RUR;
- rectangular for 32 double-glazed windows, 3 lm, 6.5 mm, 220 rub.
By material
As a rule, glazing beads are made from PVC; first, the hard part of the product is produced, and then a soft sealing rubber is attached to it.
Lately, fiberglass slats have become more popular. This is a building material with excellent ductility, has a structure made of quartz filler and fiberglass binder.
The finished fiberglass lath is fused along the edge with a thin layer of rubber, which acts as a seal. They have excellent heat-shielding characteristics, high strength and weather resistance.
Average cost of PVC beads depending on the material:
- fiberglass with a shaped section for 24 double-glazed windows, 3 lm, 13.5 mm, 590 rub.;
- PVC with a semicircular section, for 24 double-glazed windows, 3 lm, 13.5 mm, 341 rub.
Step-by-step instructions for replacing wooden slats
Step 1. Using a utility knife, separate the slats from the frame. Parts can be removed with a special spatula. The use of a spatula and knife is allowed.
Separating the slats from the frame
Step 2. Lightly remove the glass. The glass trough is cleaned. To do this, use a spatula or a plate of sandpaper. Initially with large grains, and then with small ones. The glass gutter must be clean.
Removing the window from the frame
Step 3. The glass is reinserted. A ball of glass putty is applied. A tread ball of sealant will not be superfluous.
Step 4. The new glazing bead is put back and gently pressed down. The part is inserted close to the frame. The lath is nailed to hardware.
We nail the bead to the window
Step 5. The operation is repeated for all other parts. The connecting corners are cleaned with paper containing abrasive particles. The rail should fit closely to the frame.
Note! If a specialist begins to completely install a new window or wants to refresh the paint on it, then all painting work is carried out before installing the glazing beads. After the paint has completely dried, installation can begin.
Painting
Prices for wooden windows with double glazing
Wooden windows with double glazing
Average prices
The cost of PVC glazing beads depends on:
- size,
- configurations
- type of materials and length of the slats.
The most expensive and durable are wide, fiberglass figured products.
Average prices for glazing beads for PVC windows:
wide, rectangular, fiberglass, 30.5 mm, 3 m, 669 RUR;- medium, rectangular, fiberglass - 13.5 mm, 3 m, double-glazed window 24 mm, 560 rub.;
- narrow, rectangular, fiberglass, 6.5 mm, 3 m, 510 RUR;
- semicircular, PVC, for 24 double-glazed windows, 3 lm, 13.5 mm, 341 RUR;
- beveled PVC, for 32 double-glazed windows, 3 lm, 13.5 mm, 286 RUR;
- rectangular PVC for 32 double-glazed windows, 3 lm, 6.5 mm, 220 rub.;
- fiberglass figured, for 24 double-glazed windows, 6.5 lm, 13.5 mm, 590 rub.;
- PVC semicircular for 24 double-glazed windows, 3 lm, 13.5 mm, 341 rub.
Aluminum windows
To install the aluminum bead, you must first remove the sealing layers. Today you rarely see such designs. But if a specialist has a need to remove the glazing bead from an aluminum frame, then only two methods are available for implementing this issue.
First. If the seal is placed outside. It is pulled out from one rail, and then you need to hit it in the corner with a hammer. In this case, it will disengage, and the specialist will only have to repeat the operation from all sides. It is important to hit with a hammer extremely carefully so as not to deform the frame or any parts.
Video - Dismantling and installation of glazing beads for metal-plastic windows
Second. If the sealing ball is located inside , this is not the best option. This is because the rail is additionally held in place by clips. They are not easy to remove or dismantle. The specialist needs to find the drawings of the window frame and remove them along with the rail. After the clips are removed, the bead is driven in by hand or with a hammer.
It must be taken into account that design features are the main disadvantage of aluminum sashes. Therefore, removing slats from them is not so easy.
Required Tools
You can dismantle the window structure part yourself. Even with the most reliable fastening, if everything is done correctly, it will take no more than half an hour. It is necessary to prepare working tools in advance.
- Hacksaw;
- Putty knife;
- Chisel;
- Rubber hammer;
- Scrap;
- Hammer;
- Screwdriver or Phillips screwdriver;
- Gloves.
Rice. 2. Tools for dismantling the window sill
Probably, not all of them will be needed in the work, but it will be much more convenient to collect the entire list at once, so that if necessary, you do not waste time searching during dismantling.
Rice. 3. Spatula for dismantling
Choosing the right slats
The main thing when choosing a slatt is the tight fit of the structure, carefully attaching the glass unit. Therefore, this issue should be approached in detail, especially at the stage of sizing.
The rail fits tightly to the glass unit
Wood slats
It is rational to purchase wooden slats for frames made of the same material.
The characteristics of the element are reliability and extreme aesthetics. Of course, the master often chooses a classic wooden plank that suits the dimensions, but will it complement the style of the window opening?
So at the purchasing stage it is important to pay attention not only to the technical components.
Important for a specialist:
- tight fit to the sash. This is his main task, so a specialist should immediately pay attention to this. It is important to accurately measure the windows and calculate the limit of fit;
- fasteners should not be visible. Otherwise, the apartment windows will become inorganic;
- the decorative element played with the style of the window frame. Therefore, the main thing is that the parts are made of the same material.
Based on these three criteria, a specialist will be able to purchase a good, and most importantly, ideal option for a window frame. External slats should be as strong, reliable and tight as possible. This is more important than for internal slats, so in this case the master can simply choose any of the options.
Preparing the surface for gluing PVC corners
1. Remove all protruding parts: curtain nails, wallpaper, even any protrusions on the wall. To do this, knock down part of the plaster.
We cut off the wallpaper near the slope - to make it easier to tear it off if you plan a renovation
2. Remove the wallpaper from a corner of the wall. Otherwise, you will stick the plastic corner not on the wall, but on the wallpaper, which is wrong.
Cut the wallpaper to such a width that there is no gap between it and the plastic corner.
3. Degrease with a weak solvent, or so-called. white spirit that part of the window slope on which the plastic corner will be attached.
For windows to last a long time, they need to be looked after. Rules for caring for profiles, glass and fittings can be found at the link: https://oknanagoda.com/okna/otveti/ukhod-za-plastikovymi-oknami.html