Even the most stylish bathroom interior will look ridiculous if the space under the plumbing fixture is not covered. You can decorate it using different methods, but installing a screen is considered the best and most reliable. With it, you can not only improve the room, but also create a comfortable work area, hidden from prying eyes. Under such panels in the free space you can place household chemicals, small buckets and other things.
What are they?
Modern manufacturers offer a wide range of products to suit every taste.
There are different types of protective panels:
- deaf;
- with sliding doors;
- with accordion doors;
- with hinged doors;
- with shelves.
- with fabric curtain.
Which option to choose is up to each person to decide for himself. If you want to save free space, you should choose the option with accordion doors, which fit best into small spaces. For a comfortable location of household chemicals under the bathtub, it is better to choose a product with shelves. But blank panels are distinguished by their aesthetics. They are very simply attached to the frame, but their installation limits access to plumbing connections, since not all models can be easily and quickly removed.
Find a full overview of all screens in our special article.
The most popular options among users of acrylic bathtubs are:
- front panel.
- continuous screen made of ceramic tiles;
- sliding
In our article we will take a closer look at installing an acrylic panel, because consumers most often prefer this method of decorating the space under the bathroom.
For detailed information about installing a screen made of tiles and sliding panels , see the relevant articles
Proper preparation will ensure a positive result
At first glance, tiling the walls and floor of a bathroom with tiles may seem like a rather complicated process. However, knowledge of the theoretical part of tile laying work, combined with simple construction skills, guarantees a successful result. Before you begin laying ceramic trim, you will need to meet the following conditions:
- take the dimensions of the room and calculate the area of the walls and floor; calculate how many tiles you will need;
- purchase finishing materials, in this case you need to add 5–7% to the quantity of tiles you need for cutting and stock;
- level and treat the surface of the floor and partition with antifungal impregnations.
Before you start tiling, you need to level the floor.
It must be said that ceramic tiling has long been the best option for finishing bathrooms. They are hygienic, easy to care for, and also have an attractive appearance.
It should be remembered that only tiles specially designed for this purpose are laid on the floor. It has a large thickness, which significantly increases its wear resistance, and a special coating that prevents slipping.
Likewise, only wall cladding is chosen for walls, otherwise floor tiles, which have more weight, will not be able to stay on a vertical plane.
Photo
The photo below shows various interesting options for decorating the space under the bathroom.
How to choose the right size?
Any bath panel is selected for a specific size. It is very important to check whether it fits your plumbing model. The length of acrylic panels varies from 120 to 180 cm for standard hot tubs. And the height is 55-60 cm, but it can change if there are legs.
Most often, acrylic panels come complete with plumbing fixtures and have the same tone as the bathtub, which allows the overall design to look organic. They are made of plastic coated with an acrylic layer.
The advantages of panels purchased complete with a bathtub include the fact that they fit as tightly as possible to the sides of the bathtub, eliminating unsightly gaps. Experts do not recommend purchasing such screens separately, since they do not always fit exactly in size.
If the screen is purchased separately from the bathroom, then in order not to make a mistake with the choice of size, you should carefully measure the plumbing from all sides.
Siphon assembly and connection to the sewer system
We have moved this point to the end of the article to describe in detail the process and nuances of connecting siphon equipment to an acrylic bathtub. However, this work must be done immediately after installing the legs or frame, before installing the screen, and before finally attaching the bath to the wall and brickwork.
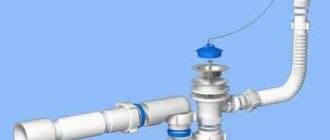
As a rule, the siphon is supplied disassembled. A large number of chaotically located parts can, at first glance, even frighten a person who is faced with connecting a bathtub for the first time. However, the attached instructions describe everything in detail and show how the siphon is assembled, so assembly does not cause any particular difficulties.
When disassembled, the siphon is a collection of various parts. The figure shows the general assembly diagram and the sequence of fastening the siphon elements (+)
Installation of the siphon begins with connecting the receiving pipe (4) and the protective grille (2) to the lower outlet of the bathtub. Before this, the joints must be treated with sealant and a rubber gasket (3) must be placed inside, on top of which a layer of sealant is also applied.
Then, without waiting for it to dry, the outlet pipe is inserted into the lower part of the bath.
Next, an already assembled flexible hose (16) is inserted into the overflow outlet (13), and its other end with a pre-installed gasket (18) is connected to the upper hole of the bath and secured with a protective overflow grill (19).
This is what a fully assembled siphon looks like. To avoid its leakage during operation, it is very important to correctly install the gaskets, which, even with a slight misalignment, can move out of place and become deformed.
Then the part of the siphon that is connected to the sewer pipe is assembled. All joints are treated with sealant. When assembling the siphon, try not to overtighten the threaded connections, as this can lead to deformation and breakage of the plastic parts.
At this stage of work, it is worth taking care of installing the mixer.
Front panel installation
We have made our choice and now we can begin installation.
It should be immediately noted that standard screens are sold complete with all fasteners, frames and fittings. They also come with detailed step-by-step installation instructions.
To install the protective screen, you will need the following tools and materials:
- roulette;
- marker or pencil;
- building level;
- screwdriver;
- wrench;
- silicone sealant.
How to assemble and secure the screen? Let's look at the step-by-step installation instructions for Triton brand bathtubs:
STEP 1. Adjust the height of the bathtub . In order to avoid a wide gap near the floor, you need to match the height of the font and the front panel. We measure it with a tape measure and, using a wrench, tighten the legs.
It is very important to check the level after all manipulations.
Don't forget to do this. STEP 2. Marking . Now you need to find plastic plugs on the frame or legs to which the screen will be attached, and mark on it with a marker the places for screwing in the screws, according to the location of the plugs.
STEP 3. Fastening . We apply the screen and, using a screwdriver, fasten it to the frame with self-tapping screws. Then we install special plugs on the screws.
It is best to seal the joint between the screen and the tile with silicone sealant to prevent splashes from getting in and causing mold to grow.
Sealing the junction of the bathtub and the wall
No matter how tightly you place the bathtub against the wall, there will still be a gap. With acrylics, the problem is complicated by the fact that their sides in the middle bend slightly inward. Therefore, simply sealing the gap with silicone will not work. Additional funds are needed.
The easiest way to fix the tape is it is sold in rolls. One is enough to seal on three sides. Shelf width 20 mm and 30 mm. The tape is rolled out along the edge of the bathtub and fixed with silicone.
You can seal the joint between the acrylic bathtub and the wall with special tape
There are also various corners for the bath. They are made of plastic, and the edges are rubberized - so that the joint is tighter and the seams between the tiles do not leak. The profiles and shape of the corners are different. There are those that are mounted on top of the tiles, and there are those that are installed under it. And they can be of different shapes and colors.
Some types of corners for the junction of the bathtub and the wall
Regardless of the shape, they are installed in the same way: in the corners, the lower parts are cut at an angle of 45°. The quality of the joint is checked. Then the surface of the wall, side and corner is degreased (preferably with alcohol), silicone is applied, on which the corner is installed. Everything is left for the time required for the sealant to polymerize (indicated on the tube). After this you can use the bathroom.
In the case of acrylic bathtubs, there is one caveat: before applying the sealant, they are filled with water, and in this state the composition is left to polymerize. Otherwise, as water accumulates and the load on the sides increases, microcracks will appear on it, into which water will flow.
A few words about which sealant is best to use when sealing the joint between the bathtub and the wall. The best option is a sealant for aquariums. It is no less durable than sanitary ware, but it has some additives, thanks to which it does not mold, change color or bloom.
How to install on corner models?
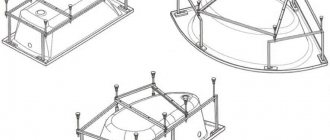
For corner bathtubs, mounting is most often provided not with self-tapping screws, but with special magnets and metal plates. Such magnets are initially attached to the legs of the font.
STEP 1. Height adjustment. Just as in the case of the rectangular model, we adjust the height of the legs based on the screen parameters.
STEP 2. How to attach the plates? On the back side of the panel, in the places where the magnets will rest, we glue the metal plates from the kit with double-sided tape or silicone sealant. While drying, you can secure them with regular tape.
STEP 3. Installation . We apply the front panel and check that the magnets grab the metal plates.
This installation option is convenient because the question: how to remove the screen and then put it back on again does not arise. Everything is extremely simple, you need to apply a little force by pulling the panel towards you, and you can just as easily return it to its place. The previous method is no different from this simplicity; there you will first need to unscrew the screws.
Practical tips for attaching a clawfoot bathtub to a tiled floor
Once the clawfoot bathtub is securely attached to the tiled floor, repair work and dismantling of plumbing fixtures become significantly more complicated. In order not to create problems for yourself while using the bathroom, do not rush to start work, carefully study the recommendations of professional plumbers. What should you pay special attention to?
Stack of water. It depends not only on the parameters of the siphon, as many inexperienced builders think. The main condition of the stack is that all curved siphon tubes and the drain in the bathtub must be located above the level of the sewer pipe. The greater the height difference, the faster the water will drain. The rapid flow of liquid automatically cleans the pipelines, as a result, you will have to do preventive inspections and repairs much less often. Before attaching the bathtub, raise the adjustable feet as far as possible. At the same time, make sure that the comfort of use does not deteriorate; the distance of the sides to the floor should be in optimal values and not make it difficult to use the bathroom.
Slope of sewer pipes
If possible, replace corrugated flexible siphon connection hoses with smooth plastic pipes.
Bath siphon
Working with flexible hoses is much easier; there is no need to strictly observe the dimensions; they can always be bent into the desired position. These are the undoubted advantages of such elements. But they also have a significant drawback. Dirt quickly accumulates in the folds of the corrugation; it will not be possible to remove it from there simply by washing; you will have to disassemble the siphon.
Corrugated pipes clog quickly
Frequent disassembly of the siphon can cause damage not only to the rubber seals, but also to the threaded connections. As a result, serious damage occurs, requiring complete replacement of the device. It is extremely difficult to carry out this work on a bathtub firmly attached to a ceramic floor. It is necessary not only to lie down under the bath, but also to perform all work with extreme caution in conditions of limited visibility and accessibility.
Practical advice. To increase the reliability of using the bathroom, it is recommended to buy siphons without a separate sump. It brings more problems than it is worth. Buy those types of siphons in which the function of a sump is performed by an ordinary bend of the tube. Such a device does not allow unpleasant odors to enter the room, becomes clogged much less often and, if necessary, is simply cleaned. There is no need to disassemble the siphon, just clean the pipe with an ordinary rubber plunger.
The siphon is plastic, the sump is represented by a curved pipe
Try to buy bathtubs from imported manufacturers. Domestic ones, unfortunately, are often of poor quality. This applies not only to enamel, but also to geometry. Check the corners of the sides with a long square; in domestic products they are rarely straight. An error of just a few tenths of a degree over a long bath length turns into several millimeters. Due to this, a wedge-shaped gap is formed between the side and the perfectly flat wall. It is not recommended to seal it with silicone sealant; the errors become too visible. You have to use special plastic or ceramic baseboards for bathtubs, and they should be mounted only on fixed surfaces. At the slightest vibration, the corners come off; re-gluing them without securely fixing the bathtub is useless.
Ceramic bath skirting board
Plastic bath skirting board
Keep in mind that all repair work in the premises being used is much more difficult and expensive than taking timely measures to prevent problems from arising during operation.
To increase the area of support of the legs on the ceramic tiles, you can use various durable pads. But this mounting option is only suitable for those bathtubs that have decorative screens. It is much safer to lay tiles for outdoor use; they have increased physical strength.
Be very careful when attaching the legs of freestanding bathtubs. The best option for such devices is installation on floors with concrete bases and thick, especially durable tiles. If there is a possibility of the container moving horizontally during use, then the legs can be fixed to the floor with small anchors. But remember that manufacturers do not provide this possibility; the lower parts of the legs will have to be slightly altered, and additional nuts will have to be used to adjust the height and horizontality. These works are very complex, it is better to use the services of professional plumbers. If possible, buy freestanding bathtubs without legs; such models rest against the floor with the entire surface of the bottom.
Freestanding bathtub rests completely on the floor
When marking holes in ceramic floor tiles, be careful not to place the holes at or near tile joints. In these places, the risk of cracking during drilling increases significantly. Pay attention to the position of all four legs, not just the visible ones. During installation, it is always possible to move the container a few centimeters in any direction and select the desired position of the lower elements of the legs.
The legs of the bathtub should not rest on the joints of the tiles
Remember that the adhesion rates of tile adhesive to front surfaces are much lower than to work surfaces. Before additionally fixing the position of the legs on the surface of the tile with glue, they should be thoroughly cleaned of dirt, dust and grease. If the fasteners are not visible, then it is recommended to remove the glaze from the surface in several places; this can be done with a grinder with a diamond disc or sharp blows with a chisel. Never rush, cracked tiles will cause big problems.
It is much more advisable to install very heavy bathtubs on a concrete base, and only after that lay ceramic tiles on the floor. The only possible problem with this technology is the difficulty of replacing an old bathtub model with a new one. But do not despair, no one in the world has yet been able to provide optimal solutions for all occasions.
In this case, the bathtub is installed first, and the decorative finishing will be done later
And one last piece of advice. Modern bathroom fixtures often contain live parts. To prevent accidents, steel and cast iron bathtubs must be grounded. If the house has three-wire wiring, great. If the wiring is old, then proper grounding cannot be done.
Protection against electric shock when swimming
Important. Never use metal pipes as grounding; this is strictly prohibited by the PUE.
Bathtub grounding
We talked about the main methods of attaching bathtub legs to ceramic tiles. If you follow professional recommendations during use, no problems will arise.
