Manual arc welding using inverter welding equipment is the most popular method of joining metals among novice welders. Manufacturers offer hundreds of budget inverters and electrodes to perform a wide variety of tasks, and the welding process itself is simple and takes little time. Electrode welding does not require highly qualified welders, but electric welding has certain nuances that should be taken into account.
Beginners need to learn the basics of welding from theory, gradually moving on to practice. Our article is a brief instruction on electric arc welding for beginners. Here are collected secrets on choosing an inverter, its correct configuration, and briefly describe welding technology and its features. Of course, this information is not enough to perform welding efficiently and quickly from scratch, but our article will help you understand the basics.
Welding machine and equipment
Before we learn how to weld metal ourselves, we need to decide on welding equipment. A welding machine for welding is selected not only by price and appearance, but also by characteristics. We have devoted several articles to this topic: here we talk about how to choose a welding inverter, and here we have compiled a rating of the best welding machines for every taste and budget. With a welding machine that can meet your work needs, you can learn quickly and easily.
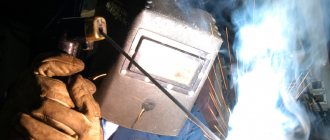
You will also need equipment to master welding. Equipment is the protection of the welder. It protects against metal splashes, flashes and ultraviolet radiation. A standard kit consists of a mask (we recommend an auto-darkening chameleon mask), a balaclava, a work suit (called a "robe") and special thick gloves. As a work suit, you can use clothes made from coarse, dense fabric; this will be enough for welding at home.
To learn how to operate a welding inverter, you need to know and follow safety requirements. Failure to follow the rules may result in burns, fires and accidents. We wrote in detail about safety precautions here, here and here. Welding work is strictly prohibited without a fire extinguisher nearby. Especially if you work in the country or at home.
Also, put on all equipment before starting work. If you light an arc without a mask, you are guaranteed to get a burn to the retina. And you won't even know about it, since symptoms will only begin to appear after some time. In the evening you worked without a mask for just a couple of minutes, and in the morning you won’t be able to open your eyelids. At the same time, even professional welders often become victims of eye burns (masters call this “catching bunnies”), but for them this is due to a large amount of work, and not to non-compliance with the rules. So keep some eye drops on hand. We wrote about this in this article.
Manual welding for beginners is fraught with other dangers. Don't forget that when welding metal you are surrounded by parts heated to very high temperatures. Do not touch them until they are completely cool, otherwise you are also guaranteed to get burns.
Next, let's talk about welding technology. For now, you can watch a short introductory lesson, it tells about the equipment and features. Learning to weld and learning welding in general requires you to be extremely focused and follow the rules. Otherwise, the welding process may end disastrously.
Welding theory
A novice welder is wondering which welding inverter to buy, and what devices are needed for welding metal with electrodes. If we ignore the professional use of welding, buy a welding inverter, not a transformer or semi-automatic machine.
The welding inverter converts alternating current from the electrical network into direct current.
The advantages of an inverter welding machine compared to a semi-automatic machine and a transformer:
- Light weight and dimensions, on average the inverter weighs 3-5 kg.
- Easy to use for beginners.
- Allows you to quickly master welding.
You can talk endlessly about the advantages of inverters, but it’s better to see it once to understand what advantages this type of welding equipment has.
Now we will tell you what kind of process occurs during metal welding and how to evaluate the result. There are two metal blanks of different sizes. A constant voltage from a welding inverter is supplied to the metal through the electrode and ground. For an electric arc to occur, two conductive elements with a plus and a minus are needed. When electrodes of different polarities touch the metal, an electric arc is ignited, releasing high temperature. The metal begins to melt and, at the same time, when moving, the metal rod of the electrode melts with a special coating - coating.
When burned, the coating creates a gas protection for the seam, protecting it from the harmful effects of oxygen.
Also, during welding, a protective slag layer of the weld pool is formed, which is then beaten off with a special hammer from the welder.
After completing the welding of the parts, the metal cools, crystallizes, and a strong welded joint is formed.
Properties and capabilities of the method
Experts say that the resulting joint is not as strong as classic welding, but stronger than something that is formed when using epoxy for gluing. This feature determines the scope of cold welding and, to a certain extent, restrains the enthusiasm of its supporters. The fact is that in this way it is possible to reconstruct those parts and structural elements that are not subject to force, that is, they are not load-bearing. Another nuance that also has to be taken into account is that the seam, made of a very plastic material, becomes rigid after final drying.
Initially, a method was developed for quick and at the same time reliable repair of cars. Now the scope of application of the new method has expanded significantly:
- cars: to restore cracked bodies, gas tanks, mufflers, radiators - both in the workshop and on the road;
- plumbing: for repairing pipes, pumps, fittings and so on, a special composition for working under water is also commercially produced;
- for sealing metal-plastic windows;
- for joining different metals together, for example, aluminum with copper or brass;
- used in the repair of gas equipment;
- suitable for restoration of ceramic products for non-food purposes;
- Suitable for gluing floor coverings overlapping, end-to-end, to concrete.
The specifics of each specific case of breakdown require an individual approach. To accomplish the task, different types of welding are used: seam, spot, butt, T, and offset.
Sometimes there are negative reviews: we tried, nothing worked. If you look into the reasons for such statements in detail, it most often turns out that the performer committed violations: he decided to use cold welding for metal, and did not read the instructions for use. Or he hurried and ignored it, considering the fundamentally important recommendation unnecessary.
What do you need to buy to start welding?
This question is answered in the article - Tools and accessories for manual arc welding: a basic set. In short, to start welding with an inverter at home, you will need:
- Electrodes.
- Welder mask.
- Gaiters or protective gloves.
- Protective trigger, trousers and closed shoes.
- Welder's hammer and brush for removing slag.
A specialist talks about choosing a mask for metal welding in this video.
The optimal choice for a novice welder is a mask with a “chameleon” type filter.
Its invaluable advantage, compared to a conventional protective shield with tinted glass, is that the welder can see the parts being welded. He does not need to raise and lower the mask, because... “Chameleon” automatically darkens when a welding arc appears and reliably protects the eyes.
When the welding process stops, the glass is automatically cleared. This makes the job easier. A beginner in welding will not pick up the so-called. “bunnies” from a bright arc flash if the mask with ordinary glass is not lowered in time.
Basic rules for joining parts
After you have mastered the basics of welding, you need to weld metal structures yourself and move on to performing simple assembly and tack operations at home. As a rule, a home craftsman does not weld thick metal, so cutting edges is not required. First, you can practice connecting a profile pipe. To do this, you will need to cut sharp corners at the ends of the parts for a larger penetration area.
The parts are inserted into the corner clamp and secured with a clamping bar. Now you need to first grab it from several sides. To do this, light an arc and place a small point.
There is no need to withstand a large leg, you just need to fix the parts. After checking the diagonals, tacks are performed on all accessible sides. Now the structure is removed and welded with a reliable and high-quality seam.
If the lessons on the angle of inclination and laying metal in a molten weld pool are well learned, then the operations of assembling metal structures will not cause difficulties even for dummies in welding.
Having studied the basics of welding and gained theoretical knowledge, you need to practice as often as possible, put on welding equipment, turn on the welding machine and hone your skills for a long time. Only practice will allow you to become a high-class welder.
What are the types and types of electrodes by brand?
If you go to any specialized store selling welding equipment and look at the assortment, your eyes will simply run away from the offers of different types of electrodes. What to buy?
When choosing electrodes for welding, pay attention to the composition of the core. The metal of the rod must be identical to the metal being welded. There are the following types of electrodes. For welding:
- Carbon and alloy steel
- For welding stainless steel and non-ferrous metals.
Let's simplify the choice. In everyday life, ordinary “ferrous” metal is most often welded - profile and round pipes, angles, strips, fittings, channels, I-beams, water pipes, etc.
Also pay attention to the coating of the electrodes. There are four types of coatings - basic, rutile, acidic and cellulose. Let us leave the acidic and cellulose coating of electrodes outside the scope of this article. For home work, a welder needs only electrodes with a rutile coating (grades MP-3 and OK 63) and a basic coating (grade UONI 13/55).
Advantages of electrodes with basic coating:
- Suitable for welding critical structures with high demands on seam quality.
- The seam is plastic and impact resistant.
Disadvantage of electrodes with basic coating:
- Increased requirements for the cleanliness of the surface of the metal being welded and the processing of the edges of parts.
- For novice welders, re-igniting the electrode is more difficult.
Advantages of rutile-coated electrodes:
- There is less metal spattering.
- Easy re-ignition of the electrode.
- Stability of the arc in all spatial positions.
Which polarity to choose when welding metal with electrodes
The inverter for manual arc welding produces direct current. If you look at the front panel of the device, you will see that there are two connectors for connecting welding cables marked + and -.
Straight polarity : a “clothespin” is connected to the plus of the device, and a holder is connected to the minus.
Reverse polarity : the electrode holder is connected to the plus of the device, and the “clothespin” clamp is connected to the minus.
Which polarity should I choose? Many copies have been broken about this issue. If you open educational materials on welding and ask on the Internet, you can often hear the opinion that with “straight polarity” the metal being welded is better heated and melted .
Practice refutes this.
When welding, more heat is generated at the contact with the plus, therefore, in reverse polarity , the holder is connected to the plus, the penetration is always deeper . As a result, it is better to weld metal with thick walls using reverse polarity. This is a profile pipe, plates, corner with a thickness of 4-5 mm. Conversely, with direct polarity it is necessary to weld thin metal, no more than 1.5-2 mm thick, in order to avoid melting of the walls and the appearance of holes.
You can verify the veracity of this statement in practice. Take a welding inverter, set the welding current to 100 A. Connect the electrode holder and ground to the connectors of the device and cut the metal - a plate 4-5 mm thick, an angle or fitting, first in direct and then in reverse polarity, without changing the current strength and electrode with a diameter of 3 mm. You will see that metal cutting is faster with reverse polarity.
How to choose the diameter of the electrode for welding metal of different thicknesses
Remember a simple rule: the diameter of the electrode depends on the thickness of the metal being welded . Metal with a thickness of less than 1 mm is usually welded using semi-automatic or argon arc welding, rather than using electrodes. For reference, below is the table: “Ratio of steel thickness to electrode diameter.”
For each electrode diameter, its own current is set.
Advice for novice welders: you can calculate the current strength as follows: for every 1 mm of electrode diameter you need approximately 30 A of current strength. Those. for the “troika” electrode, set the current to about 90-100 A.
In practice, each welder selects the diameter of the electrode and the current strength on the inverter individually.
How to ignite an electrode
There are two ways. Option one: ignite the electrode - end-to-end (by touching). Option two: strike. The methods are clear from the photo below.
The second method is similar to lighting a match on a matchbox. The first method is sometimes replaced by lightly tapping the workpiece. When the electrode is new and the metal of the rod is visible at the tip, ignition of the arc occurs easily.
If the electrode has been in use, a coating may appear around the rod. The protective coating of the electrode does not conduct electric current. Therefore, it needs to be knocked off by tapping the tip of the electrode on the part to be welded several times. Easy ignition of the electrode is a skill that has been brought to automaticity.
How to guide the electrode and the correct angle of the electrode
After igniting the arc, monitor the weld pool. Hold the electrode at a distance of 2-3 mm from the surface of the workpieces to be welded. You should be able to see and separate the weld pool from the slag.
A weld pool is a bright white spot of hot metal.
Hold the electrode at an angle from 30° to 60°, while maintaining the optimal distance, because the rod melts. Monitor its position and the condition of the weld pool. Speed up or slow down your hand movement depending on different conditions and occasions.
The welder selects the angle of inclination of the electrode depending on the spatial position, the weld and the set current. The faster you move the electrode, the less heating of the metal and the amount of penetration. If you move the electrode slowly, you can overheat the metal and burn a hole in the product.
A beginner should first train on his own on a thick sheet of metal. Task: learn how to ignite a welding arc and move the electrode along a horizontal surface to create a high-quality seam.
After this, you can begin welding in other spatial positions. A good help for beginners will be the video - Welding for dummies from FORUMHOUSE , in which technical specialist Denis Zamyslov will talk about the basics of welding skills and choosing an inverter machine.
Sequencing
Step-by-step instructions provide for performing several types of work. First you will need to equip a welding inverter. 2 cables are taken from it. One is for connecting the ground wire.
On another, of sufficient length, an industrial or homemade holder is connected. The process of learning electric welding is quite complex and time consuming.
Current adjustment
The welding manual includes information about machine settings. The welding current is subject to mandatory adjustment . At first you will not need to set the maximum value of this value.
All data is indicated in the table on the electrode packaging. You need to set it to a lower value and start learning.
With experience, when you can light an arc and make a simple seam, you need to set a higher value for the welding current. This will allow the metal to be heated better and a better weld to be made.
Welding arc
It is impossible to imagine welding lessons for beginners without learning how to strike an arc. At first, the electrode will constantly stick to the metal. There are 2 recommended methods for igniting the arc:
- passing the tip of the electrode along the surface of the parts;
- The arc can be ignited by tapping the electrode. Sometimes, when using MP-5 electrodes, the welder has to knock often and for a long time.
In the first case, there are no significant marks left on the parts; the second method is important when there is a large layer of coating on the tip of the electrode. Sometimes you have to grind the ends of the electrodes before welding.
It's very easy to learn. You just tap, and when lighting the arc, the main thing is not to stick the electrode into the molten metal and not to carry it over a long distance. In the first case, the arc will go out. The second option will lead to the formation of strong splashes and damage to the seam bead.
It is better to learn on thick metal. Only after learning how to light an arc and maintain its combustion can you move on to the next stage of training.
We develop the correct angle of inclination
The most common electrode position is between 30° and 60°. It is very rarely necessary to cook while holding the core at a right angle. When choosing an inclination, you need to monitor the behavior of the slag in the weld pool.
It should cover it securely, but without the metal spreading. You can't go too far ahead of the bathtub. To begin with, place the holder at a right angle, and gradually making the angle sharper, achieve normal filling of the weld pool with slag.
The quality of welding depends on the development of the normal position of the electrode holder. A novice welder should work by laying seams only in the lower position, on thick metal.
Having mastered the basics, you can gradually move on to horizontal and vertical seams. Depending on the thickness of the parts, you will also have to adjust the angle. Over time, this operation will be performed automatically.
Secrets and techniques of welding with an inverter for beginners
In this part we will answer the most common questions from novice welders.
benyaFORUMHOUSE user
I'm making a fence from corrugated sheets. I want to weld corners to the posts. I've never done welding before. No experience. Please advise where I should start in order to do it reliably, and how to weld correctly with a welding inverter?
Tips from a FORUMHOUSE member with the nickname vodovoz:
- For welding, take a regular household welding inverter.
- The optimal diameter of the electrode is 2.5 mm; the “three-ruble note” requires more current.
- Light up the electrode. To do this, scratch it on a flat metal surface.
- Lead the welding seam in figure eights. Starting from bottom to top in increments of no more than 1 mm.
- Do not cook the product immediately from start to finish. Make a couple of tacks so that the metal does not move due to heating on different sides.
- If there are voids left after welding and beating off the slag, boil these places again.
- Beat off the slag. Take care of your eyes! Wear safety glasses or do this with a chameleon welding helmet.
HukToFORUMHOUSE user
The most popular electrode in everyday life is the “troika”. Standard inverters pull “four”, and you don’t need more. You can change and select the current strength during the welding process, selecting the optimal mode. Set it too high and you will burn a hole; set it too low and the electrode will stick.
To the treasury of knowledge:
- Welding seams can be horizontal, vertical and ceiling.
- The easiest one for beginners is horizontal.
- It is especially difficult to make a high-quality vertical seam due to uncomfortable working conditions.
The welder’s task is to “blind” the two edges of the metal being welded together and deposit molten metal from the electrode rod on top of the seam.
To weld a steel angle to a metal pole, it is better to use clamps or magnetic angles. If you ask a friend to help hold the workpiece, he may catch the “bunnies” and get burned due to splashes of molten metal.
JamesDouglasFORUMHOUSE User
How to accurately determine the optimal welding current?
Sergeyb3MODERATOR FORUMHOUSE
Take a metal blank. Set the current to higher and cook. If you are burning through metal, reduce the current. Find the amperage at which you will be comfortable cooking without burning through the metal. Experience is gained through practice. Practice on rusty pieces of metal, get your hands on it. After several electrodes burned on tacks due to rust, then, on good metal, things will go faster.
efhFORUMHOUSE user
My advice: carefully clean the welded parts and joints from rust and paint to bare metal.
Sergeyb3MODERATOR FORUMHOUSE
Good advice. You can also learn how to weld beautiful seams vertically. After completing this training, the horizontal seam becomes ideal.
Expert advice
- Use the purchased profile welding strictly for its intended purpose. What works well for joining metal may not work if you want to glue wood or plastic. Waterproof or high temperature options also cannot be fully replaced.
- Universal welding will help out in many cases, but its properties are inferior to specialized compounds.
- To guarantee the quality of the repair, be sure to prepare the area where you will apply the adhesive mixture: thoroughly clean the metal of paint, rust, grease and moisture.
- Follow the instructions exactly and consistently.
Have you already used this amazing invention? Congratulations, there is a reason to celebrate Welder Day with a clear conscience on the last Sunday in May!