It is clear that it is not always possible to fulfill both of these conditions in private houses, villages, and holiday villages (perhaps this is why water intake fittings with a rod valve were used in Soviet toilets). In addition, the reliability of operation of membrane fittings is also influenced by the quality of workmanship and the quality of materials used to manufacture the fittings. Therefore, fittings with a diaphragm valve have to be repaired every few years, but more often they simply need to be replaced, like a used razor; you cannot cut a new membrane from an old tire for such fittings. We'll have to figure out what kind of fittings this is and how it works.
For owners of Jika toilets, as well as toilets equipped with Slovenian-made inlet fittings, I can offer the following diagrams for installing inlet fittings with a diaphragm valve:
Well, for everyone else, I present the following, in my opinion, a more visual model of the operation of inlet fittings with a diaphragm valve. But first it’s better to look at the membrane and see what it is. After watching the video, it will be a little easier to understand what we are talking about:
Operating principle of inlet fittings with diaphragm valve
It was clearly not a Soviet engineer who came up with the idea of using a diaphragm valve in toilet shut-off valves.
The technical solutions of Soviet engineers were always distinguished by their simplicity, which ensured the reliability of the system, and in the event of a breakdown, the ease of fixing the problem. And this applied not only to toilets, but also to spacecraft, the design of which Americans still admire. Toilet bowls of the Soviet period used shut-off valves with a rod float valve based on the principle of back pressure. The water in the cisterns of Soviet toilets was (and still is) noisy, sometimes very noisy: with howling, grinding and rattling, slowly and unevenly, but these are not all the shortcomings of the old fittings. But almost any adult man could repair an old-style toilet, and even my mother-in-law liked to rummage through the cistern without waiting for expert advice. An inlet fitting with a membrane float valve based on the principle of associated pressure is a completely different matter. It works quietly, especially the branded one, water fills quickly and shuts off immediately. But inlet fittings with a membrane float valve also have disadvantages, as does everything in this world. They are connected with the fact that for normal operation of the fittings, a more or less constant pressure in the water supply network is required of at least 0.05-0.1 MPa (0.5-1 atmosphere) and no more than 1-2 MPa and clean water. It is clear that it is not always possible to meet both of these conditions, especially in rural areas, and indeed in the private sector and at all sorts of dachas. In addition, the reliability of operation of shut-off valves with a diaphragm valve is greatly influenced by the quality of manufacture of the valves. So, diaphragm valves, like rod ones, have to be repaired, and more often just replaced, like a used cartridge; for such valves you cannot make a new gasket from an old tire. For those who have decided to first delve into the fittings to clear their conscience, I will try to outline the structure and operating principle of the inlet fittings with a membrane float valve. It’s not that it’s that difficult, but it’s impossible to explain with fingers.
There is a toilet with membrane fittings in almost every second apartment, but there are practically no clear descriptions and illustrations of the construction of fittings with a membrane valve on the Internet. The most informative are the following diagrams, which characterize only 2 types of inlet fittings manufactured in Slovenia:
But understanding such drawings is not always easy for a person without technical education. Perhaps the owners of Jika toilets, which most often have similar shut-off valves, will understand these drawings, and for everyone else I present the following, more visual, in my opinion, model of the operation of a diaphragm valve. But first, let's look at the membrane, what it is, after that it will be much easier to understand what we are talking about:
Position 1. The valve is open, water is drawn into the tank.
The membrane moves back under water pressure and does not interfere with water accumulation (it does not interfere so much that it is not even shown in the figure yet). Water under pressure from the water supply network flows into hole (1) and fills the preliminary chamber. To allow water to enter the toilet cistern, there is a hole (2) in the chamber; this is where the water flows. So far, everything is very similar to a regular stem valve, but we have a diaphragm valve, which means that it has a membrane (3) placed on a piston (4):
There is a hole (5) in the membrane with a diameter of about 1 mm. Through this hole, part of the water enters the filling chamber between the membrane (3) and the piston (4). The filling chamber is not shown in the figure, but can be seen if the membrane is removed from the piston. While the float is lowered, the hole (6) with a diameter of about 0.5 mm in the piston (4) is open, through which some more water flows into the tank. Thus, the water pressure in the preliminary chamber, in the filling chamber and behind the filling chamber is approximately the same and this is the main difference between a diaphragm valve and a simple rod valve.
Position 2. Water entering the tank raises the float.
The float, rising, pushes the rod with the rubber seal towards the hole, the hole is blocked. The rod presses the piston with the diaphragm against the large seat, so the filling chamber becomes sealed, and against the small seat, shown in orange for clarity. The water pressure in the filling chamber plus the pressure from the float presses the membrane tightly against the seats, and the collection of water stops. I didn’t depict how the float, rising, pushes the rod, I think it’s clear, and you can always see by removing the tank lid.
Position 3. Draining water.
When water is released into the bowl, the float drops and stops pressing on the rod. The rod opens a hole in the piston, the pressure in the filling chamber drops. Water under pressure from the water supply system pushes away the membrane and piston and begins to fill the tank. Position 1 occurs.
Theoretically, if water does not fill into the tank, then hole (6) or holes (1) or (2) are clogged, but since the area of holes (1) and (2) is much larger than the area of hole (6), clogging of the holes is less likely . If the water does not shut off, it means that the hole (5) is clogged or the membrane (3) or the rubber seal of the rod is damaged. All this can be washed and cleaned, but if the pressure in the water supply network is lower than the regulated one or changes during the day, then the valve may not work.
At very low pressure, water will not flow into the tank at all. At a pressure of 0.2-0.3 atmospheres, for example, when supplying water from a hanging tank suspended at a height of 2-3 meters, water will not pass into the filling chamber and therefore, when the float is raised, the pressure from the float will not be enough to shut off the water. In this case, you can try drilling holes (5) and (6). The larger the diameter of these holes, the less pressure is needed to push water into the filling chamber. And if the pressure in the water supply changes during the day, and this often happens in houses where the required water pressure is maintained by pumps, and the pumps are turned off at night, then nothing will help, you will have to change the membrane fittings to simple rod ones.
Phase 2. Water entering the tank raises the float.
When the toilet tank is filled with water, the float rises and pushes the rod with the rubber seal towards the hole (6), the hole closes. The rod, moving further, presses the piston (4) with the membrane (3) to the large seat, while the filling chamber becomes sealed, and to the small seat, indicated in orange for clarity in the figure. The water pressure in the filling chamber plus the pressure from the rising float presses the membrane tightly against the seats, and the collection of water stops. I didn’t draw how the rising float pushes the rod, I hope it’s clear, and you can always look at it, just remove the tank lid.
Tools for work
To fix the toilet, the best option would be to call a professional plumber. But if you prefer to carry out such work yourself, then you will need the following tools:
Toilet Repair Tools
- Pliers;
- Adjustable wrench;
- There are two types of screwdrivers: flat and Phillips;
- Various rubber gaskets;
- Silicone sealant.
To fix most cistern problems, your toilet cistern valve will need to be repaired. Now let's directly understand the malfunctions that arise and see how we can eliminate them.
Installation and replacement of drain fittings
Before you begin installing or replacing fittings, you need to prepare the necessary tools: pipe and other wrenches, pliers. Additional materials required include sealing tape, gaskets of different diameters, and flexible pipes. If the tank has two holes, a decorative plug will be needed to cover the unused hole.
Part of the fittings is installed before installing the tank, and then another part. The first stage involves installing the base of the drain mechanism. Secure it with a plastic nut. Next, put a rubber sealing gasket on the nut and attach the tank itself.
The next step is the installation of the device responsible for the flow of water and connecting the hoses from the water supply.
During installation, be sure to adjust the float, levers, and valve. Adjust the float so that it provides the volume of water required for draining. The foam float is easily adjusted - it is moved along the bar. Plastic - by changing the angle between the slats.
You can see what the installation of fittings looks like in the following video:
Inlet valve: its operation, malfunctions and repairs
The cistern inlet valve regulates the flow of water into the cistern through a special lever system. Depending on the toilet model, this mechanism may be located on the side or at the bottom of the tank. If this mechanism is faulty or not adjusted properly, you will face water overflow problem.
What should you do in this case:
- Manually lift the float as high as possible - if in this position the water stops flowing, then you just need to find the optimal height at which this mechanism will operate. To do this, try setting the clamp a little lower or twisting the plastic rod a little.
Usually these simple steps help solve the problem of water overflow. However, if repairing the fill valve does not bring the desired result, you will have to buy a new one. When choosing this mechanism, pay attention to how it is connected to the tank: from below or from the side, and depending on this, select the model. Or purchase a universal model of the filling mechanism - it will fit any type of tank.
Pear malfunctions
The bulb is, at first glance, a simple, but rather problematic element of the cistern: if it fails, leaks cannot be avoided. There may be several reasons for this negative phenomenon, but in practice there are two most common:
- Loss of elasticity. A pear is primarily a rubber device, and as you know, over time, rubber that is constantly in contact with water loses its performance properties: it becomes less elastic and even hard. As a result, the contact of the pear with its saddle is disrupted, and cracks are formed through which water flows out. There are two ways to correct the situation: if the deformations are insignificant, try additionally weighting the pear with a pair of stainless nuts - they will allow the element to come into closer contact with the saddle, but if the pear has been serving for quite a long time, there is only one way out - replacing the product.
- Plaque on the saddle. The bulb may have poor contact with the saddle not only as a result of loss of its elasticity, but also due to corrosion of the saddle itself. The cause of poor fit in this case is deposits of rust and hard water salts. The fix is easy: just clean the seat.
Advice. The best way to remove dirt from the pear saddle is to use sandpaper.
The toilet is leaking: what to do?
First of all, don't panic. If we exclude mechanical damage to the toilet (various chips and cracks), then there will be two reasons for water pouring onto the floor:
- Poor-quality fastening of the toilet with bolts;
- Wear of the rubber seal, which is located between the flush cistern and the toilet bowl.
To eliminate this problem, first try simply tightening the mounting bolts a little more. However, be careful: if you use too much force, you risk damaging the tank and breaking it. Tighten them gradually, periodically checking whether there is a leak or not.
If, after tightening the fasteners, water continues to leak onto the floor, you will have to remove the tank and change the O-ring located on the drain channel. Don’t be lazy, and if you’ve already removed the tank, immediately change the washers that secure the mounting bolts and rubber gaskets, and it’s best to treat all joints with silicone - this will provide an additional guarantee against leakage.
For tanks with bottom wiring, the problem of water leakage may be associated with a worn seal where water is poured. In this case, you will also have to change the seal that has become unusable and secure everything with silicone sealant.
External damage
Such breakdowns occur due to incorrect installation or non-compliance with the operating rules of the device. Let's look at the most common problems and their solutions.
You may be interested in the article “Soldering polypropylene pipes: temperature table, installation instructions + top best pp systems” Go>>
Crack in the base of the toilet
If you pour hot water into the toilet or drop something heavy, the toilet bowl may crack.
How to repair such a crack if it is at the base of the toilet:
- Prevent crack enlargement. Use a small drill to make small indentations along the edges of the crack.
- Sand the edges of the crack with sandpaper.
- Glue the earthenware with epoxy resin or use two-contact glue.
- Do not use the device until it is completely dry.
- If the glue fails, you will have to replace the bathroom.
The fasteners are not tightened tightly enough
If, shortly after installing the toilet, drops of water appear at the connection between the tank and the bowl, then the clamping nuts may not be tightened tightly. Therefore, the tank did not move much.
Tighten the nuts. By lightly rocking the drain tank, check whether they are screwed on well.
The toilet bowl burst
If you stand on the toilet bowl with your feet, large cracks may appear. Water will begin to leak through the cracks. In this case, repairs will not be possible; you will have to replace the toilet with a new one.
Float valve: types of malfunctions and how to eliminate them
The float valve is responsible for the dosed flow and shuts off the water supply. This mechanism is quite simple and reliable, but when it breaks down it can cause a lot of trouble.
The float is designed in such a way that when water is supplied, it rises to the required level, and then, through mechanical traction, shuts off the water supply. When flushing, the opposite is true - the float lowers, allowing water to flow freely into the toilet bowl.
If this mechanism malfunctions, various types of leaks appear (a rusty strip in the toilet bowl is the cause of the float failure).
Types of float valve malfunctions and ways to eliminate them:
- Wear of the gasket: in this case, water will constantly flow into the drain tank without stopping. To fix this problem, you need to replace the gasket.
Toilet cistern valve
Float valve in tank
You can easily repair the float valve yourself using available materials. Only in case of a really serious breakdown, when no methods help, will you need to buy a new one and replace the entire mechanism completely.
There are two other types of cistern problems that you may encounter in your daily life. This is a malfunction of the start button and an excessive noise effect that occurs when water begins to flow into the tank. Both of these problems can also be fixed by yourself.
In the first case, when you press the drain button, the flush does not occur. Typically, the cause of such a breakdown is the chain that connects the external button to the drain mechanism. To fix this problem, you need to loosen the button slightly. To do this, carefully turn the decorative fastening nut several times; this is usually enough for you to slightly lift the tank lid and adjust the trigger chain.
If there is a strong noise effect when filling the tank with water, you will need to put the fallen muffler on a specially designated fitting. This problem usually occurs in tanks with a side water supply. If, after adjusting the muffler, the noise level still remains strong enough and bothers you, you should purchase and install a special float system that has a stabilization chamber. Such systems are practically silent.
So, concluding the conversation about problems that may arise during the operation of the toilet, we note that, first of all, there is no need to panic - these problems are unpleasant, but, in principle, easily solvable. Any repair of the toilet cistern valve can be quickly done with your own hands, having a minimal set of tools and available materials.
Deformation of the siphon membrane
Finally, another frequent failure, due to which water can flow continuously from the tank into the toilet bowl, is a violation of the siphon membrane. In this case, the problem will only be corrected by replacing the membrane with a new one, since the old one cannot be repaired. The procedure is performed according to the following scheme:
- Drain all the water from the tank so that during further actions it does not leak onto the floor.
- Attach the float arm to the cross bar to block the water supply. For example, you can remove the lid of the cistern, fasten a wooden stick in its place and tie a lever to the latter.
- Unscrew the nut that secures the drain pipe to the tank.
- Unscrew the nut that secures the siphon to the float lever - it is usually located at the base of the tank.
- Remove the siphon and replace the deformed membrane. Keep in mind that the new part must have exactly the same dimensions as the old one.
- Reassemble all the elements of the tank in exactly the reverse order.
As you can see, there is nothing overly complicated in diagnosing and correcting breakdowns of the drain tank - most of the problems can be quickly and inexpensively solved with your own hands. So we advise you to carefully study common problems and tips for eliminating them - perhaps your tank does not hold water for precisely one of the reasons mentioned?
Filling fittings (mechanisms, valves) of the toilet tank
Valve for toilet tank INKOER with lateral supply 1/2
Universal fittings (valve) for the toilet cistern. Filling mechanism with 1/2″ side connection. Suitable for older style toilets.
Valve for toilet cistern UKLAD KN-54 with lateral supply 1/2
Universal fittings (valve) for the toilet cistern. Filling mechanism with 1/2″ side connection. Suitable for older style toilets.
Valve for toilet tank RBM KNU-50 with bottom connection 1/2
Universal toilet cistern valve. Filling mechanism with 1/2″ bottom liner. Suitable for older style toilets.
Valve for toilet tank UKLAD KN-55 with bottom connection 1/2
Universal fittings (valve) for the toilet cistern. Filling mechanism with 1/2″ bottom liner. Suitable for older style toilets.
Filling mechanism (valve) for Cersanit toilet tank
Cersanit toilet cistern filling valve with 1/2 inch bottom connection
Filling mechanism (valve) for Monaco toilet cistern
Monaco toilet cistern filling valve (Monaco) with 1/2 inch bottom connection
Ideal Standard toilet cistern filling valve with 1/2 inch bottom connection
Filling mechanism for Ideal Standard toilet with bottom connection.
Siamp fill valve
Siamp filling mechanism with adjustable water fill
Valve for toilet tank RBM KNU-50 with lateral supply 1/2
Universal toilet cistern valve. Filling mechanism with 1/2″ side connection. Suitable for older style toilets.
Valve for toilet tank ANI WC 5510 with bottom connection 1/2
Universal fittings (valve) for the toilet cistern. Filling mechanism with 1/2″ bottom liner.
Fill valve for Cersanit toilet 1/2 inch
Fill valve for Cersanit toilet cistern with 1/2 inch connection
Filling mechanism (valve) for Cersanit toilet tank
Cersanit toilet cistern filling valve with 1/2 inch bottom connection
Valve for toilet cistern LAB011 3/8
Compatible with any types and models of flush tanks, both with bottom and side water supply. Adjustable for any height of the toilet tank, with any volume of water.
Toilet filling valve IDO (IDO) Seven D
Original toilet fill valve IDO (IDO) Seven D
Valve for toilet cistern ANI WC 5010 with 1/2 side connection
Universal fittings (valve) for the toilet cistern. Filling mechanism with 1/2″ side connection.
Inlet coupling for filling the toilet tank IDO (IDO) Trevi E and Mosaik
Coupling for connecting the hose supplying water to the flush cistern of IDO toilets. The gasket is included in the delivery set.
Geberit inlet valve diaphragm assembly with bottom water connection of the toilet cistern
Geberit membrane filler assembly for toilets with bottom water supply. Used in GUSTAVSBERG toilets | VILLEROY & BOCH | DURAVIT | LAUFEN | GEBERIT | JACOB DELAFON | TWYFORD
Filling fittings for AlcaPlast installation with 3/8 inch connection
Alcaplast installation inlet valve with 3/8 inch connection
Filling fittings AlcaPlast with bottom connection 1/2
Inlet valve (fittings) with bottom water supply 1/2″ with metal thread. Closing is smooth - without impacts. Manufacturer Alcaplast - Czech Republic.
Valve for toilet cistern RUSSIA “LUX” side water supply
Valve for flush tank RUSSIA “LUX” side water supply
Filler fittings for AlcaPlast toilet with 3/8 side connection
Inlet valve (fittings) with side water supply 3/8″ with plastic thread. Closing is smooth - without impacts. Manufacturer Alcaplast - Czech Republic.
Filler valve with bottom connection for Oli Uni Bottom toilet
Weight, kg: 0.2 Country of origin: Portugal Height, mm: 385 Material: ABS plastic Brand: Oli Connection diameter, inch: 1/2 Type: flooded Connection option: bottom
AlcaPlast toilet filler fitting with 3/8 bottom connection
Inlet valve (fittings) with bottom water supply 3/8″ with metal thread. Closing is smooth - without impacts. Manufacturer Alcaplast - Czech Republic.
Repair kit for single-mode toilet fittings IDO (Ido)
Repair kit for single-mode fittings IDO (Ido) Repair kit for drain mechanism and inlet valve Ido StopNoise III for Ido toilets with one water flush.
Inlet fittings for toilet cistern Ideal Standard
Inlet fittings for tank Ideal Standard WW965403
Fill fitting (valve) for a Cersanit toilet tank with 1/2 inch bottom connection
Universal filler fitting (valve) for Cersanit ceramic tanks with 1/2″ inch bottom connection
Filling mechanism (valve) for Roca toilet cistern with 1/2 inch bottom supply
Original Roca filler (valve) mechanism with 1/2 inch bottom water supply
Fittings for Jika toilet cistern (Jika) with 1/2 inch bottom supply
Original fittings for the Jika toilet cistern with a 1/2 inch bottom connection
Inlet valve (fittings) for Roca toilet with 3/8 inch bottom connection
Original filler fitting (valve) for Roca toilet cistern with 3/8 inch bottom water supply
Filling mechanism (valve) for Jika toilet cistern with 3/8 inch side supply
Original fittings for the Jika toilet cistern with 3/8 inch side water supply
- To the begining
- Back
- 1
- 2
- 3
- 4
- 5
- Forward
- In the end
Troubleshooting toilet tank filler fittings is a serious problem in plumbing repairs.
You can buy a toilet filler valve at an affordable price in Moscow in our AQUASLIV online store with delivery to your home or office.
Conclusion
The hose for supplying water to the toilet is a small but very important detail. This is where leaks often occur and cause big problems. Knowing the procedure for connecting the drain tank to the water supply network, and carefully following all the recommendations, you can be confident in the reliability and durability of the connection.
But it is equally important to correctly connect the toilet to the sewer pipe. You can learn about our topic more clearly from the video in this article.
Did you like the article? Subscribe to our Yandex.Zen channel
Toilet design
Structurally, a standard toilet consists of two main parts: a drain (flush) cistern and a bowl. These parts are containers, the first of which serves to accumulate water, store it and drain it into the bowl, and the second is connected to a sewer riser where the contents from the bowl are flushed.
Modern types of bowls contain the following elements:
- the bowl itself with fastening ebbs;
- release device;
- plastic seat with cover included.
Bowls for installation in apartments are cast from porcelain or earthenware. Plastic and metal products are installed in non-residential buildings. In old houses there are still cast iron toilets, but they are unlikely to be found on sale.
The outlet from the bowl is designed with the outlet pipe bent upward so that there is always water at the beginning of the bend. A water seal is formed that prevents unpleasant odors from the sewer riser of the house from penetrating into the toilet room.
There are two groups of toilets based on the design of the outlet pipe:
- with a horizontal outlet, when the direction of the pipe is parallel or at a slight angle downward to the floor surface;
- with a vertical outlet, in which the pipe is directed vertically downwards.
The second option has not become widespread in Russia due to standard designs of sewerage installations in residential apartment buildings, which do not make it possible to install toilets of this group. It is suitable for private homeowners who build their homes according to their own designs.
The drain tank is a reservoir for flush water and is always located above the location of the bowl. The higher the tank is installed, the more powerful the flushing water flow and the cleaner the bowl.
The tank in modern plumbing is attached:
- directly on the mounting shelf on the back of the toilet bowl (“compact”, the most popular option);
- to the wall at a certain height from the installation of the bowl (suspended structure);
- hidden in the wall (built-in tank).
There are only two devices inside the tank: a water accumulation system and a drainage system. These devices have shut-off and drain fittings, including a shut-off valve and a filling and water level adjustment valve. This also includes a float and a water drain lever.
What is eyeliner and what types does it come in?
The liner is a tube that connects the drain tank and the pipe of the water supply system. Usually it comes in two types:
- Flexible;
- Tough.
Supply system for the toilet
The flexible hose consists of a rubber hose with a metal coating, fittings, gaskets and nuts. It's essentially just a braided hose. When buying such a hose, you must pay attention to the thread, otherwise it may not fit later and you will have to look for another hose model. Instead of rubber, a rubber hose can be used. This type of eyeliner is more expensive and of better quality. Cheap options usually don't last long. Even metal braiding cannot protect them from breakage and crumbling.
The braiding material is usually aluminum or stainless steel. Condensation often accumulates on their surface, which also reduces the service life of such liners. Due to oxidation, the reinforcement weakens and eventually fails. It happens that galvanized wire is used as a coating. It rusts quickly, so its service life is even shorter.
The stainless steel coating protects the rubber hose longer and lasts an average of 8 years. However, before purchasing it, also ask what pressure it can withstand.
Another option for connecting the water supply to the tank is to use a corrugated metal liner. This is one of the most reliable options. Each structural element that comes into contact with water during operation is made of stainless steel. Thanks to this, the product has one of the longest service life. This eyeliner will not have to be changed for a very long time.
Rigid liner to the toilet
Inlet fittings
There are two types of tanks based on water inlet:
- side water inlet, when the inlet of the tank is located on its side in the upper part;
- bottom inlet, suggesting the location of the water inlet from the bottom of the tank.
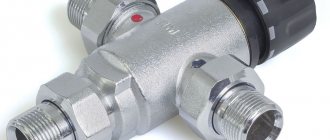
In flush tanks with a side water supply, a liquid inlet valve is located at the inlet. Connected to the valve is a shut-off device consisting of a horizontally located float on a curved brass lever (rocker arm). In tanks with a bottom water supply, the inlet valve is also located at the bottom inlet, but the float is not located horizontally in the tank, but vertically. In any intake design, the main part of the intake valve is the diaphragm. Occasionally, a piston valve is used instead of a diaphragm valve.
There is nothing complicated about the water drainage mechanism, although there are many modifications associated with saving water. The mechanism drains the existing water supply into the toilet. Part of the drain is the overflow from the tank, which prevents the tank from overflowing in cases where the water inlet valve is faulty. The drain system includes the release valve, release lever (or button), release valve seat, stem, and stem guide.
Causes of problems with water intake
In a situation where water does not flow into the toilet tank, you need to pay attention to this problem and try to fix the breakdown as quickly as possible, otherwise the plumbing fixture can completely fail at any time and will need to be replaced.
In order not to pay money for the services of specialists or not to purchase new equipment, you can try to cope on your own with the fact that the toilet tank does not fill or it does not happen quickly enough. But first you need to find out why the breakdown occurred.
You should not immediately completely disassemble the device; you must first make sure that there is water in the water supply system. According to professionals, about 40% of water drainage problems occur due to the fact that it does not enter the device. First, you should find out whether there is a water supply in the house or riser, and only then look for the reasons why water is not filling the toilet tank.
When the system is full and the pressure in it is sufficient, but the device is not working, this indicates the presence of another type of breakdown. To be completely sure that everything is in order with the water supply, it would be best to talk about this topic with the neighbors living in the apartments above or below.
Problems with plumbing drainage occur when:
- The float is in the wrong position. This malfunction causes water to poorly fill into the toilet tank. Sometimes the toilet tank leaks for this reason, which is very unpleasant. This should be checked first, since the float can block and leak fluid in different positions.
- The water supply hose is clogged or damaged. Such malfunctions lead to a slow flow of water from the system, and sometimes to its complete shutdown.
- Sand or grains of rust have accumulated in the place where the pipe connects to the device or in the filter. This circumstance may explain why water is drawn slowly into the toilet tank. Typically, blockages occur as a result of repairs to utility lines.
- The exhaust valve is damaged, clogged or broken. This is one of the possible reasons for the occurrence of such a problem as water does not fill into the toilet tank.
It is necessary to make sure that there is no plaque or mucus on the plumbing components, since their presence may result in damage to the device.
Mechanism operation
The operating principle of the entire flushing device is no different from the long-used model. The drain from the tank in modern versions of the toilet is absolutely identical to the drain in the corresponding devices of the Soviet era. The liquid in the tank comes from the apartment's water supply. To turn off the water supply to the toilet, there must be a shut-off valve. Malfunctions with the toilet happen no less often than with the water supply, and most importantly, they do not coincide in time. In order to fix problems with the toilet, you need to shut off the line from the water supply.
If the water is drained from the tank, then the float is in the bottom position of the tank , opening the path for water to enter through the inlet valve. As the liquid level in the tank rises, the float rises, gradually closing the inlet valve. Having reached a certain level of liquid in the tank, a pop-up float through a rocker arm connected to the valve membrane completely blocks the flow of water into the tank. At the same time, the pressure force of the liquid level presses the diaphragm release valve located on the drain rod to its seat. If the valves are in good working order, the drain system does not allow liquid to pass out of the tank.
To activate the flush, you need to pull the lever or press the release button on the tank. The release valve opens. Water rushes into the toilet bowl. The dual-mode tank has two release buttons: a small volume of working fluid for flushing and a full flush. Once the reservoir is empty, the inlet float is in the down position and opens the inlet valve. The system operation cycle repeats.
To assemble and use a toilet with all devices, you need to follow the algorithm (using the example of the popular “compact” type with horizontal outlet):
- turn off the water to the old toilet;
- dismantle the old toilet and cistern;
- install the bowl and mark the mounting points if they do not match the old ones;
- drill holes and insert dowels into them;
- place the bowl in place, insert the fasteners and lightly secure them;
- check the level of the installed bowl;
Signs of leakage
If the tank is leaking, you can observe the following:
- you can hear falling drops of water or a flowing stream;
- you can see rusty stains, lime deposits on the walls of the tank;
- a small wet trace is visible in the toilet bowl, which remains after flushing;
- the appearance of condensation on the outside or on the hoses;
- The water does not go away quickly after pressing the button.
If the water does not drain quickly or the level is incorrect, then the water pressure is not sufficient to pass the waste through the water seal. And some of it remains in the toilet bowl.
As soon as you detect one of the listed symptoms, you need to determine the cause and eliminate the problem.
What types can there be?
Before deciding how to choose fittings for a toilet, let’s try to understand what should be understood by the word “fittings”. This word should be understood as all the constituent elements that are aimed at ensuring the operation of plumbing, which includes, among other things, the toilet.
According to the functions performed, the following types can be distinguished:
- fittings that block the flow of water after the tank is filled;
- fittings that provide drainage of liquid.
Each type constitutes separate mechanisms, which, nevertheless, are closely related to each other. The latter circumstance leads to the fact that if one of them breaks down, the second one stops working too.
How to install new fittings
Included with the new fittings are instructions for use. First of all, let's get acquainted with the instructions.
- 1. We install a valve that regulates filling using gaskets and adapters. There are plumbing models in which the inlet and filler mechanisms are installed simultaneously.
- 2. The fittings can be inserted into the tank before installing the toilet; we place the gasket on the upper surface of the drainage system and place the device in the tank, fastening it with nuts.
- 3. Rubber gaskets are used for internal fasteners, and plastic gaskets for external fasteners. The internal gaskets can be lubricated with silicone sealant for sealing. We replace old gaskets after disassembling the device.
- 4.If possible, the gasket connecting the tank and toilet bowl is also lubricated with sealant.
- 5. The fittings must be located at a distance of at least half a centimeter from the walls of the drain container.
- 6. Having completed the installation, the tank is attached to the toilet bowl.
- 7. Close the tank with a lid by screwing on the drain button.
- 8.Connect the water and perform a test drain.
Types of drain devices
There are two main groups of toilet flush mechanisms, which are distinguished depending on the actuation:
Drain device
- Exhaust,
- Push.
The first ones are also called stock ones. This name is due to the fact that to activate such a device, you need to lift the rod up using the handle, and then the drain hole will open. Almost all new toilet models do not have such a system. Mostly manufacturers have used it before.
As for the second type of drain mechanism, it is also called push-button, and it has two subgroups:
- Single-mode flush - such a device has only one button or key that must be pressed so that water from the tank splashes into the toilet.
- Dual-mode drain - this device has a button of two halves, or two buttons. One half operates the mechanism so that only half of the water splashes out of the tank, and the second serves to release all the water at once. It is also called a toilet cistern valve device with two buttons.
There is a third type, these are tanks with a stop function. They have one key, but water can be released in different ways. To adjust this, you need to press the button more than once. For example, if you press it once, water will begin to splash out of the container, and if you press it again at this time, the release will stop and the valve will close it.
Types of drainage system
In addition to the internal configuration, the shut-off valves of the flush tank differ significantly in the material of manufacture, which affects the quality and service life of the toilet itself.
Material options for the production of toilet fittings:
- Plastic: Due to the low cost and availability of the material, polymers have rapidly conquered the market in absolutely every industry. However, plastic is a fickle material; the quality and durability of the components, as well as the direct operation of the drainage system, depend on its composition. Previously, the quality of shut-off valves could be judged by the cost of the product itself, however, today there are too many new young manufacturers on the market offering high-quality products at low prices. And established well-known brands allow defects, which leads consumers to doubts. Therefore, today it is very difficult to distinguish reliable toilet fittings from fake ones. Unfortunately, this difference is revealed only during the operation of the toilet.
- Metal: a material that provides high strength and significant service life of shut-off valves. To produce drain systems, modern manufacturers use brass and bronze compounds, because they are truly resistant to mechanical damage and the effects of water. The fittings of the cistern, made of similar metals, do not corrode for several years, maintaining all functional qualities. Metal shut-off valves are typical only for expensive models produced in the appropriate style.
As practice shows, toilets with plastic fittings are in greatest demand, which is understandable. Affordable cost and the ability to repair at any time determine our choice.
The cistern fittings are the basis for the operation of the entire toilet. Water is supplied in two ways: side or bottom. Side water supply is characteristic of our domestic plumbing and is characterized by rather high noise. The lower water supply is much quieter than the upper mechanism.
Before you begin repairing a toilet, you need to familiarize yourself with its design.
Both with side and bottom water supply, the valve closes under the influence of a control rod connected to the float. A float is a kind of plastic container or a small foam element.
Regardless of the type of water supply, the float is carefully balanced during installation of the fittings. Such work is necessary for the efficient and reliable operation of the cistern, which directly depends on a certain water level in the system.