/Repair/Plumbing/
So, you bought a faucet to replace an old one or to equip a sink with a new set and decided to take on the installation yourself. On the one hand, connecting and installing a faucet on the sink with your own hands is very simple - anyone can do it. On the other hand, even having some experience, but not knowing the basic rules, you can do the work poorly or completely ruin the product, for example, by knocking off the thread, bending the connections, etc. Another reason why you still have to contact a plumber is this is the lack of a set of plumbing tools. But this problem is completely solvable, because you can always ask your friends for something.
We tried to explain as clearly as possible how to install a faucet in the kitchen with your own hands, reliably and correctly.
List of required tools and spare parts
Before you begin installing kitchen plumbing with your own hands, you need to prepare and purchase everything you need. You will need:
- FUM sealing tape - it’s better not to use flax tow, as it swells with water, and then it will be difficult to remove the liners;
- Open-end wrench 10 or 11;
- Tubular wrench – needed to tighten a hard-to-reach nut when installing the faucet to the sink;
- Installation kit - it should contain rubber O-rings, that is, half washers (2 pcs.), one horseshoe-shaped metal half washer, a stud (1 or 2) and a nut. This set is included with the mixer, but if you wish, you can buy a thicker and stronger O-ring, since manufacturers do not always include high-quality gaskets in the kit;
- Pliers, a small wrench, a screwdriver - sometimes these are also needed;
- A rag, a basin and a flashlight will also come in handy so that you can see everything;
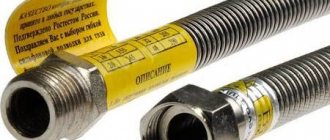
- And finally, the main thing - 2 plumbing connections - are included in the kit, but it is better to buy others, since the factory ones are often short and made of silumin;
Perhaps it’s worth paying attention to the eyeliners. Keep in mind that:
- The eyeliners need to be of such length that they do not break, but bend in the form of a semicircle, that is, they should not be too long or, conversely, short when tight. The most common length is 86 cm;
- If the factory eyeliner is too short, then it is better not to try to extend it, but to buy a new one;
- In addition, do not buy silumin hoses, especially if you bought a silumin mixer - at least the connections should be reliable;
- Installation of flexible hoses is easier than connecting rigid ones, but they are considered less reliable, so it is better to install them together with tap taps;
- The set of eyeliners must include gaskets;
- Replacing an old faucet in the kitchen most often involves replacing the old connections, because they also wear out.
How to choose a kitchen faucet?
On sale you can find a huge number of different options for mixers, which differ in design features and materials of manufacture.
Previously, most products were made of durable metal, and they were wear-resistant. Now cheaper and lighter alloys, such as silumin, are often used in production.
The silumin mixer looks nice, but is not reliable
Such designs will definitely not serve you for many years, but at the same time they have a minimal cost. Installing a cheap faucet is dangerous, because it can suddenly leak when the residents are not in the apartment, which is fraught with big problems.
This is why experts recommend purchasing high-quality products, despite the fact that they have a higher price. You can distinguish a reliable mixer by its weight - any brass structures are an order of magnitude heavier than silumin ones.
Table No. 1. The most popular faucet designs.
| View, illustration | Description |
| With one lever (cartridge) | The mixer is designed in such a way that there is a cartridge inside it. When the lever is lifted, the valve opens and tap water flows. The water temperature changes by manually turning the lever to one side. Such a mixer is unsuitable if a flow-through water heater with the ability to change the temperature regime is installed, since it is impossible to smoothly adjust this lever. Otherwise, this type of mixer is convenient for the kitchen, because it can be operated with one hand, which is extremely important during the cooking process. |
| With two valves | This design has been used for a long time, so of all the possible options it is the most practical. In this case, shut-off valves are attached to individual channels, and to supply water you will need to open one of the valves (from either side). It is worth noting that this design consumes much more water compared to the previous option. |
| Sensory | This is the most modern type of design. The sensor is triggered by hand movements, due to which the magnetic valve opens and water is supplied. This is very convenient for the housewife, because she doesn’t have to dirty the tap with dirty hands. However, such a product has two significant disadvantages. The first is high cost. Secondly, the mixer will not function without electricity, and if the lights go out, it will not be possible to turn on the water. |
With retractable watering can | This type of faucet will be needed only if the housewife needs to wash a large amount of dishes every day (if she has a large sink). In other cases, its installation will be unprofitable. |
When purchasing a mixer, you should pay attention to the following nuances:
- Sink dimensions. Based on the size of the sink, you should choose the optimal length and height of the tap. So, according to the standard, the stream of water that comes out of the tap should fall into the middle of the sink. The height of the spout should be positioned in such a way that the mixer is comfortable to use. However, the jet cannot be too high, otherwise the water will only splash on the sides along with greasy drops from the dishes.
- The location of the recess for installation and its diameter. To avoid having to enlarge the hole in the sink, you should choose the appropriate flange size. If you have an atypical hole, you will need to purchase an adapter.
- Rotate the tap. The choice of the optimal option will depend on the number of sinks. So, if there is only one sink, then a 90-degree turn is sufficient. If you have two sinks, it is better to choose a mixer with a 180-degree rotation.
- Appearance of the product. For many, this nuance is of great importance, because the mixer must be combined with the sink. If desired, you can purchase chrome or matte products, or to match the color of the sink itself.
The modern market offers faucets to suit any kitchen design
Basic criteria for choosing a kitchen sink
Step 1. Dismantling the old mixer and preparing for installation
Before installing a faucet in the kitchen, you need to turn off the water (there is no need to turn off the riser) and, just in case, put a rag on the bottom of the sink so that small parts do not fall into it, and large parts do not damage it.
Of course, replacing a kitchen faucet requires dismantling the old faucet. To do this you need:
- First, disconnect the old hoses from the cold and hot water pipes by hand or with an open-end wrench. Do not forget to place a basin under them and drain all the remaining water, after which the threads of the pipes must be wiped clean.
- Then, using a tubular wrench, you need to unscrew the clamping nut on the stud (or two studs), which secures the faucet to the sink (right under it). When you unscrew this nut, the metal half washer will also come off.
- Now you need to pull out the mixer along with the hoses from the sink hole. Well, that's all, you can proceed to the next step.
Installing a new faucet
As we said earlier, faucets are installed directly to the sink or countertop.
Faucet option with studs
A good mixer always includes nuts, special brackets with recesses for studs, and rubber gaskets of the same shape.
The second version of the mixer is with a clamping nut
This type of faucet is best suited for stainless steel construction. The main thing is that the surface of the sink is not corrugated, otherwise it will be difficult to press the nut tightly.
Nut fastening: step-by-step instructions
Step 1. First of all, we need to fix the rubber gasket at the end of the mixer, where there is a corresponding recess for it.
We fix the seal
Step 2. Now you need to insert the thread of the mixer into the prepared hole in the sink itself.
It is important to ensure that the polymer gasket does not fall out
Step 3. Now you need to fix another gasket from below. It is usually included as standard.
We fix the seal at the bottom
Step 4. Next, tighten the nut. There is a wide part at its end, thanks to which it is pressed as tightly as possible.
The nut must be securely fastened
Step 5: Next we will need to use an adjustable wrench to tighten the nut. It should be secured so tightly that the mixer cannot be moved. At this stage, it is important to calculate the correct direction of the tap - now you can still adjust the position of the mixer.
Securely fasten the nut
Step 6. Now you need to install flexible connections.
First of all, fix the eyeliner with a shortened fitting
Here you no longer need to use any additional seals, because the fitting already has rubber gaskets, thanks to which the fastening will be airtight. In this case, it is necessary to tighten it tightly, but do not overdo it, otherwise the gasket will become unusable.
Using the same principle, we tighten the eyeliner with a long fitting.
Now you need to install the sink in place.
Stud fastening: step-by-step instructions
The main feature of this method is that all flexible hoses are fixed before the tap is installed, otherwise they will not be able to be properly secured.
Step 1. First, we need to unscrew the nuts, after which they should be fixed at the bottom of the mixer. You can quickly tighten them using a screwdriver - in this case, it is not recommended to tighten the studs too tightly.
This is what the mixer should look like after installing the studs
Step 2. Now you need to insert flexible hoses into the prepared hole so that the fittings are on top. As in the previous case, the short and long fittings should be secured. Next it’s time to start installing the mixer.
Installing the structure in the recess
Step 3. You need to attach a polymer gasket to the studs, and then a metal plate, which is included in the package. Now the nuts are fixed to the studs and screwed.
Now use a wrench to secure the nuts as tightly as possible.
This is what the bottom of the system should look like after installation is complete.
It is important to pay attention that there are no gaps left near the mixer. This usually happens if the hole is too wide.
Now all that remains is to return the sink to its place.
Video - Installing a faucet on a sink
How to connect filters
Using clean water for drinking and cooking is one of the ways to maintain health – for you and your loved ones. Nowadays, it is not difficult to obtain potable water in an apartment. Special filter systems will help cope with this task.
If you have already purchased a water purification kit, you will have noticed that it includes several straws, a mini-faucet and a key. Keep in mind - you will not need any sealing tapes, sealing pastes or threads.
Step-by-step instructions for connecting the filter system
- Turn off the cold water using the tap located under the sink. It is located on the pipe and a cold water supply is connected to it for supply to the mixer. Don’t confuse it with a “hot” tap - open cold water and check if it flows.
- We unscrew the hose and instead mount the tee that came with the kit, and then screw the liner to it. Open the cold water and check the tightness of the joints.
- We decide on the location of the filter installation. It is better to place it on the side wall of the cabinet. We advise you to place it in such a way that the filter that performs rough cleaning is easily accessible - you will change it more often than others. There should be at least 10 cm at the bottom so that replacement can be done without hindrance. Leave a distance of approximately 10 cm from the doors at which it cannot damage the hoses. The kit includes a template that will facilitate the fixation procedure. We screw the screws into the marked points.
- We remove the plugs and connect the tubes to the filter in accordance with the arrows indicating the correct direction in which the water should move in it. First, we insert the tube through which untreated water is supplied from the system and connect it to one of the outlets of the previously installed tee. Then insert the outlet tube into the filter with the side without the metal tip until it stops.
- We connect the faucet for drinking water from the kit or a special mixer with two spouts - one for ordinary water, the second for drinking water. Such a device allows you to avoid making additional holes in the sink or countertop, but it will cost more than the standard version. Another drawback is that if the mixer fails, you will not have a single source of water left.
A separate faucet must first be secured to the sink or work surface, and only after that the filter tube must be attached to it. To install a two-in-one faucet, you need to find out whether the design has an adapter into which you can insert a drinking water supply tube. If there is none, you will have to cut off the metal tip from the tube and put a nut on it. After this, insert the fitting and screw the nut onto the thread.
- Check the tightness of the system and rinse the filter for 4 minutes. The water may contain impurities and white foam.
To the car wash
This option is considered the most standard. Many video instructions are devoted specifically to attaching a faucet to a sink (sink) in the kitchen.
Here you will need to do the following:
- secure the wiring to the mixer, ensuring the tightness of all connections with FUM tape;
- install the rubber gaskets exactly in the groove;
- place the tap on the sink, pushing it through the wiring hole;
- pass the pressure plate through the wiring, screw in the threaded pins and attach the nut;
- fix the tap in the desired position, tighten the nut;
- check if everything is in its place;
- connect the hoses to hot and cold water using seals.
It is best when the sink is not yet installed on the countertop. This will allow you to turn it over if necessary.
Can be attached to an existing sink. But it's more complicated. You will have to crawl under the sink, which is not always convenient.
Tips for caring for your faucet
Regularly following relatively simple step-by-step instructions will allow you to maintain a decent appearance for a long time and extend the service life of the device, namely:
- Vinegar 6% can remove rusty deposits from the faucet filter, surface and sink.
- You can increase the service life of the faucet by rinsing it after each use with running water and wiping it dry.
- It is necessary to regularly clean the mechanism to avoid lime deposits.
- When caring for a polished surface, detergent should be applied to a sponge and only then cleaned.
- No matter how much you use cheap and aggressive cleaning agents for washing, there will be no effect - they will corrode the surface.
- When treating chrome surfaces, avoid using products that contain perchloric or formic acid.
- You should not use metal or iron mesh when washing the faucet, as they can not only clean, but also scratch the surface, which will subsequently lead to erosion of the metal.
- If the valve is stuck, then before repairing it you need to close the access riser.
A thoughtful approach to choosing a model, proper installation and regular maintenance of the mixer will provide its owner with proper comfort.
What is needed to repair a faucet?
Unfortunately, you cannot fix the faucet with your bare hands. In order to get started, you need to make sure that you have the following tools:
adjustable wrench
is a must-have tool for your home if you are going to do any plumbing repairs yourself.
Pliers
can be useful for unscrewing nuts in hard-to-reach places.
Fum tape
for sealing threads;
Pad
for the mixer and all connections.
Hexagon and screwdriver set
will be required when disassembling valves, removing handles and mixer heads.
Sharp knife
may be needed when adjusting rubber seals or removing plugs.
Installation errors and ways to prevent them
When installing yourself, you should avoid common mistakes:
- Kinking of hoses.
- Water leaks after the process is completed. To eliminate this problem, rubber gaskets, linen seals and FUM tapes are used.
- Excessive tightening of nuts at the junction of the pipeline and hose. Gaskets will also help here, and docking work must be done manually, slightly tightening with a wrench.
Following the above recommendations will prevent incorrect operation and premature failure of the equipment.
Types of mixer fasteners
Installation of the structure on the countertop
Before installing a faucet of one type or another in the kitchen, you should think about its mounting. Modern models include three types:
- To the tabletop - this type of fastener is suitable for contactless, valve, lever options. First, a hole is made in the table cover of the headset by drilling. Then the connection to the water supply is carried out using hoses.
- To the sink is one of the simplest ways to connect the equipment yourself. This type of installation is suitable for all types of faucets.
- To the wall is a labor-intensive option that requires precise calculations and selection of a special faucet model with the ability to connect to the wall surface. Correct connection is made using pipes, which are then retracted into the wall (masked).
These types of fasteners differ in time costs, required materials and effort expended.
Causes and signs of faucet failure
Regardless of what type of faucet you have, the signs of failure will be similar for all models. The first step is to determine where exactly the problem occurred:
- Water began to flow between the sink body and the faucet;
- The faucet drips even when the lever or valve is closed;
- When the tap is open at full capacity, water still flows in a thin stream;
- Water flows from under the mixer fittings;
- Puddles form under the sink and leaks in the area where the hoses and pipes are located.
After a quick analysis of the problem that has arisen, let's figure out what the problem might be.
Weak water pressure in the tap
If the water pressure is low, first of all pay attention to the filter aerator and make sure that it is not clogged. If everything is in order with the filter aerator, then the cartridge or shut-off valve may break, as well as wear of the gaskets.
The faucet is leaking under the sink
If you notice that water is constantly flowing under your sink, we recommend that you pay attention to the hoses and gasket, which is located at the connection between the hoses and the mixer body. If your fears are confirmed and there is a problem with the flexible hoses or gaskets, then immediately go to the store to purchase them.
Gander leaking
A faucet leaking from under the gander may indicate damage to its body, most likely caused by a clogged filter. In the case where the mixer is a single structure, it is necessary to completely replace the body. If you have a two-valve mixer, then the gander can be easily replaced with a new one.
Water is leaking from the faucet body
The cause of such a breakdown is usually worn out gaskets at the junction of the main body with the rotating body of the spout, or at the place where the cartridge is located.
Water leaking from valve or lever
The problem associated with water leakage through a valve or lever may be caused by a loose fit of the ceramic cartridge or oil seal in the mixer seat, wear of the cartridge discs or the faucet valve.
Other causes of leakage
It also happens that there are no obvious reasons for a leak, but water appears somewhere or the mixer does not work as well as before. This may be due to the formation of limescale deposits on plumbing parts and it is necessary to disassemble the mixer to completely clean it with special means for cleaning sanitary equipment from limescale.
Briefly about the main thing
The causes of faucet leaks are most often faults associated with gaskets, faucet axle boxes or cartridges in single-lever models.
Crane axle boxes can be of two types: for worm-type ones, the seal is located on the rod at the base; for ceramic ones, three different gaskets must be replaced at once (the insert must be disassembled).
In the case of cartridges, as a rule, the mechanism itself has to be changed.
A moving spout (gander) can also leak due to a faulty gasket.
Repair of a mixer begins with shutting off the water flow in a specific section of the pipeline with a shut-off valve and draining the residual water.
To disassemble plumbing fixtures, you may need an adjustable wrench, wrench, screwdriver, or hex wrench.
Reassembling the device is carried out strictly in the reverse order by performing actions similar to disassembly.
Ratings 0