From the author: Hello, dear visitors of our construction portal. Not so long ago, when carrying out repair work, we were all forced to use various complex and not very accurate methods for various types of measurements.
Fortunately, progress does not stand still. More and more tools are appearing in modern stores that make life much easier and save us a lot of time and nerves. And today we will talk about one of them.
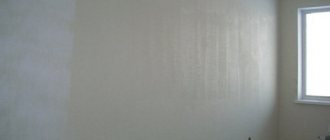
During repairs, a very important procedure is to check the evenness of the walls. This is especially true in old houses, where not much attention was paid to this issue during construction. Curved walls, the presence of bumps and dents on them and other defects are ways to completely spoil the impression of the most luxurious renovation.
That is why it is necessary to carefully measure their evenness. And today a laser level, which is also called a level, helps us with this. Today we will talk about how to use a laser level to check the evenness of a wall, how to use it at all stages of work - when determining how crooked the rough surface is and how much plaster it will need, when checking a finished one to see how well the builders plastered it, yes and during the plastering itself.
Bubble level (spirit level)
The most common construction-grade model, since it most often allows you to work in both vertical and horizontal space, does not require the help of a partner and is inexpensive.
Used when installing windows, doors, mounting stairs, laying flooring, attaching shelves, sinks, and so on. The bubble level looks like a large ruler with ampoules filled with colored liquid. The body is most often made of aluminum. On the one hand, this is good, since you often have to work with a spirit level at heights, and aluminum is a lightweight material. On the other hand, if dropped, especially from such a high height, the instrument can easily be damaged and will no longer be accurate.
There are usually 2 or 3 ampoules on a spirit level. Most often they are filled with alcohol, sometimes it is tinted with fluorescent liquid to make it easier to work in the dark. The ampoules help determine vertical, horizontal and 45 degree angles. Alcohol does not freeze at subzero temperatures, so the tool can be used even in winter.
Settings
After purchase, the spirit level must be checked and, if necessary, adjusted. This procedure is also indicated after the instrument has been dropped or damaged.
You need to fill a large container with water, put a thin piece of polystyrene foam - this will create a perfectly flat surface. If the spirit level shows an error, that is, the bubble is not exactly in the center, you need to twist the ampoule with alcohol around its axis, thereby adjusting it.
Operating rules
Such a tool has a working surface, usually it is “back”, absolutely flat, without markings, and sometimes not painted. If you do not work with it, slight errors may occur due to the protruding surface of the front side.
It is wrong to place a corner in the wall with its side, since in this way no objective data will be obtained, because a non-existent surface is being measured. The most that can be said is whether there are any dips or bulges on the wall under the instrument.
Most often, a “bubble” is used, which is located in the center of the spirit level - it allows you to determine the horizontal - that is, a plane parallel to the horizon. This will come in handy when working with floors, ceilings, doors, windows, and so on.
The bubble perpendicular to it is responsible for the vertical, that is, everything that is located at an angle of 90 degrees to the floor: these are slopes, doors, arches, pillars, etc.
Let's say we need to hang a shelf. To do this, take it in your hands, place the level on top with the bubble up and bring it to the intended location. Next, we observe the bubble: if it is tilted to the left, it is necessary to lower the left side or raise the right side. And vice versa. Next, we make notes with a pencil and remove the tool.
If you need to check the evenness of the wall, then you need to place a level with the working surface against the wall vertically with the ampoule at the top. If the bubble deviates from the wall, it means the bottom is sticking out, you need to add plaster on top. And vice versa.
Working with a spirit level is not difficult, but it requires time and care.
Checking the quality of plastering work in apartment renovation
How to check whether there is grounding in the outlet or not?
Checking the quality of plastering work is done on the basis of an open source: Requirements SNiP 3.04.01-87 “Insulating and finishing coatings”. To achieve high-quality plastering work, during the plastering process it is necessary to comply with the following requirements and standards for plastering work.
- Surfaces to be plastered must be thoroughly cleaned of dust, dirt, grease and bitumen stains, and salts deposited on the surface.
- Protruding architectural details, as well as joints between plastered structures made of different materials, must be plastered over a metal mesh or woven wire attached to the surface of the base. Wooden surfaces are plastered over shingled panels.
Note: This check of the quality of plastering work applies to plastering work performed with classic cement-sand mortars, as well as modern gypsum plaster mixtures with polymer additives.
The work performed is checked according to the following points and methods of their control:
- Deviation from the vertical is no more than 1 mm per 1 m. It is measured using a rule of at least 2 meters in length by applying it to the wall every 2 meters.
- The angle between the walls in a rectangular room should be 90 degrees. Measured using a tape measure. The length of the two diagonals of the room must be the same - this means that the corners of the room are equal to 90 degrees, and the walls are parallel. Another measurement option is with a construction square with a shoulder of at least 50 cm. It is applied to the corner over the entire distance from floor to ceiling.
- Parallelism of walls. Measured with a tape measure. The distance between the walls along their entire length should be the same.
- Deviation of slopes, pilasters, pillars vertically and horizontally - no more than 1 mm per 1 m. Measured using a building level.
- Surface evenness. Measured using a two-meter rule applied to the wall vertically and horizontally.
When accepting completed plastering work, you should adhere to the following rules and requirements:
The layers do not peel off and are firmly bonded to the surface. Cracks, waves, bubbles, and noticeable roughness are unacceptable. All deviations are within the acceptable range: vertical and horizontal gaps, slopes. Special types of plaster (waterproofing, sound-absorbing, X-ray protective and others) meet the requirements. Angles correspond to 90 degrees
They are given special attention. All corners of the room must have a flat surface and clear edges. When you hit the surface of a wall with an open palm, there is no booming sound or sensation of the surface crumbling
If these indicators are present, poor quality work is performed. The fact that errors were detected horizontally and vertically was in the range of up to 20 mm, which means that work was performed to a “C” level. This error will be noticeable even to the naked eye. Anything above this value is a marriage that needs to be fixed.
Laser level
How to check the pressure switch (level switch) of a washing machine
Laser levels and levels are very complex devices. Each of the emitter blocks has two degrees of freedom of regulation. One of them is responsible for the tilt of the horizon (for plane builders and rotary devices), the other for the angle of attack of the laser (the height of the end point of the beam). Like any device, during operation the laser level experiences shaking, light shocks, and temperature changes. Therefore, its accuracy is reduced. This means that even with a minimal beam error, you can get a deviation of, for example, a seam of 6-10 mm in a large room.
There are two ways to check the laser level.
- The angle of attack is checked in a large room with a flat floor, with a clearance between the walls of 5 to 20 meters. The device is placed at a distance of 1 m from one wall (number 1). The beam is directed to the nearest one, the position of the point or line is noted. Then they aim the laser at the opposite wall, fix the position of mark 2 and move the device to a distance of 1 m from it. The check is repeated, having previously adjusted the height of the tripod until the beam hits point 2. If the marks on wall 1 do not match, then the laser level needs to be adjusted.
- Checking the horizon for the builder of lines, planes, and rotary devices is carried out using the method of sequential rotation. To adjust the laser level, it is pointed at the wall. Mark the middle of the horizontal line within the angle of attack. Then turn the device until the edge of the light line reaches the mark. Vertical deviation will indicate that calibration is required.
Rotary devices that do not have a pronounced coverage angle are also checked by turning the device clockwise and counterclockwise. If the horizon is tilted incorrectly, the beam on the wall will deviate from the previously made mark.
How to increase beam range
If the sunlight on a construction site is too bright and the mark is not visible, a laser beam receiver comes to the rescue. It helps to mark in high light conditions and over long distances. It is best if it is produced by the same manufacturer.
There is another way to increase range. Reflective plates made of metallized plastic are hung on the object to be marked. On its smooth surface, lines will be visible even in the highest light levels.
Source
Ways to level walls
Restoring a load-bearing wall in an apartment, overhauling an old wall or repairing walls using a fence with your own hands
So, the degree of curvature and the magnitude of the unevenness have been determined, the time has come for decisive action. How to level the walls in an apartment with your own hands if you have no skills or experience? There are two methods of varying degrees of effectiveness and complexity:
- Applying a leveling layer of plaster.
- Leveling the surface of the walls using drywall.
Both methods have their pros and cons. Plaster is good because it allows you to get a solid monolithic wall surface, while drywall creates a gap that makes it difficult to hang objects on the wall (cabinets, lamps, etc.).
To apply plaster correctly, you must have skills and certain experience. Installing drywall in this regard is much simpler, and the result is better. The GK sheet itself has a flat plane; it only needs to be attached to the wall with the least amount of inconsistencies at the seams . If the curvature of the walls is too great, then installing gypsum boards will be your salvation.
.
Leveling with plaster along beacons
Plastering curved walls, without the use of control devices, can only create other curved surfaces. Only an experienced specialist can get a high-quality result, which is not available nearby. For untrained people who have no idea how to make smooth walls in an apartment, there is a very successful option - applying plaster along the beacons.
The technique of this matter is simple: straight vertical stripes are installed on the surface of the walls - beacons, which form a flat plane. The term “beacons” in this case does not reflect reality. These are rather guides.
Application is done from bottom to top. Using a rule based on the beacons, the solution for leveling the walls rises upward in a thick layer, evenly distributed between the beacons.
To do this, the rule is to make movements left and right, leveling the layer of solution and shifting it upward. If the strip between two beacons is completed, we move to the adjacent one and so on until the entire plane is completed.
When all the gaps between the beacons are filled, it is time for the final stage. The beacons are carefully removed from the layer of plaster (it should set, but not completely petrify), and the resulting voids are filled with plaster composition and rubbed down.
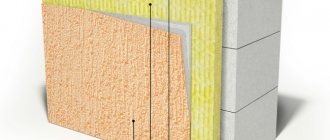
Leveling with plasterboard
Drywall is a durable and smooth material, produced in the form of fairly large sheets (the most common sheet is 1200:600 mm). Provides quick alignment of walls, installed on a special subsystem or sheathing. The supporting frame is attached to the surface of the wall; the frame strips create a plane and compensate for unevenness of the base. You can glue tiles, wallpaper or finish them in other ways on gypsum boards.
The sheets are screwed to the sheathing with self-tapping screws, the heads of which are slightly recessed into the material, and will subsequently be puttied. The joints of the sheets are glued with a special tape and puttied. In general, the process is simple, but it will require accuracy and thoroughness.
It is difficult to answer the question unequivocally: “What is better to level the walls, gypsum board or plaster?” To make the final choice, you need to take into account the material of the walls, what are the plans for these walls, or more precisely, for their use as load-bearing planes for furniture or equipment.
In addition, the experience of the person making the repair and the availability of a particular method are crucial. Properly done work gives a positive result in both cases, so you should choose methods for leveling walls according to circumstances or possibilities.
Construction portal No. 1
First, the wall should be thoroughly cleaned of dust and dirt and rinsed with water. And if it is dry and clean, then you can only moisten it. If the surface of the wall is very smooth, then notches are applied to it to impart roughness, which increases the adhesion of the mortar.
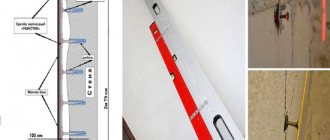
How to check the verticality of the walls to determine the required thickness of the plaster layer?
A plumb line is used to check the wall. Nails are driven into the hanging wall, under the ceiling, in the corners and in the middle. The heads of all nails must be in the same plane, then the distance from them to the wall surfaces will indicate the thickness of the plaster at each point.
Guaranteed evenness is achieved if the surface of the walls is checked using a plumb line (level), and then plug beacons are drawn out along a tightly stretched cord. Then, through the traffic jams, it is necessary to create perfectly even beacon strips from floor to ceiling. After the strips have set, the space between them is filled with solution.
How to prepare walls covered with wooden boards for plastering?
If the boards are wide, then they are split along the grain and wedges are driven into the resulting cracks. This is done in order to prevent cracking of the plaster during subsequent drying of the boards.
How to properly plaster metal surfaces?
Usually this is not necessary, since such surfaces only need to be painted. But, for example, when plastering window and door lintels made of metal profiles, you must first wrap them with wire or wrap them with steel mesh.
Are there standards according to which the thickness of the plaster layer is determined?
The total thickness of the plaster layer on stone walls should not exceed 20 mm. On wooden walls and ceilings, as well as fiberboard surfaces - no more than 25 mm. If partitions made of gypsum boards are plastered, then the leveling layer or grout is applied in the form of one thin layer of plaster (no more than 10 mm thick).
How to check the quality of plastering work?
When accepting the work of finishers and plasterers, you need to take a flat lath to the height of the ceiling and apply it to all corners of the finished walls, as well as horizontally near the floor, ceiling, and in the middle between them. The maximum gap will reveal the quality of work. If the gap is no more than 5 mm, this is an excellent job, up to 10 mm is good, up to 20 mm is “C”, however, such unevenness itself will be noticeable.
A gap of up to 30 mm for a residential building is a defect. The quality of plaster on walls longer than 6 m is checked with a stretched cord from corner to corner. In addition, the verticality of corners and slopes must be checked with a level, because they may turn out to be in an even line, but with a deviation (blockage) from the vertical.
What should plaster solutions be like?
For interior plastering, lime and lime-gypsum mortars are used.
Complex and cement mortars are intended for exterior finishing. But sometimes their use is also required for interior plaster (in rooms with high humidity, slopes of window openings).
Rooms with air humidity no more than 60% with stone and concrete walls, concrete floors are plastered with lime or complex mortars. Lime-gypsum mortars are used for wooden and plaster walls and partitions, and wooden floors.
How is the process of plastering walls carried out?
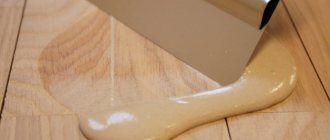
Walls need to be plastered in layers. Therefore, sequentially, with certain breaks, layers of plaster are applied - spray, primer and covering. You should not apply a thick layer in one go, as it will begin to slip during the process and will crack after drying. The solution can be sprinkled or spread using various tools. Spreading is accessible to everyone; throwing on is more difficult, since it is done with a liquid solution and requires a certain skill. Mechanical methods of performing plastering work using a mortar pump and compressor are more productive, but this is the domain of professionals.
When the brickwork or concrete surface is made with high quality, thin layers of mortar can be applied to them, thus obtaining thin-layer plaster - on brick surfaces from 5 mm and above and on concrete surfaces - up to 5 mm. If the plaster layer on the brick is thinner than 5 mm, then the seams of the masonry in the form of cells will be visible through it, which then cannot be painted over with either lime or adhesive paint.
The plaster on the surfaces of wooden walls must be at least 20 mm, counting from the filled shingles. It is not recommended to apply thinner layers - strips of shingles will be visible through them, and with slight warping of the shingles, such thin-layer plaster will begin to crack.
The material was prepared by L. Rudnitsky, A. Zhukov, E. Abishev.
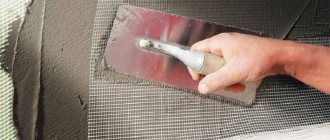
Plastering using beacons and level
This is one of the fastest and most accurate modern finishing methods, which allows you to get an ideal surface in a short time.
- First you need to prepare and prime the surface. Mark vertical lines on it where the beacons will stand, retreating 10 cm from the corners; the distance between adjacent ones should be 15–20 cm less than the length of the rule.
- Turn on the vertical plane construction mode on the laser level. Mark marks on adjacent walls adjacent to the one being repaired at a distance of 5 cm from the corners. Align the level plane according to the marks. Make marks on the rule at a distance of 4 cm from the edge. Having set the rule vertically according to the marks using a level, we get a gap between it and the wall of about 1 cm, plus or minus, depending on the unevenness.
- Now we install beacons in this gap. You need to make sure that they will fit into it at any installation location, and if necessary, move or move the laser vertical plane. After the final markings and confidence that everything can fall into place, we mix the plaster and apply a small amount to the wall according to the markings every 0.5 m.
- We place the lighthouse against the wall and cover it with plaster. We press the rule against the beacon and tap it in the necessary places so that the marks on the rule align with the laser beam. If you do this not with a rule, but with your hands, you can bend the beacons. We remove excess plaster from the lighthouse and rules. We check the verticality of the lighthouse again and leave it to freeze, moving on to the next lighthouse. Drying time depends on the amount of plaster and surface material.
- After all the beacons have dried, stir the plaster mixture and apply it between the two beacons. We press the rule against the beacons and smooth the plaster with movements from bottom to top, shaking the tool left and right. Remove excess mixture from the rule. Fill the cracks in the wall with a spatula or trowel. Then we make the finishing pass as a rule. Let's move on to the next pair of beacons. After work, you get an almost perfect surface, ready for finishing.
You can also use a level to construct a 90-degree angle in the kitchen or bathroom for installing large-sized furniture. In this case, you need a device that can build perpendicular vertical planes, and this mode is available in almost any model today.
Stages of checking the accuracy of the device
Carrying out measurements includes three points: checking the beam horizontally, vertically and inclination of the plane.
To check the X-ray, or horizontal, proceed as follows:
- Place the level on the tripod, turn it on and make a mark on the wall.
- Turn it 180 degrees and again make a mark on the wall close to the first one.
- Both marks must be placed on the same line.
- If the distance between the marks corresponds to the stated error. No calibration required.
The vertical Y axis can be checked as follows:
- The level is turned at a right angle so that the vertical beam coincides with the direction of the wall.
- Mark the position for the projection center.
- Rotate the level 180 degrees and make a mark at the center of the projection next to the previous mark.
- Compare the difference in readings with the accuracy of the device.
After this, the level is moved closer to the wall. In this case, the distance to the wall should be about half a meter. Marks are made in the same way
It is important not to confuse the first measurements with the second
After this, the error in the first and second cases is determined, and then the difference between them. If at the first measurement the error was 3 millimeters, and at the second five.
Then the difference between these readings will be equal to two millimeters. This indicator corresponds to the accuracy of the device declared by the manufacturers.
Room layout
Control points in the room are in the corners of the ceiling and floor. The corners in a room that has four corners must be right so that the room is a perfect parallelepiped. The camber of the corners must be measured using a tapping cord and a plumb line. Lines are beaten diagonally on the ceiling from corner to corner, then the diagonals are measured, they should be equal. If the diagonals are of different lengths, then you need to correct it by marking the correct points on the line. By connecting the points with segments using a painter's cord, we get a rectangle with all right angles. At least one point of the rectangle must coincide with the actual angle of the ceiling. Applying a plumb line to the indicated points, you need to mark the corresponding points on the floor. After marking in this way, it is necessary to check that pairs of diagonals in any plane passing through four control points must be equal in length. This marking technique allows you to minimize the collapse in the corners of the walls. Mainly, marking the room is needed in order to find out in which place you need to attach the starting profiles and hangers for the frame of the plasterboard structure.
How to check the evenness of walls and the quality of plastering work in residential premises
How to check the evenness of walls
Before starting work on plastering walls, you need to understand that there is simple plaster and high-quality plaster. To enable high-quality further wall finishing, high-quality wall plaster is used
Therefore, when ordering work, please pay attention to this. How to check the evenness of walls after plastering work. To do this you will need a rule-level, preferably a new one 2.5 meters high, a new building level
1.Check deviations vertically and horizontally. Differences in the plane of the walls from the vertical by 1 meter of their length by 1 millimeter are allowed. The entire height of the room is no more than 5 millimeters. The planes of the walls are 1 millimeter from the horizontal, per 1 meter of their length. Check this using a two-meter building level. Advice! Be sure to check every two meters of the wall surface.
2. Check the evenness of the walls. The surface can have no more than two irregularities of smooth outlines per 4 square meters with a depth or height of no more than 2 millimeters. The evenness of the walls is checked using the new rule - a level with a height of 2 or better 2.5 meters. It is applied to the plane first vertically, then horizontally, and the distance between it and the plastered surface is determined; it should not exceed 2 mm
Check the evenness of the surface under the radiators, on the walls where there are windows, in the area of sockets and switches, behind heating risers, in places where it is difficult to reach. Attention! Non-genuine builders believe that the ideal level should be at eye level, and will show you exactly these places, so be vigilant in this matter and check everywhere
3. Check the strength of the plastered surface. Inspect the surface. There shouldn't be any cracks
Hit the surface with an open palm in several places at your discretion; if you hear a booming sound from the impact and feel peeling, then the work must be redone. Attention: Make sure that all metal beacons are removed from the walls
4. Checking the corners If you have agreed with the performers to align the corners at 90 degrees, this is especially true in places where furniture and equipment are installed, then you can check the work as follows. The corners are checked not for evenness, since evenness will be ensured by the metal corners that are installed before the putty, but for deviations in degrees horizontally. For example, an angle of 89.9 degrees gives a wall 5 meters long, a deviation of about 1 cm. A 90 degree angle between the walls in a rectangular room is easier to check with a tape measure. You need to measure two diagonals of the room and compare them. If they are equal, then the walls form a rectangle, with right angles and parallel walls. You can also check the right angles of the walls using a long construction square at least 50 cm long; check the entire angle from floor to ceiling.
5. Check the parallelism of the walls. If you have agreed in advance on the walls, which should be strictly parallel to each other, then use a tape measure to measure the distance between them, at the beginning and at the end, it should be the same.
6
We check areas of special attention. We do this in the same way using a building level rule. Important! Door trims, ceiling and floor plinths are smooth, so the junction areas of the plinths and platbands must be perfectly smooth so as not to get a gap in this place. Deviations of door and window slopes, arches, pillars, pilasters from the horizontal and vertical should not be more than 1 millimeter. The radii of curved elements, for example arches, should not deviate from the design value by more than 5 millimeters. This can be checked using the template template. The width of the slopes should not deviate from the design value by more than 2 millimeters
Check the entire perimeter of the slopes.
Attention! Check that the walls are plastered to the very edge of the doorway, as the trim may not hide the remaining surface. Attention! Check that the plaster on the window slopes does not interfere with the free movement of the window sashes
To do this, you need to open the window all the way and see if the window opens completely
Attention! Check that the plaster on the window slopes does not interfere with the free movement of the window sashes. To do this, you need to open the window all the way and see if the window opens completely
Attention! Make sure that all metal corners, especially those above doorways, are pre-primed so that later, when painting, stains from metal corrosion do not appear
Openings and slopes
Slopes and openings must also be located strictly in horizontal and vertical planes, otherwise doors and windows will have to be installed crookedly, and this will look ugly.
The correctness of the plaster is checked using a building level. Deviations from the vertical and horizontal should not be more than 1 mm per 1 m. The width of the slope cannot deviate from design calculations by more than 2 mm.