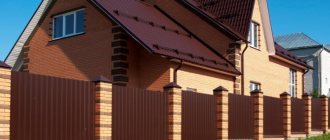
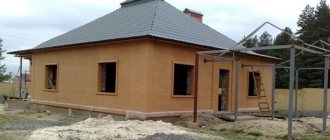
It is quite possible to build a brick house with your own hands, but it is a rather complicated and lengthy process. Here it is important to strictly follow construction technologies to ensure high strength, durability and thermal insulation. Brick still remains one of the best building materials due to its environmental friendliness, durability, high thermal insulation characteristics and aesthetics.
In the photo of a brick house you can clearly see examples of such buildings, their design features and construction technologies.
Materials and tools
To build a brick house you need to acquire the following tools:
- building level;
- construction hammer;
- device for unstitching seams;
- angle grinder;
- plumb line;
- cord for level control;
- concrete mixer;
- level;
- trowel;
- shovel.
The main materials include:
- brick;
- cement;
- sand;
- plasticizer (can be replaced with liquid soap);
- plywood or boards for formwork construction;
- insulation material (extruded polystyrene foam, mineral wool, etc.);
- lime;
- reinforcing bars;
- waterproofing material (for example, roofing felt).
Features of the staircase and its installation
The location of the staircase in the project caused a lot of controversy. Initially, its location suggested excessive emphasis on the attic ceiling. After changing the location and design of the staircase, it was made without a platform with slight turns.
The staircase is made of boards 50x150 mm, the width of the steps is 30 cm. The staircase was installed after the rough finishing of the first floor. Under the upper span there is space left for installing a toilet there. According to personal feelings, the staircase turned out to be comfortable and compact.
DIY staircase to the second floor
the space under the stairs to the second floor is sewn up
installation of railings
ladder
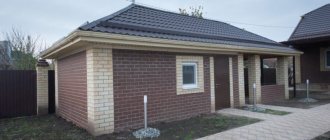
Brick selection
Manufacturers produce different series of bricks that differ in purpose. The most commonly used silicate white or red clay bricks. It is possible to combine these two types of bricks with each other.
Cladding a house with bricks is done using a special facing type of this material. It has a more aesthetic appearance. To reduce the load on the foundation, you can use cellular bricks. It has less weight, which reduces the load.
It is not recommended to use used bricks. It may have various defects, which will negatively affect the quality of the masonry. Use bricks that are undamaged and properly shaped.
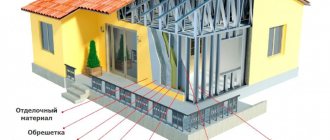
Exterior decoration of the building
Siding was used for the exterior of the building. It was mounted with a ventilation gap of 25 mm. Also at the stage of exterior finishing, a vestibule was added. The foundation for the vestibule was not installed; the structure was installed on pieces of concrete laid on the ground and sidewalk curbs.
the house is covered with inexpensive siding
facade of a cheap house
built a vestibule
Planning
There are a variety of ready-made brick house designs. You can use one of these projects, create your own, or adapt a ready-made one to your needs. The project must include absolutely all the nuances - from the foundation to the finishing of the interior and facade.
If you plan to live in the house permanently, the walls should be thick enough to increase thermal insulation. If this is a small country house for temporary residence, you can do the masonry with half a brick. For a full-fledged house, it is recommended to lay 1.5 bricks.
For single-story houses, the foundation may be less strong than for multi-story houses. In this case, internal partitions can be made from gypsum board, this will save on materials and speed up construction.
The most reliable is considered to be a strip foundation, passing under all walls and partitions. This way the wall load will be evenly distributed over the base.
Sobyanin ordered to reduce the number of migrants at construction sites under the renovation program in Moscow
After inspecting the house, which will already welcome new residents in January 2022, the head of the city noted that the number of migrants at such construction sites should be reduced. “You need people of a different quality, with a different salary, fewer migrants, of whom you have quite a lot today. Attract more Russians from nearby regions, increase wages, create working conditions,” he said, addressing Alexey Dobashin, general director of the Krost concern, who built the house. And he advised: “Increase labor productivity, mechanization and industrialization of construction.” According to Dobashin, Krost has already reduced the number of foreign builders at its construction sites by 15 percent over the past year, and this process is gaining momentum. According to him, builders with good qualifications at their sites receive about 120-150 thousand rubles. “This is a salary for Muscovites, not for migrants,” Sobyanin agreed.
Let me remind you that Deputy Mayor for Urban Development Policy and Housing Construction Andrei Bochkarev recently shared that Moscow builders are already developing plans to modernize the construction process, which will allow it to be carried out practically without the involvement of migrant labor. Sobyanin supports the construction complex in this. “Housing should be more industrial in terms of preparation, basic structural elements, even in terms of finishing work, engineering, so that this can be done not at a construction site, but at a factory site. This increases productivity, reduces the number of people required,” he said yesterday.
The mayor liked the new building on Baumanskaya Street. “We are trying to ensure that these houses improve the appearance of Moscow in terms of architecture. This is the central district of Moscow, but look around: there are no houses of this quality nearby,” Sobyanin assessed. The house of six to ten varying number of storeys turned out to be very beautiful indeed. With arched windows and a facade clad in black and white clinker tiles, it is built in a U shape, creating a courtyard with limited access for cars. Its space is mostly given over to children's and sports grounds, green recreation areas and flower beds. But car owners will not be offended either - the building has underground parking for them; participants in the renovation program can buy a parking space in which they can buy a parking space with a 40 percent discount. Residents will be able to get down to the car by elevator from their floor.
The apartments are all finished to high quality standards. Five of them are designed for residents with disabilities - with wide doorways and corridors convenient for wheelchair users, as well as bathrooms and bathrooms equipped to make it convenient for owners to use them. The first floors, as in all houses built as a result of renovation, are non-residential. They can open shops, cafes, beauty salons, sports clubs, clubs and sections for children, as well as a public information center. The lobby of the residential part will house a stroller room, a concierge room with a sanitary facility, a storage room for cleaning equipment and mailboxes. Each section is equipped with elevators with a lifting capacity of 400 and one thousand kilograms. At the end of 2021, the house even received an architectural award for the best architectural and urban planning solution for a standard-class residential building.
Over 15 years, according to the renovation program, more than one million citizens should celebrate housewarming
Sobyanin recalled that a total of 26 houses were included in the renovation program in the Basmanny district of the capital, of which five “starting” sites were selected for the construction of 3.5 thousand displaced people. Four houses are already in design and construction. Over the fifteen years for which the renovation program is designed, more than 1 million citizens who now live in 5,173 houses that are being demolished must celebrate housewarmings. The head of the Moscow Construction Department, Rafik Zagrutdinov, assured: “Despite the increased cost of building materials and the shortage of workers due to the coronavirus pandemic, housing construction under the renovation program is being carried out ahead of plans. By the end of this year alone, 91 houses with an area of 1.1 million square meters will be put into operation.” According to him, such a pace of construction will make it possible to provide housing to 36 thousand participants in the renovation program this year alone.
Site marking
It is first necessary to mark the area on the ground. To do this you will need pegs and cords. From these it is necessary to construct a marking for all walls. Markings must be made in actual dimensions. According to the markings, trenches should be dug for pouring the foundation. Control the horizontalness of the markings using a building level.
If the house is multi-story, fairly deep trenches should be made - about 2 m. This will ensure the ability of the foundation to withstand high loads.
The principle of assembling the second floor
After installing the frame, a temporary floor from unedged boards was partially laid and the walls were assembled horizontally and installed vertically. Second-floor windows were also used.
installation of floors
assembly of second floor walls
raised gables
insulation of attic walls, attic walls raised
To increase sound insulation in the interfloor ceiling, non-woven cloth was laid on the floor joists under the boards. This allows you to partially dampen vibration from steps.
backing on joists to reduce vibration
Foundation formwork
You can build formwork for the foundation from boards or plywood. It must protrude above the ground. The protruding part of the formwork should be reinforced with side supports. Otherwise, the structure will collapse under the weight of concrete.
The formwork must be free of holes and other defects. Otherwise, concrete will flow through them, which will negatively affect the strength of the structure.
Crushed stone, stones or sand should be placed at the bottom of the trench. This pillow needs to be compacted well. Next, build a frame of reinforcement along the entire perimeter of the future foundation.
Insulators ShF-20G- Production of plastic for finishing
How and how to caulk a timber house with your own hands: materials and step-by-step instructions
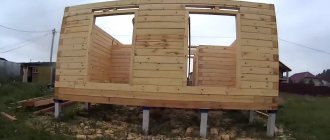
Construction of the first floor
Before installing the walls of the first floor, the platform was installed and insulated and pipes for the sewerage system were laid. The bottom of the platform is left open, the insulation is fixed by means of fixed cuttings of boards. 3 layers of foam plastic, 15 cm thick, were used as platform insulation. The subfloor is made of 150x50 mm boards.
insulation of the platform with foam plastic
subfloor is sewn
The walls were installed in a horizontal position. Foam plastic and 8 mm plywood protection are laid between the racks, and windows are also installed. The windows in the project were used second-hand. Installation of the assembled wall into a vertical position was carried out by two men. It was decided to abandon the installation of jibs in the construction of the walls. The builder assumed that the frame would be sufficiently rigid due to the plywood sheathing.
assembly of frame walls
insulation of external walls with polystyrene foam wall frame
windows installed
wall on temporary braces
After assembling the walls of the first floor, the installation of internal partitions was carried out. Polystyrene foam was also used as insulation.
external walls are covered with plywood
assembly of internal walls
interior walls raised
first floor assembled
Pouring the foundation
The construction of brick houses begins with the construction of the foundation. The latter can be monolithic or prefabricated. Monolithic is mounted directly on the construction site. It is necessary to prepare the appropriate amount of solution and pour it into the trench.
The prefabricated foundation is assembled from slabs. For brick houses it is better to build a monolithic foundation, it will be more reliable. But, it is not recommended for construction on soft soil. In this case, the optimal solution is a pile foundation.
After pouring, it is necessary to compact the concrete using an internal vibrator. This will remove air from the structure of the structure, which will have a positive effect on its strength. After the foundation has dried, you can begin laying.
Installation of a shallow strip foundation
The foundation is pre-planned with a width of 35 cm and a height above the ground of 25 cm and 20 cm below the ground. A die-cut section of 2.5x100 mm was chosen as a reinforcing element. The reinforcement of the tape was planned in 2 layers, top and bottom, with three connected sheets of die-cutting in each.
On the advice of experienced builders, vertical elements were added, and the number of sheets to be connected was increased to 5 pieces. Additionally, the height of the foundation above the ground increased and amounted to 45 cm.
reinforcement with die-cutting - you can’t do that!
pseudo-reinforcement
the foundation is ready for pouring
After the foundation was poured into concrete, 20 anchor bolts were installed to install the lower frame.
the foundation is poured
mortgages
mortgages are mounted
Construction of walls
Construction begins with the removal of corners. The uniformity and strength of the entire structure depends on the correct placement of the first bricks. It is necessary to control the evenness of the walls using a plumb line and a building level.
Pull the construction cord firmly enough; there should be no deflections; maintaining the level depends on this. Each brick must be adjusted with a trowel.
After completing the main masonry, it is necessary to finish the outer part with facing bricks, unless another finishing option is used. The seams between the bricks need to be unstitched.
During the laying process, be sure to always bandage, otherwise the strength and durability of the structure will suffer. Provide all openings for windows and doors in advance.
You should not try to lay out all the walls in one go; let the solution harden, this is important for achieving high structural strength.
Hot stamping non-woven wallpaper: pros + and consFences-blinds: what are they and what are their advantages
- Analysis of competitors' prices. Main stages, methods and services
Features of the house layout
Through the efforts of two men, a cheap house for permanent residence with an attached garage was built. Initially, the project did not include a garage and was added after the house was completed.
finished frame house
attached garage
In general, the project changed as the discussion progressed on the advice of other builders and the requests of the wife. The original layout of the house included 6 rooms on two floors.
During construction, it was decided to equip two bathrooms, while on the ground floor the toilet and bathtub should be separate. The area of the living room and the location of the stairs have also changed. Compared to the initial project, the living room was too narrow and elongated. The stairs were also planned to be awkward and steep. After the changes, these shortcomings were eliminated.
house layout 6 by 6