Every year, an increasing number of apartment and private house owners are abandoning the usual “compact” and monoblock toilets. They are being replaced by an aristocrat among plumbing fixtures - an installation. This is an easy-to-use sanitary product with an excellent design, yet affordable to the middle class. An additional bonus to the advantages of a wall-hung toilet is the need to install a false wall made of plasterboard, with the help of which the utility lines of the toilet or combined bathroom are hidden.
Despite the fact that installing the installation is much more complicated than installing monoblocks or compact toilets, many homeowners take on this work, performing all the operations on their own, without the involvement of specialists. Such independence is fraught with negative consequences during the operation of the toilet.
Knowing all the nuances of installing an installation will help you complete the work efficiently, without unpleasant surprises in the future. The editors of the StroyGuru portal decided to help the craftsmen and analyze in detail how to install a wall-hung toilet with a do-it-yourself installation with a selection of photo and video materials.
Installation installation steps
There is one unique feature in the character of representatives of the “Russian world”: first they create difficulties for themselves, and then heroically overcome them. What does this have to do with installing a toilet installation? The most direct. In most cases, a plumbing product is first purchased, and then the question of where to install it is decided. And, as often happens, the wrong design was purchased. Therefore, we present the sequence of stages for installing a wall-hung toilet:
- the location of the installation is determined;
- a model is selected to suit the formed conditions;
- the wall and floor are marked for the purchased structure;
- the tank is hung;
- installation of the installation body is in progress;
- the drain pipe is connected to the sewer riser, and the tank to the water supply;
- performance is checked;
- the installation is covered with a false wall or protective box;
- work is being carried out to finish the false panel with tiles or decorative plaster;
- a panel with drain buttons is installed;
- the toilet is hung with simultaneous connection to the tank and sewerage system.
Note that professional plumbers sometimes swap the fastening of the frame and the installation of the tank. This is not important and does not affect the quality of work.
What else is important to know?
- That there are two ways to fasten embedded equipment:
- the frame is attached, followed by the drain tank and pipes;
- The entire system is installed separately, followed by installation in place.
- What you need to know, regardless of the option chosen:
- connecting the pipes to the toilet is carried out after installing the installation and the false panel with cut holes for pipes and fasteners;
- To prevent the frame from moving when installing and connecting the toilet, it must be checked with a level.
- What in terms of usability:
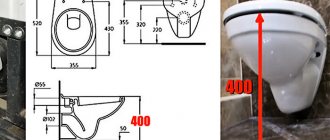
- the height of the button from the base should not exceed 1000 mm;
- the height of the wall-hung toilet from the floor should be within 410 - 430 mm;
Built-in plumbing fixtures assembled in accordance with the manufacturer’s requirements will serve well for many years without additional adjustments or repairs, and its aesthetic parameters will harmoniously complement the interior of any bathroom.
Choosing an installation location
Assembling the installation begins with choosing the location for installing the wall-hung toilet. Note that such a task is not necessary when replacing a floor-standing toilet with a new type of plumbing. After all, when developing the toilet project, specialists took into account all ergonomic requirements: the size of passages, the distance to the side walls and in front of the toilet, access to communications, etc.
When new construction or redevelopment of a combined unit in Khrushchev, the following requirements of SP and SNiP must be taken into account:
- The toilet should be located as close as possible to the sewer riser. If the dimensions of the installation do not allow this, then it is necessary to ensure a slope of 2-3 cm per 1 running meter;
- the upper edge of the bowl without a toilet seat with a lid should have a standard height of 40 cm from the floor level;
- the minimum permissible distance from the front of the toilet to the side walls, doors or other plumbing equipment is 50 cm, with an optimal distance of 75 cm;
- along the center line the parameters are slightly different: to the side walls and other plumbing fixtures - 38 cm with an optimal length of 45 cm;
- The toilet paper holder is placed at a distance of 20-30 cm from the front edge of the bowl and at a height of 60-70 cm from the floor.
The indicated parameters are designed for a standard, average person, which is approximately 90% of the country's population.
It logically follows from the above requirements:
- The installation should be installed in a place where it interferes least.
- The approach to the toilet bowl should be comfortable, there should be nothing obstructing it.
- The proximity of communications reduces the cost of extending utility lines, which, when built up, will take up part of the space of the toilet or bathroom.
In addition, when choosing an installation, it is necessary to take into account the type of wall: solid, half-brick or plasterboard partition and the dimensions of the plumbing equipment.
Having determined the installation location, it is easier to decide on a specific model of wall-hung toilet. It could be:
- block design. The tank is mounted in a pre-prepared niche in the main wall (in this case, the toilet takes up minimal space) or on its surface (the tank is subsequently covered with a screen), and the toilet bowl is installed on the floor;
For reference: block systems have a height of 45-110 cm, a width of 44-53 cm, and a depth of 12-20 cm.
- frame system, where the frame is attached to the wall and floor. In the case of lightweight partitions, frame structures with 4 legs are purchased. A toilet in a frame system is always installed on frame studs;
For reference: the standard for frame installation is: height - 1.02-1.4 m; width - 50 cm; depth - 15-30 cm. However, for small rooms you can find a high but narrow frame, for example, the WISA model (118x38 cm) or a low but wide installation - SANIT (82 cm by 53 cm).
- corner installation is a type of frame system for installing a wall-mounted toilet in the corner of a room. In this version, a special fastening system to adjacent walls has been developed for the frame.
Common Difficulties
The main problems arise due to the limited size of most bathrooms. This is especially true for strictly residential buildings, when in addition to the small “dimensions” there is added poor geometry of the room - the absence of right angles and parallels in the enclosing surfaces. In this case, even the slope of the wall is checked before installation. And leveling the walls further reduces the room for “maneuver” when installing the installation under the toilet.
The correct choice of type and model of installation, as well as the accuracy of markings, frame location and adherence to the installation diagram will help you avoid mistakes and alterations.
And the main condition is careful handling of mechanisms and sanitaryware. Even “tightening” the fastenings of the intake and exhaust valves or the hinged bowl can lead to a violation of the tightness of the connections or damage to the device itself.
What is important to know. It is necessary to buy installations and plumbing from reputable brands. It is better to do this with dealers or trading companies that have appropriate agreements with service centers and provide a guarantee for the purchased product. In addition, if necessary, you can buy additional accessories or a repair kit for the selected installation model from such sellers.
Preparatory work
During the preparatory work, materials and tools are purchased, markings are made for the installation, and a niche is cut out in the main wall for the block installation. The last operation is not always performed. Often the tank is installed on the surface of the wall. But in this case it is better to buy a frame structure.
Required materials and tools
Do-it-yourself toilet installation is impossible without purchasing an installation kit, auxiliary materials, and also purchasing a set of tools. The last position is not difficult. Therefore, some or all of the tools can be found at home, with friends or neighbors. As a last resort, rent from specialized companies.
The installation kit should include:
- frame structure;
- plastic tank;
- inlet valve;
- fitting;
- fastening elements for the frame and toilet;
- drain control panel with a button (experts call the entire panel a button or key);
- flush elbow;
- drain pipe;
- pipe plugs - installed during installation to prevent debris from getting inside;
- noise-insulating (shock-absorbing) gasket under the toilet;
- wall hung toilet bowl;
- toilet seat;
- toilet lid.
In addition, you will need auxiliary materials:
- pipe for connecting the tank to the water supply;
- silicone-based sealant for insulating the connections between flush pipes, the toilet bowl and the sewer riser;
- flax fiber or fum tape for insulating threads on fittings.
Tools you will need:
- hammer drill with pobedite or diamond drills for concrete or brick;
- hammer;
- set of wrenches;
- adjustable (gas) wrench;
- level;
- plumb line;
- screwdriver or screwdrivers;
- construction knife;
- roulette;
- construction corner;
- marker or simple pencil (for builders);
- grinder with cutting wheel or hacksaw for metal.
Marking the wall for installation
It is theoretically possible to install the installation correctly without preliminary marking, but in practice it is very difficult.
Therefore, you need to arm yourself with a tape measure, a pencil, a plumb line and a long, even strip, or better yet, mark on the wall the dimensions for installing the installation for the toilet: a vertical line that will serve as the axis for the structure of the wall-hung toilet and the mounting point for the frame. There are several installation options here, and therefore several options for determining the center line:
- In a separate bathroom only a toilet is installed. In this case, a vertical line is drawn strictly in the center of the wall near which the installation will stand.
- It is planned to install a bidet next to the toilet. Then two axes, one for the toilet frame, the second for the bidet, should divide the wall into three equal parts. This is the best option, but not the only one. With a long wall, the proportions may be disrupted while maintaining a minimum distance of 50 cm between the toilet and bidet bowls.
- In a combined bathroom, the vertical is drawn in the center of the selected location. But at the same time, one rule must be followed: the installation frame must be at least 13.5 mm from the adjacent wall. Then the center line will be located from the side wall at a distance of ½ the installation width +13.5 mm.
After applying the vertical line, the location of the drain panel is determined. It should be at a height of 1 m from the finishing of the floor: tiles, laminate, parquet or linoleum. Therefore, you need to take into account what the legs of the structure are installed on: on the base of the floor or on the screed. In the first case, you should take into account the thickness of the screed, tile adhesive and tiles if the floor is ceramic, in the second - only glue and tiles.
Further operations are carried out in the following sequence:
- the top of the structure is located;
- a horizontal line is drawn through the top point of the frame, after which marks are made on it for the installation width of the installation;
- through the marked points, strictly vertical lines are lowered down the wall, after which they continue along the floor perpendicular to the wall and parallel to each other at a distance of up to 25 cm from the wall surface;
- The lines on the floor determine where the legs will be installed. The calculation is carried out as follows: 1.5 cm is added to the depth of the structure for the gap between the tank and the wall and 3.5 cm if the sewer pipe is laid along the wall. The given figures apply to smooth walls. If the plane of the wall is blocked or there is a curvature, corrections are made;
- the points on the floor are connected;
- the perpendicularity of the drawn line in relation to the adjacent wall is checked. If there is no 90o, the foot placement points are adjusted. In this case, the legs of the frame will have different distances to the wall. Here you need to maintain the actual depth of the structure at the leg closest to the wall by adding 1.5 cm.
Careful assessment of pros and cons
When choosing a more modern model, you need to think carefully about whether it makes sense to unconditionally give preference to such a solution or whether you should still prefer the traditional option.
What attracts users to the suspended model and what makes them doubt it?
- Design. The laconic appearance of the product is a definite plus. An elegant bowl that does not touch the floor looks more aesthetically pleasing than the one that is built into it. The panel covering the installation site looks attractive. You can also select a suitable flush key option.
- Compact placement. This statement, by the way, causes controversy among experts. If we talk about the real, and not about the visual effect, then it is small. To install the installation not in a niche, you need about 15 cm. Let's add the thickness of the false wall to this value and make sure that the gain is not as great as we would like.
- Easy to maintain. The absence of a foot makes it easy to clean the space under the toilet. There is no hole in the floor that causes problems with cleaning and could disrupt the overall pattern of the floor covering.
- Repair work. Closed communications are good only if they work properly. In the event of a breakdown, access to them can be very difficult, and restoration of the interior can be expensive. Difficulties may also arise with repairing the tank if it is still needed.
- Psychological aspect of exploitation. The frame of the device is reliable enough to withstand loads of up to 400 kg. But overweight people may experience psychological difficulties when using this plumbing fixture: the fear that the bowl may come off and break. It is very difficult to relax in such a situation.
- Features of installing a wall-hung toilet. Of course, installing a wall model is more difficult than a floor model. To successfully complete your plan, you must either spend additional money by inviting specialists, or energy and time if you decide to do the work yourself.
- Price. A wall model will cost you more than a floor model. This difference in price can be attributed to the cost of the steel installation, so the option of installation on a concrete base can be considered the most budget-friendly.
In fact, apart from a nice appearance, the popular and fashionable model does not have any special advantages. This is rather a matter of taste of the owners. Therefore, if you are on a budget, think again: is the result worth the expected cost?
A wall-hung toilet looks especially impressive when paired with a bidet of the same design: both of these plumbing fixtures successfully complement each other
Niche for installation
For a block structure, a niche is knocked out in the wall, and a groove is placed under the pipes (it is also allowed to write a groove). If this is not done, the point of purchasing this type of installation is lost - you will have to install a false wall or a protective box. In such a situation, it is easier to buy a frame system or install a monoblock toilet, with the same effect in design and spatial solution, but much cheaper.
Help for beginners in the construction business: a groove is a shallow groove in the wall for various communications: cables, wiring, pipes, etc.
Below we will provide detailed instructions for constructing a niche and laying a groove, but now let’s talk about the fact that such work is PROHIBITED in load-bearing walls .
A niche can be knocked out only after obtaining permission from the management company and developing a project for additional reinforcement of the wall. The cost of the project not only eats up all the savings from purchasing a block structure, but also significantly goes into the owner’s pocket.
If a niche can still be legalized, then with a fine for pipes everything is much worse. By Decree of the Government of the Russian Federation No. 508 (clauses 10.3 and 10.11), it is categorically prohibited to make grooves in concrete walls, and to lay horizontal grooves in brick walls. The same requirement applies to aerated concrete. The explanation is simple: the walls lose their load-bearing capacity.
By and large, a wall with a niche and a fine can stand until the building is demolished. There is another unpleasant point here: if unauthorized influence on load-bearing walls is detected, the owners face a fine, which can be survivable, and a requirement to legalize the alteration. But here a bad trend has been observed lately - engineering design bureaus set the price for retroactively changing a project in the region of 500.0-800.0 thousand rubles. Refusal to legalize the completed alterations may result in forced eviction through the courts. Such a resolution of the conflict in Russia has already been recorded. And more than once.
For those who will still install the installation in a niche, here is the sequence of work:
- a center line for the tank is drawn on the wall, and then the location of the panel with buttons is marked;
- taking the panel point as a reference, draw a rectangle 100 cm high and 60 cm wide;
- On top of the rectangle, a place is marked for the supporting beam of the niche arch (it will always be there in the project);
- using a grinder with a special circle, a slot is made along the drawn lines to a depth of 15-20 cm;
- Mark the location of the water supply with a pencil;
- Using a grinder or a grinder, lines are cut for a channel for laying a metal-plastic (polypropylene) pipe connecting the installation tank to the water supply system. The size of the fine depends on the outer diameter of the pipe used;
- using a hammer drill with a spatula, a niche is knocked out in the wall - a depth of 15-20 cm and a fine;
- A beam made of metal channel is installed on the cement mortar.
Having completed all the above work, you can begin installing the installation.
Preparing tools
Any frame or block will require fixation in the wall, so you will need a hammer drill with a special drill. Choose a drill with diamond or pobedit tips. The diameter of the drill corresponds to that of the dowel. The fasteners are sold with the toilet or purchased separately. It is better to use anchor bolts.
Other tools:
- construction bubble level or laser;
- tape measure, square, pencil;
- adjustable wrench, pliers, hammer;
- screwdrivers, screwdriver.
To use silicone, you will need a special caulk gun. The tool for finishing a frame installation depends on the type of decoration. Drywall is cut with a knife; to cut out parts from OSB and laminated chipboard, you will need a jigsaw. You need primer brushes and spatulas.
Installation nuances
Every business has its own secrets. There are also some nuances when installing the installation.
Block installation
With the advent of a block design with a wall-hung toilet, mounting it to the wall became a serious problem. At the same time, the method of installing pins on which the bowl is hung, proposed by plumbing manufacturers, is unlikely to be liked by the owners, since it steals some of the space and hardly fits into the design of the toilet.
Briefly about the method. The formwork is being assembled. Studs with a washer and a nut are installed on the back side. All this is poured with concrete, which is then tiled.
Plumbing experts have adopted other methods. More on the secrets below.
1. The solid wall is drilled through with a hammer drill with a long drill. Here's another little trick: the drill is cooled with oil very often, literally every 20-30 seconds. On the reverse side, a countersunk hole is drilled under the washer and nut (bolt head).
A long pin is installed if from inside the apartment or a bolt if from the outside of the wall. The potay is sealed with putty and lined. This method is ideal for private homes. In a high-rise building, it is unlikely that the neighbors will allow the decoration of their walls to be destroyed. Therefore, it is necessary to adopt the following method.
Scheme for attaching a tank with studs through the wall.
2. Anchors are driven into the concrete wall if it is monolithic, or special dowels are used if there are cavities. There is another secret here. Before installing the toilet with studs, you need to open the spacers. You can't just turn a hairpin - there's no head. For these purposes, plumbers use a mushroom nut, that is, not a through nut.
Dowel “petal” for concrete structures with cavities.
Tightened anchor pin.
Anchor pin.
They advise those who do the work themselves to do the same. It is impossible to find such a part for sale. Therefore, there is only one option left: look for a turner and order an unusual nut from him. However, being a professional in one business does not mean that a person is a pro in another.
Our grandfathers also knew how to screw in and unscrew studs using two nuts: you screw them onto the stud, and then use two keys to lock them tightly. The stud is screwed into the top nut, and unscrewed through the bottom nut.
Frame installation
When installing a frame installation, professionals advise:
- use a more modern panel with two buttons, which will save water;
- place the drain panel either between two tiles or in the center of one of them;
- set the upper edge of the toilet bowl to a height of 40-44 cm;
- the thickness of the protective screen or false wall should not be more than 7 cm;
- Carry out thorough quality control of work at each stage of installation.
We install it ourselves
When installing a toilet installation with your own hands, a person can use previously acquired skills, instructions included with the design, and video clips from the Internet. There is enough information to get an idea of what the design should look like in the end, and how to achieve the desired result. But, if you have doubts about your strengths, it is better to seek the help of professionals. Using modern tools, they will quickly cope with this task and in the near future will provide a decent result of the work.
If you think there is not enough information, you can always supplement it and express your opinion in the form below “Your opinion”.
Recently, conventional floor-standing toilets are increasingly being replaced by wall-hung structures. They require placement in a smaller area and also have a more modern appearance. Therefore, the process of displacement of traditional models by them is quite natural. However, following modern trends has its negative sides - more complex installation, longer and more expensive. However, you can successfully get out of this situation if you learn how to install a wall-hung toilet with a do-it-yourself installation.
Installation instructions
In the instructions on how to install a toilet installation, there are no clear recommendations on what work is performed initially: connect the tank to the water supply network, and then secure the frame, or vice versa, start installation from the frame. In practice, they often start with the tank.
Connecting the installation to the water supply
The technology for connecting the tank to the plumbing system has its own sequence:
- the cold water riser is closed;
- We find in one of the packages an adapter for the tank wall, also known as a faucet. For different manufacturers, the shape of the tap and the method of closing may be different;
- since you can’t put a water pipe directly onto the tap, we find an additional fitting (there is a different model for each type of pipe);
- to better seal the connection, we wrap flax fiber or fum tape around the tap;
- twist the fitting with the tap;
- we attach a metal-plastic (in our case) or polypropylene pipe to the fitting;
Important: Do not use a flexible hose.
- install the tap in the wall of the tank;
- turn off the tap inside the tank;
- connect the metal-plastic pipe to the water supply;
- we find a flexible hose inside the tank or among the parts of the kit, remove the protective covers from it and screw it to the tap;
- take the hose out. Take a bucket and place it under the hose. Alternately open the tap on the riser, and then in the tank;
- We conduct a test drain of water to check for leaks;
- close both taps, connect the second end of the hose to the drainage unit;
- put a plug.
Frame installation
Considering that the frame can move vertically using its legs, first of all you need to set its height, and only then attach it to the wall.
At what height to install
In Russia and the CIS countries, regulatory documents (GOST, SP, SNiP) do not regulate the installation height of a toilet from the floor, since there is no standard for installing a floor-standing toilet. It can neither be raised nor lowered, and the size of the bowl is regulated by GOST 30493.
At the same time, many years of experience in operating floor-standing toilets has shown that the most convenient, and even common, height is 40 cm (in Europe it is customary to install it at a height of 43 cm). The standard developed by practice is suitable for people with different physical abilities, heights and builds. When the edge of the bowl is raised by 4 cm, the person is still in the comfort zone. At a height of 46 cm, discomfort sets in (45 cm is the borderline value between the two zones) - 90% of toilet visitors’ feet do not reach the floor.
It is not always possible to maintain the specified parameters when installing a wall-hung toilet, since in many cases the desire of the apartment owner runs into objective circumstances:
- the height of the receiving hole of the sewer pipe turned out to be too high due to a miscalculation by the builders - they simply played it safe or incorrectly calculated the thickness of the floor covering cake;
- out of necessity, the toilet was moved away from the sewer riser, as a result of which it had to be raised 3 cm for every meter of connecting pipe.
- They laid a warm floor without a screed, as a result of which the floor level dropped, but the sewer pipe remained in the same position.
If it is not possible to hang the toilet within 40-44 cm, then a podium is arranged. After all, it is easier and more convenient for a toilet visitor to climb onto a small elevation than to sit on a toilet seat without support under his feet.
An alternative to this solution would be to rebuild the riser, which is much more expensive (the cost of replacement usually scares the owners). Everything is much simpler when you need to raise the bowl to 40 cm. For this, manufacturers have provided two methods:
- drilled 4 vertical holes in the installation frame for toilet studs;
- We installed retractable legs in the frame, which have a height reserve of up to 20 cm (for most models 17-18 cm).
Therefore, you can adjust the height of a wall-hung toilet either by installing pins in the desired hole, or by raising/lowering the legs (a 13mm wrench will help, or even better, a socket head with a “ratchet”).
To simplify the process of adjusting the height of the toilet using the legs, there is a 1 m mark on the installation frame. If set, the height of the top of the bowl from the floor surface will be 42 cm. Therefore, if there is a need to raise or lower the toilet, this mark must be adjusted: increase by a couple centimeters or reduce.
If the installation frame is installed on the base of the floor (floor), then it is necessary to take into account the thickness of the waterproofing, cement screed, tile adhesive and tiles (5-8 cm).
Frame mounting technology
The height-adjusted frame is placed with its feet on the floor at the points marked during the marking process. Further actions do not cause difficulties:
- Mark the places where the legs are attached on the floor with a marker or pencil;
- install the upper stops;
- mark the mounting points on the wall;
- move the frame to the side and drill holes in the wall and floor;
- hammer the dowels into the drilled holes;
- we fasten the frame at all points, but do not fix it rigidly;
- We check the vertical and horizontal installation. If necessary, we make adjustments - for this purpose, play is left in the fastenings. First we check the vertical;
- then horizontal, correcting deviations with the legs;
- All fastening points are clamped and secured with a locknut.
Connection to sewerage
At the final stage of installation, the installation is connected to the sewer system. For this purpose, the kit includes two elbows: one with a right angle (90o), for connecting to the riser at the back of the installation, and one at an angle of 120o, when the outlet passes along the wall.
The connection is carried out according to the following algorithm:
- The hemisphere of the mounting clamp is attached to the frame. The fastening can be both upper and lower - during the work you need to focus on the drilled holes;
- an elbow is inserted into the hemisphere and secured with a latch;
- measure the distance from the elbow to the riser hole and cut off the adapter pipe with an angle grinder (an angle grinder is not a technology, but the most convenient tool);
- we remove the chamfer from it, remove the burrs with a file;
- Lubricate all connections with silicone and assemble.
After connecting the sewer system, the toilet studs are screwed into the frame. It is very important to prevent skewing: they must be parallel to each other and perpendicular to the wall. The method of mounting on the wall is clearly visible in the photo below.
Functionality check
After connecting the tank to the water supply and the drain pipe to the sewer riser, the functionality of the system is checked. After all, the next stage is covering the installation with plasterboard, which will block access to many structural elements. For this:
- open the tap inside the tank;
- remove the plugs from the pipes (red in the photo, yellow or blue from other manufacturers);
- pipes with cuffs are attached to the toilet;
- The toilet bowl is put on the pins and moved towards the installation. The goal is for the dressed pipes to mate with similar pipes mounted on the frame. It will not be possible to push it all the way, since the fittings on the toilet have a decent amount of length (later they will have to be shortened);
- manually activate the flush valve rod.
Attention: many craftsmen place wooden blocks between the installation and the bowl and secure the toilet with nuts, which makes the structure rigid.
The test of the functionality of the wall-hung toilet is completed by eliminating the identified faults (if any) and returning the structure to its original state: the tap is closed and the water is drained from the tank, the bowl is removed from the studs, and the plugs are put in place.
Sewage supply
Supplying water to the toilet installation does not cause any difficulties. And for any connection of the tank (from the side or from above), you can always lay a half-inch rigid or flexible pipe. With connection to the sewerage system the situation is more complicated. The diagram for the installation shows two types of connections:
- the knee goes down at a right angle;
- the knee is rotated 45° in the plane of the frame.
In most cases, the connection of the installation to the sewer system is based on these options.
The first option, for example, is used for direct connection to the drain, when the frame stands in the same niche as it. The second option is used when laying a drain pipe to the riser along the wall.
But there are cases when both options are not suitable due to limited space and the unique geometry of the bathroom - the large diameter of rigid pipes and fixed elbow angles prevent this from being done correctly. And to solve the problem of how to turn the sewer elbow away from the installation and provide the required slope angle, corrugated adapters are used. For example, corrugation D 90/110 MM FLEXI from ALCAPLAST. But in this case, it is necessary to check the slope of the corrugation.
Installation covering
After completing the installation, the transition from plumbing work to general construction work takes place. All elements of the system, as well as engineering communications, are hidden behind a false wall, protective screen or in a box. The priority option is a gypsum plasterboard partition from floor to ceiling. To install it, a guide metal profile is attached to the walls and screed.
Stiffening ribs from the CD (ceiling) profile are screwed to it with metal self-tapping screws. In this way, a sheathing is formed for fastening the sheet material. Holes are drilled in the drywall for toilet pipes and studs, and a window is cut out for a panel with buttons, after which the installation is sheathed with plasterboard.
To help self-taught people, we recommend that you look at the work “How to sheathe an installation in a toilet,” which describes in detail how to install the sheathing and correctly attach the gypsum board to it.
Performing markup
When all the preparatory work has been completed and the structure for concealed mounting of the toilet has been installed, markings are made for attaching the frame:
- In the example under consideration, the top sheathing is done to a minimum, so the mark is placed flush with the metal frame. If there is no laser level to align in one plane as indicated, the line is transferred using a square or a building level.
- Then the plane of the front frame post is transferred to the walls.
Plumbing connection
Tiling the walls and floors starts the last two stages of plumbing work: installing the toilet bowl and installing the flush button. Installing a wall-hung toilet bowl is much easier than a monoblock or compact one. All work is performed in the following sequence:
- Among the elements of the toilet, we can find pipes and cuffs for them, nuts with washers for studs;
In the photo, the cuffs are not removed from the pipes after checking the functionality of the system.
- Cuffs are attached to the pipe sockets;
- plastic fittings are placed on the faience pipes of the toilet;
- with a marker or pencil, mark the location of the plane of the back wall of the toilet on the pipes (for convenience, you can attach a long ruler or strip to the sides of the bowl);
- the fittings are removed from the toilet and placed on the frame. The plane of the false wall (with tiles) is marked;
- The pipes are removed and the length between the drawn lines is determined. In our case, X is for the drain fitting and Y is for the flush fitting. The pipes from the edge with the smaller diameter need to be shortened to the length X and Y. In this case, IMPORTANT, you need to cut 3 mm less - the fitting will lengthen due to the shock-absorbing gasket;
- the pipes are cut with a grinder, as in the case of connecting the installation elbow to the riser;
- the cut fittings are chamfered;
- burrs are removed with a file;
- all connections are lubricated with silicone sealant;
- a shock-absorbing pad is installed;
- protective PVC tubes are put on the studs;
- fittings are inserted into the installation pipes;
- faience toilet pipes and fitting cuffs are lubricated with silicone;
- the toilet bowl is put on studs and moved towards the false wall, after which it is clamped with nuts through polymer gaskets;
- a lid with a seat is installed.
After complete polymerization of the sealant (12 hours), the toilet can be used.
How to make a hatch
Installing a false wall blocks access to control and measuring instruments, shut-off valves for cold and hot water and other elements of utility networks. The problem is solved by installing an invisible hatch, which has become familiar to many homeowners.
Hatch selection
When installing a hatch, two problems are solved at the same time:
- access to utilities is provided;
- The location of the inspection window is completely hidden.
The correct choice of an invisible hatch in terms of size and opening method allows you to achieve a positive result. According to the parameters, the hatch, firstly, should provide convenient access to plumbing equipment, and secondly, it should be harmoniously combined with the format of the tiles so that the ceramics do not have to be trimmed.
The hatch can open to the right, left, and, if necessary, down. The main rule of choice here is: nothing should interfere with opening the hatch.
Materials and tools
To work with the hatch you need to have on hand:
- screwdriver with drill and cross-shaped bit;
- calipers;
- roulette;
- pencil;
- bubble level.
Preparatory work
Before installing a hatch in a false wall, two operations must be performed:
- remove the door from medium and large hatches - further work is simplified;
- drill holes for fasteners.
Removing the door is easy. It is enough to use a wrench (included) to unscrew the nuts on the hinges.
It's a little more difficult to drill holes for fasteners. The number of holes and their location depend on the size of the hatch and where the door hinges are attached (this side carries additional load). The diameter of the holes should allow the “bug” to freely pass to the ceiling profile, but not fall through the hatch frame (if, however, the self-tapping screw falls through, you will have to install a washer).
For small-sized hatches, 3 attachment points are sufficient, for medium-sized ones - four, for large ones - 6-8 points, since they have significant weight. The number and locations of drilled holes are shown in the figure below.
Invisibility hatch attachment points.
Hatch installation
To secure the hatch, support posts made of CD profiles are attached to its sides. For medium and large frames, the same profiles are attached to the top and bottom of the frame, which is clearly visible in the photo below.
The frame is fixed to the ceiling profile using metal screws - “bugs”. In this case, you need to ensure that the hatch with the door closed is flush with the surface of the installation and does not violate the vertical and horizontal plane.
The work on installing the hatch is completed by lubricating the hinges with some kind of universal lubricant and installing the doors on the hinges.
Finishing work
The screen installation process is completed by sealing the seams and screw heads with putty. For this:
- sickle tape is glued to the seam;
- use a narrow spatula to rub gypsum putty into the seam (through the mesh);
- screw heads are rubbed;
- A second, leveling layer of putty solution is applied over the shrinking (dried) putty with a wide spatula. It also seals traces of hardware.
These works are described in detail in the material “Leveling walls with plasterboard without a frame.” You can see how to decorate a false wall in the works “Laying tiles in a toilet” and “Decorative plaster of walls”.
In total, the device of the protective screen allows you to hide the installation, and during installation, false walls and all utility networks. The work is not very complicated and can be performed by untrained workers. All you need is attentiveness and patience.
Installation of the release button
For some reason, professional plumbers believe that installing a panel with drain control buttons is beyond the power of a non-professional. However, there is nothing complicated here. Let's look at the process in detail.
- We remove the plug, cutting it flush with the tile with a knife.
- We remove the plug. It is always colored, and different models have different colors.
- Open the tap.
- We place the rocker arm on the drain assembly.
- Among the installation elements we find a gasket and a metal frame for the technological window.
- We fasten the spacer rods and install a gasket on them.
Spacer rods are installed.
- Find the position of the frame on the inspection window.
- Using a screwdriver, attach the frame to the spacer rods. It is important here not to twist, so as not to break the thread of the plastic.
- We find the pushers (white plastic rods with threads) and screw them in. The depth of screwing is controlled by the drain button. To do this, you need to constantly try it on. After screwing in, we fix them with special latches.
- We mount the panel with buttons. To do this, first press down the lower stop and install the panel. After that, we pull it onto the frame and snap it at the top.
System health check
When all installation activities are completed and the installation elements are connected to the main communications, you need to make sure that there are no malfunctions in the system. To do this, first turn the water tap valve and monitor the flow of water into the tank.
As soon as the tank is full, press the drain button and repeat this action several times. Then they carefully inspect all parts of the system.
If the structure works correctly, and water does not ooze from the pipes and connecting parts, proceed to decorative finishing. Detected dampness or droplets of water clearly indicate a problem that needs to be corrected before tiling work begins.
The most common causes of problems:
- Water is leaking from the tank - perhaps the sealing gaskets were not installed correctly or moved out of place during the installation process. You need to turn off the water supply, unscrew the connecting bolts, check the location of the gaskets and correct them or replace them if necessary.
- The toilet bowl is wobbly - you need to look at the fasteners of the toilet itself and the connecting elements of the installation, and then carefully tighten them so that the position of the plumbing fixtures is clearly fixed. It is advisable to act very carefully, otherwise there is a risk of breaking the threads of the reinforcement fasteners or even splitting the ceramics.
- Water stagnates in the toilet - a clear indication of improper placement of the drain pipe. To resolve the issue, you will have to dismantle the plumbing, install the drain strictly at 45 degrees, and only then return the toilet back.
- Dampness on the floor and around the base of the toilet - most often this phenomenon is associated with poor sealing of the connecting corrugation. To eliminate a leak, just cover the joints with another layer of sealant and let it dry well.
All these problems are not very difficult and can be easily fixed with your own hands at home. If the owner does not have the desire or time to carry out repairs, you can call a professional plumber, and he will quickly fix the problems that have arisen.