Due to recent changes in land legislation, a new document has appeared, or rather a component part of the “Notification of the planned construction or reconstruction of an individual housing construction project or a garden house” - a schematic representation of a capital construction project planned for construction or reconstruction on a land plot (hereinafter referred to as the Scheme). That is, from March 1, 2021, for all garden houses and individual residential buildings, WAS be submitted before starting their construction. About him in the link above. One of the points in this notice is a diagram on which your future home should be depicted with reference to the land plot. You can prepare this diagram yourself or involve specialists (cadastral engineers). In this article we will tell you in detail how to prepare it and when you can do it yourself, and when it is better to pay and get a 100% result. We do not pursue the goal of persuading you to order the preparation of this scheme from our company. We’re just giving food for thought, and it’s up to you to decide.⇓
We would like to immediately draw your attention to the fact that notifications for new buildings, as well as schematic images for them, have been canceled in most cases since December 19, 2021. More details at the link above.
Who can prepare the Scheme, nuances
First, we consider it necessary to inform you that a “schematic representation of a capital construction project planned for construction or reconstruction on a land plot” is nothing more than a SPOZU (scheme of the planning organization of a land plot), which was previously necessary to obtain a building permit. Using the above link you can find out what happened with the permit and what new things Russian legislators came up with. As for the Scheme, they simply renamed the SPOSU and finally gave official recommendations for its preparation. These are the recommendations that ultimately constitute the rules for designing the Scheme. If you don’t adhere to them, there is a high probability of getting rejected.
As for the main question - who draws the Scheme and whether it is possible to make it yourself - the answer is not so clear. Any individual or legal entity can prepare a scheme. No seals or stamps of licensed organizations are required there. This means you can prepare it yourself or turn to specialists. The only thing is that the owner of the site must leave his autograph.
Purely technically, if you look at the sample diagram below, you can, having faith in your abilities, prepare it yourself. Moreover, you can draw by hand without really going into scale. The main condition is that all records are readable and can be unambiguously interpreted. If you have the skills to use graphic editors on a PC, that’s great. This greatly increases the chances that there will be no “nitpicking on the design” on the part of the administration. In principle, if you have the time and desire, this Scheme can be prepared in a few hours. If you need to submit electronically, scan it and you're done! But you can also leave this to cadastral engineers.
There are two reasons why this is worth doing. The first is a simple and basic lack of knowledge, time, skills and desire to draw something. Oddly enough, many are willing to pay a small amount and not go into details of what they encounter for the first and last time in their lives. The second, more important nuance is if you have already started construction and only now want to submit a “notification of the start of construction”. The house will need to be shown on the Scheme exactly according to its actual configuration and location on the land. If the data in the Scheme differs by more than 10% from the data in technical terms (submitted to the MFC after completion of construction), then registration of real estate may subsequently be refused. Therefore, if you cannot accurately determine the location of your house on a plot of land, it is better to leave this to the specialists. Moreover, after the final construction of the house, additional measurements of the building’s location will no longer be needed and you will receive a discount on the preparation of a technical plan.
As a result, you can do it yourself without much effort. If it is not possible or you want to do it for sure, contact us.
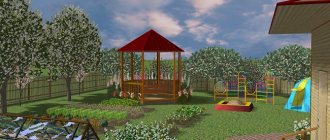
Landings
20 – Blue honeysuckle. Since this culture loves the sun, the southeast side is just right for it. My imagination is already painting a picture of how I will pick large, tasty berries right from this “edible” hedge! 21 – Blackberry. In my opinion, the place is simply ideal for planting this light-loving crop! 22 – Raspberry. Perhaps, as a gardening experiment, I’ll plant, for example, raspberries here. 23 – Thuja. Along the rest of the perimeter the hedge will be represented by thuja. 24 – Alpine slide. Since the area of the site allows you to “swing”, I would like to make the rock garden large enough. 25 – Jasmine. Garden jasmine, also known as mock orange, grows well in shaded areas, so I will leave a place for it on the north side, in the shade of the barn. 26, 27 – Hydrangeas. I want to try to “plant” both tree-like and large-leaved hydrangeas on the site. Shrubs of these two species do not require a lot of sunlight to produce lush blooms every season. 28 – Pear. Why not make the most of a free corner? 29, 30 – Hosts. These plants are also quite shade tolerant, so the northern side of the site is ideal for them. 31, 32 – Climbing roses. The space under the window and near the terrace will be decorated with beautiful rose bushes. 33 – Blueberry. The southwestern side allows you to plant a light-loving highbush blueberry bush. 34 – Currants and gooseberries. What would a garden be without these berry bushes! 35 – Cherries. Initially, I had the idea to plant a self-fertile cherry seedling near the greenhouse in order to save space for something else, but after thinking about it, I abandoned the idea - what if there were very few berries. Still, let there be two cherries. 36 – Plum. 37 – Apple trees. 38 – Pear. 39 – Flowerbed.
40 – Track. It was decided to cover it with decorative slabs.
I can't wait to try out the capabilities of the first design program and show you what I did. Stay in touch!
What does a schematic image of the planned construction of a public housing complex on the charger look like (sample)?
First you need to know that the Scheme was approved by order of the Ministry of Construction of Russia dated September 19, 2018 No. 591/pr). Pr- means that this is only a project. But, as you know, there is nothing more eternal than temporary. A lot of time has passed, but it has not been finalized and has not been transferred to the status of a valid order. So, in fact, the project remained active.
The order is not very long and you can read it, but it is not necessary. Since there is a lot of “water” there, it is recommended to indicate too much unnecessary information on the drawing. If you do not indicate it, the scheme will still be accepted. What is still desirable to display there is below. As already mentioned, you can draw by hand (most importantly, not with a pencil) or using computer modeling (for advanced users). The essence of the scheme is a description of the location of future and existing buildings, their technical and economic indicators, landscaping and zoning of the land plot.
List of programs for site design
Almost any program for site design requires prior downloading from the network or purchasing a physical distribution medium in any other way. The software must be installed on your home computer in advance and then you can start working.
Depending on the chosen program and the method of purchase, you can become the owner of a licensed or pirated version, Russified or in the original language of the developer.
SketchUp
A multifunctional design program in which you can develop landscape design and carry out pre-design preparation and planning of a garden plot.
Available in two versions - paid and free. The first is intended for commercial use by professional organizations and specialists. The second one can be used at home, designing your own garden plot.
Ready site design in SketchUp
A huge advantage of the program is its coordinated work with various Google products. One of the most useful services is the exchange of data almost automatically with the Google Earth application.
This is convenient because to create a 3D model of your own plot, you don’t have to create a base from scratch, but take ready-made, completely realistic land planning parameters from a virtual globe. And then continue to work with this material.
The program has the ability to create both two-dimensional and three-dimensional images and plans of the garden plot. Moreover, these objects will be interconnected, all possible information will be automatically transferred to new worksheets and areas, and you will not have to do the same work twice.
What should be shown on the Diagram?
A schematic representation of a future building may not be drawn to scale, which simplifies the execution of the drawing. It consists of text and graphic parts.
The graphic part must necessarily display the boundaries (cadastral) of the land plot, the location and future configuration of the building with terraces and verandas, the linear dimensions of the external walls along the base and the linear dimensions from the boundaries of the land plot to the nearest walls of the building. The remaining buildings, wells, paths, underground communications and other landscape elements can be specified as desired. Naturally, this will complicate the work and make the drawing less “readable”. In other words, there is no need to draw too much.
The text part should contain the symbols used, fields for the signature of the owner of the land plot and technical and economic indicators of the future house. The main indicators include:
- building area - the area of the future building with verandas and terraces calculated at the basement level. You should not be too scrupulous about measuring and calculating this area. It is more informational in nature;
- development coefficient - the ratio of the building area to the area of the land plot
- The total area of the building is the sum of the areas of all rooms enclosed by walls.
- building density coefficient - the ratio of the total area of the building to the area of the land plot
- the total floor area in the dimensions of the external walls is an incomprehensible characteristic. However, this is the sum of all rooms in the above-ground floors, taking into account even those not covered by partitions (open terraces, balconies, etc.) in the dimensions of the external walls, that is, according to external measurements.
- number of floors - in this case we mean above-ground
- the height of the building is from the ground to the highest element of the building.
Zones
12 – Parking. There was no point in building a separate garage: I did not intend to live on the site permanently. It is much easier to park a car on the site. In my case, it will be lined with crushed stone. 13 – Reservoir. I would like to make it large enough, about 3-4 m in length. Such a personal whim! 14 – Barbecue area, also known as a summer kitchen. It would be nice to lay out this area with slabs. 15 – Compost heap. A fenced area measuring 1.5 x 1.5 m will be quite enough for her. 16 – Relaxation area with umbrella and sun loungers. 17 – Raised beds. I didn’t intend to set up a classic vegetable garden. And in order to have less trouble with the soil, the space between the beds was mulched with pine bark. 18 – Children's playground with swings and sandbox. I designed it right behind the house, away from the road. It will be located between the vegetable garden and the gazebo, right under the windows of the house, so the children will always be in sight. 19 – Garden. Here I will plant fruit trees and berry bushes.
Nuances of preparing a diagram
Analyzing the many responses of various Administrations to the submitted schematic images as part of notifications, several conclusions can be drawn:
- If the drawing is made by hand, but carefully, and all the characteristics of the building are indicated on it, in most cases there are no complaints about it.
- Sometimes additional information may be required that is not included in the main list displayed in the diagram (above). Simply add the required item. For example, wall material, connection to central networks, etc.
- The concepts of “building density coefficient” and “building density” are often played with. They are calculated differently, and if you do not immediately guess which option suits the Administration, you will have to recalculate.
The cost of preparing the Scheme by our specialists
If you still decide to contact us, our specialists will promptly prepare a schematic representation of your future building for filing a Notification. Accordingly, to fill out the notification, you will need some initial data from you and a contact email address. We will send the finished document to your email and all you have to do is print it and sign it.
The cost of preparing the scheme is 1500 rubles. If we prepare the entire Notification, then 2000 rubles!
Price for preparing the diagram