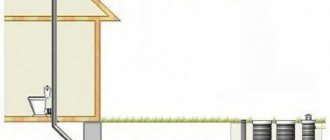
There are two types of floor heating: electric and water. A water circuit is suitable for a country house, but this option cannot be installed in apartments. Installation is prohibited due to the fact that heating is carried out using central heating. Water moving through the pipes cools and is not able to sufficiently heat other apartments in the house.
Pipe laying.
What is a heated floor?
Heated floors are the latest trend in home renovation using the latest technologies. Installing a system in your bathroom can bring a sense of functional luxury at a reasonable price.
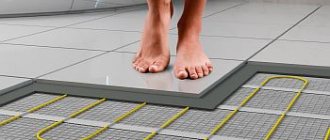
The modern floor heating system is much simpler than it seems at first glance. It is basically a folded mesh sheet with electrical wiring running the entire length. It is purchased at the required length, depending on the size of the room, and rolled flat onto the floor during installation.
RECOMMENDED ON THE TOPIC
- Pros and cons of sand-lime brick
- Paintable wallpaper - pros and cons
- Pros and cons of liquid wallpaper
After connecting to the network, the heated floor will be heated by the controls. After installation, a concrete screed may be needed, on top of which a covering is laid, which can be used in various options: from tiles to vinyl floors.
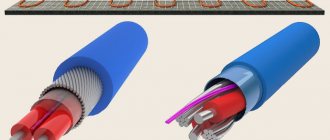
Water
Pipes of the floor water heating circuit https://prostory-ukraine.com.ua/teplyiy-pol-vodyanoy/truby
Pros:
- Eco-friendly;
- More economical than electric (about 5-7 times);
- Comfortable heating (70% of heat is transferred due to radiation);
- Does not take up useful kitchen space (compared to radiators).
Minuses:
- Significant installation costs;
- Installation in apartments is prohibited. In some cases, it is possible to officially agree on installation.
Installation cost. The price directly depends on the materials used for the collector, thermal insulation, and system pipes.
An approximate cost guide for installing a water option, taking into account the necessary materials: from $300 or more (for a room of 12 sq. m.).
Photo: kirov-portal.ru, lenstav.sk, norstar.ru, profittings.ru
Advantages and disadvantages of heated floors
The main advantages of such a heating system are:
- heat is distributed evenly throughout the room, maintaining a constant temperature;
- constant temperature optimizes energy consumption;
- stable temperature = less heat loss;
- if necessary, it is very easy to upgrade;
- floors remain warm, even at low temperatures;
- a warmer floor temperature prevents the “reproduction” of dust;
- saving useful space in the bathroom;
- the ability to use almost any floor covering: laminate, wood, carpet, stone, tile, vinyl, concrete screed.
5 questions about choosing a plastic door to the balcony
The disadvantages include the following:
- more difficult to install in old buildings;
- The cost of a heated floor system pays off for quite a long time.
It is best to think through all the nuances in advance (power, installation method, type of flooring) before installing a heated floor system.
Laying tiles
The tiles should be laid on a cement screed 2–3 cm thick. The greater the thickness, the greater the heat capacity of the floor, but at the same time the heating time increases. Before laying the tiles, you need to prepare the screed. It can be done using the pouring method or traditionally using cement-sand mortar, beacons and rules. There is no need to talk in detail about the technology, it is widely known, but there is a need to give professional advice on the features of underfloor heating technology.
Energy efficient heated floors
Thanks to energy efficiency, ease of maintenance and other advantages, heated floors have gained popularity all over the world. Heated floors save money on heating bills. For the most energy efficient bathroom heating solution, insulated underlayment and insulation boards are used when installing a radiant floor heating system.
To make the most of the energy-saving ability of an underfloor heater in your bathroom, install a smart thermostat to automatically control the system and save more.
Connecting a collector device
The collector is considered an essential component of underfloor heating; it is represented as a technological unit of equipment that regulates the movement of heat flows in the circuit of the device. So, the boiler can heat water to a temperature of 95 degrees, however, these indicators are not applicable for normal operation. The collector aligns these numbers to the required levels, helps to evenly distribute water moving through the pipes, and controls any processes in the system.
For full operation of the heated floor in the kitchen, it is necessary to correctly connect all the elements of the circuit. First, the manifold cabinet is installed as close to the wall as possible or mounted at its base. The collector, supply (with hot water) and return (cold water) pipes are placed here. A shut-off device in the form of a faucet is attached between these mounted parts. On the other hand, a drain device is placed from the collector.
Bathroom size and shape
These must be taken into account when choosing the type of heater to install. While there are many options that are ideal when space is at a premium, not all bathroom heaters can be used in small spaces without causing inconvenience. This is another factor in favor of underfloor heating systems.
For larger bathrooms, considering how efficient the heater will be throughout the space should be a major focus. For small rooms, a more important factor is choosing the optimal location for the heater, taking up the least amount of space.
Recommendations from experts
You can build a warm floor yourself. It is preferable, of course, to have at least basic knowledge in this area. After all, for example, the same infrared film requires proper connection. Although some systems are easier to deal with.
Regardless of whether the floors are made with your own hands or workers are invited to do this, there are a number of tips that will help carry out all the work efficiently. So:
- you need to understand that not the entire floor will be heated, but only those areas where there is no furniture or other interior items - approximately 60-75% of the total area of the room, which means that the material is purchased at exactly these percentages;
- before laying tiles, you need to double-check the serviceability of the system, especially if mats were installed (they may be twisted, broken, or even have breaks);
- after all the elements are put in place, you need to “ring” and double-check the joints of each section of the floors - it is cheaper to fix the damage before the finishing coating is installed than to then make repairs not only at your place, but also at those of your neighbors below;
- Under no circumstances should you walk on laid heating mats or place or throw any heavy objects on them until the tiles are laid;
- if the repair is not yet completed, then you need to mark the “path” of all cables, so that in the future it doesn’t happen that when drilling walls (for example, under shelves), you get into a wire;
- if a cable floor is being installed, you can turn it on for testing only after the screed has completely dried (drying time depends on the mixture);
- when working with infrared film, it is imperative to use a substrate with heat-reflecting properties - experts recommend using a rolled technical cork (2mm thick);
- before fixing the infrared film, you must first lay the mounting fiberglass mesh (mesh size - up to 3cm);
- to select the power of the thermostat, you need to carry out the following calculations - 150 multiplied by sq.m. heated area;
- for convenient operation and repair (if such a need arises in the future), it is recommended to use installation cables of different colors;
- if the infrared heating system outputs more than 2W, then you need to use a connection through a special machine.
These tips were compiled by professionals, which means they are tested by experience. Therefore, if you plan to create really high-quality heating, then you should listen to them.
Freedom of design
Radiators can sometimes seem a little bulky, especially in small spaces. Underfloor heating systems offer an 'invisible' approach to heating, so you can create a bathroom with complete design freedom. Heated floors also provide better air quality in the bathroom.
Regardless of the type of flooring used, there is a wide range of underfloor heating systems ideal for your key needs. You can even install a heating system behind the bathroom wall tiles.
Mineral wool characteristics and properties
Electric underfloor heating mats, available in ready-made rolls, are an easy and affordable way to install underfloor heating in your bathroom.
Warm floors in the kitchen: pros and cons. How to choose?
Some people think that heated floors are an expensive thing that is not necessary.
That it is very difficult to install and requires terrible effort and investment. But this is nothing more than the imagination of those who have never actually encountered this. We spend a lot of time in the kitchen, which means that everything must be at the highest level. Warm floors are a very important thing, and in some homes they are simply vital. Especially if you have children and pets. We think there is no need to explain that they love to be around, including while you prepare food. And you yourself want to be warm, but no one likes to be cold and sick.
Let's look at a couple of situations in which floor installation will not be necessary
:
· if the apartment has very strong heating, and the windows face south;
· if you do not have children and do not plan to have them;
· if there are no heat-loving pets;
· if all family members wear slippers and like to dress warmly.
In all other situations, it is worth taking care of installing a heated floor. After all, this is not only comfort, but also health. In addition, the cost is only 1,500 rubles per square meter.
In what cases is it necessary to install underfloor heating?
This decision is necessary if:
· there are (planned) children in the house;
· have pets that need warmth;
· want to combine a kitchen and a balcony (loggia);
· you have tiles or laminate as a floor covering;
Source of the article: https://zen.yandex.ru/media/teploluxe/teplyi-pol-na-kuhne-za-i-protiv-kak-vybrat-5fddfa758ae4867dad92eaaf
Protecting your floor
When installing an underfloor heating system in a bathroom, you need to consider whether decoupling technology should be used. This means separating the floor finish in a particular room from the structural layer of the building itself, which prevents damage to the floor from seasonal temperature changes.
It is advisable that the electric underfloor heating system supports this decoupling technology as it is ideal for large stone floor tiles which are prone to cracking in such cases. The mat should be equipped with special prongs that can be used to wind loose electric heating wire, creating a customized heating pattern for the bathroom.
Do you need underfloor heating in the kitchen?
Installing heated floors in the kitchen is not always justified. Let's consider all the pros and cons, which will help determine whether additional heating is necessary in your case.
The need for a heating device arises if:
- you like to walk barefoot - to maintain health;
- live on the ground floor or in a private house - the floor is not heated by conventional heating and remains cold;
- after renovation, the kitchen is combined with a balcony - without an additional heat source it is difficult to create the desired temperature level;
- If you plan to use tiles or laminate as flooring, this is a cold material.
If your heating system warms up the room well, then there is no point in installing additional heating. Also, when using warm material as finishing - wood, cork or linoleum, it is also not needed.
In addition, the wood will dry out due to constant heating, resulting in cracks. And when laying linoleum on a heating surface, it will release toxic substances. Another point when you don’t need a heated floor is that if the windows face south, the sun’s rays will warm the room.
That is, you need to make a decision about the need to install a heating structure taking into account the layout and location of the kitchen, as well as your temperature preferences.
Choosing coverage
Practical coverings in the kitchen are simply indispensable for a modern person. They must meet the following requirements:
- Hygiene - easy to clean from dirt, grease, and easy to withstand the effects of aggressive household chemicals.
- Moisture resistance. The forge in the entire house is the second room in terms of humidity after the bathroom, where the floor surface is actively influenced by water.
- Wear resistance - the floor must be resistant to abrasion, durable and reliable.
- Impact resistance. Preference should be given to a coating that can withstand falling heavy objects without damage.
These requirements do not apply to every coating. But in addition to this, it should suit the overall interior of the room, look aesthetically pleasing, and be recommended for use with heated floors. It is better to study the characteristics of the finish in advance to make the right choice.
Tile
This is the optimal choice of covering for the kitchen when planning additional heating installation. Ceramic tiles retain their environmental friendliness even with strong heating. It also does not collapse or crack with repeated heating and cooling, it has maximum moisture resistance, and is easy to clean.
Tile
But a high heating rate is not always good for your feet.
You need to choose the material wisely. For example, where there is not a lot of load on the floor, thinner tile coverings are also suitable. This will allow for better heating.
When selecting a specific type of material, attention should be paid to the following criteria:
- Hardness - it is measured on the ten-step Mohs scale. For an apartment, an indicator of 5–6 is suitable.
- Water absorption. In a room with high humidity, the water absorption of the tiles should not exceed 3 - 6%.
- Wear resistance. There are 5 different classes. For light loads on the floor, class 2 material is suitable, and in other situations, class 3 and 4.
- Chemical resistance. The tile itself is a durable coating, but it is especially important to pay attention to this characteristic for the kitchen.
- Porosity. When laying with heated floors, the density of the tiles should not be too low.
After laying the tiles, the floor must be checked for evenness. You can turn on the heating only after the glue has completely dried, otherwise the quality of the work will be ruined.
Self-leveling coating
Self-leveling flooring is a good choice for the kitchen. A screed is not required for its design, because it is capable of leveling itself. Minimal maintenance is required for such a surface; self-leveling floors are easy to clean and are not afraid of moisture, scratches, or impacts.
Another advantage is the ability to choose original colors, even if you want to create a 3D effect.
But such finishing is still considered a new product, so the cost is not the most affordable. The quality largely depends on the professionalism of the installer. Some do the job sloppy, as a result the floor looks uneven, and in the light of the sun every dot or swollen bubble is visible.
Before choosing this option, you need to find a reputable company that will do the job perfectly.
When installed correctly, the surface has a long service life - more than 50 years. It retains its original appearance for a long time.
Cork
As a cork covering for the kitchen, adhesive varieties are more suitable. The advantages of using them in the kitchen include:
- if it falls and hits the floor, the dishes will not break;
- It’s nice to walk barefoot;
- the material is an excellent heat insulator;
- good sound insulation;
- does not support combustion;
- does not release toxins;
- does not slip.
Cork
Despite many positive reviews and advantages, there are also disadvantages:
- high price, more laminate, linoleum;
- use of special glue and varnish for finishing;
- it is unacceptable to leave even minimal unevenness on the base under the cork surface;
- You won’t be able to lay the floor yourself without the services of professionals;
- high probability of scratches - easily damaged when rearranging furniture with metal legs, falling sharp objects or from the claws of animals.
There is an opinion that cork flooring is prohibited from being used with a heated flooring system. It is not true. You can conduct an experiment yourself, put a piece of floor on the battery. The material conducts heat well and is not prone to fire.
Video description
About the features of laying heated floors on thermal insulation in the video below:
Control and management
In order to receive information about the degree of heating of the heated floor, it is necessary to install a temperature sensor. For it, a groove is made in the wall from the thermostat vertically downwards, then passes along the floor. The sensor must be placed in a corrugated pipe that is laid in such a way that it ends at the temperature control point.
A thermostat is used to control the heating mode. It is installed on the wall next to the outlet. With its help, you can set the desired operating mode for the heated floor.
Checking electrical parameters
Before installation, it is necessary to check how accurately the resistance of the thermomat corresponds to the value stated in the description. An accuracy of 10% is considered acceptable. This can be done using a multimeter.
Water heated floor Source boyargo.ru
Laying the heating layer
If a cable is being installed, it is convenient to attach it using mounting tape. When installed on top of the mesh, the wires can be secured to it using plastic cable ties. It is enough to arrange the thermomats according to a pre-drawn diagram and after that the heated floor is connected to the thermostat. After installation is completed, another measurement of the wire resistance is carried out. It must match the one received earlier.
Now, how to connect the thermostat:
- First, remove the decorative frame.
- The power supply is connected to the In socket, taking into account the polarity.
- The wire from the heated floor is connected to the Out input.
- The temperature sensor must be connected to the Censor.
After this, the thermostat will be in working order.
Screed
To fill it, prepare a cement mortar. It should include: sand, cement, crushed stone, water in a ratio of 4:1:5:0.6. It is also necessary to add 1% plasticizer to the mixture. The thickness of the screed should be 3-5 centimeters. It must be remembered that the cement mixture will dry completely after 4 weeks.
The tiles must be installed very carefully Source rmnt.ru
Laying tiles
After the screed has dried, apply a layer of tile adhesive on top. You can do this in 2-3 days. If a thermomat is used, the glue can be placed directly on the mats without installing a screed. After this, the tiles are laid.
Installing a thermomat Source teplospec.com
We install water heating
Water pipes with coolant are mounted in long loops. The maximum length of the circuit is no more than 100 m. The geometry of pipe laying may vary. Usually it is a snake or spiral.
The pipes are connected to a common manifold, which is placed in a separate cabinet.
The pipes are filled with screed on top, unless they are already equipped with special mats. Instead of a screed, when installation is completed, the system can be covered with sheets of fiber gypsum - this is an insulator for pipes and top decorative trim.
Laying the water circuit
Video description
About calculating the power of a heated floor in this video:
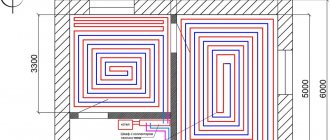
Create a schema
Before you begin directly laying an electric heated floor under the tiles, you need to imagine how the mats will be located. To do this, you need to draw up an appropriate diagram. In it you need not only to mark the location of the heating wires, but also to set the laying step for them.
Laying a water floor Source yar-limb.ru
When planning, the following must be taken into account:
- Necessary. so that the distance from the wire to the walls is not less than 10 centimeters.
- You need to first think about where massive furniture without legs or household appliances will stand. It is not recommended to lay a heated floor in this place due to the fact that the heat will practically not escape outside and will cause overheating of the wires.
- When determining how the wires will lie, it is not necessary to ensure that they are strictly parallel. If necessary, the mesh can be cut and the cable placed at an angle.
The location of the heating elements must be made taking into account the required power, which has been previously calculated.
Connecting heating pipes Source rmnt.mirtesen.ru
Checking the electrical wiring
For reliable operation of electric heating, it is necessary to ensure high-quality and reliable operation of the electrical wiring. It is necessary that the cable cross-section corresponds to the power that will be spent on an electric heated floor. If this is not the case, then an appropriate replacement must be made. You also need to check whether the switches can handle this current load and, if necessary, they will need to be replaced.
Thermal insulation
It is necessary to ensure that the heat from warming up does not go down. To do this, you need to lay out a thermal insulation layer. One effective way is to lay penofol. This is a self-adhesive surface with a foil layer. It is recommended to stick damper tape around the perimeter of the walls. which is designed to compensate for thermal expansion of the coating. A metal mesh is placed on top. This is necessary so that there is no direct contact between the heating elements and thermal insulation.
Tiles are glued to thermomats Source dekormyhome.ru
Installing electric heating
The stages of installing heating in the kitchen will be as follows:
- Preparing the space for the thermostat. For this purpose, a hole is made in the wall using a hammer drill. A groove is formed from it downwards for cables - power or electrical, as well as for the sensor.
- A corrugated pipe is placed in it so that its blind end ends 6 cm from the wall. The groove is sealed with a gypsum-based mixture.
- After carefully leveling the subfloor, a layer of reflective heat insulator is laid on it with the foil part facing up. The joints are sealed with tape.
- To fix the heating sections, a mounting tape is attached to the heat insulator using dowels.
- The cable is laid evenly without sharp bends or kinks.
- After installation is completed, the floor is filled with concrete mixture.