How to cut at 45 degrees
- - miter box;
- - construction square;
- - pencil;
- - hacksaw;
- - sharp knife;
- - metal ruler.
Most often you have to cut the baseboard for the internal corners of the room. To trim, place it in a miter box fixed in a stationary state. Press the very edge a little further than the slot at the 45 degree mark located on the right. Cut the baseboard using a hacksaw blade. If its long part is on the right, the cropped corner will be right-handed, respectively, on the left - left-handed.
Remember that the side of the plinth that is pressed against the side wall of the miter box when cutting the corner will be glued to the wall during installation, and the side that is pressed against the bottom of the miter box will be glued to the ceiling. After cutting off two corners: left and right, place the product in the corners to check the accuracy of the cuts made. Correct minor discrepancies using a sharp knife.
External corners are less common in apartments. When cutting the baseboard to create such corners, you must first make a mark at the beginning of the outer corner. To do this, use the markings to press the product against the wall and use a pencil to mark the edge of the corner of the wall where the cut will be made. Please note that before applying the mark, the baseboard must be prepared for gluing, that is, have an internal corner or be ready for direct joining.
Place the plinth in the miter box and press down. If its long part is located on the left, make a cut along the left mark of the miter box, corresponding to an angle of 45 degrees. The side pressed against the side wall, as when cutting an internal corner, will be glued to the wall during installation.
When gluing, make sure that the bottom side of the outer corner matches the outer corner of the wall or protrudes slightly beyond it. Cut the right side of the corner in the same way.
To cut an angle on a wide plane, use a square. Place it so that the inside fits snugly against the end of the product.
How to cut a 45 degree angle without a square and a protractor
Methods
In addition to cutting using a miter box, in which the angles are clearly defined (90, 45, sometimes 60 degrees), there are other methods. More expensive is to use a rotary miter box or rotary circular saw. Cutting an angle with a tool like this, where it can be adjusted and is fairly easy to install, is not difficult. Cutting is done either manually or using a circular saw.
Purchasing such equipment for finishing one room, bathroom or even an apartment is hardly justified; professional activity is another matter, in this case, of course, it is better not to save.
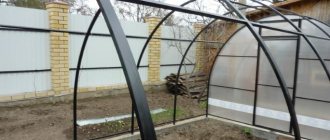
In order to file a fillet at home, you can get by with a more budget-friendly option by preparing a homemade miter box from plywood. It is important to clearly measure the corners and make cuts along which the plinth will be sawn off in the future.
In order not to confuse the sides of the plinth and to cut correctly, at first it is better to apply it together with the miter box to the ceiling; gradually the skill will be developed and you will be able to do without repeated movements up and down.
You can also prepare a kind of mock-up of the miter box on cardboard; the sawn-off plinth will have to be placed on the mock-up and marked with a pencil. In order to cut the required angle, it is better to move it to a more convenient place; in addition, it is important not to spoil the layout.
There are ways to saw off corners without a miter box. This is especially true since the angles are not always ideal, and the standard angle of 45 degrees may be incorrect. In order to make a corner in this way, you need to place a piece of plinth directly on the ceiling exactly as it will be mounted. Use a pencil to mark the width of the fillet on the ceiling. Having placed the baseboard on the other side of the corner, you also need to mark its width on the ceiling.
You will get two intersecting segments. Then you need to again attach the pieces of plinth to the ceiling and mark the same point on them.
It is necessary to cut from the edge to the marked point; it is important to remember the sides with which the plinth will be adjacent to the wall and ceiling; under no circumstances should they be confused. Small flaws can be corrected during the installation process, trimmed with a stationery knife, if the baseboard material allows this. With wooden fillets everything is much more complicated; a knife will not help there.
READ How to correctly cut the outer corner of a skirting board
“On-the-spot” measurements make it possible to cut both internal and external corners without large losses, although the latter are not common, yet their finish is significantly different.
How to cut the ceiling plinth at 45 degrees, see below.
Method 3: Trim by eye in one pass
The fastest way is to trim by eye in one pass. At the same time, with experience you can gain sufficient skills so that the quality of the end is quite suitable for further welding work.
The cutting disc of the grinder is applied to the pipe from above as perpendicularly as possible. With a developed eye, this will work out the first time. After cutting the upper side of the profile, you need to move the disk to the near side. The tool must also run perpendicular to the pipe. Having two intersecting cuts, all that remains is to deepen the disk, and it will cut the profile to the end without distortion on the remaining walls.
How to cut a 45 degree angle: How to cut a 45 degree angle
Trimming using a miter box
How to evenly trim the corner of a ceiling plinth using it?
A miter box is a simple tool used by carpenters. With its help, you can cut any workpiece at the desired angle.
It is usually a wooden, metal or plastic tray on which special vertical slots are made for cutting at an angle of 45° and 90°.
There are complicated designs, which, in addition to the mentioned angles, also have a hole for making a 60-degree cut.
A special miter box is produced for professional work. Its rotating mechanism allows you to fix the cutting blade in relation to the workpiece at any given angle.
How I glued plastic corners to the wall and windows.
The process of trimming skirting boards to go around internal and external corners in a room is simple, but requires precision in execution. The video below provides you with additional information on this topic.
How to form an angle?
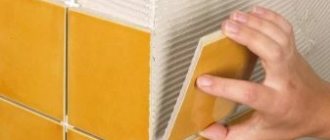
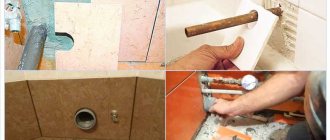
Lay the cut tiles on the corner so that they look perfect, which is important, since the profile of the connecting edges has been changed and it is necessary that the tiles fit together evenly at the joint.
- The first tile is glued, the position is fixed with a level, the cut edge goes beyond the edge of the wall, which is normal.
- While the glue has not hardened, the tiles are glued to the other side of the wall, the cut edges are tightly connected, and then the tiles are glued in this order.
- It is important that the wall is level on both sides, otherwise it will not be possible to form the correct angle with the help of tiles.
Laying tiles is no different from what is done during regular tiling work. The main thing is that the walls on both sides are smooth, and the tiles are adjusted so that everything looks smooth and beautiful.
Decorative solutions
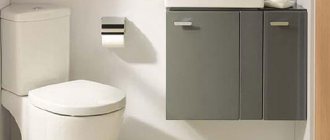
A plastic corner is the most common and affordable option for decorative finishing of various joints in the bathroom. The use of such a corner helps to hide all aesthetic defects that arise as a result of rough sealing of seams. The corner can close gaps up to 3 cm wide. It is recommended to fasten the baseboard using transparent sanitary silicone. Silicone is an excellent adhesive, provides additional sealing, and also contains antifungal additives, which is necessary when finishing a bathroom.
Border tape is the easiest and fastest way to close a gap up to 3 cm. The tape is a strip of polyethylene with an adhesive base. To glue it, you just need to degrease the work surface, measure and cut the required piece and attach it, pressing with your fingers, to the gap. Border tape without an adhesive layer is installed using silicone.
Experts recommend purchasing border tape without an adhesive base and installing it using silicone. This way it will last longer.
You can fill the gap with tiles. It is better to use tiles left over after tiling the walls. If there are no tiles left after the renovation, you can purchase several pieces of white tiles of such a size that a minimum of trimming is required. If the bathtub is white, the tiles will blend in with it and the borders will be almost invisible.
Sometimes when decorating walls with tiles, craftsmen use a decorative ceramic border. The same border can also be used to decorate the joints. Attach it to the surface using waterproof glue or liquid nails.
How is cutting done?
Here's how to cut a corner of a tile for wall installation:
- when cutting, do not touch the glazed part, minus 0.5 mm and maximum 1 mm;
- if the coating layer is touched when cutting at a UCA (i.e. at 45 degrees), then treat it with sandpaper, giving the edge an attractive appearance;
- tiles, especially domestic ones, have a concave shape, so in principle it is impossible to make an ideal cut on a machine; the section that is concave is processed manually by grinding, but if there is a deflection in the tile, it is better to use a traditional plastic corner, it will turn out cheaper and faster;
- when cutting there is a secret - cut the tiles with an angle of less than 45 degrees, but for ceramic plinths such a tolerance is not applicable;
- the painted end is better suited for cutting, it is not finished to the end, leaving a gap of 1 mm;
- A tile cutter cuts the edge of a tile without dust; if you use water when cutting, an angle grinder leaves much more dust, so they work in a sealed mask or respirator.
Laying on corner surfaces is a costly method and takes a lot of time. In some cases, it is better to go the usual route - pick up plastic corners. But there are options when you can’t do without pruning. This refers to tiles that look like decorative stone. In this case, it is only possible to cut the edge of the tile at an angle of 45 degrees.
Another similar option
You can do it differently. First, the same work is done as in the previous version - a strip is drawn, a corner is laid and pressed. But here the groove is made somewhat deeper - 4-5 mm. After the corner is removed, the remaining metal can simply be broken off, and the edge can be processed using an angle grinder with a grinding disc. However, there may be small pits on the edge, which makes the second option more acceptable.
The groove along the guide angle is made a little deeper than in the previous version
What tool to cut with?
In this version of tile cutting, the bottom part is cleared so that only the bottom tile layer is involved. And the top glazed part is not affected. Tools used to cut corners :
- an electric tile cutter is a convenient, practical tool that cuts an angle at 45 degrees, because it cuts tiles in the range of up to 45 degrees and firmly fixes the cutting edge in this position;
- an angle grinder, with which you can also cut a corner, but doing this is much more difficult than with a tile cutter, however, for home use, an angle grinder is the most reasonable option.
Cutting tiles at 45 degrees with a tile cutter
It is clear that a tile cutter is used by those who are engaged in professional tile laying, and an angle grinder is suitable for those who decide to do their own renovations in the bathroom or kitchen. But professionals also use an angle grinder to carry out the final work of grinding the cut corner. But making a cut on a tile with an angle grinder is not easy for an untrained person. Therefore, practice on used pieces of ceramic before you start finishing work, which will help you cut the corner correctly.
Cutting tiles at 45 degrees with a grinder
Safety precautions when operating an angle grinder
Note! It is no secret that when interacting with a dangerous tool, there is always an instruction consisting of rules that allow you to avoid unpleasant consequences when working with an angle grinder.
The following points should be emphasized:
- Compliance with requirements and instructions.
- Do not work with a damaged disk.
- Use the wheel according to its intended purpose: cutting wheel for cutting, grinding wheel for processing.
- A good master is careful, attentive and calm.
- Monitor the situation both before and after the operation.
- When using an angle grinder, do not stretch
Laying tiles end-to-end
- externally aesthetically pleasing, and if the cut corner is made correctly, neatly, the wall is even, then it feels like the surface of the wall is monolithic;
- there is no need to match the plastic corner to the tile so that it matches the color of the cladding, which reduces time.
But tiles treated in this way also have disadvantages:
- such a corner is located in the passage part and since the cut part becomes thin, it is more vulnerable; a small blow with an empty bucket is enough to make a chip in this place, which will lead to the need to replace the tiles;
- Work with cutting a corner is labor-intensive, time-consuming, and the price will increase compared to using a plastic corner.
But still, cutting ceramic tiles at an angle of 45 degrees is a preferable and presentable technology, giving the room a cozy look.
We measure
The first method is not entirely convenient, but quite accurate. Suitable if you are “in the tundra” and have nothing at hand except a pencil and tape measure. I had to use it a couple of times. The diameter of the pipes does not matter.
An important condition is the presence of a flat plane near the cut. This could be the edge of a pipe, a socket, a put-on or welded-on coupling, a seam, or any other concentric circle.
We mark the place of the cut with a risk. We measure the distance from the mark to a flat plane. We rearrange the tape measure along it and make risks in a circle, using the given size. We get a circle from the marks.
Where should you not use a turned 45° angle?
This type of corner becomes quite fragile due to the thinned (narrowed) edge of the tile, so it is undesirable to use it when facing steps. In the place of the greatest traffic, the tile will definitely come off, the corner will be chipped - it’s only a matter of time.
READ How to Correctly Cut Skirting Corners
The steps are laid with the top tile overlapping the end tile (on the riser) or using aluminum corners/profiles.
And in general, before making such angles, think carefully about everything. If there is a big threat of hitting and knocking down a given corner, then most likely this is not your option. In this case, you can try using an aluminum corner (but not a plastic one).
The easiest way is a grinder
It is more difficult to achieve a high-quality result with a grinder, but, in principle, it is also possible. This is the easiest way to sharpen a 45 degree corner of a tile with your own hands at home.
The process of bevelling and polishing porcelain tiles in the video below.
First of all, you must have a good diamond tile blade.
Place the tile on the edge (perpendicular to the one that is being cut) and grind its back part (clay) at an angle of 45 degrees.
If it turns out a little uneven, then large rough irregularities can be gone over again with a disk, and in order to get a cleaner and smoother edge, you can use a grinding attachment like this (pictured below) with sandpaper or diamond “turtles”.
The sanding wheels are on Velcro, if they wear off, take them off and attach a new one. The base itself with Velcro is screwed onto the thread of the grinder. Diamond bits have a much longer service life, but they also cost many times more. If you are constantly laying tiles, then it makes sense to take diamond turtles. If you are doing the first and last repairs in your life, then you can get by with sanding wheels.
When working with such a thing, you need an angle grinder with adjustable speed (minimum speed!), otherwise the edge of the tile will melt and burn, rather than being sanded.
Features of working with an angle grinder
Safety precautions when working on a drilling machine
A modern angle grinder allows you to replace the emery when working on metal. To avoid problems, it is useful to remember a few guidelines when using the tool:
- The angle grinder should be held with both hands during operation. In the event of a kickback, a strong fixation will minimize displacement. Otherwise, the risk of injury increases.
- Work should be carried out on a flat surface, confidently maintaining balance.
- Place the power cord on the opposite side of the disk. The operating instructions for the angle grinder make these requirements in order to avoid short circuits and shock waves from the unit.
- When completing work, the tool should be held firmly in your hands until the disk comes to a complete stop.
- If there is a power outage, you must unplug the tool from the outlet. Otherwise, the angle grinder may start working without operator control.
- The work process is accompanied by heating of the disks. After turning off the tool, they should not be touched until they cool down.
Fixing the material
How to properly cut tiles at 45 degrees?
In order for the corner of two tiles to look beautiful, when cutting the tiles you need to be a little short of the glaze (0.5-1mm). That is, only the clay is cut off. If you walk on the glaze (the front part of the tile), it will be “torn” and chipped. It will immediately catch your eye, it’s not beautiful.
We encountered this problem when cutting wavy tiles. But more on that later.
Surely many of you have seen such “art”, but most often everyone thinks that this is how it should be. And a tilemaker with twenty years of experience assures that it cannot be any other way.
Even if there is a need to cut the corner of the tile away from the “factory” edge and you have to cut the glaze, there is still a way to do it beautifully.
Firstly, to do this, you first need to cut the tile evenly (to the required size), and then, again, before reaching the glaze, cut it at 45°. This cut will be much cleaner and more beautiful.
You can also sand the edge of the glaze with fine sandpaper, this will make it even smoother.
Secondly, you can still cut off the corner from the beautiful edge (factory end), and sand the trimmed opposite edge and hide it in the other direction. It will be less noticeable.
For example, we once did this when tiling a toilet installation. Because a nice corner is more important than the bottom seam. Moreover, it also turned out to be very neat, and if you don’t know that it is trimmed, you will never pay attention to it.
Electric tile cutter
An electric tile cutter, or as tilers also call it, a wet cutter. It has a water-cooled disk, and the same water extinguishes all possible dust. The tile cutter cuts along one clear, fixed path and minimizes the human factor such as hand trembling, etc.
The tile cutter has two working positions - a straight cut and a cut at an angle of 45° (in fact, you can set any angle from 0 to 45°, but this most often makes no sense).
Preparing to work with an angle grinder
The rules for working with power tools and their accessories always provide for preparatory work. Bulgarian is no exception. First of all, you should prepare the required protective equipment.
Safety precautions when working on a lathe
Note! The minimum program is glasses and a casing. Failure to comply with these requirements may result in sparks entering the eyes and injury.
You should also have protective gloves. During the labor process, the hands are close to the disk. This causes particles, scale and sparks to land on your fingers and palms. Thick gloves are used to protect hands and preserve their skin. This is a minimal set for home use. If we are talking about production, then in the work area you need full protective clothing that covers all parts of the body.
How to veneer and form a right angle?
First you need to glue the first tile and level it. The trimmed edge will “fly” beyond the plane of the wall.
Then you immediately need to glue the second (counter) tile on the other side of the corner. While the glue is fresh and adjustable, you need to form a beautiful right angle.
And so we gradually move up, row by row.
How to cut a baseboard at 45 degrees? Three best ways.
Before tiling the corner, make sure that your walls are vertical.
Because if the walls are even slightly heaped outwards, then without steps the corner will no longer meet. And this is not very beautiful, believe me! And you won’t cover it up or make up anything.
General information
Please note that at the moment it is even impossible to imagine the work of repairmen, builders, mechanics and mechanics without an angle grinder. With its help, you can cut various materials, including metal - rods, fittings, water pipes, profiles and corners.
The cut obtained from an angle grinder can be ground, sharpened or polished. An incredibly large selection of interchangeable attachments helped make this tool universal and indispensable. At the same time, it would be dishonest to mention that this is the most dangerous electric tool. To cut metal, you will definitely need the material itself, a face mask, an angle grinder, glasses and replacement discs.
How to cut a 45 degree angle correctly
Sometimes you need to cut a particular part or product at a certain angle. As a rule, you need to cut baguettes, fillets, platbands, baseboards and other similar interior elements at an angle of 45 degrees. Anyone can cope with this task. The main thing is not to rush, don’t be nervous and everything will work out.
READ How to cut a round pipe at 90 degrees
Buy ready-made corner elements
For example, as for baguettes or fillets, special corner elements are sold for them that fit perfectly into the corner and do not need to be trimmed. They just need to be glued into place and pressed well.
How to cut skirting boards at inner corners: step-by-step action plan
Begin installing the skirting boards in one of the corners. If this is your first experience, choose the part of the room in which something will stand. Not always, of course, the first pancake is lumpy, but still it’s better to play it safe. To make corner on the baseboard, work slowly. One was sawed off, checked, adjusted. Let's move on to the next one. It is better to fasten after two adjacent corners have been assembled. But you shouldn’t delay the assembly too much either.
Trimming skirting boards in corners requires certain skills. But by making a few joints yourself, you can beautifully design complex angles
How to use a miter box to cut baseboards? Place the device in front of you, preferably on a table, but it can also be on the floor. It doesn’t matter which way you turn it, it’s symmetrical. Insert the bar into the profile and turn it so that it will stand against the wall. When cutting down a floor plinth in a miter box, the “wall” is the wall that is farthest from you. Once again: firmly press the baseboard strip against the back wall in the position in which it will be installed. Insert a hacksaw into the required slots. You can start sawing.
Types of finishing products
This material is intended for decorative finishing of the ceiling area, visually separating it from the walls and covering the joints of diverse finishing elements. Almost any decorative option or interior design involves the use of such details. Otherwise, the room will look unfinished.
To secure this part, fillets are used, which are attached to the ceiling using glue. But a problem arises - how to properly trim the ends of the fillets so that they meet each other successfully. There are rooms with a non-standard configuration, where ingenuity is required for the normal joining of material. How to cut ceiling plinths in corners? There are different options for cutting and joining - with or without tools.
The choice of mounting option depends on the type of product:
- PVC is the cheapest, but also the most brittle and prone to defects, but it is easy to use and can be cut with a knife.
- Expanded polystyrene is also inexpensive, fragile, and requires easy cutting. Another option is a little more expensive - made from extruded polystyrene foam, it is more difficult to cut, but it crumbles less.
- Polyurethane is the most expensive and moisture-resistant, durable and elastic. It is more difficult to work with; it deforms at high temperatures.
- Wooden is a dense and heavy material that can only be cut with a hacksaw.
How and with what to cut plastic skirting boards
All of the above applies to MDF and wood skirting boards. Cutting them with a regular hacksaw is not a problem. It is advisable to use a blade for metal, since it has a smaller tooth and the cut is smoother; you will have to work less with sandpaper. With plastic the situation is different - when you try to cut a piece, some thin-walled skirting boards crumble and break.
Cutting plastic is not very convenient due to the thin walls
To cut normal quality plastic skirting boards you can use:
- A hacksaw for metal.
- Grinder (angle grinder) with a diamond blade.
- Turned with a miter saw. Before cutting, accelerate the blade and only then start cutting.
- A jigsaw and a fine-tooth file. Here you have to try - select the speed and blade.
- Sharp knife.
- Metal scissors. In any case, it is not difficult to make straight cuts with them.
Only personal experience will help you decide which is more convenient for you to cut plastic floor plinths. If you have a miter saw, try using it. It’s not a problem to try a couple of times with a grinder with a diamond blade. If all this does not give a normal result, try a hacksaw, jigsaw or knife. There are, of course, special scissors for plastic, but for one-time use they are too expensive to buy.
Accessories for decorating corners and joints of PVC skirting boards
In plastic skirting boards, you can design corners and joints using special fittings. There are external and internal corners, plugs and connectors. In principle, they allow you to assemble the desired configuration. Each manufacturer makes its own fittings - according to its own profile, colors. But the principle of their use is the same.
How to decorate the corners of a plastic plinth
The first rule is that all cuts are made straight. Strictly perpendicular. Marks in the corners are placed 1-1.5 mm away from the corner. The fact is that the fittings for rigidity have their own jumpers. So for them you need to retreat a couple of millimeters, but no more. Otherwise, a gap will appear or the baseboards will pop out of these corners.
This is what comes out of the assembly:
I must say that not everyone likes the look of plastic corners. You can make a corner on a PVC plinth in the same way as described for wooden or MDF. The only difficulty is that you have to be careful with plastic - it breaks from excessive force. There is one trick - before cutting the plastic baseboard, add a little polyurethane foam on the back side and wait for polymerization to begin. It will be tougher, easier to cut, less deformation. If the foam subsequently gets in the way, it’s not a problem to remove it, but it’s actually easier to cut it.
Using Templates
If you don’t have a protractor, miter box or ready-made corner elements, you’ll have to look for a suitable template. Of course, the template must have the desired angle. It is applied to the workpiece and the workpiece is marked with a pencil. This is one of the easiest ways to achieve the desired result.
What is a kickback?
This is the name of one of the most dangerous cases that can happen during work. The effect occurs when the wheel is strongly jammed into the workpiece, as a result of which the power tool is sharply thrown back. It is necessary to carefully monitor the process and hold the grinder tightly.
The points weren't enough
How to avoid kickback
To do this you need:
- Always hold the tool by the standard handles.
- Take a stable position on the ground.
- Use both hands.
- Be slightly away from where the tool will hit.
- When the angle grinder moves away from itself during a reverse impact, it bounces onto the person.
- Be especially careful when working around corners and edges.
Miter box for skirting boards
A carpenter's miter box is a device for making cuts at a certain angle. It is used with a hacksaw. In principle, you can make a miter box yourself by assembling a guide from boards and making cuts in the walls. There are various models on sale ranging from 15 to several hundred dollars. They differ in capabilities and materials, although they are all called “miter box”. Professional models are made on the basis of a good hacksaw and have a scale that allows you to set the saw as needed. With such a tool, it is not a problem to set any desired cutting angle in order to correctly cut the plinth for a perfect fit.
Professional carpenter's miter box - a tool with a wide range
The simplest miter box is a plastic U-shaped profile with slots in the walls. These slots are used as a guide for the hacksaw. They do not allow the canvas to deviate. In any version there are two cuts - straight and at 45 degrees. Some may have a couple more options.
How to cut a baseboard at 45 degrees? One way is to use a miter box
Sometimes a hacksaw is included, sometimes not. Usually the ones included are not very good. You can use any hacksaw, selecting a blade for the material you plan to cut. It is important that the canvas moves freely in the slots.
Sources:
https://laminatepol.ru/21523-rezku-plitki-pod-45-gradusov.html https://instabur.ru/plitka-pod-45/ https://ingener-pto.ru/2019/12/12 /kak-pravilno-otrezat-ugol-45-gradusov/