Comfort in an apartment is important for any person. It allows you to relax after a busy day at work, forget about everyday worries for a while and simply have a pleasant leisure time. Creating a pleasing home environment begins with well-groomed walls. Wallpaper is still the most preferred cladding option. Many people know how to glue them. But only specialists know how to properly prepare a room for their application. In this article we will reveal all the secrets of the technological process of treating walls before decorating them with wallpaper.
What an ideal wall should look like
In Soviet times, when changing decorative coverings, it was often practiced to apply new wallpaper directly onto old ones or onto newspapers. Thick wall layers can be found in many “aged” houses and apartments. Modern society rejects the “it will do” principle, offering instead a rational approach and verified calculations. Competent and beautiful decoration of the room with new canvases depends on the condition of the walls. The quality of the base and the scope of repair work can only be determined by first removing the previous coating. Experienced craftsmen put forward the following requirements for surfaces for wallpapering:
- The base must be clean and free:
- from previous paintings, paint and other possible coatings;
- from screws, nails, etc.;
- from fungal infections is a very important factor that greatly influences not only the appearance of the home, but also the health of its owners.
- Without cracks and numerous pores, which will contribute to reliable adhesion of the material to the surface.
- The base must be level and smooth. The assumption that a new trellis will hide all defects is completely wrong.
- The wall must be well dried. Otherwise, wallpaper glue, which contains water, will not be able to firmly attach the canvas to the wall. Increasing the temperature in the room will generally lead to peeling of the trellises.
- The same color of the base is of great importance when choosing thin wallpaper in light colors, otherwise the difference in color schemes will be noticeable even after repairs.
Taking into account the above criteria for preparing the surface for gluing, you will create a solid, high-quality foundation and the most comfortable conditions for further work.
Puttying the surface
After the plaster has dried, prime the walls and start puttingty. This procedure is carried out in one or several stages, depending on what wallpaper is chosen for covering the walls. Thick vinyl wallpaper with a pronounced texture does not require a perfectly smooth surface. To cover walls with thin and smooth wallpaper, you will have to apply both base and finishing putty. The finely dispersed structure of the putty mixture evens out the grain size of the plaster layer.
To work you will need a long and standard spatula.
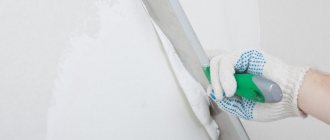
Scoop the mixture with a short spatula, spread it evenly over the long one, and apply the putty forcefully along the wall using smoothing movements. After the solution has completely dried, sand the surface with 240 or 320 grit sandpaper. During sanding, dust is generated, which must be removed with a vacuum cleaner, and if it is very dusty, wipe the wall with a damp cloth. Be sure to prime the walls after sanding. Wallpaper can be glued to a dry surface.
Why treat walls?
Many people don’t understand why the easy process of wallpapering needs to be complicated by carefully preparing the walls. In addition, this is a very time- and money-consuming, as well as a “dirty” event. The answer is simple. Wall cladding is needed in order to:
- the new decorative coating looked aesthetically pleasing;
- the trellises held firmly;
- protect against mold;
- glue without problems.
Housing, both in the secondary and in the new building, needs similar repair work, the only difference is in their quantity. Apartments on the primary market often already have a fine finish; in this case, you won’t have to bother with preparing the walls for long. Homes with history will require a lot more effort. In this case, the step-by-step preparation of surfaces for wallpaper must be strictly observed. Each stage has its own purpose. Finishing specialists do not recommend skipping any stage, as this will affect the final result.
Proper processing of walls before applying a new paper layer goes through 3 main stages:
- cleaning;
- alignment;
- primer.
Below is a step-by-step sequence of actions.
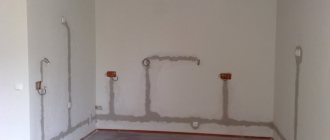
Applying plaster
The task of this stage is to apply the leveling mass to the walls. It is necessary to achieve the most even surfaces on which the wallpaper will be pasted.
Modern gypsum mixtures have good adhesive properties. It is recommended to apply such solutions in 5-7 mm layers in one go, which is very convenient. Prices for gypsum mortars are higher than for cement-based plaster, but the ease of work and higher quality justify the increased costs.
Instructions for plastering surfaces:
- Prepare the plaster solution. We dilute the mixture in a container with water (for example, in a bucket) using a construction mixer. The exact proportions can be found on the packaging of the plaster mixture.
- To apply the plaster you will need a pair of spatulas: a wide one and an overlay one. You need to work with both hands: use an overlay spatula to apply the plaster onto a wide tool. After this, apply the solution to the surface with smooth movements. Movements start from the top and go down.
- The depressions are sealed with the usual movement from bottom to top.
- If there are significant bulges on the wall, we beat them off with a hammer or remove them with a hammer drill. Then we smooth out the remaining defects with plaster, gradually leveling the surface.
- Correcting the line of a blocked wall is much more difficult and will take more time. You will need special beacons, a plumb line and a rule. Before plastering such a wall, it needs to be primed. We place the initial beacon in the most level place of the ledge. We install the next beacon on the opposite side. To establish a plane along the wall (top and bottom), we pass the threads. After pulling the threads, we place several more beacons at a distance of about a meter from each other. To place the beacons in the same plane, we use the rule and the building level.
- After the plaster has dried, apply plaster. First we spray with a liquid solution - this is the base on which, when it dries, the main layer will be applied. The purpose of spraying is to improve the adhesive properties of the surface. After spraying, slipping of the main layer of plaster will become less likely.
Is it possible to glue wallpaper onto wallpaper?
Old wallpaper definitely needs to be removed. This needs to be done for several reasons. Firstly, if the panels are glued overlapping, the joints will appear on the surface of the new wallpaper.
Secondly, stains and spots of paint that were applied to the old wallpaper may appear on the surface of the new finish.
And one more thing: you can never be sure that old wallpaper sticks to the wall firmly enough. Having absorbed moisture from the glue, they will become wet and may peel off in the most unexpected places. Along with them, the new wallpaper will also suffer. Thus, you cannot glue wallpaper onto wallpaper . By choosing this path, you act at your own peril and risk.
What solution to use
The best option for coatings made of concrete, plasterboard and plaster is an acrylic primer. It does not have a specific smell, it is easy to work with, and the drying time is about 5 hours, which is much less than other compounds. For wood it is better to use alkyd solutions. This primer must dry for at least 10 hours.
Previously, diluted PVA or glue for gluing were used for priming. This is not to say that this is a completely wrong move. This ensures good adhesion, but the surface will not be strengthened, as is the case with the use of acrylic solutions. Some craftsmen coat the wall alternately with a special compound and glue; with this option, the finish is best maintained. This method is also used for non-woven wallpaper. That is, the surface is primed, then covered with a layer of diluted glue, and only after this layer has dried do they begin to glue the sheets.
In stores you can find special primers “for wallpaper”. Often their main component is the same PVA. You can prepare this composition yourself by diluting regular PVA to the desired consistency. The only advantage of a purchased solution is ease of use; you won’t have to worry about whether you prepared everything correctly thanks to the presence of clear instructions.
Alkyd primer is in demand due to its versatility
Let's sum it up
Let's take stock of our planning. If we assume that we do everything thoroughly and include absolutely all the work, then preparing the walls for wallpaper or painting will take us about 25 days! If we don't plaster, we get 13 days. As you can see, this is quite a decent period. Moreover, I want to say right away that even if a super professional works, it will not be possible to reduce this time significantly, because technology is a stubborn thing: 1 layer of putty dries in 1 day, plaster can dry up to 4 days, and there’s no point in doing so no escape.
This is why real craftsmen are so reluctant to take on a small amount of work, because having putty all the walls in one room in half an hour, they can safely go home while the putty dries until tomorrow.
Unfortunately, there are also unfortunate craftsmen who do not adhere to the correct technology and try to deliver the work to the client as quickly as possible. So, for example, they can throw putty on plaster that has not yet dried, and then, without allowing the first layer to dry completely, quickly throw on a second layer.
Failure to follow the correct technology leads to the fact that the wall will only look beautiful in appearance, but in fact it will crumble and crack in places right under the wallpaper.
So, this is where the article ends. Today we went through all the stages in great detail and step by step and learned how to prepare walls for wallpaper. And be sure to look here if you want to know what kind of wall decoration there is in principle: the article shows about 30 different options!
Materials and tools
To carry out the work you must have:
- primer selected according to recommendations for a specific type of wall;
- container (plastic bucket or small basin). The primer will be mixed in them;
- a ditch for a roller of the appropriate width;
- roller with fur trim;
- goats or stepladder. You will need to rise to a height of up to 80...110 cm in order to thoroughly process the upper part of the walls;
- small brush. In the corners you have to work on surfaces that are inaccessible to the roller.
The roller is used to apply primer to the wall
Preparing the composition at home
To save money, some people make their own primer. To do this you will need:
- 7 liters of boiling water;
- 100 g drying oil;
- 150 g laundry soap;
- 2 kg of slaked lime;
- 2 buckets;
- sieve;
- grater.
Instructions:
- You need to grate 150 g of soap.
- Dilute the resulting mass in 3 liters of boiling water.
- After dissolution, add drying oil and mix thoroughly.
- Pour the remaining 4 liters of boiled water into another container and add lime.
- Mix the contents of the second bucket.
- Pour the contents of the first bucket into the resulting lime milk and mix thoroughly. When the primer has cooled, strain the liquid through a sieve.
After complete cooling, the mixture will be ready to be applied to the walls.
Is it possible to glue wallpaper over paint?
If the walls have been painted, in some cases the old coating can be left. The wallpaper will work well with water-based (water-dispersion) or adhesive painting. Just first you need to clean all peeling areas, if any, putty these places and be sure to cover the walls with a primer.
Surfaces that are finished with paints that form a smooth, moisture-proof film - latex moisture-resistant paints, alkyd and pentaphthalic enamels, and oil paints - are not suitable for wallpapering. It is advisable to completely remove such coatings from the walls.
Another option for working with smooth painted surfaces is possible: the walls need to be matted using sandpaper, and then covered with a primer. Yes, the work is troublesome. But this is usually easier than completely removing the paint. If you can achieve a good surface roughness, the wallpaper will adhere perfectly to the paint.