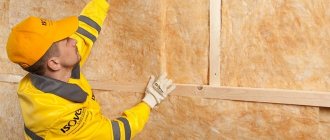
If you combine PVA glue and cement, the properties of the solution improve. The material lasts longer and better resists tensile and compressive loads. In addition, the price of glue is low, so adding it to the solution will not increase the cost of the mixture. However, to ensure high quality concrete, a number of rules should be followed when mixing it.
Tile adhesive composition
Depending on the composition of the tile adhesive, it is divided into: epoxy, cement, dispersion, polyurethane and liquid nails.
Epoxy - made on the basis of epoxy resins. It has very high performance qualities, is waterproof, heat-resistant, and can withstand high loads. Recommended for laying tiles in public institutions, enterprise workshops, etc. Suitable for application on uneven surfaces, wood, plywood, polyvinyl chloride, metal, cement screed, concrete, etc. Epoxy adhesive is a two-component adhesive and consists of a resin and a hardener.
Cement is a relatively cheap adhesive based on cement, sand and polymer substances. The properties of cement adhesive vary depending on the type and amount of the polymer component. This type of glue can be used in rooms with high humidity (bathhouse, sauna, etc.). Sold as a dry one-component mixture, it requires mixing with water before use.
Dispersive is a dispersion of a polymer resin in water. It is a non-toxic and environmentally friendly product, has high adhesion and ductility. Designed for gluing ceramic, polystyrene foam and acoustic tiles. Used for application to plastic, wood, metal, drywall. The process of gluing tiles occurs due to the sticking together of polymer particles during the evaporation of water. Dispersion adhesives based on acrylates are widely used. They are available in ready-to-use form.
Polyurethane - has high adhesion. Used for laying ceramic and parquet tiles. It is highly resistant to temperature changes, moisture, mineral oils and gasoline. When dried, it increases slightly in size, which helps fill empty cavities between the tile and the base. Available in two forms: two-component and one-component. The two-component adhesive contains a monomer (isocyanate) and a hardener (polyol). The polymerization reaction of isocyanate occurs after mixing it with a polyol, and in a single-component one due to the interaction of the urethane group of the monomer with air moisture.
Liquid nails - the glue contains synthetic rubber (neopreon or polyacrylate), polymers and fillers (clay, chalk, titanium dioxide). Acetone and toluene are used as solvents, which gives the product a pungent and unpleasant odor. It allows you to glue loose objects.
Liquid nails based on neoprene have high performance characteristics, but are also very toxic. Water-based liquid nails, based on polyacrylates, are environmentally friendly, but are sensitive to moisture and are only suitable for gluing porous materials such as tiles.
The performance characteristics of liquid nails are different and depend on their composition. The product is available in sealed packaging in a ready-to-use form.
Recommended for gluing ceramic tiles, plastic, wood, and metal.
Criteria for choosing liquid nails for ceramic tiles
When choosing, the type of surface, weight, and thickness of the tile material are taken into account. The time of preliminary or final hardening, as well as the type of plane (horizontally or vertically), is of considerable importance. Before purchasing the required volume, it is advisable to consult with the seller and study the instructions for the materials offered.
When purchasing glue, the required volume is increased by 15%, which will help prevent a lack of composition when installing tiles.
When choosing, you should consider:
- setting time is always indicated in the instructions;
- lack of calcium compounds - these components reduce adhesion;
- lack of toluene, acetone - pungent odor, toxic effects make the glue unsuitable for indoor use.
In order to properly glue ceramic tiles to liquid nails, it is necessary to take into account the time of complete polymerization, which can be 11-24 hours.
Common types of glue: specifics of mixtures
The main thing you need to understand is that the choice of adhesive composition is determined by certain factors:
- total cladding area;
- type and characteristics of ceramics;
- material and condition of the base intended for cladding.
It is necessary to carefully understand the types and specifics of applying glue
According to the classification, tile adhesive is divided into five groups:
- Adhesive for indoor work. The composition contains a minimum amount of additives, thanks to this, the price for such mixtures is the most reasonable. It is used for laying ordinary tiles on a surface made of concrete or cement-sand mortar.
- Universal compositions. Used for laying standard-sized ceramics both indoors and outdoors.
- Adhesive intended for laying floor tiles. Due to the large number of plasticizers in its composition, it has increased fluidity, which makes it impossible to use the adhesive on vertical surfaces.
- Compositions with a high adhesion rate. Suitable for working with large format ceramics on non-standard surface types.
- Adhesive with a high degree of moisture resistance. The presence of a hydrophobic modifier in the mixture allows the use of such tile adhesive in swimming pools and fountains.
Best Brands of Tile Adhesive
In order not to make a mistake in your choice, it is worth purchasing products from popular manufacturers that fully meet the specified requirements, in contrast to cheap handicraft mixtures. Knauf is also a leader in this area: under the same brands they produce entire lines of tile adhesives and repair compounds in a wide price range. Here you can easily choose adhesives for all types of tiles, natural stone, porcelain stoneware, waterproof and frost-resistant compounds, and mixtures for laying tiles on heated floors.
The adhesives “Osnovit”, “Yunis”, and “Starateli” are in high demand. Even the simplest cement compositions are distinguished by their adhesive strength and durability, are easy to apply, and have a long setting period. Among the reinforced types of glue, “Plitonit” stands out due to its characteristics - mixtures of this brand are excellent for floors in high-traffic areas.
| Name of glue | Main characteristics |
UNIS 2000 | The adhesive has enhanced adhesive strength, resistance to moisture and sudden temperature changes, and is suitable for lining heated floors. Used for laying tiles from 30x30 cm to 60x60 cm. Can even out height differences on the working surface up to 15 mm. Average consumption is 1.4 kg/m2, pot life of the mixture is 180 minutes |
CERESIT SM-11 | A universal composition that is great for beginners. The mixture is very plastic, easily distributed over the surface, and firmly adheres to the base. The viability of the solution lasts 120 minutes, the adjustment time is about 20 minutes. Apply glue in a layer from 2 to 10 mm, consumption is 2.7 kg/m2 |
PLITONITE V | Waterproof composition for ceramic tiles and porcelain stoneware up to 60x60 cm in size. Suitable for any surface, characterized by plasticity and ease of application. The maximum permissible layer thickness is 10 mm. The solution remains viable for 4 hours, dry mixture consumption is from 1.7 to 4.3 kg/m2 |
Prospectors STANDARD | The composition is suitable for tiles and porcelain stoneware of any format, can be used in unheated rooms, at normal and high humidity. It is applied in a layer up to 15 mm thick, consumption is from 3 to 5 kg/m2. The solution remains viable for 240 minutes, adjustment time is about 10 minutes |
Lithocol LITOACRIL PLUS | Ready mix with extended adjustment time. Suitable for ceramic tiles of any format, can be used in bathrooms, kitchens, bathrooms. Consumption per m2 ranges from 1.5 to 4 kg. |
NEOMID glue | Ready-made heat-resistant adhesive mixture. It has increased moisture resistance and is suitable for all types of floor tiles, natural stone, and agglomerates. The maximum application thickness is 4 mm, complete drying time is up to 120 hours. Consumption ranges from 0.5 to 1 kg per m2 |
Choosing the right adhesive
In order to choose the right adhesive composition, we are guided by the following rules:
- preference should be given to proven brands;
- select glue depending on the task at hand;
- pay attention to the date of manufacture of the composition and its shelf life;
- Warehousing and storage conditions can also affect the quality of the product.
The standard adhesive mixture should allow individual fragments to be adjusted within 15-20 minutes.
When choosing an adhesive, you should also pay attention to the fixing properties and degree of adhesion of the adhesive mixture.
Following the instructions for preparing glue on the packaging is the main requirement.
Component Selection
When analyzing the topic of how to properly dilute tile adhesive, you should familiarize yourself with the selection of suitable components. The environment, such as temperature, is of particular importance. Attention to detail affects not only the consistency and characteristics of the solution, but also the glue consumption per 1 square meter. m. The following points are important:
- Water. Most manufacturers believe that mixing should be done using clean water. But no one indicates that the liquid should be drinkable. The unsuitability of process water lies in the presence of impurities, acids and alkalis that affect the properties of the solution.
- Temperature. The preparation of the composition should be carried out at a temperature of 5 to 40 degrees. But the best indicator is the room norm - 18-24. Under such conditions, the components react quickly, and there will be no need to prepare the solution for a long time.
- Temperature difference. The mortar that will be used when laying tiles must be prepared from seasoned materials. This means that the water and the building mixture must be at the same temperature. It is advisable to keep them in the room longer so that they become equal in warmth to the air.
Working at room temperature stabilizes glue consumption per 1 square meter. m. In the cold, the product deteriorates, and calculating its quantity is not so easy. And in hot weather, moisture quickly leaves the solution. Another important factor that affects product characteristics is the cleanliness of the mixing container.
Before carrying out work, the container must be cleaned thoroughly, removing frozen residues of the previous solution, as well as removing plaque on the walls. During mixing in such a container, there will be no chemical effect on the glue. The same requirement applies to a construction mixer and a drill attachment. Clean containers and a stirring device reduce the number of lumps, helping to achieve an even consistency.
When to use
Despite the apparent similarity, the materials have different characteristics and scope of application. Sodium silicate is ideal for high humidity conditions. The product reduces the porosity of concrete, repels water and creates unfavorable conditions for mold. Treated surfaces do not allow moisture to pass through and do not rot.
Due to the “glass effect”, the liquid additive is recommended for use in lining baths and toilets, wells and swimming pools. At high temperatures, the solution with the addition of transparent material acquires heat-resistant properties. The characteristics of the mixture are useful in the construction of chimneys, fireplaces and stoves.
Use in damp environments Source par-torg.com
How to mix tile adhesive: simplicity is ideal
Any beginner in the construction business can simplify their task as much as possible and not have to think about how to mix tile adhesive before finishing their own kitchen or bathroom. To do this, it will be enough to simply purchase in the store a one-component glue that is completely ready for use, which you simply need to chop with a suitable stick and can be used for its intended purpose. However, this scenario cannot be called cheap, and in some cases, ready-made polymer compositions are simply not suitable for a particular material.
And after the work is completed, the paste-like mixture remaining after the repair will simply have to be thrown away, since in a month or two, until it is useful and gathers dust in the pantry, it will dry out and completely lose its properties and qualities, and if necessary you will again need to think about how to make tile adhesive. Dry formulations can be stored for years in suitable conditions and can simply be diluted according to the instructions and used as needed.
Basic rules and features of breeding
Before you begin to thoroughly study the instructions on how to prepare tile adhesive, you should carefully study the rules and recommendations that experienced and professional tilers share with us. All of them are quite simple, but following them guarantees that you will ultimately obtain a high-quality texture, consistency and original properties of the adhesive compositions.
If you are going to thoroughly understand how to prepare tile adhesive, you should understand that the dry mixture itself, as well as the water, must be at the same temperature. In order to ensure such compliance, it is enough to simply leave the dry mass and water in an open container for several hours in the room where the walls or floors will then be tiled.
- Prepare a container in which you will mix the glue. If it has already been used for similar purposes, it must be thoroughly washed and pieces of frozen solutions must be completely removed from its surfaces, otherwise it will harm you in future work. Moreover, this can not only disrupt the texture of the glue, but also affect its composition, and therefore its properties.
- To dilute the glue, use only clean and soft water, and exactly the same one you take for drinking. A liquid for technical purposes may be saturated with alkalis or acids, as well as other components, which can adversely affect the quality of the resulting glue.
- If it seems to you that the glue is too thick or thin, although you diluted it according to the instructions, leave the mixture for five to ten minutes, then stir again, perhaps the consistency will be restored.
- Never add more liquid than indicated in the dilution manual; it is better to wait for the excess moisture to evaporate, constantly stirring the solution.
All safety recommendations refer to the use of respirators, not just gloves and safety glasses, when diluting glue. The thing is that dry mixtures can generate quite a lot of dust and particles of it will get into the lungs. This, of course, won’t do much harm, but it’s still worth being careful.
Preparation of material
Before diluting tile adhesive, you must follow the simple requirements described below:
- All components used must be at room temperature.
- Provided that the air temperature in the room is cool, then the glue and water must correspond to it (it all comes down to ensuring that the temperature of the dry mixture and liquid corresponds to the temperature of the room where the tiles will be laid and kneaded).
- For kneading, completely cleaned tools and containers are used.
- Only clean water is used for mixing.
- You should wear construction gloves on your hands and protect your respiratory system.
- The adhesive on the tiles is diluted using a special construction mixer.
- You will need a powerful drill or hammer drill with an attachment for mixing the mixture.
- To make it convenient to pour the dry mixture into a container, a trowel is used.
Mixing algorithm
The process of preparing adhesive for ceramic tiles is very simple. The whole job is as follows:
- Take a clean bucket.
- Pour water into a bucket or other container according to the established proportion.
- Next, the dry mixture is added in small parts.
- You shouldn’t pour out the whole bag at once and try to make a large batch. This will make it difficult to stir with a mixer. Moreover, the drill may not be able to cope with the load of mixing a large mass.
- As you add the dry mixture, mix everything with a mixer. It is better to do this work together. One slowly pours the adhesive into the water, and the other holds the mixer at low speed.
- Care must be taken to ensure that no lumps form. If you pour a lot of glue into water, a large lump will form that will be difficult to break up with a mixer.
- When the required proportion is immersed in water, the speed on the mixer increases and everything is thoroughly mixed.
- When everything is ready, it is recommended to leave the adhesive for 15 minutes. During this time, all existing dry parts will completely swell and be diluted with water.
- After 15 minutes, the mixture is stirred again at high speed.
The resulting mass should not be liquid, but slightly moist. It should be easy to work with. To verify this, smear it on the wall and you will see how much effort you need to put into it.
Mixing tile adhesive with your own hands - video
Do not forget that before applying glue to the wall, it should be thoroughly primed.
When laying ceramic tiles, it is correct to apply glue not only to the floor/walls, but also to the tile itself. The adhesive can be applied to the surface immediately at the time of laying the tiles. There is no need to do this in advance.
You can test the prepared mixture in a simple way. Take a trowel and scoop it up a little. Then carefully rotate the trowel and hold it in this position for some time.
If the solution holds and does not flow, then you have an ideal glue consistency. If it drips and plops into the bucket, then it is too liquid. Also, if the resulting mixture falls off the trowel, this may be a sign that it is thick.
The right approach to mixing
Knowing how to dilute a ready-made mortar for laying tiles also includes the procedure for carrying out operations. The quality of the resulting solution depends on it, as well as how quickly the process will be completed. Let us describe the subtleties briefly.
- No need to add water to the solution. This creates a lot of lumps that are difficult to stir. The actions should be reverse. First, water is poured into the mixing container, then the solution is added little by little. This should be done by immediately stirring the mixture with a mixer. The amount of water is selected in the proportion recommended by the manufacturer.
- The method of diluting the adhesive mixture with the condition of adding dry powder to water, and not vice versa, has another advantage. Stirring not only happens faster, but also creates two layers of solution. The top one is denser, the consistency is assessed by it. The lower one is somewhat thinner, but it reaches its condition in the time it takes to produce a solution from the surface.
The advantage of adding the powder mixture to water while mixing it is that there are no dry areas or large lumps.
- All manufacturers of dry construction mixtures emphasize separately: the solution must be mixed again. This is necessary not only to break up the formed lumps, but also to restore consistency. The freshly mixed composition quickly sets, it is specially left for the time specified by the manufacturer (at least 5 minutes) and then processed again with a mixer. This restores consistency and allows the solution to retain its characteristics for 20-60 minutes.
- How much time and at what speed to stir can be estimated according to the requirements of the manufacturer of the adhesive mixture. Some specifically indicate that only manual breeding is allowed. As for time, it is worth remembering that the longer the mixer lasts, the thinner the solution turns out. Therefore, it is recommended to add the powder to water while kneading - this allows you to obtain a uniform composition, without dry areas or lumps.
Responsible manufacturers indicate the most detailed recipes. For example, on the packaging of compositions from the Ceresit brand, the water consumption per kilogram of dry mixture is indicated with an accuracy of 100 grams, the holding time before re-mixing is normalized, and also the number of minutes during which the position of the laid tiles can be adjusted.
Breeding Features
It is known that there are different types of tile adhesive. Therefore, before diluting tile adhesive, you should carefully study the manufacturer’s instructions on the packaging. If you do not take these recommendations into account, it will be difficult to achieve the required consistency.
Moreover, you can get help from the advice of specialists who have done this work in practice more than once. In this article, you will find a lot of interesting and simple tips.
So, immediately before kneading, everything you need is prepared. The container must be clean. If it has been used for such purposes, it must be washed thoroughly.
There should be no remaining dry solution in the inner surface of the bucket or other container. Otherwise, it will be difficult to apply tile adhesive to the wall or tiles.
Important! Remains of dry solution in the freshly prepared mass will disrupt the texture of the glue and affect its properties.
As for water, it must be clean and soft. Process water will not work. It may contain certain contaminants. Moreover, process water may contain alkalis, acids and other inclusions that negatively affect the quality of the prepared adhesive composition. Therefore, drinking water from the tap is used.
If in the process of diluting the glue you followed the proportions and all the manufacturer’s recommendations, and the mixture turned out to be thick, then do not rush to get upset. It is recommended to leave the diluted composition for ten minutes, and after this time it is re-mixed with a mixer. Thanks to this, the consistency can be completely restored.
note
It is not recommended to add more liquid than indicated in the proportions on the manufacturer's packaging. This way you will be able to achieve the ideal consistency.
As for the cooking process, you must wear a respirator and safety glasses. This is important because when kneading, the mixer mixes the mixture at high speed. This could cause the finished adhesive or dust to get into your face or eyes. Although this is not too dangerous, it is better to protect your visual and respiratory organs from possible troubles.
These are the main features and recommendations on how to dilute tile adhesive. Following them, you will be able to prepare the mixture. As a result, applying glue to the wall will be very simple. Now let's look at step-by-step instructions on how to prepare tile adhesive correctly and in what sequence.
Preparing glue for work
Epoxy adhesive
If epoxy glue is purchased from a trusted manufacturer, then its preparation will not cause difficulties. All components will be packaged in separate packaging and all you have to do is mix them; the instructions will help you do this. To properly dilute the glue, remember that you need to add dry (hardener) to liquid (epoxy resin) with constant stirring. You need to start working with this glue immediately after preparing it.
Cement glue
In order to properly dilute the tile adhesive, you will need an empty container and a construction mixer. 2/3 of the required amount of water to prepare the solution is poured into the container. Then, with continuous stirring, gradually add a dry mixture of cement glue, making sure that the solution is homogeneous, without lumps. After all the dry mixture has been mixed with water, it is necessary to add the remaining liquid and bring the solution to working condition. Let the resulting solution sit for 10-20 minutes so that all the polymer particles can swell, after which the glue is considered ready. It is recommended to prepare the adhesive solution at a temperature of 15-250C.
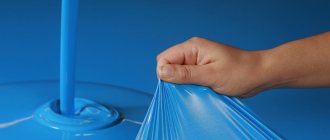
Dispersion glue
Despite the fact that dispersion adhesive is sold in a ready-to-use form, it may be necessary to dilute the tile adhesive with water to adjust the viscosity. To do this, you need to pour it from the factory container into a large container and begin to gradually add water, not forgetting to mix. After obtaining the required viscosity, you can begin to work. Glue diluted in the required quantities of water will not lose its characteristics.
Two-component polyurethane adhesive
As with epoxy glue, you must strictly adhere to the manufacturer's instructions. The adhesive components are usually marked with the Latin letters A (monomer) and B (hardener). They must be mixed in the proportions specified by the manufacturer.
Polyurethane glue is not stored for a long time and should be used immediately for its intended purpose.
Service life: how to extend
Liquid nails are considered a fairly durable material; they can last for several years from the moment of application. To increase service life, you should use the following tips:
- correct the thickness, size, and other parameters of the seam immediately after completion, when the glue has not yet set,
- work at room temperature, since when it drops to +10 degrees or less, the properties of the composition may deteriorate,
- work only with glue that has a normal shelf life, has been stored in suitable conditions, and has not dried out.
How to make tile adhesive yourself?
If you are a jack of all trades and don't want to spend extra money on tile adhesive, you can make this product at home. The list of components is available to absolutely everyone + in terms of time, this process is no longer than diluting the purchased powder.
Advantages of “homemade” tile adhesive:
- Saving.
The individual components are much cheaper. If the circumstances are successful, you can save up to 50% of the cost.
- Versatility.
You can dilute your own tile adhesive for most types of ceramic tiles, and if you add polymer modifiers, you will end up with a mixture with high tenacity, suitable even for large decorative stones.
- Ease of production.
The operating algorithm is no different from what is used with a purchased one. The only caveat is that before diluting the dry mixture, you will have to mix the collected components together.
Despite all the advantages, self-preparation has one difficulty - the correct proportions of the dry mixture. You will have to weigh the components by eye, or you can use a scale for a better result in the end.
To prepare tile adhesive you will need:
- high quality cement (M400 and more);
- polymers and minerals - sold separately in hardware stores;
- dry sand without lumps;
- a plasticizer that can be replaced with PVA glue, slaked lime, liquid soap or a powder solution (mixing the components together is not excluded).
If you add a plasticizer to water and dilute the dry mixture with it, the adhesion of the glue to the surface will be much stronger. The minimum ratio is 1:1, but if you plan to work with large tiles, we recommend using only plasticizer without adding water.
How to make tile adhesive yourself:
- Mix cement and sand in a ratio of 1 to 3.
- Add mineral additives and polymers.
- Gradually add plasticizer (200-300 ml at a time). If you use plasticizer + water, first mix these two liquids together, and only then start diluting the dry mixture. After each portion, stir the solution vigorously for up to 60 seconds.
- Leave the finished mixture for 10-15 minutes, and then mix again to get rid of lumps.
Just 4 steps and the tile adhesive is ready for use.
It is worth understanding that a solution made at home is inferior in properties to a store-bought solution, even if you prepared it correctly. It is suitable for small-scale finishing, but for more global projects (swimming pool, saunas) it is better to use commercial tile adhesive.
How to glue tiles to the floor
Required Tools
Knee pads and gloves will be required
The tiling process requires diligence and accuracy, because the slightest defects are clearly visible on the tiled surface, especially if the tiles are of the correct shape and monochromatic. Let's look at how to glue tiles to the floor to get a high-quality coating.
Step 1. The floor surface must be thoroughly cleaned - scrape off dirt, paint stains, putty, and vacuum.
It is necessary to scrape off dirt and small irregularities
Dust removal of the base
Step 2. Next, wash the floor with water and detergent to degrease the base and dry it.
Step 3. Draw a straight line from the center of the doorway to the opposite wall.
Line drawing diagram
Step 4. Lay out the first row of tiles along a line on a dry floor, observing the width of the joints.
Laying the first tile without glue
First row layout
Step 5. A second marking line is drawn along the outer edge of the last tile - perpendicular to the first. Laying will be carried out from the point of intersection of the lines.
Marking scheme
Step 6. Prepare an adhesive solution according to the manufacturer's instructions.
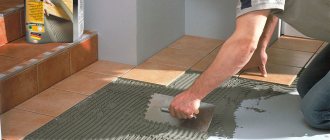
Step 7. Apply glue with a trowel along the marking lines slightly wider than the width of the tile.
Applied glue
Step 8. Level the adhesive layer, then run it over it with a notched trowel, forming a relief.
Relief formation
Advice. If the tile is large-format, a thin adhesive layer is also applied to its back side. For standard tiles, an additional layer of adhesive is not needed.
Applying adhesive to tiles
Step 9. Take the first tile and lay it on the glue so that its sides exactly coincide with the marking lines. A wooden block is laid on top and hammered with a rubber hammer so that the tile lies evenly.
Laying tiles
Aligning the first tile
Step 10. Insert crosses for seams on the sides and continue laying the first row, controlling the placement of the tiles using the rule and level.
Cross between tiles
Step 11. Having completed the first row, proceed to the next one. During the work, it is very important to maintain the width of the seams and do not forget to control the plane.
Horizontal control using a long rule
Step 12. When cutting tiles, you need to mark the cut line with a pencil, having first measured the required distance. It is most convenient to cut the material with a tile cutter, manual or electric.
Cutting with a manual tile cutter
Cutting tiles with a power tool
Advice. If a shaped cutout is needed, first mark it with a pencil on the surface of the tile, and then divide the part that needs to be cut into squares. After making cuts along the lines, remove excess fragments, and break off uneven edges using pliers.
Marking for figured cutting
The remaining pieces are broken off with pliers or wire cutters.
Step 13. A ceramic plinth is fixed around the perimeter of the room, placing crosses underneath for the seams.
Applying glue to the baseboard
Gluing the baseboard
Step 14. A day after cladding, the joints are grouted. The mixture is applied across the joints, carefully filling all the irregularities. As soon as the grout has set, the floor should be wiped with a damp, clean sponge. The remaining residue after drying is removed with a dry cloth.
Application and distribution of grout
Cleaning tiles with a cloth
Final cleaning of the floor with a damp sponge
Finishing the bathroom floor with ceramic tiles
Prices for tile adhesive "Unis"
Unis tile adhesive
Recommendations
Do not rush while stirring. It is necessary to accurately assess the consistency of the solution. To do this, dial a little on the trowel, and then tilt the tool. If the solution falls off in pieces, then you need to increase the amount of water.
The amount of liquid should be increased only when mixing the glue for the first time. After 2 mixings, if the glue thickens or begins to clump during work, then you should not add water. It is advisable to use a mixer to mix the solution. This is necessary to restore its consistency for a while, which will help finish the job.
If the solution flows or slides, then some time is needed for partial setting, and the next portion is prepared with the required amount of liquid. If the adhesive composition holds securely, then the mixture can be used.
10 tips for beginners on how to dilute tile adhesive
It is very difficult for beginners in the construction business to properly dilute and use tile adhesive, so we decided to collect the most useful information on this topic together and present it as an advisor.
Tips for mixing tile adhesive:
- Don't overmix.
The optimal volume of the finished mixture should cover 1-1.5 m2 of surface.
- Do not store the finished glue for too long.
If the mixture is left in the open air for more than 240 minutes, it completely loses its adhesive properties.
- Do not pour all the powder in at once.
You will get a single layer that cannot be crushed even with a mixer at high speeds.
- Stir again before use.
This will remove the top frozen film and make the solution homogeneous.
- Observe temperature conditions.
Tile adhesive will “feel comfortable” within 12-24 degrees. With large deviations from the norm, the adhesiveness will decrease significantly.
- Do not use glue with a thick film.
An overstayed solution will not be able to provide high-quality adhesion.
- Glazed tiles require a thinner solution.
This type of tile is characterized by high moisture absorption rates, so the adhesive must be diluted to a thinner consistency.
- The glue should not harden immediately.
If, when applying the solution to the surface, it instantly hardens, then the glue has expired and cannot be used.
- Don't delay making adjustments.
This means adjusting the tiles that are already sitting on the adhesive. The first 10-15 minutes are considered the optimal time. after posting.
- Don't chase low prices.
Even if a trusted brand costs 30-40% more, you will be completely confident in the quality of such a product.
If you follow the tips listed, even a beginner will be able to mix tile adhesive at the highest level without any problems. High-quality tile adhesive is the key to the durability of your tiles. Make your choice wisely and you can forget about your problems for at least 25-30 years.
The influence of glue composition on the preparation method
The composition of the adhesive determines how the solution applied to the tiles and walls will be prepared. Today there are several types of tile adhesive, for example, Plitonit, Eunice glue and the like. To avoid making mistakes with the technology for its preparation, it is recommended that you read the appropriate instructions on the label with the bag of adhesive.
Thus, the material in the form of a paste is a ready-made component. There is no need to dilute it. It is immediately ready to use. You may need to mix it thoroughly with a mixer before using.
Its advantage is that it does not dry so quickly. Due to this, the work of installing tiles is carried out slowly and carefully. As for two-component compositions, they are prepared immediately before starting work. This glue has excellent elasticity.
Advice! If after work you have leftover glue left over, use it. For example, you can cover up a crack, a pothole, or hide any other unevenness.
When dry powder remains after work, it must be stored in a dry place. Thanks to this, after a while, it can still be used. When moisture gets into it, the entire composition turns into stone, suitable for garbage.
Conclusion As we have seen, the technology for diluting glue with your own hands is indeed very simple. It does not require special skills or knowledge. By following the tips provided in this article, you will be able to do this job perfectly.
We hope that this material helped you expand your knowledge base, and perhaps discovered something new for you. Additionally, we invite you to watch a video that clearly demonstrates this work.
Additional Tips
- In order to understand whether there is a sufficient amount of water in the solution, you can use the following method. Using a trowel, scoop up the solution and tilt it; if the mixture slides off in one piece, this indicates that there is not enough water in the solution.
- After the first kneading, you should check the resulting solution using a trowel. If the mixture drains, you need to wait until the solution is infused. And also use less water the next time you knead.
- A good solution should have a uniform consistency and adhere to the surface of the trowel. In this case, you can be sure that the ceramic tiles you lay will be reliably adhered to the surface.
ATTENTION! It is necessary to check the amount of water and add it before the solution is left to sit. Once it has settled, you can no longer add water. In addition, if during the work the solution begins to thicken and lumps begin to appear in it, in this case you should not add water either. You can try stirring it again, but without adding liquid.
Gluing tiles
When working with neoprene compound, take precautions: use a respirator and gloves.
Place the bottle of liquid nails in a special construction gun, carefully cut off the tip and make a test squeeze onto the surface. Next, perform the following steps step by step:
- apply nails to the surface in a zigzag, dotted pattern or make a grid;
- wait 20-30 seconds;
- lean the tile from bottom to top;
- fix for a few minutes (according to the instructions);
- tap large tiles lightly with a rubber hammer to ensure even fixation;
- After installation is complete, allow the glue to dry completely and set properly (about a week), and only then grind the seams.
Use spacer crosses to maintain equal spacing between tiles. Three hours after completion of work, they can be removed.
Manufacturers and cost
The cost of packaging such a product depends on the brand and country of manufacture and can vary significantly. On average, the price can vary from 80 to 450 rubles. But you can also find more expensive ones.
Let's take a look at the popular fastening products on the market:
- Titebond Multi Purpose. Firmly holds various materials. The hardening period is approximately 20-30 minutes, which makes it possible for a novice master to work with it. Frost-resistant, insensitive to moisture, practically odorless.
- "Moment Installation Universal." The synthetic resins it contains are well suited for brick, metal, concrete and ceramics. Withstands heating up to +70C and cooling down to -40C. The joints are securely fixed.
- LIQUID NAILS LN-901. Neoprene compounds based on artificial rubber are ideal for stone and tile. They are used for facade work because they are durable and can withstand significant impact loads.
- Tytan Ceramics and stone. It is based on odorless and solvent-free acrylic adhesive. Eco-friendly. Fast adhesion after application. Possibility to paint immediately after drying.
Once again, we note strength as the main advantage of the adhesive in question, which allows you to work with many types of tile material. No additional care is required, but they are durable and reliable in operation.
What to do if a tile falls off
Due to various influences and time, sometimes individual slabs can fall off the wall. You can restore the finish by following simple steps:
- Carefully remove the old layer of glue so as not to touch the neighboring ones;
- A new layer of adhesive is applied to the wall;
- The plate is installed in place, you will need to ensure its fixation;
- After 7 days it will be possible to grout the joint.
The plate is installed in place; it will need to be secured.
Laying tiles is a popular finishing method that comes after wallpapering. Previously, it was necessary to use only cement compounds, which produce strong dirt. Now you can carry out the work more conveniently by choosing special liquid nails, which are easy to work with.