- home
- Did you know? — Information for clients
- Sectional doors
- Design features
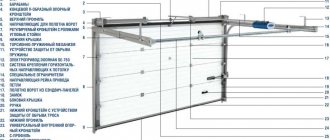
- Garage door diagram
| Image | № | Name |
| 1 | Gate panel | |
| 2 | Side trim | |
| 3 | End profile | |
| 4 | Sealing insert (lower) | |
| 5 | Running roller | |
| 6 | Bottom bracket | |
| 7 | Side roller bracket | |
| 8 | Upper bracket | |
| 9 | Intermediate loop | |
| 10 | Window | |
| 11 | Pen | |
| 12 | Nashchelnik | |
| 13 | Shaft | |
| 14 | Spring | |
| 15 | Drum | |
| 16 | Spring tips | |
| 17 | Connecting coupling | |
| 18 | Bracket with safety ratchet | |
| 19 | Intermediate bracket | |
| 20 | Traction cable | |
| 21 | Vertical corner profile | |
| 22 | Vertical guide profile | |
| 23 | Mounting profile | |
| 24 | Bolt |
Types of installation of garage door guides (basic)
Standard installation of sectional garage doors
| Parameter | Name | Calculation formula or value |
| H , mm | Jumper height | min 230 |
| ET , mm | Depth of entry of the gate into the premises | RM+445 |
| D.H. , mm | Hanging point coordinate | RM+175 |
| H1 , mm | Dimension limiting the working area | RM - 300 |
| H2 , mm | Dimension limiting the working area | RM - 40 |
| B.W. , mm | Height to shaft axis | RM+160 |
| LDH , mm | Clear passage height | When opening the gate manually RM - 150 |
| When using an electric drive RM - 50 |
* — When installing a reinforcing bracket outside the side post of a sectional door, the minimum size of the side space is 140 mm
Kinds
At the moment, Alutech offers its customers two types of gates:
- Classic . Torsion springs, responsible for compensating the mass of the web, are located above the structure. With the help of a coupling, you can easily adjust the location of the shaft parts during installation work. All springs included in the kit are connected to ratchet couplings. This is required for safety reasons. That is, if the spring breaks, the coupling will become an obstacle to the shaft and will be able to hold additional mass. It is worth noting that the Classic type of gate can be mounted in three ways.
- Standard . The balance of the canvas depends on the springs that stretch it between the panels and profiles. Because of these elements, the canvas will never go down on its own.
The installation work of the presented design is quite simple and does not require much experience. It is important to follow the attached instructions.
Low installation of sectional garage doors from Alutech
| Parameter | Name | Calculation formula or value |
| H , mm | Jumper height | When opening the gate manually min 105 |
| When using an electric drive min 130 | ||
| ET , mm | Depth of entry of the gate into the premises | RM+580 |
| D.H. , mm | Hanging point coordinate | 700 |
| H1 , mm | Dimension limiting the working area | RM - 435 |
| H2 , mm | Dimension limiting the working area | RM - 95 |
| LDH , mm | Clear passage height | When opening the gate manually RM - 195 |
| When using an electric drive RM - 125 |
Alutech sectional garage doors have a compact and reliable design. Its main elements are the following.
Advantages
At the moment, Alutech products have no analogues. Main advantages:
- High quality.
- The gates are not afraid of the cold. At the time of production, “thermal lock” technology is used. This allows the outer metal coating to be separated from the inner one. This provides reliable protection from the cold and provides thermal resistance in the form of a polyurethane layer.
- Do not corrode. The top layer of the structure is covered with zinc, which was applied there using galvanization.
- Wide selection of products. You can choose a product with a smooth or classic surface. It is possible to cut out a window of any shape, repaint the gate or adjust the size.
- Customers have the opportunity to choose fittings. For example, determine a specific shade for handles, locks, etc.
Versatility of installation of automatic sectional garage doors
The design of Alutech sectional doors can be easily adapted to specific installation requirements. The diagrams above show two main methods for installing guides:
- standard - used for installing guides at a normal height of the lintel above the garage opening;
- low - the method allows you to install garage doors on openings with low lintels by increasing the depth of entry of the door into the room.
It is also possible to install sectional doors in openings with high lintels and in rooms with a sloping ceiling. The set of guides may not include corner profiles if the door leaf rises strictly vertically when opened (a sufficient margin of wall height above the opening is required).
Installing springs
Balancing spring for gates
Modern Alutech models use a double spring that replaces the torsion shaft. It has a complex design and its cost is several times higher than that of other gate manufacturers, and its repair and straightening is impossible. Therefore, this stage must be approached with maximum responsibility and accuracy.
- Screwing the handle to holes specially made for it.
- Installation of spring valves on the second and third sections.
- Fastening the cable with one end to the roller loops and the other to the upper protrusion on the guide.
- Inserting the cable to the spring, adjusting it, fixing the desired position with bolts.
Finally, the web retainer is installed. The gate is raised, the place on the top rail is marked where it ends and the lock is screwed there.
Preparatory work
Taking measurements
Sectional gates vary in size and are suitable for any opening. To select the appropriate design, it is necessary to accurately measure the opening in height and width, measure the height of the lintel, that is, the free space between the opening and the ceiling. It is unacceptable to carry out installation if there are distortions and deviations in size by more than 5 mm, because it is only possible to correctly install sectional doors in a geometrically flat opening.
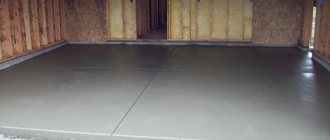
The gate structure is located inside the building, all fastenings are located on the sides and at the top of the opening. You need to measure these areas: the height of the lintel should be 30 cm, the width of the side parts should be 25 cm. If the free space is smaller, it will not be possible to install the gate. It should be taken into account that the inner surface around the opening must be free of defects: numerous cracks, sagging, deep depressions, holes. This interferes with the tight fit of the structure and reduces the efficiency of the mechanism.
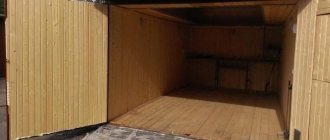
Preparing the room
Installation work requires free space, so the room is immediately cleared of bulky things, shelving, pipelines and anything else that may impede movement. It’s good if the walls are stone, concrete, or ordinary bricks - then the gate structure is fixed to the opening. But if the walls are light - made of silicate blocks, hollow bricks, cellular concrete - the opening must be strengthened. It’s not difficult to do: the entire opening needs to be framed with a 75 mm metal corner.
It is worth paying attention to the outside of the opening: remove cracked lining, uneven surfaces, and re-tile if necessary. Plastering or painting after installation of the structure can spoil the appearance of the sashes.
Choosing sectional doors
The special design of sectional doors requires the presence of protective mechanisms. This is an anti-pinching device, special protection of the canvas from breaking, protection from freezing to the floor. In addition, the panels are coated with an anti-corrosion compound, otherwise the gate will not last long. The highest quality gates are from German and Belarusian manufacturers, which is confirmed by the relevant certificates.
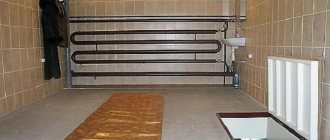
Sectional doors: inside view
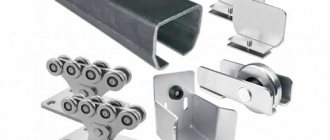
It is better to choose gates in a construction showroom, where there are optimal conditions for storing such structures. When purchasing, be sure to request a certificate, check the contents and the presence of all specified elements. The kit includes door panels with or without insulation, aluminum guides, a spring mechanism, a torsion bar system with rollers and brackets, an installation instruction diagram, intermediate hinges, and fasteners. If you choose a truly high-quality product, the question of how to install sectional doors is much easier to solve.
Tools for work
Installation will not be possible without special tools. To avoid searching for anything while working, you should prepare everything at once.
These gates are installed using the following tools:
- level;
- roulette;
- electric drill;
- perforator;
- pobedit drills;
- locksmith kit;
- fasteners.
An electric drill can be replaced with a screwdriver; pobedit drills can be easily replaced with self-tapping screws and a drill. Fastening elements must be purchased with a reserve so that there is definitely enough.
Constructions
Alutech produces two groups of gates: “Classic” (for established buyers) and “Trend” (for those who want to save money and still get normal quality). The first selection uses 4.5 cm thick panels, and the components are made of stainless steel. Such products can be safely installed even in polar regions; they are guaranteed to withstand the effects of hurricane winds.
Western European concerns can offer similar quality, but their fees for automatic entrance systems of this level are significantly higher.
The “Trend” line is made on the basis of 4 cm panels; this is the optimal solution for a garage located in a temperate continental climate. All main parts are made of zinc coated steel. The products will not withstand winds of 40 m/s, but they are not afraid of very strong gusts. Such properties are achieved not by making the structure heavier, but by reliably sealing it with polyurethane foam. The quality is higher than that of similar gates made in the Russian Federation, and things are better with automation.
The lock supplied is a mortise-type deadbolt in a deadbolt format. Closing and opening is possible only with the original key; In all versions, the gate can be locked and unlocked both inside and outside. The locking device is inserted as securely as possible. Alutech designers refused to use a single piece of fabric; they preferred to divide it into autonomous panels. This solution made it possible to radically increase strength compared to monolithic versions.
Alutech engineers have prudently added a counterweight to the design, making opening easy and quick. The plowing course, directed rigidly vertically, ensures free access and almost close approach. Assembly with the participation of professionals occurs as quickly and reliably as possible.
Connecting the drive and setting it up
The last stage is the assembly of the panels, which occurs with their simultaneous adjustment by adjusting the roller fastenings. At this stage, the screws on the rollers are not tightened all the way.
Installation of the panels starts from the bottom and sequentially goes up, adjusting the rollers of each panel sequentially, since after installing all of them at once it will be extremely difficult to do this.
Drive motor installation
After installing the engine, we pull the cable into the grooves, starting from the bottom edge of the first panel, then pass it under the upper roller and then under the spring roller, securing it to the upper outer frame under the rotary skids. Next, we check the smooth movement of the panels and ensure that there are no difficulties during movement. Then we tighten all the screws until they stop on the rollers.
When checking the smooth operation, before you have tightened the screws on the roller fastenings all the way, you should not raise the gate completely.