Not everyone is able to organize an automatic water supply system for a country house, which includes the installation of pumping equipment. Often the main problem is financial, because to implement such a project you will have to spend a lot of money. As a result, many have to come to terms with reality and carry water in buckets from the well for irrigation and other needs. However, for some, this prospect prompts them to look for an alternative solution. For example, a hand pump is installed for water from a well. This is an ideal solution to automate the water supply process. Although it is difficult to obtain a large volume, it is better than carrying full buckets from a nearby street or transporting them from somewhere, which is even worse.
In this article we will tell you about the existing types of hand pumps. Looking ahead, we note that there are 4 main types, including piston, rod, membrane and vane. We will look at the features of each of them and will definitely talk about the arrangement of the well. In addition, instructions will be provided on how to make such a pump yourself. But first, let's get acquainted with the features of this equipment.
Features of hand pumps: advantages and disadvantages
A hand pump has its positive and negative qualities.
A hand pump means a special device that pumps liquid to the surface from a well. Physical effort is required to operate the lever mechanism. Unlike the automatic type, the water flow rate is much lower. But this lever mechanism has advantages over its counterpart. If there is no electricity supply at your dacha, then you will have an uninterrupted source of water, including clean drinking water.
The hand pump is especially convenient for those who cannot carry heavy buckets. In just a few presses of the lever you can get a glass of water. This device has both positive and negative features, consider them:
| pros | Minuses |
| There is no need to use expensive equipment. | Water is pumped only after pressing the lever mechanism. |
| Can be installed under almost any conditions. | Low level of productivity. Unlike analogues, liquid is supplied to the surface in a very small volume. |
| No electrical connection required. | |
| If some components fail, they are easy to replace. | |
| Unlike analogs (electric devices), a hand pump costs much less. | |
| If you really want to, you can do it yourself. | |
| Easy to use. | |
| The installation is quite simple. | |
Although you can make such a device for a well yourself, most people decide to buy ready-made products. This is explained by the fact that welding is used to manufacture the pump. Not everyone is able to make a high-quality weld, and as a result, the efficiency of the design is reduced to zero.
Feasibility of application
Hand pumps for pumping water do not require electrical power or the use of any other energy carrier, which is one of their most significant advantages. Manual water pumps can be used as backup equipment and used in cases where the main electrical device is unable to function due to a breakdown or lack of voltage in the power supply.
An advisable solution is to install a hand pump in summer cottages that the owners rarely visit, only from time to time.
In such cases, it is undesirable to use more expensive electric pumping equipment, which requires regular maintenance and more thorough care. In addition, an electric pump left unattended by its owners for a long time can simply be stolen.
Hand pumps for water are actively used in dachas and country houses that do not yet have a central power supply. In such cases, the use of a manual device for pumping liquids will allow you to obtain the required amount of water both for domestic needs and for watering garden and vegetable plants in the summer.
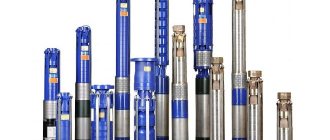
Pump classification
Hand pumps take on different and even unexpected appearances
Today you can often find water intake standpipes in courtyards or in the private sector. Such speakers have nothing in common with manual mechanical pumps. Why? In conventional water pumps, water pressure is created by pressure in the city water supply. In a mechanical pump, pressure is created through pressure, which must be constantly pumped up using physical effort.
All mechanical pumps are classified into 4 main groups:
- Piston.
- Rod
- Membrane.
- Winged.
Piston devices are used for sources up to 10 m deep. If the well depth is 30 m, then rod devices are ideal. Membrane ones are mainly used for pumping water in water supply systems. As for vane hand pumps, this is the most expensive device. It is a rotary mechanism in a housing with a suction pipe.
Also, hand pumps differ in operating mode and materials of manufacture. For example, some models can only be used in the summer. The housings of such pumps can be made of plastic. There are also metal models of devices that should be insulated for use in the winter.
Now we invite you to familiarize yourself in more detail with all types of similar devices used to lift water from a well.
FAQ
Which booster pump manufacturers are the best?
+
If you prefer to use foreign equipment, then Wilo (Germany), Valtec (Italy), Jemix (China), Grundfos (Denmark) are considered the best. On the domestic market, we should highlight Gilex, Valfex, and Whirlwind.
Which pump should I get for my apartment?
+
Take a quiet centrifugal pump - you can make an approximate calculation of its main characteristics using the method given in our article. As for specific series, the most popular are Wilo PB, Grundfos UPA, Jemix W15GR.
Piston hand pump: device and features
Piston hand pump for water. In this case it is made of stainless steel
As already mentioned, a piston pump is used in cases where the water surface is located high. The maximum permissible limit for it is 10 m. If the mirror is deeper, the pump will not be able to lift the liquid to the surface.
Piston type device
Piston pump design in every detail
The unit is based on a special piston, which is the main working unit. The piston itself is placed in the pipe and connected to the bottom of the device. Under the influence of forces on a special lever, the piston moves up and down. As soon as the piston is in water, it flows through the valve into the space above the piston. When the piston rises, it is pushed out through the outlet pipe.
The following nodes are visible from the outside:
- cylindrical body;
- drain pipe;
- lever arm;
- a rod extending into the cylinder.
The internal part consists of the following nodes:
- The piston is located inside the sleeve and comes into action under the influence of a lever mechanism.
- The stem is partially visible from the outside.
- Hole for water outlet.
- A pipe is connected to the pump from below through a fitting.
- Valves located on the piston itself.
In the diagram you can see all these components, as well as familiarize yourself with the operating principle of this pump:
The operating principle of a piston pump is shown in this diagram.
It can be seen that the pump has 2 valves: one on the movable piston, the second on the stationary part, which opens under the influence of pressure and releases water. If it is not there, then pumping out water will be problematic. Typically, after using the pump, a small amount of liquid remains inside, as can be seen in the picture on the left side. When the piston rises, the valve opens, filling the inner cylinder.
In the figure in the center you can see that when the rod with the movable piston is lowered, the lower valve closes. At the same time, the valve on the piston opens and draws in liquid for its subsequent lifting up. When the piston moves completely down the cylinder, water flows completely from the lower chamber into the second.
Now in the diagram on the right side we see that the valve on the piston is closed and water comes out through the pipe. As you can see, the operation scheme is very simple. The only nuance of the operation of this pump is that with intensive use, the rubber seals on the piston quickly wear out. Sometimes valves fail. If the fluid contains small impurities, wear increases.
As for productivity, measured in liters of liquid lifted at one time, it varies depending on the model. Performance is mainly affected by the internal diameter of the cylinder, that is, the volume of water that is located between the first and second valve.
Video: operating principle of a piston pump
Types of piston pumps
These devices are distinguished by the type of working body that displaces the liquid. So the pistons have the following types:
- diaphragm (water is separated from the piston by a special diaphragm, and there is oil or emulsion inside the cylinder);
- plunger (the piston has the shape of a cylinder);
- piston (the piston is disc-shaped).
Piston pumps also differ in their method of action:
- Differential. These are double-acting devices, they have 2 chambers (the first chamber has one valve, the second chamber has suction and working valves).
- Double action. Unlike differential action, in this case the water flows evenly. The design has 2 working chambers. The liquid is pumped by the piston in 2 revolutions.
- Single action.
These devices also differ in the number of pistons. There are pumps with small and large diameter pistons.
Making a piston pump yourself
This diagram will help you make a piston pump yourself
Having understood the principle of operation of this device, it’s time to talk about how you can make it. Many summer residents immediately consider this option, wanting to save money.
It is worth noting that you can assemble such a pump from scrap materials. We provide you with instructions to help. Although it is not as detailed, since it is difficult to describe all the technological processes, it talks about all the basic design elements that are necessary in the manufacture of a piston pump. After that, you can watch a video that complements everything below:
| Pump manufacturing instructions |
| Step #1 | The first step is to make the pump housing. This will require a metal cylinder, for example, some use a fire extinguisher, a piece of pipe, a liner from a diesel engine and the like. |
| Step #2 | The length of the section should be up to 80 cm. It will be good if you can thoroughly clean the inside of the pipe from uneven areas. This will ensure the piston moves well. |
| Step #3 | If you are using a piece of pipe, you should cut the lid out of thick metal. A hole for the rod must be made in the lid. If you are using a used fire extinguisher, then its upper rounded part is ideal for a future hand pump. |
| Step #4 | A metal rod is used as a rod, onto which the piston must be secured. Several holes are made in the piston through which water will flow. |
| Step #5 | Thick rubber should be secured to the top of the pistons. But not so dense that it cannot let water through, because when the piston moves down, the rubber must act as a valve. |
| Step #6 | So, now you need to attach a piston with a valve to the metal rod. It is immediately inserted into the housing of the future pump. |
| Step #7 | A hole is pre-made for installing the drain spout. Ø1/2 pipe can be used. |
| Step #8 | A supply fitting should be welded to the lower part. Inside the housing, a rubber valve in the form of a petal is also attached to the fitting hole. It will hold water in the first chamber. |
This is a good example of a homemade well pump
These are the basic processes for making a piston pump. You should also attach a lever to raise the piston. All processes involve welding, so sufficient qualifications are required. We invite you to take a closer look at the manufacturing process in the video.
Video: how to make a piston pump
Rod hand pump - its features
This type of pump is also known as a rod pump. It is used in cases where the water surface lies deeper than 12 meters. With such parameters, the piston type cannot cope. They are somewhat similar in design. The main working unit is the cylinder and piston. The pumping process is carried out practically according to the same scheme as in the case of the piston analogue. However, they differ in that the pump part itself is located directly in the aquifer. You can see its feature in the diagram:
The diagram shows the design of a sucker rod pump in all its details.
The working cylinder is located directly in the water column. To install such a pump, you need a well with a casing pipe. The working cylinder is connected to the main part by a pressure pipeline, inside of which there is a rod or rod. It is he who sets the piston in motion. As for the presence of valves, there are also 2 of them, the first is located on the intake pipe of the cylinder, and the second on the piston.
Based on this diagram, it becomes clear that the supply to the top does not simply occur by suction. The working cylinder located in the aquifer creates a column. Each up and down movement of the piston creates pressure, replenishing the existing column with a new volume of liquid. Using this scheme, water can be raised even from a depth of 30 meters.
If we compare piston and rod units, then when using the latter, more effort is required to raise water to the surface. For this reason, the pump lever is often made longer. This allows you to achieve maximum piston stroke with less labor.
Such installations are more complex. This applies to both installation work and subsequent maintenance. However, if there is no electricity at your summer cottage, and the aquifer is located at a depth of 25–30 meters, then a rod pump is simply irreplaceable.
In what cases are they used?
A water pump to increase water pressure in an apartment is designed to create acceptable pressure in the water supply. If the norm is pressure in the region of 4 atmospheres, then in practice we record its decrease to a value of 1-1.5 and even lower. And to operate, for example, a washing machine, a pressure of at least 2 atmospheres is required. The Jacuzzi and shower cabin will not want to work at all at this pressure, since they are designed for 4 atmospheres. However, higher pressure is also dangerous for pipelines. Even at a pressure of 7 atmospheres, some elements of the water supply network can be damaged. Therefore, the pressure must be within certain limits and be stable .
It’s especially frustrating for residents of the upper floors during rush hours, when, coming home from work in the evening, it’s impossible to even wash properly. At the same time, residents of the lower floors have normal pressure. In this case, a circulation pump to increase water pressure, embedded directly into the inlet water main, can give residents a complete feeling of comfort.
Diaphragm pump
The small diaphragm pump is convenient to use as it can be carried as needed
Such a pump means a special chamber, which is divided by an elastic membrane. Hence its name - membrane. It can be used to lift water from a depth of up to 6 meters. This device has a round body with handles located above it.
The internal movable partition is connected to the handle. The pump design has an air chamber; it does not participate in any way in the transfer of water. There are 2 pipes at the bottom of the device. One of them is connected to the suction through a valve. The other acts as a supercharger.
When the membrane is pressed down, pressure increases in the chamber containing the liquid. As a result, the valve opens. When the rod is raised up, the membrane also rises up. Under pressure, water is released through the check valve. So, one valve is on the suction pipe, and the second is on the outlet pipe.
Metal or cast iron is used for their manufacture. One of the weak points of this pump is the membrane. With frequent use, it quickly breaks through. Moreover, over time, the membrane stretches and becomes elastic. Because of this, productivity drops to zero. Water may leak through the housing, this is if the membrane has broken. Replacing the membrane will not be much of a problem. But even despite this, diaphragm hand pumps have not gained widespread acceptance.
Video: homemade membrane principle unit
Installation recommendations
Correct installation of a pump to increase water pressure with automation will ensure the water needs of the apartment for many years. During the installation process, adhere to the following recommendations:
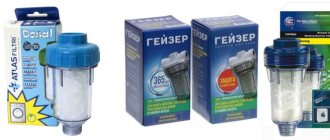
- For longer operation of the device, it is highly advisable to install a mechanical filter at the pump inlet. Thus, you will protect the equipment from foreign particles entering it;
- The device must be installed in a dry place in a heated room. At sub-zero temperatures, the water in the pump may freeze, damaging the inside of the device;
- The shut-off valve must be installed before the pump. This will make it possible to carry out equipment maintenance when the water flow is turned off;
- Gradually, during operation, the vibration acting on the pump can loosen the device, which can cause leaks in the places where it is attached. Therefore, first check the tightness of the connections.
A correctly selected and correctly installed pump to increase the working water pressure in the apartment water supply will solve your problems associated with low water pressure in an apartment of any number of floors.
Source of the article: https://okanalizacii.ru/vodosnabzhenie/nasosy-i-stancii/nasos-dlya-povysheniya-davleniya-vody.html
Vane pump
A vane pump can be used to pump water from a well
Another type that we will describe is winged. Such a pump is used not only for pumping clean water, but also petroleum products, sea water and other liquids. In the diagram, you can familiarize yourself with the vane pump in all details:
Design diagram of a vane pump
The device consists of the following components:
- Inlet valve.
- Valve seat.
- Screw.
- Frame.
- Screw.
- Impeller.
- Exhaust valve.
- Lever.
- Lid.
- Ring.
- Shaft.
- Sleeve.
- Oil seal packing.
- Cork.
To set the impeller in motion, a handle is fixed and rigidly mounted on the shaft. If the pump will not be used in winter, there is a plug on the body, which can be unscrewed to drain the water.
Procedure for commissioning a vane pump:
- The inside should be thoroughly rinsed with hot water. This is necessary, because a conservation lubricant is applied there. During the flushing process, the plugs from the suction and discharge pipes should be removed.
- Next you need to install the handle.
- Using 2 bolts, the pump should be fixed vertically.
- Then the pipeline is connected to the suction pipe. The pipeline must not be deformed under the influence of vacuum. Therefore, the ideal solution would be to use a metal pipe.
- The pressure pipeline is attached to the pump using the same principle. Please note that there is a hole in the pressure pipe through which liquid is poured into the device.
- If the depth of water intake is more than 1 meter, then a check valve must be attached to the suction pipeline. This will ensure normal operation of the pump.
- It is equally important to ensure complete tightness of the suction pipeline. Otherwise, the device will not work normally.
The vane water pump is small in size and has low performance
The main disadvantage of a vane pump is its low performance. That is why it is rarely used in the household. It works great with small amounts of water.
Installation of equipment in the apartment
Installation of a water pressure booster pump in an apartment is carried out in the following sequence:
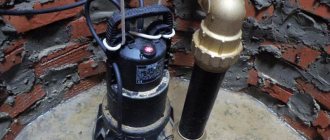
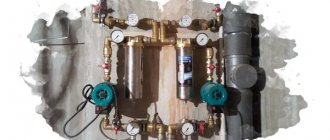
The photo shows an installed booster pump for water.
- The pipe on which the pump will be installed is marked taking into account the length of the pump and adapters.
- The water in the apartment is shut off.
- The pipe is cut in two marked places.
- Threads are cut from the outside of the cut ends of the pipe.
- Adapters with internal threads are screwed onto the pipes.
- The included fittings are screwed into the adapters. When installing the pump, follow the instructions of the arrow on the device body, which shows the direction of fluid flow.
- A three-core cable is pulled from the electrical panel to the pump. It is advisable to equip a separate outlet near the pump, and connect the pump through a separate RCD.
- Turn on the pump and check it. Make sure there are no leaks from the fittings. If necessary, tighten the fasteners. For better sealing, use FUM tape, wrapping it around the thread.
Manual pump - features of choice and common models
We have discussed with you the main types of hand pumps that can be used to lift water from a well. If you can’t do it yourself, then you can consider ready-made models. When choosing, you need to consider the following nuances:
- An important selection criterion is the depth of the well. Compare this indicator with the parameters of the pumps.
- It is also important to know the performance, namely how much water it can pump out in one cycle.
- The diameter of the casing pipe is taken into account. It is important to keep one thing in mind here: if the diameter of the casing pipe is less than 100 mm, then you will not be able to insert a sucker rod pump pump assembly into it.
- You should know the degree of contamination of the source. Typically, the technical specifications are indicated in the product passport.
- Assess your strength, whether you can lift water from great depths on your own.
- Differences in installation methods. Therefore, immediately think about which installation method is acceptable in your case, for example, it could be a permanent installation or temporary, implying dismantling at the end of the warm season.
- Appearance also plays a significant role.
Considering these features, you can choose the pump that will ideally suit your needs. Now let's take a look at the most common models in the table:
| Pump name | Specifications | Price |
| "Dachny" | The device body is made of stainless steel. It is mainly used for pumping water from wells, wells, and reservoirs with a water surface of no more than 8 m. During operation, a check valve must be installed. The height of the pump with a raised rod is 0.75 m. The diameter of the connection to the pipe and the outlet hose is 1 inch. At one time, the pump pumps out a volume of 1.25 liters. Operation is allowed at temperatures not lower than +5°C. Device dimensions 750×500×125 mm. | From 6 thousand rubles. |
| NR-3M | Used for pumping water from wells, wells, reservoirs and other containers. The piston and cylinder of the unit are made of high quality plastic. Piston ring and valves made of rubber. Other elements are metal. This model is suitable for lifting liquid from a depth of no more than 2 m. However, it is also possible to operate at a depth of up to 9 m if a check valve is installed on the pipe at the bottom of the suction line. This pump weighs 5.5 kg. Device dimensions 540×180×550 mm. The diameter of the inlet and outlet pipes is ¾. | Around 2500 thousand rubles. |
| RN-01 NZh | This piston hand pump is used when raising water from a depth of no more than 9 m. The body of the device is made of stainless steel. Holder, black steel handle. Mainly colored green. A check valve must be installed at the suction. In one cycle (down–up) of pressing the lever, it dispenses up to 1 liter of water. The length of the lever allows the pump to be used by elderly women and those who have little strength. Pump dimensions 1000×150×870 mm. The installation weighs 8 kg. | Around 6.5 thousand rubles. |
| BSD | It is used to lift liquid from wells and wells. The depth of the aquifer is no more than 6 m. If you install a check valve on the suction line, you can raise water from a depth of up to 9 m. The pump can be installed on a flat surface due to the fact that the hole at the bottom allows the hose to be pulled out to the side. The height of the unit with the rod raised is 40 cm. By intensively pressing the lever, you can raise 22 l/min. Device dimensions 390×240×200 mm. The total weight of the installation reaches 7 kg. | From 3 thousand rubles. |
| BSAN | Like its analogues, it is used for pumping water from wells and wells. When using a check valve, water can be raised from a depth of up to 9 m. The pump body is made of cast iron. The flow rate is 28 l/min. Device parameters 650×240×160 mm. The total weight of the hand pump is 15 kg. | From 4 thousand rubles and more. |
| Series "K" | A pump is used to pump water without abrasive particles. Suction height up to 9 meters, provided that a check valve is installed at the end of the suction pipe. | Depending on the model, from 3 to 30 thousand rubles. |
| GBS-86 | A piston hand pump is used for pumping liquid from wells, wells and reservoirs. Vertically it is capable of lifting water from a depth of 15 m under a pressure of up to 1.5 atm. When installing a check valve, the suction height is up to 9 meters. With the rod raised, the height is 64 cm. In the delivery set you will receive a semi-assembled pump, a handle and a fitting for connecting a suction pipeline with a diameter of 25 mm. Device dimensions 530×240×160 mm. Weight 16 kg. Flow 28 l/min. | 6.5 thousand rubles or more. |
| D40 | Can be used for both clean water from a well/well and contaminated water. The diaphragm hand pump does not require pre-filling and is capable of lifting water from a depth of up to 6 meters. The body and pipes are made of cast iron. Valves and membrane made of oil and petrol resistant rubber. Device dimensions 250×250×650 mm. Installation weight 13.5 kg. Capacity is 50 l/min. | From 7 thousand rubles and above. |
| BSK | With minimal physical effort, this pump can lift water from a depth of up to 9 m when using a check valve at the end of the suction pipe. The body is made of cast iron using artistic casting. The pump is mounted using a flange. The height with the rod raised is 62 cm. There are 2 types in this series: BSK for wall mounting and BSKG for floor mounting. In the first case, the BSK capacity is 28 l/min. Its dimensions are 600×240×160 mm with a weight of 15 kg. The only difference between its analogue is the productivity, which is 30 l/min. They have a slight difference in cost. | From 6.2 thousand rubles. |
| NR-4-16 | Used for lifting from a depth of no more than 16 meters. Dispenses up to 1 liter of water per double stroke of the handle. The rod pump itself dives to a depth of 16 meters and pushes out the liquid. Weight is 127 kg with dimensions - 17560x230x1430 mm. | 27.6 thousand rubles or more. |
Here are several common options for hand pumps that will fully satisfy the water needs of your dacha.
What to look for when choosing
If there is an urgent need for a hand pump, then you should know how to correctly choose the optimal model.
- First of all, the parameters of the well (depth of the aquifer) and the parameters of the pumps offered for sale are compared. As already mentioned, most hand-held models are capable of working with sources located on the forehead at least 6 ÷ 8, rarely 10 meters. If the burial is deeper, then there is no alternative: you will have to install only a sucker rod pump.
- It is important to know the performance of the pump - how much water it is capable of pumping per cycle (or per unit of time - a minute, under intense load))
- The next parameter of the planned (or existing) well - the diameter of the casing pipe, also affects the choice of pump. If the pipe has a nominal bore of 4 inches (100 mm) or more, there are no problems, and you can purchase any pump. But in the case when the casing is narrower, the rod pump may no longer be suitable - it will simply be impossible to lower its working pump assembly into the water column.
- It is necessary to know the degree of contamination of the water from the well - usually the pump's specifications indicate the permissible level with which the equipment is capable of operating.
- It would probably be worthwhile to evaluate the ease of working with the pump. It is necessary to keep in mind that among the users there may be people of advanced age or children - will their efforts be enough to collect at least a small volume of water.
- It is necessary to think about how the pump will be installed - what mounting platforms or mounting holes, brackets or lugs, etc., are available for a particular model. It is also important to know the weight of the purchased device in order to foresee possible ways of installing it in advance - whether it will be a metal welded frame, a concreted platform, a flange connection to a casing pipe coming out of the ground, a wall mount, or just some lightweight option for seasonal use.
- Based on the expected operating conditions, you can determine the design features of the product. So, for installation only in the summer, you can purchase a lightweight plastic version. If a permanent installation is intended, then the choice is made in favor of cast iron or stainless steel. In addition, for temporary use you should purchase a model that is easy to quickly install and dismantle on your own.
- Finally, for many owners, the determining factor is also the external decorativeness of the pump - this has already been mentioned in the article. Of course, purchasing a pump that can decorate a site will entail much more serious financial costs.
The value of the pressure created by the pump is very often not assessed - such devices, as a rule, are not designed for pumping water through external pipelines. Water from them is most often collected into placed containers.
Manufacturing and arrangement of an Abyssinian well (well) for a hand pump
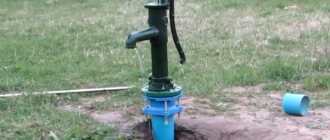
The hand pump is ideal for installing it on an Abyssinian well
For a hand pump, the ideal solution would be to make an Abyssinian well or borehole. Typically, such wells reach a depth of up to 9 meters. Based on these parameters, most of these devices were developed. At this depth there is usually a good aquifer, which makes it possible to provide a suburban area with drinking water. Moreover, this can be used for construction work.
If you watch a video about making an Abyssinian well, you will immediately notice that it is possible to make it yourself, however, there is a possibility that you will not cope with the task. And the reason for this will not be that you are a bad master, you may simply not be able to find water or other problems will arise. You can verify this by watching a video where all the rules of work were followed, but home craftsmen failed.
Video: making an Abyssinian well using the driving method - a bad experience
As can be seen from the video, all the details of the work were observed, but as a result, it was not possible to clog the pipe; it broke off. Although it is also possible that there simply was not enough experience in performing these works. Moreover, part of the pipe remained in the soil. With this in mind, it is worth considering everything carefully and weighing the pros and cons.
The Abyssinian well is made using the drilling method
An important condition for making an Abyssinian well is the composition of the soil. It should be predominantly sandy or consist of a mixture of crushed stone and sand. If your soil is rocky, then you won’t be able to get deeper on your own, unless you make a drilling rig yourself. However, not everyone can do this. Therefore, in most cases, experts are called to help. If the soil is predominantly sandy, then the work of making and equipping the Abyssinian well can be done with your own hands. Therefore, next we will tell you about driving technology, because the drilling rig is mainly used by specialists. You can watch prepared videos on this topic.
Video: what is an Abyssinian well and how to make it
Advantages of the Abyssinian well
To begin with, let’s present a real picture of what advantages such a well has compared to analogues:
| Benefits of the Abyssinian well | |
| Economical | Today, the cost of making a well will cost you a little more than 20 thousand rubles. At the same time, you will not need to rent a large amount of equipment. Usually specialists come in their own car and bring all the equipment in a small volume. If you decide to make a well yourself, then in general, assembling and preparing the necessary equipment will not cost you as much, unless you decide to make a homemade drilling rig. If the driving method is chosen, then it will take about 10 thousand rubles to purchase the necessary equipment. Although you will have to put in a lot of effort, the result will not leave you indifferent. |
| Fast and simple | There is absolutely no need to construct a tripod and a drilling rig. On the territory of the Russian Federation, the aquifer lies at a depth of 2 to 15 meters. If the soil is predominantly sandy, it can be done by two strong men in one day (in some cases in a few hours). Moreover, if the drill gets stuck or hits a stone, it is easy to remove it yourself. But there are also bad experiences when the pipe may break (you could watch this in the video above in the article). |
| Environmental friendliness | If your home is located far from the city, then it is quite possible to find good water at such a depth that will be quite suitable for drinking. At the same time, its quality will not be inferior to water located in deeper aquifers. |
| Duration of operation | If all manufacturing conditions are met, the service life can be about 30 years, provided that the water does not run out. Therefore, the duration depends on the debit of the source. |
| Lack of obtaining permits | This is perhaps the main advantage of the Abyssinian well. You do not need to obtain permission to manufacture it. Permits are required for an artesian well, but not for an Abyssinian well. |
Conducting geological research
Water levels may vary in different areas
The first step is to study the geology of your area. If neighbors live next to you, then you can ask them what the condition of the soil is and at what depth the water lies. There will be no problems if the aquifer lies at a depth of no more than 9 meters. If the depth is greater, then using a hand pump is problematic.
The aquifer predominantly consists of medium-grained sand or sand with fine crushed stone. It is through such soil that water will flow well. Now it is important to determine which method is best for driving or drilling.
Which drilling method is better: drilling or driving?
The diagram shows how to drill an Abyssinian well using the driving method
If you decide to make a well yourself, then a driven well is a suitable option. For this purpose, a “hammering woman” is used. However, there is always the possibility of passing by the aquifer. And if a stone is encountered at depth, the entire structure can be damaged.
If you choose a drilling method, then it is better to contact specialists. In this case, you have a great chance of getting an Abyssinian well with water. You can watch videos demonstrating this method.
Video: well drilling technology
We also invite you to familiarize yourself with the technology of making a well using the driving method. Thanks to this, you can compare all labor costs.
Video: making a well using the driving method
What is needed to make an Abyssinian well
Needle for drilling an Abyssinian well
First of all, you should prepare all the necessary material and equipment. The main equipment is presented in the table:
| Equipment | Purpose |
| Needle | A needle means a steel cone or point. You can make the tip yourself on a lathe or order it from a craftsman. The diameter of the needle should be 20 mm larger than the diameter of the pipe being installed. Length not less than 200 and more than 300 mm. The needle is soldered to the pipe or screwed into the thread. If you decide to solder it, then you cannot use lead (you can poison the water). For solder you should use tin. |
| Filter | It keeps sand out of the clean water pipe. A filter in the form of a pipe is placed at the very bottom of the well. You can do it yourself, you will learn about this further. |
| Sections (pipeline) | They are connected to each other by thread using a coupling. But it is important that the connection is tight. For ease of operation, one section of the pipe should have a length of no more than 1 meter. |
| Pump | After making the well, a hand pump is installed. If funds allow, you can install an electric one. |
Making a filter for water purification
For production you will need a pipe 110 cm long and 1 inch in diameter. A needle can be soldered or welded to one end of the pipe. Alternatively, you can cut the pipe and flatten the end. It is necessary to make holes Ø13 mm in the pipe in 50 cm increments in a checkerboard pattern.
First, holes are drilled in the pipe
Next, a metal filter mesh is applied and tightened with clamps every 10 cm. For this, you can use stainless or galvanized wire Ø3 mm.
Then a stainless filter mesh and wire are put on
Finally, the wire is fixed into the pipe with a self-tapping screw. You can see this in the picture below:
The end of the wire is fixed with a self-tapping screw
This is how you can make a homemade filter. Of course, if you have the time and materials for it.