Looking at the compact and simple in design Malyutka washing machine, it is difficult to believe that there is a very powerful engine inside it. The manufacturer managed to equip it with a rather large motor, which even had to be placed in a separate housing. But large size is not its only feature. This motor is also known for its highest reliability, as it can serve for many years without accidents. We invite you to take a closer look at the characteristics of the Malyutka washing machine engine and evaluate its advantages and potential.
What can an engine from an old washing machine look like?
If you are planning to make homemade products from a used engine, you need to figure out what it is and what it is capable of. In washing machines you can find three types of motors: asynchronous, brushless and commutated. Let's take a closer look at them:
- Asynchronous - can be two-phase or three-phase. Two-phase engines are found in older Soviet-made models. More modern machines are equipped with three-phase. The design of such an engine is extremely simple; it can reach speeds of up to 2800 rpm. The working engine removed from the machine just needs to be lubricated - and it is ready for new exploits.
Such motors are characterized by quiet operation. Their only drawback is their impressive dimensions.
- Commutator – you will find this type of motor in the design of most household appliances. Such devices can operate from direct and alternating current, have compact dimensions and a controlled speed. The only drawback of such an engine is the brushes that wear out, but these parts can be replaced if necessary.
It must be admitted that, in comparison with an asynchronous motor, such a motor is noisier. In addition, it often overheats and even sparks
- Brushless direct drive is the most modern motor from the Korean manufacturer. You will find it in modern washing machines from LG and Samsung.
Such models are the most compact. They are characterized by wear resistance, simplicity of design and high efficiency.
Now that you can determine the type of motor, all that remains is to decide where you can use the motor from the washing machine.
Functionality check
In order to check the correctness of the assembled circuit, you need to turn on the electric motor and let it run first for one minute, and then for about 15. If the engine is hot, then the reasons may be:
- Worn, dirty or jammed bearings.
- Large capacitor capacity. turn it off and start the engine by hand; if it stops heating, reduce the capacitor capacity.
An error has occurred; The tape may not be available. Please try again later.
A single-phase motor can be commutator or squirrel-cage. With a commutator motor, everything is quite simple: the two wires coming out of the motor housing are plugged into a socket - the connection is made. You will have to tinker with connecting a single-phase motor with a squirrel-cage rotor. It's all about defining the conclusions. In parallel with the working winding (RO) in a single-phase motor, a starting winding (WW) is connected to create at least some kind of rotating magnetic field. A single-phase motor with four terminals has a permanently connected SW. It operates in tandem with the main one, without turning off, only the connection is made through a phase shift capacitor (Fig.a). The connection diagram for such a single-phase motor is very convenient, since all the wires are easily accessible, they can be swapped using a switch to perform reverse (Fig. a1). They can be determined without much difficulty: call with an ohmmeter and find the ringing pairs. For example, an ohmmeter determined a closed circuit of the first terminal with the second, and of the third with the fourth. This means that 1 and 2 are one winding, 3 and 4 are another. We connect the fourth wire to the second (or the first to the third, it doesn’t matter) - this is common. The beginning and the end don't matter. Next, all connections according to figure a or a1. A motor with three wires coming out is a little more difficult to deal with. In such cases, the software is connected for a short time: the engine has spun up, and it turns off, otherwise it will burn out. How does this kind of switching happen? For this purpose, a starting-protective relay was invented. Its function is not only to connect the software, but also to create its optimal shutdown time. During startup, a large current passes through the electromagnetic coil. At this moment, its core is retracted and acts on the contact that controls the software (Fig. 1 and 2). After starting, the current drops, the core is released, the starting circuit is broken. If there is an interturn short circuit in the working winding, the current is constantly high, the software remains in operation, and the engine smokes. For protection, a thermal relay with a bimetallic plate is installed, which disconnects the X3 from the network. If the engine turns on and off for a short time, then the thermal protection is triggered. The reason is either an interturn short circuit or low (high) network voltage
Pay attention to the strange, at first glance, Figure 3. This is the cover from the protective device, which shows the marking of the wires connected to it and an arrow.
Everything is clear with the markings - do not confuse the ends when connecting. But the arrow indicates the position of the relay in space. it should always face up. While still a novice electrician, I repaired a washing machine. Turned it upside down. It turned out that all I needed to do was replace the belt. I replaced it, tried to turn it on - it started working... and started smoking, the engine burned out. After some time, I learned that on an inverted relay, the contact remains closed, whereas in the normal position, under the force of gravity, after the coil is turned off, it falls down. And I just ended up at the bottom in an overturned car. To test turn it on, you just had to turn the device over so that the arrow would point upward again. How to connect a single-phase motor with unknown three wires. The resistance of the PO (X1-X3) is several times greater than the resistance of the RO (X2-X3). X3 comes out from the junction of PO and PO (see Fig. b). First, let's mark the wires so as not to get confused (the same X1, X2 and X3). We measure the resistance, for example, between X1 and X2, it turns out, say, 60 Ohms. We measured X1-X3 - 45 Ohms. Between X2 and X3 there are only 15. They wrote it all down. We look at the largest (60) - the total of all windings. 15 - working winding, 45 - starting winding. We find the wiring with which the other two show 15 and 45 Ohms. This will be our X3. You can open the engine cover and visually determine the software: it is wound with a thinner section. That's probably all!
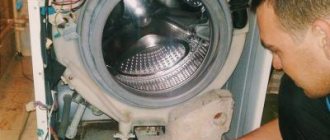
We properly disassemble and decide what can be made from parts of an old washing machine
Disassembling a washing machine is a leisurely task. After working with water, a salt build-up may remain on the parts; it must be carefully removed so as not to damage the parts during removal. What can be made from an old washing machine? A motor will be useful for homemade projects - it will become the basis for many devices. The drum will also come into play. It is usually made of stainless steel. All pipes must be disconnected from the drum. A loading hatch may also be useful. In addition to these parts, do not rush to throw away springs, counterweights and body parts.
For those who are versed in electronics, you may need a circuit board - it can easily be used to find spare parts for repair work if necessary.
Engine power and energy consumption
People are often concerned about how many kilowatts the machine will “eat” on average per wash cycle. Many people want the machine to be as economical as possible. In general, the energy consumption of washing equipment depends on many factors:
- motor power - and the amount of electricity consumed by the engine will change, depending on the running washing program;
- technical characteristics of the heating element. The amount of “consumed” kilowatts is also affected by the power of the tubular heater (it varies from 1700 to 2900 W) and the set washing temperature;
- drain pump power, this figure can range from 24 to 40 W;
- total power of indicators, sensors, electronic module and other elements. In general, the figure reaches 5-10 watts.
The energy consumption of a washing machine depends on the power of its motor, pump, heating element and system sensors.
So what indicator should the buyer focus on? On what basis is a washing machine assigned an energy efficiency class? The manufacturer indicates in the technical specifications the energy consumption of the automatic machine when the “Cotton” program is activated. This mode assumes full drum loading and “medium” water heating – up to 60 °C
How to make a sharpener or grinding device from a washing machine engine
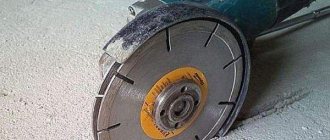
A sharpener is one of the most popular tools for the home. It can be used to sharpen garden tools, household knives and scissors. If you don’t already have one, buy it at any tool store or make a sharpening machine from a washing machine. The most difficult part is how to attach the sanding wheel to the motor. The easiest way is to buy a ready-made flange. It looks something like this.
Flange for motor
You can machine a flange from a metal pipe of a suitable diameter; most often, a tube with a cross-section of 32 mm is suitable. You need to cut a piece 15 centimeters long from it, this is quite enough to fix the emery. The flange is secured to the motor shaft by welding or a through bolt. The video describes in detail how a homemade washing machine sharpener works:
Making a wood lathe from a washing machine
What else can you do with the washing machine motor? One popular idea is a wood lathe. Let's look at the step-by-step process.
| Illustration | Description of action |
| To firmly fix the engine on the workbench, make fasteners from a metal angle. To do this, drill holes for fixing to the motor legs and table. | |
| To fasten a wooden part, you will need a flange fixed to the motor shaft, and these are the studs made from ordinary bolts with cut off heads. Screw these pins into the base. You will need 3 studs. | |
| The motor is fixed to the table with self-tapping screws and to the metal part with bolts. | |
| The opposite end of the wooden part is attached with such a device. It consists of a screw with a loop, two wooden stands perpendicularly fixed to the corners. | |
| This wooden part must be movable so that different workpieces can be used. For mobility, it is mounted on a threaded stud with bolts. | |
| To control the motor you will need a power supply. You can use one of the computer units. You will need to install switches to adjust the rotation speed. | |
| How to connect a motor to a power supply in animation. | |
| To guide your tools, make a tool rest. It consists of two wooden parts and a metal corner. All parts are movable due to fastening with one bolt. | |
| The lower part of the tool rest is rigidly fixed on the workbench using self-tapping screws and corners. | |
| The workpiece is fixed on the machine on both sides: on the left - on studs, on the right - on a bolt with a handle. To fix it in the workpiece, you need to drill the corresponding holes. | |
| To work, you will need sharpened tools - cutters. | |
| Final sanding of the workpiece is done using a strip of sandpaper. |
Schemes for connecting the electric motor to the power supply
Almost every day we are faced with the same question from our customers: “how to connect an electric motor to the power supply?”
The easiest and most reliable way is to contact a proper electrician and do not skimp on this, because... Often, in an attempt to save money, they invite “Uncle Vasya” or other sympathetic “specialists” who are nearby, but in fact have little understanding of what is happening. At best, these “pros” call and ask if I’m connecting correctly. There is still a chance not to burn the engine. The qualifications of an “electrician” immediately become clear when they ask such questions that you can simply fall into a stupor (since this is exactly what electricians are taught).
For example: - why are there six contacts in the engine? — why are there only three contacts? - What are “star” and “triangle”? — why, when I connect a three-phase pump and install a float switch that breaks one phase, the engine does not stop? — how to measure the current in the windings? — what is a starter? and so on.
If your electrician asks such questions, then you need to send him back to where he came from. Otherwise, everything will end with a burnt out electric motor, loss of money, time, and expensive repairs. Let's try to understand the diagrams for connecting an electric motor to the power supply. First you need to understand that there are several popular types of AC networks:
1. Single-phase network 220V, 2. Three-phase network 220V (usually used on ships), 3. Three-phase network 220V/380V, 4. Three-phase network 380V/660V. There are also voltages of 6000V and some other rare ones, but we will not consider them.
In a three-phase network there are usually 4 wires (3 phases and zero). There may also be a separate ground wire. But there are also ones without a neutral wire.
How to determine the voltage in your network? Very simple. To do this, you need to measure the voltage between phases and between zero and phase.
In 220/380 V networks, the voltage between phases (U1, U2 and U3) will be equal to 380 V, and the voltage between zero and phase (U4, U5 and U6) will be equal to 220 V. In 380/660 V networks, the voltage between any phases (U1 , U2 and U3) will be equal to 660V, and the voltage between zero and phase (U4, U5 and U6) will be equal to 380V.
How to make a simple feather removal machine for home use from a washing machine with your own hands
The time of slaughtering a bird is a troublesome stage. This is usually done in the fall, when the ducks and broilers have reached the desired weight, and it is no longer profitable to keep them in the winter. You need to pluck several dozen or even hundreds of carcasses very quickly. You can get rid of hard labor with the help of a feather removal machine, and it’s easy to do everything from the same parts of the washing machine.
The only thing that can cause difficulties is the search for rubber fingers with threads - beaters. You will have to order them, so keep in mind that you need to think about making the machine long before slaughter
The device does not require disassembling the washing machine. It is especially convenient to use machines with vertical loading. You just need to fix the beats in the drum so that they point inward. Before plucking, the chicken carcass must be scalded with boiling water and then simply thrown into a rotating drum. Here's what happens:
Important! To prevent water from getting on the engine of the feather removal machine, you need to protect it with a plastic casing.
And the last point - the feather removal device must be firmly fixed, since the vibration when loading the carcass will be very strong.
How to connect via capacitors
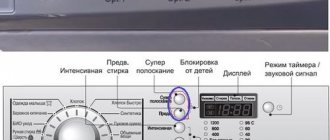
First, decide which circuit is assembled on the ED. To do this, open the bar cover where the blood pressure terminals are output, and see how many wires come out of the device (most often there are six).
The designations are as follows: C1-C3 are the beginnings of the winding, and C4-C6 are its ends. If the beginnings or ends of the windings are combined with each other, this is a “star”.
The most difficult situation is if six wires simply come out of the housing. In this case, you need to look for the corresponding designations on them (C1-C6).
To implement a scheme for connecting a three-phase electric motor to a single-phase network, two types of capacitors are required - starting and working.
The first ones are used to start the electric motor at the first moment. As soon as the rotor spins to the required number of revolutions, the starting capacitance is excluded from the circuit.
If this does not happen, there may be serious consequences, including engine damage.
The main function is performed by working capacitors. Here it is worth considering the following points:
- Working capacitors are connected in parallel;
- The rated voltage must be at least 300 Volts;
- The capacity of the working capacitors is selected taking into account 7 µF per 100 W;
- It is desirable that the type of working and starting capacitor be identical. Popular options are MBGP, MPGO, KBP and others.
If you take these rules into account, you can extend the life of the capacitors and the electric motor as a whole.
Capacity calculations must be made taking into account the rated power of the electric motor. If the motor is underloaded, overheating is inevitable, and then the capacity of the working capacitor will have to be reduced.
If you choose a capacitor with a capacitance less than acceptable, the efficiency of the electric motor will be low.
Remember that even after the circuit is turned off, the voltage remains on the capacitors, so it is worth discharging the device before starting work.
Also note that connecting an electric motor with a power of 3 kW or more to conventional wiring is prohibited, as this can lead to the machines turning off or the plugs burning out. In addition, there is a high risk of insulation melting.
To connect ED 380 to 220V using capacitors, proceed as follows:
- Connect the containers to each other (as mentioned above, the connection should be parallel).
- Connect the parts with two wires to the electric motor and a single-phase alternating voltage source.
- Turn on the engine. This is done in order to check the direction of rotation of the device. If the rotor moves in the desired direction, no additional manipulations are needed. Otherwise, the wires connected to the winding should be swapped.
With a capacitor, an additional simplified one is for a star circuit.
With a capacitor, an additional simplified one is for a triangle circuit.
Lawnmower from a used motor
We continue to look for the answer to the question of where we can use the motor from an automatic washing machine. Another original idea is making a lawn mower. For a small area, an electric model connected to a power source with a cord is quite sufficient. The design of such a unit is very simple. You will need to make a platform on four wheels with a small diameter.
The platform can be made of metal or OSB board, plywood and even the body of the same washing machine
The engine is fixed on top of the platform, the shaft is threaded into the hole below, and the knife is attached to it. All that remains is to attach handles and a lever to the cart to turn the power on and off. If you have an asynchronous motor lying around, you will be surprised at how quiet the unit will be, even compared to factory models.
Advice! To prevent grass from wrapping around the knives, you need to slightly bend their cutting edges down.
Video: how to make a lawn mower
How to build a generator from an old washing machine
We continue to look at homemade products from a washing machine motor, and the turn has come to the generator. You won't be able to assemble a powerful device, but in the event of an emergency shutdown, you can be well prepared. To turn the engine into a generator, you will have to disassemble it and partially cut off the core. In the remaining part of the core you need to make grooves for neodymium magnets.
The magnets must be placed in two rows with the same spacing
The gaps between the magnets are filled by cold welding. To operate the device, the kit must include a motorcycle battery, a rectifier and a charge controller. Details of the work in the video:
Homemade concrete mixer
If you have started a small renovation that requires, for example, plastering the walls, a concrete mixer will come in handy. Once again, washing machine parts will come in handy.
As a result, you will receive a compact device with low power, which you won’t mind throwing away after the repair work is completed.
As a container for concrete, you can use the same drum with pre-sealed holes for draining water. It is best to use parts from a front-loading machine; there will be almost nothing to redo. To strengthen the body, use a metal corner, and for convenient movement of the concrete mixer, equip it with wheels. The main difficulty in the design is the manufacture of a “swing” for the correct tilt and subsequent pouring of concrete. How to do it correctly in the video:
How much does SMA consume?
When choosing a washing machine, buyers evaluate it according to a standard set of criteria. Usually they are interested in modes, drum loading, dimensions, loading type, drum illumination and other visible functions. But people are rarely interested in kilowatts. The lower the energy consumption class, the more electricity is spent, the higher the electricity bills. Today, almost all SMAs belong to group A. The exception is devices with a drying function - but here you have to sacrifice savings for the opportunity to receive dry laundry.
Energy consumption can be easily determined by the energy efficiency class. Thus, models A+++ consume 0.13 kWh, and, for example, group C - 0.25 kWh. Power consumption of class A SMA is up to 0.31 kWh. Equipment of groups E, F and G is not used in everyday life. Its consumption is respectively 0.39 and 0.4 kWh.
Homemade products from a washing machine engine: circular saw
You will be surprised, but a circular machine can also be built based on the motor from a washing machine. An important point in this matter is the additional equipment of the motor with a device that regulates speed. Without this additional module, the circular machine will work unevenly and simply will not cope with the task. Device assembly diagram:
Circular saw diagram
The principle of operation of the device is simple: the engine drives a shaft on which a small pulley is mounted. From the small pulley there is a drive belt to a large pulley with a circular saw.
Important! When working with a homemade circular saw, take care of your hands. All structural parts must be firmly fixed.
The resulting unit will not be very powerful, so it can only be used for cutting boards up to 5 cm thick. How this homemade circular saw works:
Frequency regulation
Just recently (10 years ago), there were a limited number of frequency controllers for motor speeds on the market, and they were quite expensive. The reason was that there were no cheap high-voltage power transistors and modules.
But developments in the field of solid-state electronics have made it possible to bring power IGBT modules to the market. As a result, there is a massive appearance on the market of inverter air conditioners, welding inverters, and frequency converters.
At the moment, frequency conversion is the main way to regulate the power, performance, speed of all devices and mechanisms driven by an electric motor.
However, frequency converters are designed to control three-phase electric motors.
Single-phase motors can be controlled by:
- specialized single-phase inverters
- three-phase inverters with the exception of the capacitor
Converters for single-phase motors
Currently, only one manufacturer announces serial production of a specialized inverter for capacitor motors - INVERTEK DRIVES.
Optidrive E2 model
For stable engine starting and operation, special algorithms are used.
In this case, frequency adjustment is possible upward, but in a limited frequency range, this is prevented by a capacitor installed in the phase-shifting winding circuit, since its resistance directly depends on the frequency of the current:
f – current frequency
C – capacitance of the capacitor
The output stage uses a bridge circuit with four output IGBT transistors:
Optidrive E2 allows you to control the motor without removing the capacitor from the circuit, that is, without changing the motor design - in some models this is quite difficult to do.
Advantages of a specialized frequency converter:
- intelligent motor control
- Stably stable engine operation
- Huge capabilities of modern inverters:
- the ability to control the operation of the engine to maintain certain characteristics (water pressure, air flow, speed under changing load)
- numerous protections (motor and device itself)
- sensor inputs (digital and analogue)
- various outputs
- communication interface (for control, monitoring)
- preset speeds
- PID controller
Disadvantages of using a single-phase inverter:
What else can be made from a washing machine drum: original decor ideas
The drum with its correct perforation is a material for the manufacture of decorative objects. Here are some interesting ideas.
Ottoman with drum base. It’s easy to do – you just need to attach the wheeled legs and make a soft seat
Such a drum can also be turned into an original lamp. If you place a lamp inside, the perforated surface of the drum will cast glare on the walls. Such lamps will look good on the ceiling of the veranda or even on the floor
Bedside tables and tables. Drums with doors from top-loading machines can be used to hide small items.
This is how the drum turns into a cabinet or nightstand
Making a barbecue from a drum from a washing machine, photo examples
A metal grill is a temporary product. Sooner or later it burns out and requires replacement. You can buy a new one each time or use improvised material, for example, a drum from a washing machine. Making this craft from a washing machine drum takes a couple of minutes. The beauty is that oxygen easily enters the perforated container, which causes active combustion.
Kebab coals burn quickly, and the process of cooking meat is significantly accelerated
The metal of the drum can withstand a couple of seasons. Make a comfortable stand for it so you don’t have to bend over, and you’re done. Standard length skewers will fit comfortably on a small roasting pan. If necessary, you can lightly weld a couple of guides.