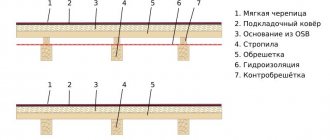
These characteristics have a very negative impact on the structure of the walls, and, consequently, on the strength of the entire wooden house.
The condition of the tree is negatively affected not only by external atmospheric moisture, but also by internal moisture generated as a result of human activity.
According to calculations, during the residence of one average family of 4 people, up to 200 liters of water vapor are generated in the house per year. Wood walls absorb this moisture, which leads to changes in structure, shape and volume, causing cracks to form on them.
These changes also have a negative impact on the condition of the interior and exterior of the house, ceilings, windows and doors. In order to protect a wooden building and all its structures from deformation and subsequent destruction caused by the accumulation of moisture in the internal structure of the material, hydro- and vapor barrier films of the walls are installed. This process occurs in conjunction with the thermal protection of wooden walls.
Functions of vapor barrier films
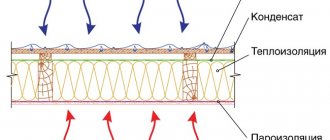
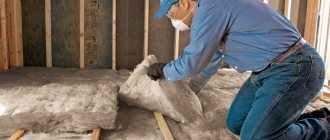
Without understanding the purpose and characteristics of vapor barrier materials, finding the right answers will be difficult, so first you need to understand the tasks that these films perform. For example, mineral wool thermal insulation materials (plates, rolls) are very popular, but they have a huge drawback. These insulation materials are hygroscopic: they are able to absorb water vapor accumulating in the air. But they perform their work efficiently only in a dry state. Damp mineral wool cannot maintain its stated thermal conductivity.
Inside the walls, where cold air from the street and warm air from the room meet, water vapor begins to condense. If such a “dew point” is located inside the thermal insulation layer, then the material inevitably gets wet. The result is the loss of its protective properties, its deformation and shrinkage. Even after partially drying, mineral insulation is no longer able to do its job well: thermal conductivity increases in the area where it gets wet.
Vapor barrier prevents moisture insulation material, as well as elements of the roof, floor and walls. Thanks to this protective layer:
- Comfortable conditions are provided inside the room - optimal humidity;
- there is no danger of the appearance or growth of black mold colonies;
- heating and air conditioning costs are significantly reduced.
For brick, gas and foam concrete walls, vapor barrier is no less important. These membranes allow the dew point to be moved beyond or to the edge of the insulating layer. This protection ensures the strength of structures for a long time.
When it is necessary to protect the room from steam and moisture penetration
Floor vapor barrier is not always necessary.
Insulation absorbs moisture only when there is a temperature difference, which is observed on the external walls. Moisture condenses inside the heat insulator and turns into droplets of water, which have a destructive effect on the building material. If this does not happen, then it is not necessary to use a protective layer. In warm, damp houses (for example, in bathhouses, heated basements), a vapor barrier must be created. After all, in such buildings warm air with drops of water circulates, which comes out through the ceiling and walls. This leads to the appearance of fungus and mold and destruction of the structure.
Multilayer structures must also include a layer that is resistant to steam. Ventilated external walls and facades require wind protection. It is provided by an anti-condensation coating, which protects the outer insulation from overload and softens the air flow. An example is a brick building, insulated from the outside with mineral wool and covered with siding. The created barrier prevents the building from being blown through. At the same time, excess moisture is removed from the surface of the windproof layer. Read about proper ceiling vapor barrier here.
Installation of a vapor barrier
Installation of vapor barrier material is an important stage of work when insulating building structures, determining their ability to retain heat and provide protection against moisture penetration into the insulation.
A vapor barrier is installed during the construction of a building (structure) before finishing the premises or installing the roofing, as well as when performing repair work on these structural elements.
Performing this work requires knowledge of the installation features of a vapor barrier.
They can be divided into several stages: preparatory, execution of work and final.
Preparatory stage
During this period of work, the material that will be used as a vapor barrier is selected and purchased, and the selection criteria will be:
- place of use, installation (facade of the building, interior, etc.);
- requirements for technical characteristics (ability to pass evaporation);
- operational indicators;
- the possibility (features) of installation on a particular building structure.
Initially, prepare the surface on which the vapor barrier will be mounted. These works depend on the material from which the base is made and the location where they are carried out.
Wooden structures are treated with antiseptic solutions and fire-fighting substances, and brick and concrete are treated with deep penetration primers to prevent the appearance of microorganisms (fungus, mold, etc.).
Execution of work
At this stage, the installation of a vapor barrier is carried out on a selected area of building structures, while the installation is carried out on different elements of the building (ceiling, wall, rafters, etc.) made of different materials (metal, wood, concrete, etc.) differently.
Ceiling mount
The installation of a vapor barrier layer on the ceiling is required when performing work on insulating rooms on the upper floors of a building that have a cold attic, when insulating the roof of buildings that do not have an attic, when insulating basements, as well as the ceiling in a bathhouse.
For these purposes, films of various types, as well as pseudo-diffusion membranes, are used.
The film (membrane) must be solid to cover the entire required area. If this is not possible, installation is carried out with an overlap of 10.0 - 20.0 cm.
Attaching the vapor barrier membrane to the ceiling
The joints are taped on both sides with construction tape or special tape to prevent the possibility of moisture penetration.
When using foil film, the strips are laid end-to-end, without overlapping. The joints are taped with aluminum tape.
When installing on a wooden surface, use a construction stapler or nails with a large head.
Vapor barrier can be attached to wooden surfaces with a stapler
The vapor barrier layer should extend onto the walls and there should be no gaps in the corners. If possible, the joints of the strips of the material used (film, membrane) should be located on the rafters or elements of the ceiling frame, which will allow the vapor barrier to be securely fastened and prevent the connecting tape (adhesive tape) from peeling off. The canvas should not sag, but be taut.
Ceiling covered with vapor barrier film
Floor fixing
When performing floor insulation work, the vapor barrier is laid after the waterproofing is done and the insulation is laid.
The film (membrane) must be solid or overlapped to prevent water vapor from penetrating into the insulation layer.
The vapor barrier should lie on the walls, and between it and the insulation layer there should be an air gap of 45.0 - 50.0 mm.
Wall mount
When installing a vapor barrier to a wall indoors, galvanized nails with large heads or staples are used to secure it.
Fastening is carried out directly to the surface of the wall, if it is a wooden structure, or to a wooden sheathing mounted on a wall made of concrete or brick.
When performing facade work, the vapor barrier layer is mounted on the frame for fastening the facade finishing elements.
During this period, excess film (membrane) that interferes with the finishing of the insulated room (corners, excessive overlap on the wall, etc.) is removed. The fastening of the installed vapor barrier is checked.
Adhesive tapes
For the convenience of laying any vapor barrier materials and protecting joints from moisture penetration, construction experts recommend using adhesive tapes. Tapes are used to glue horizontal and vertical overlaps and are used to connect vapor barrier materials to adjacent structural elements, as well as to connect vapor barrier materials to each other. To install vapor barriers, it is recommended to use Izospan adhesive tapes of several types: Izospan KL, Izospan KL+ and Izospan ML proff.
Installation
In order to properly install a vapor barrier, you must first know what the house is like. It can be frame or made of timber. The fact is that laying material indoors and outdoors is not the same thing. Laying will be done differently.
- If we talk about external vapor barrier, then it is necessary to protect the house from the effects of cold wind; you should use a layer that will perform this function. Waterproofing is only needed when the building is old and needs to be protected from moisture.
- If a layer of waterproofing is laid inside the walls, then you should know that when water evaporates on the surface of the material, it must go somewhere. That is, the connection to the insulation should not be too tight - a small gap should be left.
- If the house is made of cylindrical timber, then there is already a gap for drainage, since the timber has a natural rounding. In this case, the membrane must be attached directly to the logs using a stapler. Afterwards it is necessary to make the lathing and install the internal finishing material.
If the vapor barrier is carried out from the outside, then in this case the film should, as it were, lie under the sheathing layer and adhere well to the insulation. At the same time, there should also be a place for condensate to accumulate and drain. In this case, the technology will be as follows:
- if the log is round, then the vapor barrier will be secured using a construction stapler;
- all joint surfaces must be glued using construction tape;
- if the house is frame or made of rectangular timber, the membrane must be placed on the counter-lattice in the same way as it was done from the inside;
- the film is nailed with wooden slats at the same intervals as the counter-lattice posts.
You should pay attention to another option for installing a vapor barrier, which is universal. This method will be used when mineral materials are used as a heat insulator.
This process consists of the following steps:
The vapor barrier film must be positioned on the side that is needed, and then carefully and efficiently fasten it to the sheathing. Damage to the film in this process is unacceptable; after this, you should glue any possible cracks, as well as places where there are punctures or overlaps; a sheathing should be made using beams to form good ventilation; Drywall, wall panels or necessary finishing materials should be placed on the structure.
It is necessary to figure out when it is really possible to simply insulate the walls with polyethylene film, and when better protection is needed. In this case, there are two options.
- If polystyrene foam, polyurethane foam or something similar is used as insulation, then there is no need to install a film to protect them, since it is not typical for them to absorb moisture. But if the house is insulated with ecowool or mineral wool, or with a material such as sawdust, then a membrane should definitely be used, since wool that has become damp will definitely become rotten in just 1-2 years.
- If the house is old and made of a wooden frame or a bulk structure, then a moisture retention layer will be necessary in any case to protect the wood itself.
Roof insulation
Vapor barrier and roof insulation are reminiscent of those procedures for the internal partitions of a frame house, but there are certain differences.
Waterproofing is installed along the rafters, on which the sheathing is mounted. Subsequently, the roofing material is attached to it. The space between the rafters is used for installing insulation in the form of slabs.
It is necessary to create a gap between the insulation and waterproofing to allow moisture to escape and ventilate the structure. It is very important to ensure that the waterproofing layer is sealed. When thermal insulation comes into contact with moisture, it loses its beneficial properties.
The inside of the rafters must be lined with a vapor barrier. A sheathing is mounted on top of it, onto which finishing materials are attached. When the attic is properly insulated and there is a vapor barrier, you can install heating there. This will allow you to use it as a full-fledged living space.
So, the best vapor barrier for the entire frame house is achieved thanks to high-quality installed and correctly selected material. Then the membrane will fulfill its purpose - to prevent moisture from coming into contact with the insulation, and, if necessary, remove liquid from the “pie” of walls, floors and ceilings.
Vapor barrier and waterproofing: what is the difference
As you know, water molecules are larger than steam molecules, so not every material that does not allow water to pass through does not allow steam to pass through. That is, not every waterproofing material retains water vapor, so waterproofing materials are divided into two groups:
- Vapor permeable waterproofing. This is precisely waterproofing, which retains only water without interfering with the passage of steam.
- Vapor barrier or vapor barrier. Water does not pass through these materials in any form.
Differences between vapor barrier and waterproofing
Once again: vapor-permeable waterproofing conducts steam, but does not conduct water. The vapor barrier/vapor barrier does not conduct either steam or water. As you can see, they work differently, so they have different areas of application.
An example of the use of vapor barrier and waterproofing in a floor structure along joists
Let's give an example. Vapor-permeable waterproofing is used in floor construction along joists with mineral wool insulation. It is hemmed from the bottom and prevents water from penetrating into the thermal insulation, but does not prevent steam from escaping from the mineral wool. This allows you to maintain the insulation in normal condition.
In the same case, the vapor barrier is placed on top of the insulation - on the room side. In this case, it protects the insulation from both steam penetration and water penetration. How does the whole structure work? The vapor barrier does not allow water to pass through, which can be spilled on the floor in the room, and it does not allow steam to pass from the room into the insulation. But, all the same, some part of the steam gets inside the insulation through imperfect joints and other defects. Due to the fact that the bottom of the insulation is lined with vapor-permeable material, it can evaporate.
The simplest pie of a wooden floor using joists with insulation
If such a floor is made above the underground, the moisture that penetrates into the underground from the soil through the vapor-permeable film enters the insulation. This is not very good, but a vapor barrier placed on top prevents moisture from entering the house. And wet insulation dries out if there is ventilation in the underground. So, in order for the floor to be dry and warm, it is necessary that there are properly arranged vents in the base.
Is it possible to replace waterproofing with vapor barrier in this cake or vice versa? No. If you lay a vapor barrier underneath, the water will be trapped in the insulation. There it will accumulate and either break through the film somewhere and spill out, or it will simply lead to the insulation turning into dust.
Vapor barrier in a concrete floor pie
In the case of an insulated floor on a concrete base, everything is exactly the opposite. Let’s say right away that a vapor barrier layer is not always needed. This layer is needed if:
- concrete is poured on the ground;
- unheated room below;
- below is a room with high humidity (bathroom, kitchen, swimming pool, laundry room, etc.).
If the concrete floor is above a heated room, neither waterproofing nor vapor barrier is required. You can pack them just in case, but you can also save money.
As you can see, a vapor barrier is laid below, and a vapor-permeable moisture barrier is installed on top. Why? Because the situation is the opposite. Concrete will not be harmed by high humidity, it will only become stronger, so it is very logical to lock moisture in concrete and this can be done with the help of a vapor barrier. It will cut off both capillary suction and prevent the vapor form from leaking into the insulation.
Using a vapor barrier for a wooden floor over a concrete slab
It is better to lay vapor-permeable waterproofing on top of the thermal insulation. It will prevent water from getting inside, but will help maintain the normal humidity of the thermal insulation, as it will not prevent evaporation. Is it possible to replace steam and waterproofing here? Again, no. Otherwise, everything will not work correctly.
An important rule when constructing external enclosing structures
The upcoming paragraphs are devoted to the most important rule in the arrangement of external enclosing structures. Each material has a certain vapor permeability resistance. Many of you probably guessed that we are talking about vapor diffusion. This parameter is defined in narrow circles of civil engineers by the abbreviation “SD” - equivalent air diffuse layer. The higher the numerical value of this parameter, the more a certain building material resists the process of water vapor passing through it.
Any multi-layer cake is checked according to this rule. What does it look like? The resistance to the movement of suspended liquid particles from the inside to the outside should decrease. Steam that has entered the wall must escape unhindered, because the resistance of individual layers decreases as it approaches the living area. At the exit, it leaves the wall structure through a vertical ventilation gap. For obvious reasons, she remains dry and healthy. She is no longer in danger.
The SD parameter is a good example
Suppose we have a building at our disposal, the outside of which is sheathed with fiberboard 20 millimeters thick. Next comes ecowool insulation with a density of twenty centimeters. What covering material should be used to continue construction without barriers or restrictions? The “SD” indicator for the classic “MDVP” is 0.1 meters. The diffusion resistance level of an ecowool layer of 200 millimeters is approximately 0.3 meters. To comply with the principle and enter the descent mode, we need material with a stated technical characteristic above 0.3 meters.
For example, let's take ordinary cardboard with a diffusion index from 1.5 to 3 meters. As you can imagine, this is significantly more than 0.3m and 0.1m, respectively. Thus, the basic rule of reducing resistance from inside/out is observed. At first glance, there is nothing complicated in these calculations, but this is not so. To hit the point (target) one hundred percent, you need to have certain skills in engineering, design, and construction. It is not recommended to approach the question posed without experience and semi-professional skills. It is better to entrust this matter to specialists with higher education, relieving yourself of all responsibility.
Resistance of vapor barrier building materials - classification
On the market of construction and finishing materials of vapor barrier type, there are those that have strong resistance and analogues with the lowest level of potential. Let me remind you that the factor determining this ability is the already familiar technological parameter “SD”, not to be confused with an information storage device for personal computers.
If the “SD” indicator announced in the article is from one to ten meters, the vapor barrier product belongs to the group of vapor-limiting products. The second collection, let’s say, includes materials with maximum resistance - from 15-20 to 110-115 meters. This is solid insulation.
The first category includes products of the Tyvek commercial brand – “Air Guard” with a stated “SD” characteristic of about five meters. The analogue is "Delta Flex" luxury class, has a two-meter resistance. There is also Finnish cardboard with a dynamic level - from one and a half to three meters. The list goes on, but this is advertising. Therefore, we will not stop and move on.
Modern range of vapor barrier materials
In construction, it is possible to use several technologies that would protect the structure of the building. There are main types of vapor barrier materials:
Pasted vapor barrier - insulation carried out by pasting the base.
- insulation carried out by gluing the base (glued vapor barrier);
- protective layer of paint material (paint vapor barrier);
- Grouting the base with ordinary sand-cement mortar.
All these insulation methods mainly serve to protect the heat-insulating material from moisture penetrating from the room and are applied to the base of the structure.
Today, modern manufacturers offer quite a large variety of vapor barrier materials that perform several functions at once:
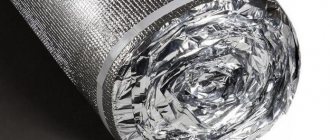
- “Penofol” is a material that is used as insulation, which performs functions and serves for heat, hydro and vapor barrier. Presented as a multilayer composite, covered on one or both sides with aluminum foil, and inside there is foamed polyethylene. There are quite a large number of modifications of this product, which will allow you to make a more accurate choice for a particular case. Thus, “Penofol A” is insulation covered with foil film only on one side, “Penofol B” is insulation covered on both sides with foil film, and “Penofol C” is insulation that has, on one side, a foil coating, and on the other side - a self-adhesive surface. If thermal insulation properties (insulation) are a priority, and vapor barrier properties are in second place, then perforated “Penofol” is used.
- “Armofol” is a foil material (insulation). Usually made from glass mesh on both sides. This modification of the vapor barrier material may have a self-adhesive surface. This material is mainly used for heat, hydro, and vapor barrier of baths, saunas, and bathrooms.
- “Alucraft” - this material consists of three layers: foil, polyethylene and kraft paper. This material is attached to the insulation from the inside to create a vapor barrier, usually under the lining. This material is secured using aluminum tape or a stapler.
- “Izospan B” - the material has a smooth structure on one side and a rough structure on the other. The rough surface serves to retain condensation and further evaporate it. It is used to protect the insulation and structures of buildings from moisture saturation from inside the room.
Approximate costs
Calculation of the cost of work on external hydro- and vapor barrier using the example of a residential building as part of a ventilated facade.
Initial data:
- residential building 10x10 m, one-story;
- building perimeter, 40 m;
- wall height, 300 cm;
- insulation - mineral wool, 10 cm;
- insulation density, 30 kg/m3;
- cost of insulation, 1500 rub./m3;
- cost of dowel “fungus”, 4 rubles;
- window area, 3.6 m2;
- door area, 2 m2;
- total insulation area, 114.2 m2;
- lumber consumption for sheathing, 1.2 m3;
- membrane consumption, 115 m2;
- construction tape consumption, 265 m;
- total weight of insulation, 343 kg.
Cost of work
| № | Name of expense item | Quantity | ISOSPAN price of work per m2, rub./total | Ondutis price of work per m2, rub./total | JUTA SP-1 price of work per m2, rub./total |
| 1 | Installation of step lathing, m2 | 115 | 200/23000 | 200/23000 | 200/23000 |
| 2 | Installation of insulation, m2 | 115 | 380/43815 | 380/43815 | 380/43815 |
| 3 | Installation of hydro-vapor barrier film and counter-batten, m2 | 115 | 120/13800 | 145/16675 | 150/17250 |
| 4 | Ventilation gap installation, m2 | 115 | 150/17250 | 150/17250 | 150/17250 |
| 5 | Cladding with clapboard, m2 | 115 | 300/34500 | 300/34500 | 300/34500 |
| Work, rub. | 132365 | 135240 | 135815 |
How and with what to fasten
If a vapor barrier is used in a floor pie along joists, there are options for its installation.
- If the material is laid before installing the lag, it is simply rolled out, leaving it in the corners of the fold, connecting the sheets as indicated above. There will be logs on top that will hold the material. It does not require additional fixation. You just need to start it and fix it on the walls.
- If the logs are already installed, we wrap each of them with material, leaving a small fold so as not to tear.
We attach it to the wood using staples and a construction stapler. Staples are needed with a leg of 8-10 mm. We place the fasteners along the joists (from above) in increments of 50 cm. But the staples make holes. Although they are small, they are there and break the seal. They are closed using wooden planks, which are mounted on self-tapping screws. Self-tapping screws are placed so that they do not fall into the brackets. If the logs are installed, carefully wrap each one, leaving a small fold at the bottom so as not to tear when laying the insulation - If the film has to be attached from below, the situation is similar to that described above, only there is no need to wrap the logs. We stretch the film and fix it with staples. When all the canvases are secured and glued, we nail the strips covering the brackets along the joists.
To be sure that no steam will pass through the holes near the brackets, foamed polyethylene or polypropylene can be laid between the film and the fixing bar. These materials are often used as a backing for laminate flooring. The material also does not allow steam to pass through, and due to its “foaming” it has considerable elasticity. It will definitely block the steam access.
How and with what to attach vapor barrier to walls? Any more or less serious manufacturer of vapor barrier films has specialized connecting tapes. They are available for different wall materials, so choosing is easy. These tapes themselves have double-sided adhesive. The gluing procedure is as follows:
- We glue the tape to the walls around the perimeter at the required level.
In this case, we remove only one layer of the protective film. On the side that we will glue to the wall. How to properly attach vapor barrier to walls - We roll out and fix the films on the floor, so that the edges overlap the walls and there is room for folding.
- When everything has already been laid, the joints have been taped, secured, we begin to glue the vapor barrier of the floor to the walls. We lay a fold at the base of the wall, remove the protective film from the adhesive tape pasted, and glue the canvas.
It's that simple. Once glued, the excess can be cut off. And finally, you know not only which side to lay the vapor barrier on, how to lay it correctly, but also how and with what to fasten it.
Features of vapor barrier installation
In order not to get confused in the recommendations, you should reduce the rules for attaching a vapor barrier to a wall, ceiling, or roofing to two main positions:
- Which side to attach?
- Is there a need for a gap between the vapor barrier and thermal protection?
The vapor barrier is laid on the insulation with the smooth side, with the exception of the last under-roof layer.
A gap for ventilation between the film and the insulation of 2 to 5 cm is left when working with Izospan.
Preparatory work
Preparatory work inside the premises is of a general construction nature. It is necessary to reliably insulate exposed electrical wires, prepare the necessary tools and a workbench. Once again, you should make sure that you know how to properly attach the vapor barrier. Then unwind the roll with the desired side up.
Technology for laying vapor barrier on the ceiling
When installing the vapor barrier on the ceiling, to the inside of the wooden paneling, the vapor barrier is placed with the rough side facing the room. Using a stapler, the strips are secured with an overlap of 10 cm. An overlap of up to 5 cm is left on the walls around the perimeter. The joints are glued with special tape. The film must be stretched, sagging must not be allowed, so it is fixed in the right places with intermediate slats. The rules for laying vapor barrier for the ceiling allow the use of both conventional PVC film and Izospan.
Technology for laying vapor barrier on the floor
Vapor barriers for floors are used to prevent laminate, parquet, and natural boards from absorbing excess moisture.
On the prepared, cleaned and primed base coating (concrete floor), thermal insulation is laid between profile 5-centimeter slats, followed by vapor barrier material (rough side up), the strips are overlapped using tape. It is necessary to release a reserve of up to 5 cm around the entire perimeter of the room, and glue the film with tape with an overlap of 10 cm. Next, heat-insulating foil is laid and secured with tape. Next, the flooring is installed.
Rules for installing a vapor barrier layer on walls
In frame buildings with external insulation, the vapor barrier material Izospan A is used. The material is laid on the outside of the insulation under the outer skin of the building with the smooth side facing out. Laying is done from the bottom up in horizontal stripes, fixed with a stapler, the strips are overlapped by 10–15 cm. Wooden counter-battens are attached on top of the insulation, which are used for installing the sheathing. Be sure to make a ventilation gap equal to the thickness of the slats.
The vapor barrier for the walls of a wooden house is attached directly to the insulation from the inside, with the smooth side facing it. The vapor barrier film should be laid from bottom to top in horizontal stripes overlapping to a width of 10–15 cm.
Ceilings
Most often, ceilings in a frame house are insulated using mineral wool. Sometimes ecowool, polystyrene foam or expanded clay are used.
The process looks like this:
- A vapor barrier membrane is attached to the bottom of the beams, which requires a stapler. The bars are nailed onto it. The step between them is 40 centimeters;
- Next, the ceilings are insulated with mineral wool. The material should be laid overlapping the walls to get rid of heat loss;
- The seam should not be continuous, the insulation should be laid in a checkerboard pattern;
- If you plan to get a warm attic, then you should install another layer of vapor barrier. It is imperative to seal all joints. If the attic will not be heated, then this step can be safely skipped. Next, the floor is laid in the attic.
If the ceiling pie is installed correctly, the appearance of moisture is excluded.
Types of materials
When figuring out which side to lay the vapor barrier on, you need to learn about the main types of such materials. After all, people often wonder why a layer has the same or completely different sides. Conditionally existing varieties are divided into groups: A, B, C, D.
This is useful: table of vapor permeability of leading materials.
Vapor barriers are divided into 4 groups and each of them has its own specifics
Representatives of the first group are intended to remove condensate from the other side. They cannot be used as a vapor barrier, since they are characterized by high throughput and solve the opposite problem - they release steam to the outside, but do not allow rainwater to enter the room. Such thermal insulation is indispensable for roofing structures with an inclination angle of 35° or more. The fact is that on such a roof drops will easily roll down and evaporate.
Because of this feature, such hydro-vapor barrier is always laid with the smooth side facing the insulation, and the rough side facing outwards. This option is suitable only for rooms with roof insulation, since in the absence of insulation its strength is significantly reduced.
Before purchasing a vapor barrier, you need to know the features of each group.
Membranes from group C are intended for maximum protection of insulation from water vapor. Their structure consists of 2 heavy-duty layers, which differ from the previous ones in increased density. Often this vapor barrier is used in non-insulated roofs to protect wooden elements and enhance the protective functions of the insulation. Unlike the previous type, the material is laid with the rough side in the lower (inner) part of the thermal insulation.
There is another type - polypropylene isopar group D. It is a modernized material consisting of especially durable polypropylene fabric with a laminate coating on one side. In addition to the main task of insulating the attic floor, such insulation can protect the roof structure from leaks, and in conditions of maximum humidity.
Materials and tools required for installing vapor barrier
Before laying the vapor barrier part of the roofing pie, it is necessary to check whether everything is prepared for such work. To install a roof vapor barrier, you will need the following materials and construction tools:
- vapor barrier material, as mentioned above, it is best to use a vapor barrier film;
- construction tape or adhesive tape necessary for joining vapor barrier sheets;
- fasteners, which can be flexible dowels or metal staples for a construction stapler;
- wooden blocks with a small cross-section. They must be pre-treated with an antiseptic. This will increase their service life; construction tools: hammer, stapler, pliers and scissors.
After all the necessary building materials and tools are ready, you can talk about how to properly lay the vapor barrier material.
Variety of materials
To protect surfaces and insulation from moisture use:
- reinforced polyethylene film;
- aluminum coated film;
- film made of propylene fibers;
- membrane vapor barrier.
What where When?
The main role of a vapor barrier material is to protect wooden structures and insulating material from moisture, rotting and, as a result, premature destruction.
It is extremely important to use it on lower floors, above basements and basements, and especially above bathrooms and kitchens. It is also necessary to remember that the insulation protection must be double-sided, since wet mineral or glass wool almost completely loses its thermal insulation qualities. That is, the film is placed between the finished floor and the insulation material, as well as between the insulation and the subfloor
However, often the bottom layer is replaced with waterproofing
That is, the film is placed between the finished floor and the insulation material, as well as between the insulation and the subfloor. However, often the bottom layer is replaced with waterproofing.
Which side should I lay?
You need to know which side to lay the vapor barrier on the floor. An extremely important nuance, since the wrong technology for installing the material will negate all its properties.
A man lays vapor barrier material on the floor
Here are the instructions:
- The double-sided film is placed with the smooth side facing the insulation and the corrugated side on top. The rough surface acts as a filter for steam and even the smallest drops of water.
- It is customary to lay polypropylene with the wicker side away from the insulation, and the smooth side inside.
- Installation of foil vapor barrier is carried out with the aluminum side facing the room, as it tends to reflect infrared radiation.
- Individual installation technology is possible for individual brands and types of vapor barrier materials.
- Before use, be sure to read which side to place the vapor barrier on the subfloor and insulation.
Laying algorithm
It's not complicated:
- First, the old flooring is dismantled down to the subfloor. Then the base is prepared: debris is removed, cleaned, leveled, treated with antiseptic and primer. Old floor beams or joists that have begun to collapse must be replaced with new ones.
- Hydro and vapor barrier of the subfloor is carried out, preventing moisture from entering the insulation from the ground or lower rooms. The film strips are laid with the correct side (see above) overlapping by 15-20 cm. The edges must be glued with reinforced or double-sided tape. Also, the vapor barrier should extend 10-15 cm onto the walls and joists. It can be attached to beams and joists with metal brackets.
- A layer of insulation is laid on top of the film with the seams staggered and a thickness of at least 20-30 cm.
- A second layer of vapor barrier is laid on top of the insulation, also with an overlap and gluing the joints. If installation is carried out on wooden floor joists, it is necessary to lay the film so that it sag slightly: this way a ventilation gap is created between it and the finished floor. However, it is also recommended to put counter-battens on the logs on top of the vapor barrier, which will prevent the film from coming into contact with the finished floor.
- The finished floor is filled and then finished with the finishing floor covering.
Now you know how to install a vapor barrier on the floor and will not make the mistake of doing your own repairs.
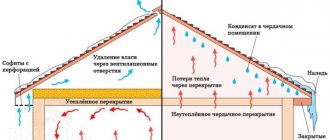
We recommend looking at what happens if the vapor barrier is not installed correctly. Condensation fills the ceiling with water, the insulation gets wet and mold spreads. Don't make these mistakes.
In winter, when it’s frosty outside but the inside of the house is cozy and warm, unnoticeable steam forms in the rooms. And this steam must leave the room freely. To accomplish this task, a vapor barrier is installed. You need to know which side to lay the vapor barrier on the floor, walls or ceiling.
Wind protection: which one to choose?
Of course, the buyer first of all studies products in the price range available to him, but one must remember that the desire to save money and purchase, for example, polyethylene film instead of a high-quality superdiffusion membrane, will ultimately result in new expenses.
Be that as it may, the main parameters that you should pay attention to are: Material safety. Toxic films that emit harmful substances are not suitable for residential premises under any circumstances.
Lifetime. If the repair is being done permanently, for centuries, it is better to think about purchasing the most durable material possible, albeit at a higher price.
Characteristics. Resistance to ultraviolet radiation, the temperature at which wind protection can be used, its strength - all this must be taken into account. Familiarize yourself with the properties of the purchased material in advance - the manufacturer is obliged to indicate all the characteristics of its product in the description.
Main characteristics of high-quality wind protection:
Temperature Range. Shows the minimum and maximum temperature at which the product can be operated. Be sure to take protection with our winters in mind!
Water resistance, or waterproofing. Indicates resistance to moisture. The higher the better.
Equivalent diffusion thickness. A number characterizing the correspondence of the thickness of the material to the thickness of dry air. This characteristic is needed for professional builders; it will say little to the average user.
Weather resistance. A parameter that shows how long the membrane can last without a finishing coat.
If we talk about external parameters by which we can judge the quality of wind protection of a wooden house, then it is better to:
the outer surface of the membrane was rough - so the condensate formed on it would not flow into the space between the walls and under the roof, but would evaporate naturally.
the film was tear-resistant - the stronger it is, the more difficult it is to tear, the longer it will last.
had high resistance to ultraviolet radiation - especially if you decided to hold off on finishing the cladding for now.
Vapor barrier of walls in wooden houses
Structures made of wooden materials require special vapor protection. Wooden houses are characterized by high vapor permeability of walls in comparison with brick and stone walls. This indicator is determined by the thickness of the timber and logs, the presence of cracks, and the impermeability of the grooves to moisture and steam.
Glued laminated timber, which is used to build walls, must be dried in production to an acceptable humidity level. It should also have sealing grooves and low shrinkage. All this is necessary to limit the flow of steam into the insulation.
Timber or log walls with natural moisture levels are dried directly during use. Due to shrinkage within 5 years, deformations and cracks appear on the walls. Logs and beams change their dimensional characteristics, the grooves lose their tightness.
Therefore, you should not carry out interior finishing for 5 years - this will not allow access to the grooves to restore the tightness. In such a situation, there are two options: either wait for the wood to dry completely, or organize a vapor barrier using membranes such as “Izospan FB”, “Izospan B”, “Izospan FS”.
Organization of vapor barrier of wooden buildings
Vapor barrier laying technology
After choosing a vapor barrier, it is also very important to install it correctly. This is not difficult, but requires care when installing, since in most cases the vapor barrier material has an external and internal surface in relation to the insulation
Choosing a side
Among builders, there are two opinions on which side to lay the vapor barrier against the insulation. Some believe that the vapor barrier should be attached only to one “correct” side, while others believe that it does not matter which side the vapor barrier is attached to. All vapor barrier membranes come in two types:
- for one-sided installation, this type of vapor barrier is attached to only one side;
- double-sided, which can be worked with regardless of its side.
Before installing the vapor barrier, you should carefully study the instructions included with the material itself. If there is none, remember these simple rules:
- The outer side of the vapor barrier has a pile in which moisture is retained and then evaporates. The inner one is smoother. It is the smooth side that should come into contact with the insulation.
- If the vapor barrier material has a different color, then the light side will be the inner side and should lie on the insulation.
- Usually the vapor barrier is sold in rolls. When rolling out such material, the side that will be facing the floor will be the inner one.
If you still have doubts, you can do a small experiment. Take a small piece of vapor barrier membrane and cover a mug of hot water with it. Condensation will appear on the side of the film that is waterproof, which means the inside.
Installation of vapor barrier film on the ceiling
After determining the inner and outer sides of the vapor barrier, there are no further questions about how to properly lay the vapor barrier. But still, a few nuances need to be taken into account:
Before laying the vapor barrier, it is necessary to carry out preparatory work. First of all, it is necessary to treat all wooden elements with special agents against insects, fungus, rot and fire. Subsequent work should be carried out only after the impregnation has completely dried. Irregularities on the surface to which the vapor barrier will be attached should not exceed 0.5 cm. If the house is located in a climate zone where there are frosts below -25˚C in winter, then a vapor barrier must be laid on both sides of the insulation. When installing, pay special attention to the corners
It is important that the corners are covered with a solid film. It must be well stretched. At the joints of the canvases, the vapor barrier must be laid with an overlap of at least 10-15 cm. With less overlap, moisture can penetrate inside.
Seal the joints with tape
You need to use special tape, preferably the same brand as the vapor barrier. The film is attached to the beams using a stapler. If installation is carried out between beams, you can use slats and screws with a wide head.
Laying vapor barrier on walls and ceilings
After installing the insulation on the walls, a vapor barrier film is laid. Which side to lay towards the insulation was discussed above. You just need to consider the following:
- The vapor barrier must be well tensioned so that it does not sag, there are no unevenness and so-called waves.
- The joint should overlap 5-10 cm and be securely taped with wide tape.
- The film should fit tightly to the insulation.
- Near window and door openings, it is necessary to leave 2-4 cm of vapor barrier film “in reserve”, since shrinkage or deformation of the material may occur during operation.
- There should be a small gap between the vapor barrier and the facing material for ventilation and condensate removal.
- After laying the vapor barrier, it is necessary to cover it with finishing material as soon as possible, since this material is “not friendly” to sunlight. If you leave the vapor barrier uncovered for just one season, ultraviolet radiation will do its dirty work and all your work will go down the drain, and the vapor barrier membrane will have to be replaced.
When laying a vapor barrier film there is nothing complicated and no special skills are needed. The main thing, as with any other work, is to be careful, take your time and read the instructions of the manufacturers of the material you are working with. Then there will be fewer mistakes, the house will be warmer, the mood will be excellent and you will be proud of your creation.
Alignment
Hydro-thermal insulation pie
The next stage is to create a strong and level base for finishing. Since in most cases ceramic tiles are used as flooring in showers, such a base must be as durable as possible.
Separately, we note that the difference between the “heavy” and “light” flooring options lies in the method of implementing this stage.
The lightweight version involves filling the cavities between the joists with mineral wool insulation and then covering the insulation with a vapor barrier film.
An important point: there must be a ventilation gap (at least 30 mm) between the vapor barrier and the next floor level.
OSB board
In this case, leveling the base is done by laying OSB boards or moisture-resistant plywood on the logs.
In some cases, to give the floor special rigidity, OSB boards or plywood are laid in two layers, with the joints overlapping.
A simpler, and also more often used, is a “heavy” floor, in which a concrete screed acts as a leveler.
Several factors speak in its favor:
- lower price;
- solidity, completely eliminating deflections and shrinkage under the tiles;
- the possibility of using coating or liquid waterproofing for showers without a tray;
- lower height.
Film - mesh - screed
Please note that even if there is a joist, the screed is still made with metal mesh reinforcement. Therefore, the leveling process using a concrete screed is carried out in several stages:
- installation of communications;
- installation of reinforcing mesh;
- pouring the concrete mixture.
To ensure that the coating is smooth and without cracks, we recommend using ready-made mixtures with plasticizers for filling.
When leveling the floor for showers, remember that its height must be at least 20 mm lower than the level of the other floors. This is necessary to minimize the risk of water spilling from the shower into other rooms.