Expanded clay is one of the most versatile building materials you can find. But in this article, we will examine in detail the issue of floor insulation.
The material, due to its complex of properties, has found wide application both in construction and in other industries.
However, this expanded clay is most popular in construction for lightweight structures and as insulation for buildings.
Properly installed thermal insulation of a house using expanded clay can reduce the energy consumption of a building by 70% . In this case, the load on the load-bearing elements of the structure increases slightly due to the low density of the material.
What is expanded clay
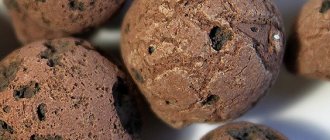
This material has the appearance of brown granules covered with a hard sintered crust. This appearance is given to it by the production method and the chemical composition of the material.
Fig.1. Expanded clay is a product of special processing of clay shale
Expanded clay is made from clay shales with a high content of quartz - up to 30% - and iron oxides. The production method is sintering in rotary kilns. The furnaces for its production are a pipe with a diameter of about 1.8 - 2.0 meters, laid horizontally. Gas burners are located inside. The mass of shale is loaded into the furnace, the torches (burners) are turned on and the rotation drive is started. When rotating at a speed of 1.2 - 2.0 revolutions per minute, the mixture is formed into granules, while foaming. The temperature in the oven is 1200 – 1500oC.
Fig.2. The process of producing expanded clay from air-activated mud
The property of clay shales is to foam during heating, forming into granules when rotated.
At the end of the process, the finished product is passed through a series of sieves with cells of various sizes, thus being separated into fractions.
The gradation of factions is divided into four divisions:
- The size of the granules is 5 – 11 mm.
- The granule sizes of the next fraction are 11-21 mm.
- The size of the granules is 22 – 41 mm.
- The fraction with granules less than 5 mm is called expanded clay sand.
Accordingly, the density of expanded clay varies, which ranges from 250 kg/m3 to 800 kg/m3.
The foamed interior of the material determines its low thermal conductivity, which allows it to be used as a heat insulator.
Fig.3. When the granule is broken, the porous structure characteristic of expanded clay is visible, which determines its heat-protective and sound-insulating properties.
Thus, the value of expanded clay as a building material is determined by its following qualities:
- low specific gravity;
- heat and sound insulation properties;
- high strength;
- ease of production;
- relatively low cost;
- manufacturability in application;
- chemical inertness.
Features of expanded clay concrete
Expanded clay concrete differs from the usual concrete mixture in the type of filler: instead of crushed stone, expanded clay is placed in it - a bulk material obtained from baked clay. It gives the solution special properties.
A few words about expanded clay
Made from natural raw materials, expanded clay is an environmentally friendly material. Thanks to special production technology, it is light in weight, has a porous structure and has high thermal insulation and sound insulation properties.
At the same time, it does not rot, does not corrode, and does not contribute to the development of microorganisms, so, unlike other insulation materials, it can be used for screeding on the ground.
The material is classified according to the shape and size of the fractions. Concrete screed with expanded clay of different fractions has different purposes.
The volumetric bulk mass of the material in kilograms per cubic meter, and ultimately the weight of the expanded clay concrete screed, depends on the grain size. The volumetric mass is reflected in the grade of expanded clay (from 150 to 800).
The price of expanded clay is higher than crushed stone. But it also provides many advantages as a concrete mixture. And not only in the mixture. Lightweight and free-flowing, it allows you to level surfaces with large differences in heights without creating a serious load on the floors.
Main technical characteristics of expanded clay
| Indicators | Fractions, mm | ||
| 11 – 21 | 5 – 11 | 0 – 5 | |
| Bulk density, kg/m3 | 281-371 | 298-399 | 501-798 |
| Crushing strength, N/m2 | 1,1-1,9 | 1,3-2,1 | 3,1-4,1 |
| Particle size composition, % | 4 | 8 | 0 |
| Frost resistance 20 cycles, weight loss, % | 0,4-2,0 | 0,2-1,2 | Not regulated. |
| Number of crushed particles, % | 3-10 | 3-10 | 0 |
| Thermal conductivity, W/m3 | 0,0915 | 0,0915 | 0,11 |
| Water absorption, mm | 250 | 250 | 290 |
| Effective activity of radionuclides, Bq/kg | 271 | 271 | 292 |
Knowledge of the technical characteristics of expanded clay makes it possible to make most of the strength and other calculations when using it.
Of course, using this material to insulate roofs, floors, walls and other structures, you can easily calculate the reduction in load on the foundation and make adjustments to its design in terms of simplification and reduction in cost. To do this, it is enough to know the specific gravity of the expanded clay fraction used and the volume of its use.
The frost resistance value (in the table) makes it clear that the material is very frost-resistant and can work for a long time at low temperatures.
Where and how can you use expanded clay
The application of this material is so extensive that it is simply impossible to list everything. This includes landscape design, growing plants on expanded clay, and various uses in construction. Let's briefly look at some aspects.
- As a heat-insulating material for heating networks, the depth of the pipe can be reduced by almost half when filling it with expanded clay.
- Production of wall blocks from concrete with expanded clay. They will retain heat perfectly and serve as reliable sound insulation.
Fig.4. Expanded clay concrete blocks are a reliable and durable material for construction. Holds heat well and insulates sound
- Adding this material under the foundation of a building will significantly reduce its thickness without fear of freezing of the soil with subsequent distortion of the foundation of the house. Misalignment can lead to jamming of doors and windows due to deformation of the frames.
- Insulation of roofs with loose expanded clay in bags directly under the roof of the house. The low weight of the material allows you to pour a layer up to 15 cm thick (the standard width of a rafter beam) and obtain reliable thermal and noise protection.
- The material is widely used for constructing filters in wastewater treatment plants.
- In road construction, expanded clay is widely used to make road cushions in places where soil water occurs close to the surface.
- The most effective use of this material is to insulate the floors of buildings , which we will dwell on in more detail.
Floor insulation
Let's consider the features of using expanded clay for floor heating in your own home or country house.
Insulation of the first floor floor
The peculiarity of the construction of the floors of the first floor is that it must also be protected from soil moisture, especially during the period of snow melting and summer downpours. Therefore, it is recommended to make a clay screed about 10 cm thick under the base of the floor . To do this, the clay must be stirred to a semi-liquid state and poured over the surface of the soil, having previously leveled it. The drying time for the fill is at least 7 days; work can be continued when the surface can firmly support the weight of a person and there are no traces left from walking on it. Clay has always been an excellent waterproofing agent.
Next steps:
- Lay a vapor barrier made of polyethylene film. Lay the film overlapping and seal the seams with construction tape. When laying, run part of the film onto the walls to a height up to the level of the finished floor, secure with tape.
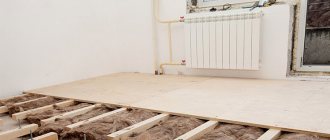
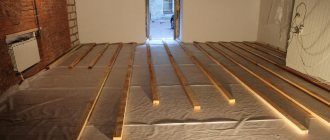
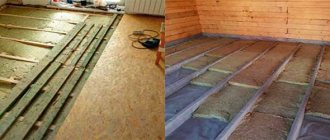
- Add a layer of expanded clay. The thickness of the layer will depend on the type of topcoat that will be applied. If you plan to make a wooden floor, you need to install and align the logs before backfilling. The thickness of the expanded clay layer can be almost as high as the supporting surfaces of the logs.
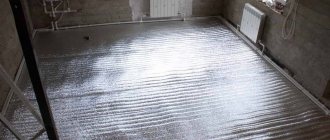
Fig.5. Spreading an expanded clay layer for thermal protection of the floor
- Carefully level the poured layer and tamp lightly.
- Place a layer of plastic film between the joists and secure with tape. If this is not done, the floor may subsequently begin to “dust” through the inevitable gaps between the boards.
- Next you can start laying the floor.
- If the finishing coating is laminate or linoleum, you need to apply a dry screed about 30mm thick on top of the expanded clay layer. It allows you to well level the floor under the coating and does not require long drying. Before laying, the screed must also be covered with film.
- The thickness of the expanded clay backfill is desirable to be at least 20 cm.
Also, as an alternative to global insulation of the “floor pie,” you can make a floor screed with expanded clay. Those. a layer of expanded clay is already poured onto the finished rough surface and a cement-sand screed is made on top of it.
Insulation of the second floor floor
In principle, the process is not much different from that described above, the steam film is simply laid directly on the floor slabs in the same way, and the further procedure is the same.
It should be taken into account that when making warm water floors, the thickness of the concrete layer is required to be at least 50 mm .
For any heated floors, before making the screed, you need to stick a damper tape about 2 cm thick on the walls at the level of the finishing coating, since when heated, the screed can “heave up”.
po-polu.ru
Practical recommendations for dry leveling of expanded clay backfill
First, we’ll talk about gross technological errors that cause the floor surface to sag.
What not to do
Never use drywall. The fact is that this is the worst building material in terms of all physical characteristics. It has no strength, is afraid of water, does not hold hardware, etc. Even the so-called moisture-resistant board loses its properties after several hours of direct contact with water. If you don’t believe me, put a piece of it in a container of water. Such a practical experiment will allow you to clearly see false advertising by manufacturers. Another problem is that plasterboards laid flat bend under their own weight. Why is this material so often used by builders in various architectural structures? The explanation is simple - it is very easy to work with him, and this makes it possible to significantly increase salaries. In the case of expanded clay, it is difficult to achieve a perfectly flat surface; the slabs under the voids will certainly bend. As a result, you will have to redo the floors, and this is very time-consuming, labor-intensive, dusty and expensive.
When leveling expanded clay, do not make stationary beacons using cement-sand mortar. The fact is that expanded clay itself gives a slight additional shrinkage over time
Have you noticed how a initially large pile of sand decreases in height over time? Grains of sand gradually occupy free spaces, the size of the heap decreases, and this does not require rain. The same processes occur with bulk expanded clay, only on a smaller scale. The surface reduces the height and the cement beacons always remain in a stable position
As a result, over time they rise above the plane of expanded clay, and tubercles and depressions appear on the dry screed.
How to level the base
The correct technology will cost you much more than other methods of leveling the base for the final floor covering. Keep this in mind before making your final decision.
- To level the surface of expanded clay, use special devices. This is a professional tool, consisting of two long aluminum slats and a rule that can be moved by it. As the work progresses, the tool is transferred to a new location, leaving behind perfectly flat surfaces, and there are no stationary beacons. It is not economically profitable for non-professionals to buy these tools; such devices significantly increase the estimated cost of the floor.
- You need to work with the laser constantly on; the beam continuously controls the horizontal plane of the expanded clay. Walking on an already prepared surface is strictly prohibited.
- Prepare the base in sections; immediately cover the prepared small areas with durable slabs of extruded polystyrene foam at least five centimeters thick. Why do you need additional insulation, since expanded clay itself is used as a heat insulator? The heat-saving properties of this material can only be considered more or less satisfactory when air movement completely stops. It should be noted that the bulk layer of large granules is well blown by air currents; due to the convention, warm masses rise upward, and cold masses take their place. Continuous movement occurs, the efficiency of heat conservation decreases sharply. If leveling is done using the wet method, the solution not only binds the moving granules, but also prevents the removal of heat.
- Expanded polystyrene materials cannot support heavy loads; their surface must be protected. Cement-fiber boards (fiber cement) performed well. The addition of cement significantly increases strength indicators; a slab with a thickness of only one centimeter is capable of withstanding the maximum dynamic and static forces on floor coverings possible in residential premises. These materials are widely used and, in all technical parameters, are excellent for dry screed. If the floors are not loaded, then GVL can be used; they are cheaper, but in terms of physical properties they are noticeably inferior to their cement analogues. To increase the stability of the structure, the joints must be coated with a special glue - the entire surface becomes monolithic, the base does not sag.
- Expanded clay is afraid of getting wet, the consequences will always be very sad. Professional builders strongly recommend covering the surface of the dry screed with waterproofing material. It should be remembered that high-quality mastics are quite expensive. By the way, after pouring expanded clay with concrete mortar, there is no need to perform additional insulation measures.
Purposes of use and advantages of expanded clay floor screed. When is an expanded clay screed needed?
Expanded clay floor screed consists of two layers: a layer of expanded clay 2–12 cm thick at the bottom, a layer of sand concrete 2–3 cm thick at the top and is used in the following cases:
- when leveling of large thickness is required (large unevenness, communications, slope of sewer pipes, differences in height between floor slabs);
- with a sufficient height of the ceilings of the apartment. The thickness of the expanded clay layer cannot be less than 2 cm (usually 3.5–12 cm), the total thickness of the screed is from 5 to 15 cm;
- if you need to additionally insulate the floor;
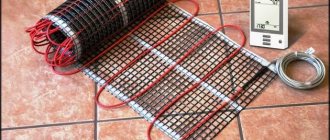
- under a warm electric floor for additional thermal insulation;
- when it is necessary to reduce the load on floor slabs.
Advantages of expanded clay screed:
- costs are significantly reduced: for expanded clay floor screed, the prices of materials and labor are lower than for sand concrete;
- the weight of the floor is significantly reduced (compared to the sand-cement version),
- the thermal insulation and sound insulation qualities of the floor are improved,
- labor costs for performing work are reduced in comparison with conventional cement screed,
- The drying time of the layer is reduced.
- Clean the floor from debris and dirt, remove plaster deposits;
- seal the cracks between the floor slabs with a cement-sand mixture;
- seal holes and holes in the slabs, especially in places where heating risers and water pipes pass through;
- remove or bend protruding pieces of reinforcement, wire, loops close to the slab;
- For waterproofing purposes, cover the floor with plastic film. Lay damper tape around the perimeter;
- install level beacons. They can be attached to the solution. A guide ceiling profile is suitable as a beacon.
Methods of laying expanded clay screed and the order of work
Expanded clay floor screed can be done in two ways: First, with cement laitance. Sand-cement mortar is poured onto the filled and leveled layer of expanded clay. The second method involves thrombosing the mixture. A mixture of expanded clay, sand and cement is poured and leveled along the beacons.
Method of pouring with cement laitance:
- They fill in the expanded clay, moving along the perimeter of the floor, and level it. The expanded clay layer should not reach 1.5–2 cm to the edge of the beacon;
- Cement “milk” is poured onto the expanded clay layer so that the surface is covered with a film. The “milk” should not be very liquid and not very thick. The density of the milk is selected experimentally;
- the milk is allowed to dry for 24 hours, after which a layer of cement-sand mixture is poured, starting from the wall opposite the front door. The mixture is stretched with a trapezoidal rule toward itself and to the sides, aligned along the beacons;
- The leveled screed is left to dry for three weeks, sprayed with water daily.
Method of thrombusting a mixture of expanded clay, sand and cement:
- pour water into a large container and pour expanded clay into it, leave the granules so that they get wet and absorb water (for better compaction, you should use a mixture of granules of two fractions);
- add a mixture of sand and cement and mix until smooth. The amount of sand-cement mixture is selected experimentally so that all the expanded clay is wet and gray;
- The resulting mixture is used to level the floor surface: first compacted, then leveled with a trowel and then with a rule. The layer of the mixture should also be 1.5–2 cm below the level of the beacons;
- At the same time, you can pour concrete screed over the beacons, performing the work in parts.
Work on laying floor coverings on the floor prepared in this way will begin no earlier than a month later. Concrete screed is more expensive than expanded clay floor screed. The price of expanded clay is 2-3 times lower than that of sand-cement mixture.
polof.ru
Device instructions
Combined screed with expanded clay
Scheme of a combined screed. As mentioned above, this technology involves the presence of a dry layer of bulk material at the bottom and a wet cement pour at the top. Installing a semi-dry floor screed with expanded clay with your own hands must be done in the following order:
- cover the clean, prepared surface with roll waterproofing or cover with a layer of bituminous primer;
- fill in a layer of expanded clay with a fraction size of 5-20 mm, 30-40 mm below the future level of the screed;
- compact the bulk material well and level with the rule;
- prepare cement laitance and pour it over the surface;
- after setting, which will occur in a day, install beacons corresponding to the level of the screed on the frozen surface;
- prepare cement mortar in a ratio of 1:3 or 1:4 to sand;
- pour the solution between the beacons in strips and level it with a plaster rule;
- the top layer of the screed must be pierced with a thin rod with a pitch between holes of no more than 100 mm;
- Over the next two days, the surface must be periodically moistened with water.
The complete readiness of the screed is determined at the rate of 5-7 days for each centimeter of the cement layer. After this, you can proceed to laying the finishing floor coverings.
Wet screeds with expanded clay
“Wet” screed - pouring the base with expanded clay concrete and then leveling the surface. Laying the concrete layer is carried out in the following sequence:
- pour dry expanded clay into a tray or other container and fill it with water for 10-12 hours to soak;
- install beacons on the surface of the base that will determine the horizontal level of the future floor;
- pour wet expanded clay (4 parts) into a concrete mixer, then add a little water and cement (1 part);
- After stirring for a short time, add sand (3 parts). Stir the mixture until ready - at least 4 minutes. If necessary, add water during mixing (the consistency of thick sour cream is required);
- To level the surface, use a plaster rule, which must be pulled along the beacons with transverse movements of the tool.
If, after the screed has set, floating expanded clay granules are visible on the surface, they must be sanded using a power tool. If there are a large number of such granules, you will have to lay an additional layer of self-leveling mixture on top. The complete drying time is 28 days.
Dry screeds with expanded clay
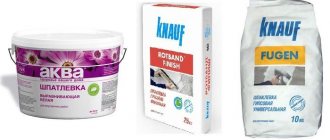
To install a dry screed, you need to purchase fine expanded clay or crushed granules, sheet material such as chipboard or plywood, sand, cement and a plasticizer. The order of work is as follows:
- Cover the surface of the base with dry expanded clay and level the surface using a level lath. When laying a construction bubble level on the slats, periodically check the level of the layer;
- remove beacons;
- lay sheet material on the expanded clay so that it covers the entire surface;
GVL laying diagram.
- check the horizontal position of the sheets using a level;
- cover the second row of sheet material in the same way. The only thing that needs to be provided is that the shift of the seams of the second layer relative to the first should not be less than 20 cm.
After this, you can begin laying the topcoat.
You can see the construction of expanded clay screed clearly and in more detail in the presented video.
Type and properties of insulation
Expanded clay is made from natural clay, which is given heat treatment. Thanks to this, the material becomes durable and reliable. Insulation is produced in the form of granules, different fractions of which are used for specific purposes. There are only three factions:
- sand;
- crushed stone;
- gravel.
The latter is the largest fraction with granules with a diameter of 20-40 mm. They have a porous structure and a dense shell. This gives the material strength and allows it to retain heat. Air cells are formed due to the swelling of clay. This structure makes it possible to obtain thermal conductivity lower than that of expanded polystyrene.
Larger expanded clay crushed stone is obtained by crushing gravel. The size of the grains, which have an angular irregular shape, can reach 10-20 mm.
The first fraction is mainly used in the production of dry mixtures to increase their thermal insulation properties. The size of sand grains is 5-10 mm. It is also added to larger fractions to avoid voids that inevitably form between large granules.
Sand is a by-product of the production of two base fractions. Since it has high thermal conductivity, it is used in the manufacture of expanded clay concrete.
Experts recommend insulating the floor with expanded clay of various fractions. This will allow the material to penetrate into all hard-to-reach places and fill the voids between the granules. This way the thermal insulation will be most effective. According to consumer reviews, insulating the floor with expanded clay in a wooden house or garage should only be done with whole granules of the heat insulator. This will allow you to obtain a high-quality layer of thermal insulation.
Expanded clay concrete is less often used to insulate floors on the ground under a screed. It can be of 4 varieties:
- Thermal insulation (up to D700).
- Septal (D700‒D1400).
- Wall (D1400‒D2000).
- Facing.
As a rule, it is used for monolithic construction.
Among the advantages of the material, the following should be noted:
- the technology of expanded clay insulation is quite simple and does not require special skills or knowledge;
- has a relatively low cost;
- ecologically pure;
- floor insulation with expanded clay can be carried out directly on the ground, having previously laid waterproofing;
- does not rot, does not lose its thermal insulation properties under the influence of high or low temperatures, does not burn;
- rodents do not touch it;
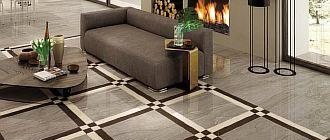
- insulating floors with expanded clay allows you to get a smooth floor covering;
- carries heavy loads, which makes it possible to insulate floors not only in a private home, but also in garages and industrial premises.
The expanded clay layer is determined by various parameters. However, the thickness must be at least 20 cm to provide high-quality protection from the cold. The disadvantages include the low moisture resistance of expanded clay. Therefore, it is very important to perform high-quality hydro- and vapor barrier of the insulated room.
The principle of operation of insulation
Many people know that the most effective thermal insulation material is air. Along with it there is only inert gas, which almost does not react to the environment. It is this gas that is used to fill the glass unit chamber. However, you cannot use it for building structures (floor, walls, ceiling), since absolute tightness is required.
Almost all materials for thermal insulation have a porous structure. Due to this, there is air in the pores, which inhibits heat loss. There is a certain pattern: a less dense material has better thermal insulation properties than a dense one. The lower the density, the better the insulation.
All insulation materials can be divided into several types:
- roll;
- slab;
- bulk;
- sprayable.
The most budget-friendly is the sprayed type of insulation, which includes expanded clay. The fact is that this type of material has almost the lowest thermal protection indicators. But it can insulate the structure. Why do you need thermal insulation at all? Look at the photo to find out.
Insulation work solves at least 4 problems:
- Provides a reduction in budget waste on heating the house.
- They protect the structure from condensation, which serves as a source of fungus and mold.
- They create comfort, warmth and coziness in the house.
- Gives the room soundproofing properties.
If you do not insulate your house, its operation will bring you many problems. What can we say about expanded clay as an insulation material?
Characteristics and scope of use
It is necessary to highlight the following parameters of the heat insulator:
- The thermal conductivity coefficient of the material is 0.16 W/μ, which puts it on par with foam plastic and mineral wool. This is one of the lowest rates among insulating materials. A layer of 10 cm allows you to replace 30 cm of wood.
- High strength index. This material is perfect if the question arises of how to insulate the floor in the garage. Its density ranges from 250 to 600 kg/m³.
- Since the thermal insulator consists of clay, its service life is practically unlimited.
- It is not susceptible to chemical attack, fire or frost.
- It has high strength and low weight. This avoids reinforced structures during material filling.
- The installation technology is quite simple and allows you to carry out insulation with expanded clay yourself.
Lay this material on the floor and other surfaces:
- carry out insulation of the floor on the ground with a screed;
- fill the space under the flooring made of boards;
- on the attic floor to insulate the ceiling of the room;
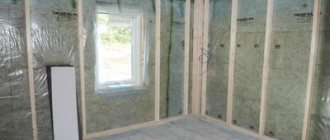
- in a special box to insulate the walls.
However, expanded clay is most often used for floor insulation. It is necessary to consider the technology of thermal insulation of the floor with this material in a private house.
Advantages and disadvantages
Expanded clay floor screed does not lose its relevance due to the environmental friendliness and availability of the material. In an apartment or private house, expanded clay is used for thermal insulation under floor coverings due to the following advantages:
- Allows you to raise the floor level (especially when insulating the subfloor in private houses and cottages) and inhibits cold from the ground.
- Insulates reinforced concrete floors in apartments under which there are unheated (non-residential) premises.
- Excellent soundproofing of the room due to its porous structure.
- In case of unevenness and differences in floor level in the room, it allows you to level the surface very inexpensively, especially in comparison with concrete and ready-made screed mortars.
- It is inert to the formation of mold and rot, since it does not contain a nutrient medium for pathogenic organisms, which means you don’t have to worry about increased dampness and dangerous fungal spores that can harm human health.
- It does not create additional load on the floors, as it is a very light material.
- It is not flammable, which means it can be used to install heated floors. If a fire occurs in a room with an expanded clay floor, no harmful or toxic substances are formed during the combustion process. Also, in such a screed you can easily hide engineering structures and electrical wiring.
- Not afraid of temperature changes. Does not lose its properties both at low and high rates.
- Long period of operation. According to some reports, expanded clay is able to retain its properties for 30-40 years.
- Installing expanded clay screeds does not require special skills or complex tools.
- Moisture resistant. The water absorption coefficient ranges from 8-20%.
- Low cost and availability allows you to find this material in any, even small town or village.
However, in addition to the obvious advantages, floor screed made of expanded clay has some negative aspects. Among them:
- In most cases, the thickness of the expanded clay backfill is significant. As a rule, a layer of screed made of this material with a height of less than ten centimeters does not exhibit the properties necessary for heat and sound insulation.
- A dry screed, if moisture gets inside the expanded clay layer, can significantly aggravate the microclimate in the room. Although the granules themselves are impervious to water, the concrete coating located on top may be damaged.
Before giving preference to one or another material for floor screed, all the positive and negative aspects are carefully weighed. In the case of expanded clay, there are plenty of advantages, but the disadvantages are conditional and can be easily overcome if all the necessary standards for carrying out floor insulation work are observed.
Insulation technology
There are 3 methods of insulation:
- dry;
- wet;
- combined.
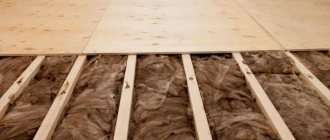
Insulation of a wooden floor with expanded clay usually occurs using the dry method. To do this, heat insulation is poured onto the covering between the joists, on the floor or along the beacons, and then the subfloor is laid. It can be:
- chipboard;
- plywood;
- MDF;
- boards.
To insulate a floor with expanded clay using the wet method, you must first mix the material with concrete in certain proportions. Then place the resulting mixture between the beams or pre-installed beacons. This method is good when insulating a room with a significant difference in floor level.
Since this method uses concrete, the thermal conductivity of expanded clay deteriorates.
The combined method involves the use of dry and wet styling. First, dry expanded clay is poured onto the coating, and then the insulated surface is filled with cement mortar and leveled.
When the mixture dries, make a regular finishing screed. Thanks to the cement mortar, the insulation does not deform. If significant loads on the floor are planned, then it is additionally reinforced with a special mesh.
Insulation of a wooden floor
In a private home, expanded clay is the best material for floor insulation. To install it you will need:
- nail puller;
- hacksaw;
- roulette;
- marker or pencil;
- building level;
- shovel;
- hammer;
- drill;
- self-tapping screws;
- sand;
- waterproofing;
- damper tape.
First you need to remove the previous flooring. The joists must be inspected and, if they are no longer suitable, replaced. They should be installed in the same horizontal plane. Remove debris from the surface; it is advisable to remove dust with a vacuum cleaner. All cracks must be filled with putty. If they are too large, the damage must be expanded to be filled with concrete.
Small recesses are made perpendicular to the crack for reinforcing rods. They are placed in hollows, and everything is filled with a cement-sand mixture.
Corners should not contain protruding elements. The joints between the floor and walls are covered with polyurethane foam. Then the floor is covered with sand and compacted. If coating waterproofing is used, sand is not used. If it is rolled, then it is laid on top of the sand.
To do this, you can use plastic film or a specialized membrane. The material must be laid in such a way that the edges overlap each other by 10-15 cm. All joints are sealed with construction tape. The joists must be under waterproofing. The film must be secured to the beams using a construction stapler.
Coating waterproofing should be applied to concrete, which is previously cleaned of dirt and dust. The water-repellent material should extend onto the walls to a height of 15-20 cm. To ensure high-quality protection, waterproofing is applied in several layers after the previous one has completely dried. After the last layer has hardened, a damper tape is laid to prevent deformation of the screed.
If the logs had to be completely removed, new ones must be installed. Wooden beams and slats must correspond in size to the insulated coating. Before installation, they must be treated with an antiseptic and allowed to dry. The wooden frame determines the thickness of the thermal insulation layer and is at least 10 cm. Along the perimeter, the beams should be at a distance of 2-3 cm from the walls. The logs should be 50-100 cm apart from each other. All elements should be leveled. The bars are fixed using corner metal plates to the floor. Fasteners are placed in 0.5 m increments.
Then, expanded clay of different fractions is mixed and poured between the joists. To ensure that the granules are laid as densely as possible, they are straightened by hand and carefully compacted. The waterproofing layer is again overlapped on top and secured with a stapler. The subfloor is covered with a water-repellent layer, followed by the topcoat.
Wet screed with expanded clay
Expanded clay is laid under a wet screed if an additional layer of heat and sound insulation is required. At the same time, lightweight expanded clay does not add extra weight, which is suitable for those structures where high loads on the base are not allowed.
Preparing the base
The screeding process begins with preparing the base. Do not pour the solution onto a cracked, uneven floor. Even though a layer of expanded clay is poured, defects on the base can lead to damage to the finished floor.
This is the best option, since the new screed will also take away centimeters and in the end you will lose even more height. But if, nevertheless, the condition of the screed is still good and you do not want to get rid of it, then you can pour a new layer on top of the old one.
If you nevertheless decide to dismantle, you can do this using a hammer drill. There will be a ton of debris during the removal process, so work protectively. After the coating is removed, immediately clean the room and take out all trash.
Inspect the surface. Small cracks need to be repaired. First, they are expanded a little and then sealed with the mixture. If there are stains, they are removed. Vacuum all cracks and treat with primer. Use a deep penetration compound. This way the putty will adhere better. The cracks are sealed with putty and leveled, and then left to dry completely.
After the putty has dried, you need to cover the entire floor area with a primer. Ideally, this should be done twice. The primer not only provides adhesion, but also acts as protection against the formation of various microflora.
Marking
Before you start pouring, you need to mark its level. The easiest option is to use a laser level. There is no need to do anything with it, I installed it and marked it. But if you don’t have it, you can borrow it. It would also be a good idea to buy it, since it is often needed.
But if it is still not there, then the markings are applied using a regular water level. But measurements must be taken carefully. Find the highest point of the floor along the perimeter of the wall. It is she who will become the support. Mark a point with a marker at the desired height from this point. Now the line will align with it. Draw a marking line across the entire area of the room with a marker.
The zero level is measured in exactly the same way. Mark the thickness of the expanded clay layer on the wall. After this, stretch several ropes along the markings from one wall to another. Nowhere should it come into contact with the rough surface, otherwise you will have to raise the marking line a little.
Fill
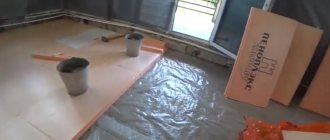
A waterproofing layer is laid on the prepared surface. It is necessary to prevent moisture from accumulating under the expanded clay layer. Sheets of material are overlapped by 15-20 cm. They are fastened together with tape. Also, the material should extend onto the wall and be located slightly above the marking level.
The wires are also laid at this stage. Then a damper tape is laid around the perimeter of the room at the marking level. Its edges should be slightly above the level of the screed, and from below should extend onto the waterproofing layer.
Then expanded clay is poured. The thickness of the layer should be such as to leave 3cm of space for concrete. Fill the material tightly and level it according to the rule. The insulation layer is filled with liquid cement. And then left until completely dry. Reinforcing mesh is laid on the dried layer, and then beacons are placed. They are installed on the same solution from which the screed will be made. You'll have to wait until it dries.
You can buy cement mortar in a store or make it yourself. The screed is poured in small areas and leveled with a spatula. The resulting air bubbles need to be pierced. Full alignment to beacons is performed using a rule. After the entire area is leveled, the screed is left to dry completely. After 12 hours you can cover it with film.
You can walk around the room only when the solution is completely dry. The drying period depends on the mixture, humidity level and temperature. It may take a week to harden. And then you can already walk on the floor. Then the tape and film are removed. But complete setting occurs only after a month, and only after this period can other repair work be carried out.
Insulation on the ground
The use of expanded clay for floor insulation on the ground is justified if you follow the technology for laying the material. First, the ground should be leveled, compacted and covered with waterproofing film. Crushed stone or gravel is poured on top in a layer of 15 cm. Then sand, which must be compacted to avoid subsidence of the material. Expanded clay is poured last in a layer of 20-30 cm. To ensure a dense embankment, a mixture of different fractions is used.
Then the surface is leveled so that it is in the same horizontal plane. A wooden floor is laid on top or a concrete screed is made. It all depends on the purpose of the room. For a garage, it is necessary to fill the expanded clay with a cement-sand mortar to ensure the integrity of the insulation.
Numerous positive user reviews indicate that expanded clay is a high-quality floor insulation material. If the installation technology is followed, it provides high heat retention performance. However, it is preferable to use it only in private homes, garages or workshops. Expanded clay is not suitable for multi-storey buildings due to its weight. The exception is the first floor of an apartment building, which is too close to the ground.
uteplix.com
Getting to know the faction
You should not miss the fraction of the material, which is quite important. It characterizes the size of expanded clay. In general, there are 3 types of material fractions. Let's look at them.
- Expanded clay sand. The smallest faction. It is used for dry mixtures and improves their thermal insulation characteristics.
- Expanded clay crushed stone. Its particles are already larger and have sharp edges.
- Expanded clay gravel. It is considered the ideal option for insulating a private home. Its size can be compared to crushed stone, only its shape is rounded. On the outside, the pores of the material are protected by sintered clay.
Note! Experts recommend using expanded clay granules of different sizes. Thanks to this, the insulation will penetrate into the most inaccessible and inconvenient places.
Based on consumer reviews, when purchasing, you need to ensure that damaged granules are contained in a minimum amount. This is the only way to achieve ideal and effective insulation.
Characteristics of expanded clay
Expanded clay is a loose insulation material; it consists of oval and round granules with a porous structure. It is obtained by firing clay of low-melting types, due to which the material acquires high deterioration with low weight.
Expanded clay of three fractions is used in construction:
- 20-40 mm – crushed stone;
- 10-20 mm – gravel;
- up to 10 mm – sand.
A 10-centimeter layer of expanded clay has thermal insulation properties equal to 1 m thick brickwork or 25 cm thick wooden covering. Other advantages of expanded clay:
- low cost;
- good sound insulation properties;
- environmental friendliness;
- durability;
- low thermal conductivity;
- resistance to high and low temperatures;
- light weight;
- strength.
The disadvantage of expanded clay is its hygroscopicity; granules, saturated with moisture, retain it inside for a long time and almost completely lose their properties. Damp insulation sags unevenly and contributes to the deformation of the floor covering. To prevent this from happening, when using expanded clay, be sure to install reliable waterproofing.
Methods of insulation with expanded clay
In construction, 3 methods of laying expanded clay are used - dry, wet and combined. To choose the right option, you should first familiarize yourself with each in detail.
Dry insulation
With the dry method of thermal insulation, the material is simply poured between the joists or beacons, and a subfloor is mounted on top - boards, chipboard, plywood. To protect from moisture, the base under the insulation must be covered with waterproofing material. To increase the density of the thermal insulation layer, it is recommended to take expanded clay of different fractions and mix it before backfilling. This insulation is done very quickly and does not require much effort.
Wet styling
When insulating using this method, expanded clay is mixed with liquid concrete and the space between the beacons is filled. This option is excellent for floors with large differences in height, where a thick leveling screed is required. Due to the lightness of expanded clay, the load on the base is significantly reduced; The screed itself dries faster and does not crack as much. When choosing a wet method, you should take into account that the thermal conductivity of the material increases sharply, which means that its efficiency will be much less than with dry installation.
Combined method
With combined insulation, dry expanded clay is poured between the beacons, leveled, then the top layer is spilled with a liquid cement solution and, after drying, a standard screed is made. Cement mortar makes it possible to strengthen the expanded clay layer and avoid its deformation when pouring the screed. Additionally, reinforcing mesh is used if a large load on the floor is expected during operation.
Reviews
“Not long ago I made repairs and insulated the floors in the hallway, toilet and bathroom. First I made waterproofing, after which I poured expanded clay (it turned out to be 10 centimeters in height). I filled everything with “cement laitance” on top. After 20 hours, I covered everything with sand concrete and repeated this several times. Expanded clay did not float, the screed dried without cracks. When everything was completely dry, I laid the tiles. The floors are much warmer, although a little higher.”
Sergey, Nizhny Novgorod.
“I don’t sell expanded clay and don’t try to advertise it, saying that it’s a super material. In fact: I had it in a bathhouse, the first floor was a log house, and the second floor was filled. I always had enough insulation, flooded it - and after an hour and a half I could already steam. On the second floor they calmly undressed. Friends came constantly, and no one ever complained that it was cold or the bathhouse was cooling down quickly.”
Vladimir, Yaroslavl.
“We had a sloping floor in our living room, which made the furniture doors difficult to open and scratched the laminate flooring.
We hired workers to level the floor; they measured a level difference of 11 cm. They advised us to level it with expanded clay and insulate it at the same time. We had waterproofing done for the entire room; expanded clay and dry mortar were mixed right on the floor in portions. They spread it out and knead it again, so the entire area. We waited a long time for everything to dry, and then laid the laminate flooring. The floor is now both smooth and warm.” Marina, Moscow
Insulation of a wooden floor
For insulation you will need:
- nail puller;
- hacksaw or jigsaw;
- roulette;
- marker or pencil;
- building level;
- shovel;
- hammer;
- electric drill;
- self-tapping screws;
- sand;
- waterproofing film or coating materials;
- damper tape.
The option of installing a wooden floor on a concrete base is being considered.
Step 1. Dismantling the coating
The floor boards are removed and taken out of the room; The logs are carefully inspected and level checked.
If the beams are in good condition and do not have sagging or other deformations, they are left in place. In case of minor damage, individual beams are replaced, and if the logs are very old, loose and rotten, everything is removed down to the concrete base.
Step 2. Surface preparation
The floor is cleared of debris, small cracks are repaired, and corners are inspected.
Deep cracks in the corners are covered with mortar or blown in with foam.
The joints around the perimeter of the floor and walls are also foamed. The surface is covered with a layer of sand, which is compacted well. When using coating waterproofing, sand is not needed.
Step 3. Waterproofing
Polyethylene or a special membrane is spread on the floor so that the edges of the material cover the perimeter walls by 7-10 cm; in this case, the logs also end up under the film. If the whole canvas is missing, pieces of film are laid overlapping and the joints are secured with construction tape. On the beams, the waterproofing must be fixed with a stapler, carefully distributing the film in the recesses between the joists.
When using coating waterproofing, the mixture is applied to dust-free concrete with a paint brush or roller, covering the walls to a height of 15-20 cm. In this case, the logs are installed on top of the protective layer. Bitumen mastic, liquid rubber, bitumen-polymer mixtures and cement-polymer based mastics are suitable for coating. The composition should be applied in 2-3 layers; Each layer takes about 3 hours to dry, so waterproofing will take time. Finally, a damper tape is fixed along the perimeter of the walls at the height of the subfloor, which will help avoid deformation and cracking of the screed during temperature changes.
Step 4. Installing the slats
So, if the logs have been completely dismantled, new ones must be installed. To do this, take strong wooden slats or beams, cut them to the size of the floor, prime them with an antiseptic solution and dry them. The height of the wooden frame for the floor should be at least 10 cm. The outermost slats are attached at a distance of 2-3 cm from the surface of the walls, between the rest there is a gap of 0.5 to 1 meter. Each rail must be level and parallel to the others so that no part protrudes from the horizontal plane.
The slats are screwed to the floor with screws using metal corner plates, one side of which is adjacent to the wood, the other to the base of the floor. The outermost fasteners are placed 2-3 cm from the ends of the slats, all subsequent fasteners are placed in increments of 50 cm.
Step 5. Filling with expanded clay
Mix large and small expanded clay and then pour it between the joists or guide rails. In the corners, the insulation is carefully straightened with your hands so that there are no voids left. Having filled the entire space, the expanded clay layer is carefully compacted, trying not to damage the granules. Waterproofing is laid on top and secured with a stapler.
Step 6. Installation of flooring
A subfloor made of plywood, chipboard or boards is placed on the beams protruding from the insulation, and then the finishing coating is laid. The film protruding along the perimeter is cut off with a knife, and the joints are covered with plinths.
Insulation on the ground
If there is soil under the floor instead of a concrete base, the insulation technology is performed slightly differently:
- the soil is leveled and compacted;
- pour a layer of gravel about 10 cm;
- then add a layer of sand and compact it well;
- the next layer is expanded clay, its thickness is from 15 to 25 cm;
- After leveling and compaction, the wooden floor is installed.
Insulation under a concrete base
When insulating a floor under a screed, preparation of the base is carried out as standard: the old covering is dismantled, the cracks are sealed, and the surface is cleaned of dust. Then the base is covered with liquid waterproofing or covered with film.
The joints around the perimeter of the floor must be closed, so the film is placed on the walls. The damper tape is attached last at the level of the future screed. Now you can start insulating.
Step 1. Installation of beacons
Beacons must be metal; it is best to use T-shaped aluminum slats. Mix a little cement or gypsum mortar to fix the beacons, take the first strip and lay it under the wall opposite the doorway on the mortar. Be sure to check the location of the guide with a level and, if necessary, press it into the solution or, conversely, lift it. The height of the beacons should not exceed 10 cm, and the distance between them should be from 0.5 to 1 m.
Step 2. Backfilling insulation
A mixture of expanded clay of different fractions is used to fill the space between the beacons and level it with a rule or a piece of plywood. Particular care should be taken to fill corners and joints where voids may form. After this, the expanded clay is carefully compacted so as not to damage the granules.
Step 3. Reinforcement
A metal mesh with large cells is laid on the insulation, leaving 4-5 cm indentations from the walls along the entire perimeter. The mesh should not have any dents or bulges or protruding sharp edges.
Step 4. Making the screed
For the screed, take 3 parts of sifted sand and 1 part of cement, mix thoroughly with water to a uniform thick consistency and pour in portions onto the floor between the guides. Level the screed using a long rule, running along the beacons and removing excess mortar. Now you need to wait for the concrete to dry completely and you can lay the floor.
Expanded clay concrete screed
If the rough foundation is too uneven or it is necessary to significantly raise the floor level, use expanded clay concrete screed. First, the surface is cleared and cleaned of dust, cracks and joints are foamed, and waterproofing is installed. After this, the main process begins:
- beacons made of metal slats are installed on the floor, strengthening them with cement mortar;
- mix 1 part of cement with 2 parts of sifted sand, add 1 part of water and 3-5 parts of expanded clay, depending on the expected loads on the floor;
- fill the gaps between the beacons with the mixture, not reaching the top 2-3 cm;
- compact and level the surface by immersing the floating granules in the solution;
- when the screed has set a little, prepare standard concrete without impurities and pour it on top, leveling it according to the beacons as a rule.
It takes at least 3 weeks to dry, but it is better to wait a month. During the first days, the screed surface is periodically watered with water to prevent cracks from appearing. This base is quite durable and warm, and lasts a long time.
| Advantages of expanded clay | Disadvantages of expanded clay |
| Good thermal conductivity of expanded clay - grade 500 has a thermal conductivity coefficient of 0.12-0.15 W/m*K | You have to fill in a thick layer of expanded clay - more than 50 cm, because... otherwise noise and heat insulation will be poor |
| The weight of expanded clay is only from 250 kg/m3 versus 2500 kg/m3 of concrete | It is an absolutely moisture-resistant material; it is recommended to use either a waterproofing film or not to use expanded clay at all |
| With its help, the service life of wooden floors is extended to 50 years. | |
| Resistance to chemically aggressive environments | |
| Environmental friendliness | |
| Relatively low cost |
stroyday.ru
Types of installation technologies for screeds with expanded clay aggregate
The flexible characteristics of the filler itself make it possible to use it in different ways, depending on the circumstances and the room itself. There are three main types of screed installation.
Dry method
- arrangement of communications at floor level;
- if you need to make a screed in a short time. After just 24 hours, you can not only carry out finishing work, but also lay the topcoat;
- if there is a need to install a screed with minimal weight;
- if you want to carry out clean work;
- when installing the most heat-intensive floor.
Bulk method
Installation using liquid mixtures for various purposes. A self-leveling screed device is used in cases of total leveling of the base to one level, but subject to a small layer. It is ideally suited for renovations in apartment buildings.
Typesetting technology
Traditional concrete screeds over expanded clay are used to insulate and level the base. This method can be distinguished among the main ones by its relatively low cost and large leveling layer, which is ideal for heavily damaged bases.
In any case, no matter what method the floor is pulled out, the technology for other plastering work must be carried out in advance.